解锁前端Vue3宝藏级资料 第四章 VUE常用 UI 库 2 ( ailwind 后台框架)
4.5 ailwind
上面介绍的都是国内比较优秀的UI框架,现在我们在介绍一款国外比较流行的CSS UI框架ailwind 。官方网站https://tailwindcss.com/docs/guides/vite#vue CSShttps://flowbite.com/docs/getting-started/introduction/ 。这个ailwind 架构需要自己去写一些基础组件功能,它只提供了UI样式,所以扩展新和二次开发能力比较强,适合更高水平的开发者使用。
第一章 Vue3项目创建 1 Vue CLI 创建vue项目
第一章 Vue3项目创建 2 使用 Webpack 5 搭建 vue项目
第一章 Vue3项目创建 3 Vite 创建 vue项目
第二章 Vue3 基础语法指令
第三章 Vue Router路由器的使用
第四章 VUE常用 UI 库 1 ( element-plus,Ant ,naiveui,ArcoDesign)
第四章 VUE常用 UI 库 2 ( ailwind 后台框架)
创建一个新项目
npm init vite@latest vue-zht-app
cd vue-zht-app
npm install
在Vite环境中安装Tailwind CSS,导入ailwind UI样式与 CSS进入项目中来。
npm install -D tailwindcss postcss autoprefixer
安装完成后,在项目文件目录中运行以下命令创建 Tailwind CSS 配置文件, tailwind.config.js 和 postcss.config.js 文件将被创建出来。
导入系统架构使用的图标库,我们安装的是 heroicons 图标库。
npx tailwindcss init -p     //目录中运行创建tailwind.config.js文件
npm install @heroicons/vue  //导入图标库
项目结构
vue-zht-app
   |---node_modules
   |---index.html        //运行html
   |---src               //代码源文件
   |    |--page           //页面架构
   |    |   |---layouts.vue  //架构页面
   |    |   |---top.vue      //头像组件
   |    |   |---menu.vue     //菜单组件
   |    |--components        //业务页面
   |    |   |---index.vue    //页面
   |    |   |---zht.vue      //页面
   |    |--main.js       //入口文件
   |    |--App.vue       //模板入口路由
   |    |--router.js     //路由控制器
   |----style.css        //ui 样式引入
   |----package.json     //配置文件
   |---- tailwind.config.cjs //ui架构配置文件
1 tailwind.config.js设置
在tailwind.config.js配置文件中设置ailwind项目配置。
module.exports = {
  purge: ['./index.html', './src/**/*.{vue,js,ts,jsx,tsx}'],
  darkMode: false, // or 'media' or 'class'
  theme: {
    extend: {},
  },
  variants: {
    extend: {},
  },
  plugins: [],
}
2 style.css
在 src 文件夹中创建 style.css 并添加 tailwind 指令。
@tailwind base;
@tailwind components;
@tailwind utilities;
3 main.js
main.js文件中引入tailwind 样式
import { createApp } from 'vue'
import './style.css'
import App from './App.vue'
createApp(App).mount('#app')
4 App.vue
在App.vue文件写入代码检测Tailwind CSS实用类是否引入到项目中来。
<script setup>script>
<template>
  <h1 class="text-3xl font-bold underline">
    欢迎使用tailwind
  h1>
template>
4.5.1 框架页面布局
1 layouts.vue
在src目录创建一个page文件夹,创建layouts.vue 布局页面。
<script setup>
script>
<template>
  <div class="relative">
    <div class="fixed top-0 w-64 h-screen bg-white z-20">菜单div>
    <div class="bg-gray-100 h-screen overflow-hidden pl-64">内容div>
  div>
template>
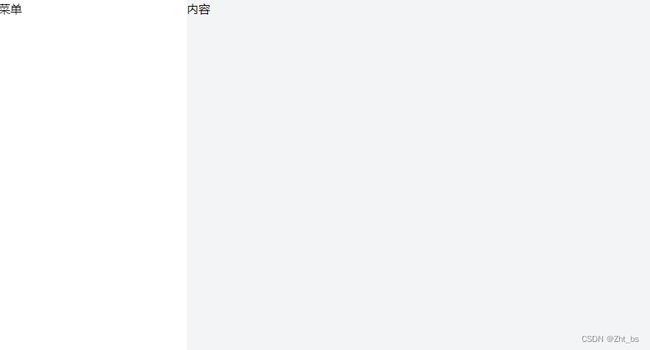
页面分为左右两侧布局,左边是菜单,右边是系统内容部分。

2 App.vue
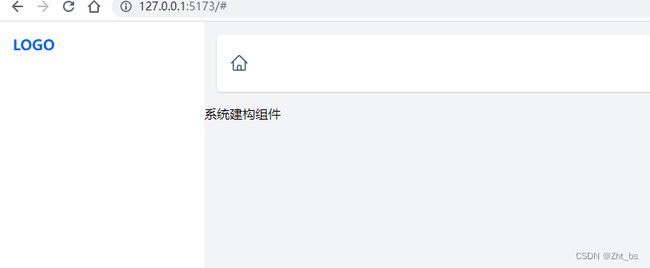
修改App.vue内容,将 layouts.vue组件引入到App.vue中模板中,创建这个后台系统的页面架构。
系统建构组件
3 设置菜单隐藏功能
设置点击菜单图标将左边的菜单部分隐藏,再次点击后菜单部分显示。
让我们在菜单div与内容div中的class属性中添加一个菜单隐藏的动画功能, duration-300过度动画。
<script setup>
import { ref } from 'vue';
import {HomeIcon} from "@heroicons/vue/24/outline";
 //控制菜单部分隐藏
const show = ref(true);
script>
<template>
<div class="relative">
<div
  class="fixed top-0 w-64 h-screen bg-white z-20 transform duration-300"
  :class="{ '-translate-x-full': !show }"
>
 菜单部分
div>
<div
  class="fixed xl:hidden inset-0 bg-gray-900 opacity-50 z-10"
  @click="show = !show"
  v-show="show"
>灰色div>
<div
     class="bg-gray-100 h-screen overflow-hidden duration-300"
     :class="{ 'xl:pl-64': show }">
        <div class="bg-white rounded shadow m-4 p-4">
          <HomeIcon
            class="h-6 w-6 text-gray-600 cursor-pointer"
            @click="show = !show"
          />
        div>
        <div>
            内容部分
          <slot />
        div>
      div>
    div>
  template>
4.5.2 模式切换
根目录中的 index.html 页面中加入样式模式class="dark"标签。
DOCTYPE html>
<html lang="en" class="dark">《----加入模式标签
  <head>
    <meta charset="UTF-8" />
    <link rel="icon" type="image/svg+xml" href="/vite.svg" />
    <meta name="viewport" content="width=device-width, initial-scale=1.0" />
    <title>Vite + Vuetitle>
  head>
  <body>
    <div id="app">div>
    <script type="module" src="/src/main.js">script>
  body>
html>
1 layouts.vue加入黑夜css
在layouts.vue框架页面菜单组件与内容组件中加入黑夜模式css样式 dark:bg-gray-800。
<template>
<div class="relative">
<div
class="fixed top-0 w-64 h-screen bg-white
       dark:bg-gray-800 《-----加入黑夜样式
       z-20 transform duration-300"
:class="{ '-translate-x-full': !show }"
>
 菜单部分
div>
<div
class="bg-gray-100 h-screen overflow-hidden
       duration-300
       dark:bg-gray-900" 《-----加入黑夜样式
:class="{ 'xl:pl-64': show }"
>
<div class="flex items-center justify-between bg-white
            dark:bg-gray-800  《-----加入黑夜样式
            rounded shadow m-4 p-4"
>
  div>
div>
<div class="dark:text-gray-300">
<slot />
div>
div>
div>
2 黑夜样式切换脚本
加入黑夜与白天模式的切换代码脚本。
import {HomeIcon,SunIcon,MoonIcon} from "@heroicons/vue/24/outline";
const theme = ref('light');
if (localStorage.theme === 'dark') {
  document.documentElement.classList.add('dark');
  theme.value = 'dark';
} else {
  document.documentElement.classList.remove('dark');
  theme.value = 'light';
}
const changeMode = (mode) => {
  theme.value = mode;
  theme.value === 'light'
    ? document.documentElement.classList.remove('dark')
    : document.documentElement.classList.add('dark');
};
模式选择图标加入到页面中。
<div class="flex items-center justify-between bg-white dark:bg-gray-800  rounded shadow m-4 p-4"
>
  <HomeIcon
   class="h-6 w-6 text-gray-600 cursor-pointer"
   @click="show = !show"
  />
  <div class="flex items-center space-x-4">
  <MoonIcon
    class="w-7 h-7 text-gray-600 cursor-pointer"
    @click="changeMode('dark')"
    v-if="theme === 'light'"
  />
  <SunIcon
  class="w-7 h-7 text-gray-300 cursor-pointer"
  @click="changeMode('light')"
  v-else
  />
  div>
  div>
div>
黑夜模式的运行效果。
3 模式切换代码
<script setup>
import { ref} from 'vue';
import {HomeIcon,SunIcon,MoonIcon} from "@heroicons/vue/24/outline";
const show = ref(true);
const theme = ref('light');
if (localStorage.theme === 'dark') {
  document.documentElement.classList.add('dark');
  theme.value = 'dark';
} else {
  document.documentElement.classList.remove('dark');
  theme.value = 'light';
}
const changeMode = (mode) => {
  theme.value = mode;
  theme.value === 'light'
    ? document.documentElement.classList.remove('dark')
    : document.documentElement.classList.add('dark');
};
script>
<template>
<div class="relative">
<div
class="fixed top-0 w-64 h-screen bg-white dark:bg-gray-800 z-20 transform duration-300"
:class="{ '-translate-x-full': !show }"
>
 菜单部分
div>
<div
  class="fixed xl:hidden inset-0 bg-gray-900 opacity-50 z-10"
  @click="show = !show"
  v-show="show"
>灰色div>
<div
class="bg-gray-100 h-screen overflow-hidden duration-300 dark:bg-gray-900"
:class="{ 'xl:pl-64': show }"
>

<div class="flex items-center justify-between bg-white dark:bg-gray-800  rounded shadow m-4 p-4"
>
  <HomeIcon
   class="h-6 w-6 text-gray-600 cursor-pointer"
   @click="show = !show"
  />
  <div class="flex items-center space-x-4">

  <MoonIcon
    class="w-7 h-7 text-gray-600 cursor-pointer"
    @click="changeMode('dark')"
    v-if="theme === 'light'"
  />
  <SunIcon
  class="w-7 h-7 text-gray-300 cursor-pointer"
  @click="changeMode('light')"
  v-else
  />
  div>
div>
<div class="dark:text-gray-300">
<slot />
div>
div>
div>
template>
4.5.3 头像与下拉
我们将在顶部的菜单栏中设置一个人像,并设置为当单击该图像时,将显示一个下拉菜单。人像在 assets 文件夹中保存为 user.jpg。在page目录中创建一个头像组件top.vue。
<script setup>script>
<template>
  <div>
    <img
      src="../assets/user.png"
      class="rounded-full w-10 h-10 cursor-pointer"
    />
  div>
template>
在 layouts.vue 文件中导入创建的 top.vue 文件。在深色模式切换图标旁边添加导入的 top 组件。使用flex在深色模式切换图标旁边设置了一个空格(space-x-4)。
<script setup>
import top from './top.vue';
script>
<template>
<div class="flex items-center
            justify-between
            bg-white dark:bg-gray-800
            rounded shadow m-4 p-4">
  <HomeIcon
   class="h-6 w-6 text-gray-600 cursor-pointer"
   @click="show = !show"
  />
  <div class="flex items-center space-x-4">
  <MoonIcon
    class="w-7 h-7 text-gray-600 cursor-pointer"
    @click="changeMode('dark')"
    v-if="theme === 'light'"
  />
  <SunIcon
  class="w-7 h-7 text-gray-300 cursor-pointer"
  @click="changeMode('light')"
  v-else
  />
  //映入头像部分菜单
  <top>top>
  div>
div>
template>
创建一个在单击图像时出现的下拉菜单。position relative设置为图片父元素的div,下拉菜单以absolute设置的图片父元素为准设置为top-16,right-0。设置了退出系统和我的信息链接,但这些页面不存在,所以我需要更改菜单中的列表以适应应用程序。
<script setup>
import { UserIcon, ArrowsPointingOutIcon } from "@heroicons/vue/24/outline";
script>
<template>
    <div class="relative">
    <img
      src="../assets/user.png"
      class="rounded-full w-10 h-10 cursor-pointer"
    />
    <div
      class="absolute top-16
             right-0 z-10
             w-40
             py-2 bg-white
             rounded-sm shadow">
      <ul>
        <li class="text-gray-700
                   hover:bg-blue-100
                   hover:text-blue-600 p-2">
          <a href="/#" class="flex items-center space-x-2">
            <UserIcon class="w-5 h-5" />
            <span class="text-sm font-bold">我的信息span>a
          >
        li>
        <li class="text-gray-700
                   hover:bg-blue-100
                   hover:text-blue-600 p-2">
          <a href="/#" class="flex items-center space-x-2">
            <ArrowsPointingOutIcon class="w-5 h-5" />
            <span class="text-sm font-bold">退出系统span>a
          >
        li>
      ul>
    div>
  div>
template>
给img元素设置点击事件,设置函数toggle,这样就可以通过点击图片来显示或隐藏菜单。添加变量show,根据show的值切换菜单的显示/隐藏。使用toggle函数来切换show的值。如果 show 为 false,toggle 函数将其值更新为 true,如果为 true,则将其更新为 false。将 v-show 指令设置为下拉菜单元素。
- 别忘了在下拉菜单中加入黑夜样式 dark:bg-gray-800
<script setup>
import { ref } from 'vue';
import { UserIcon, ArrowsPointingOutIcon } from "@heroicons/vue/24/outline";
const show = ref(false);
const toggle = () => {
  show.value = !show.value;
};
</script>
<template>
    <div class="relative">
    <img
      src="../assets/user.png"
      class="rounded-full w-10 h-10 cursor-pointer"
      @click="toggle" -------显示隐藏事件
      >
    />
    <div
      class="absolute top-16 right-0 z-10 w-40 py-2
             bg-white rounded-sm shadow
             dark:bg-gray-800" 《-----加入黑夜样式
      v-show="show" -------显示隐藏属性
      >
      <ul>
        <li class="  -------黑夜模式中高亮
        text-gray-700
        dark:text-gray-300
        hover:bg-blue-100
        dark:hover:bg-gray-700
        hover:text-blue-600
        dark:hover:text-blue-600
        p-2">
          <a href="/#" class="flex items-center space-x-2">
            <UserIcon class="w-5 h-5" />
            <span class="text-sm font-bold">我的信息</span></a
          >
        </li>
        <li class="  -------黑夜模式中高亮
        text-gray-700
        dark:text-gray-300
        hover:bg-blue-100
        dark:hover:bg-gray-700
        hover:text-blue-600
        dark:hover:text-blue-600">
          <a href="/#" class="flex items-center space-x-2">
            <ArrowsPointingOutIcon class="w-5 h-5" />
            <span class="text-sm font-bold">退出系统</span></a
          >
        </li>
      </ul>
    </div>
  </div>
</template>
点击头像以外的菜单隐藏
上面的列子必须始终单击图像才能在显示和隐藏菜单之间切换。我们需要设置事件完成头像外单击也会从切换为菜单隐藏。这个功能需要注册和删除事件侦听器,因此会使用到 Vue 生命周期挂钩 onMounted 和 onUnmounted事件。同时添加一个变量 root 来存储整个 top 组件的元素信息。
<script setup>
import { ref,onMounted, onUnmounted  } from 'vue';
import { UserIcon, ArrowsPointingOutIcon } from "@heroicons/vue/24/outline";
const show = ref(false);
const root = ref(null);
const toggle = () => {
  show.value = !show.value;
};
 // 事件监听方法
const clickOutside = (e) => {
  if (!root.value.contains(e.target) && show.value) {
    show.value = false;
  }
};
//注册监听事件
onMounted(() => document.addEventListener('click', clickOutside));
//删除监听
onUnmounted(() => document.removeEventListener('click', clickOutside));
script>
<template>
    <div class="relative" ref="root">
       下拉页面html元素
  div>
template>
root.value 包含 < div class=“relative”>…< /div>。e.target 因您点击的位置而异,如果您点击仪表板文本,可以看到包含 < div class=“dark:text-gray-300”>…< /div>
4.5.4 菜单设置
我们将在侧边栏中添加一个有徽标的菜单列表。
1 ment.vue
在 page 文件夹中创建一个 ment.vue 文件,用于创建设置应用程序菜单组件功能。
<script setup>script>
<template>
  <div class="p-4">
    <div class="font-bold text-lg text-blue-600">LOGOdiv>
  div>
template>
2 layouts.vue 引入菜单组件
layouts.vue页面 导入菜单组件,在左边的菜单位置中加入菜单组件。
<script setup>
import top from './top.vue';
 //创建菜单组件
import zhtmenu from './menu.vue';
script>
<template>
<div class="relative">
<div
class="fixed top-0 w-64
       h-screen bg-white
       dark:bg-gray-800
       z-20 transform
       duration-300
       dark:text-gray-300"
:class="{ '-translate-x-full': !show }"
>
 <zhtmenu/> <-----引入菜单组件
div>
  其他html部分
<template>
layouts.vue中的完整的代码内容。
<script setup>
import top from './top.vue';
import zhtmenu from './menu.vue';
import { ref} from 'vue';
import {HomeIcon,SunIcon,MoonIcon} from "@heroicons/vue/24/outline";
const show = ref(true);
const theme = ref('light');
if (localStorage.theme === 'dark') {
  document.documentElement.classList.add('dark');
  theme.value = 'dark';
} else {
  document.documentElement.classList.remove('dark');
  theme.value = 'light';
}
const changeMode = (mode) => {
  theme.value = mode;
  theme.value === 'light'
    ? document.documentElement.classList.remove('dark')
    : document.documentElement.classList.add('dark');
};
script>
<template>
<div class="relative">
<div
class="fixed top-0 w-64 h-screen bg-white dark:bg-gray-800 z-20 transform duration-300 dark:text-gray-300"
:class="{ '-translate-x-full': !show }"
>
 //导入菜单部分
 <zhtmenu/>
div>
<div
  class="fixed xl:hidden inset-0 bg-gray-900 opacity-50 z-10"
  @click="show = !show"
  v-show="show"
>灰色div>
<div
class="bg-gray-100 h-screen overflow-hidden duration-300 dark:bg-gray-900"
:class="{ 'xl:pl-64': show }"
>

<div class="flex items-center justify-between bg-white dark:bg-gray-800  rounded shadow m-4 p-4"
>
  <HomeIcon
   class="h-6 w-6 text-gray-600 cursor-pointer"
   @click="show = !show"
  />
  <div class="flex items-center space-x-4">
  <MoonIcon
    class="w-7 h-7 text-gray-600 cursor-pointer"
    @click="changeMode('dark')"
    v-if="theme === 'light'"
  />
  <SunIcon
  class="w-7 h-7 text-gray-300 cursor-pointer"
  @click="changeMode('light')"
  v-else
  />

  <top>top>
  div>
div>
<div class="dark:text-gray-300">
<slot />
div>
div>
div>
template>
3 创建菜单
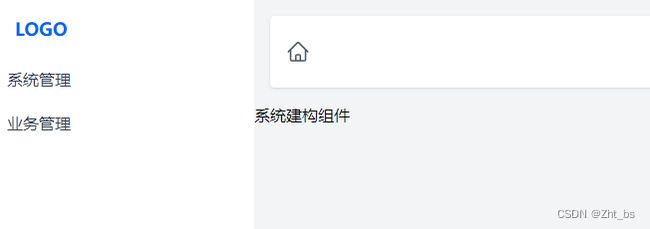
使用 reactive 来保存列表中的菜单信息,在页面模板中使用 v-for 指令展开列表。在 lists 变量中,菜单列表由子列表分层,但是我们先不处理子分层。
<script setup>
import { reactive } from 'vue';
const menus = reactive([
    {name:"系统管理",id:10000,icon:"ServerIcon",
    child:[
        {name:"用户管理",id:100001,path:"/zht1"},
        {name:"部门管理",id:100002,path:"/zht1"}]},
    {name:"业务管理",id:20000,icon:"ShoppingCartIcon",
    child:[
        {name:"班组维修",id:20001,path:"/zht1"},
        {name:"工单管理",id:20002,path:"/zht1"}]}
]);
script>
<template>
  <div class="p-4">
    <div class="font-bold text-lg text-blue-600">LOGOdiv>
  div>
  <ul class="text-gray-700">
    <li class="mb-1" v-for="list in menus" :key="list.id">
      <a
        class="block p-2 rounded-sm hover:text-white hover:bg-blue-400"
      >
        <span>{{ list.name }}span>
      a>
    li>
  ul>
template>
菜单图标设置
使用component 动态加载图标对象进入组将,但是运行的时候会发现无法加载到@heroicons/vue/24/outline中的图标对象。
<script setup>
import { reactive } from 'vue';
import {ServerIcon,ShoppingCartIcon} from "@heroicons/vue/24/outline";
script>
<template>

  <ul class="text-gray-700">
    <li class="mb-1" v-for="list in menus" :key="list.id">
      <a
        :href="list.child"
        class="flex
          items-center
          block
          p-2
          rounded-sm
          hover:text-white hover:bg-blue-400"
      >
      <component :is="list.icon" class="w-6 h-6 mr-2">component>
      a>
    li>
  ul>
template>
这是因为list.icon 中获得的时menus列表中的icon属性中的字符串,不是图标heroicons对象引用,那么我们怎么解决这个问题呢。需要我们定义一个icons 集合对象装入图标heroicons对象,v-for指令中component通过字符串反射icons中的属性对象来获得图标组件。
const icons = {
  ServerIcon: ServerIcon,
  ShoppingCartIcon: ShoppingCartIcon,
};
<component :is="icons[list.icon]" class="w-6 h-6 mr-2"></component>
menu.vue完成代码例子。
<script setup>
import { reactive } from 'vue';

import {ServerIcon,ShoppingCartIcon} from "@heroicons/vue/24/outline";
//图标引用集合
const icons = {
  ServerIcon: ServerIcon,
  ShoppingCartIcon: ShoppingCartIcon,
};
const menus = reactive([
    {name:"系统管理",id:10000,icon:"ServerIcon",
    child:[
        {name:"用户管理",id:100001,path:"/zht1"},
        {name:"部门管理",id:100002,path:"/zht1"}]},
    {name:"业务管理",id:20000,icon:"ShoppingCartIcon",
    child:[
        {name:"班组维修",id:20001,path:"/zht1"},
        {name:"工单管理",id:20002,path:"/zht1"}]}
]);
script>
<template>
  <div class="p-4">
    <div class="font-bold text-lg text-blue-600">LOGOdiv>
  div>

  <ul class="text-gray-700">
    <li class="mb-1" v-for="list in menus" :key="list.id">
      <a
        :href="list.child"
        class="flex
          items-center
          block
          p-2
          rounded-sm
          hover:text-white hover:bg-blue-400"
      >
      <component :is="icons[list.icon]" class="w-6 h-6 mr-2">component>
        <span>{{ list.name }}span>
      a>
    li>
  ul>
template>
子菜单列表的使用用 v-for 展开child中的列表内容。
<script setup>
import { reactive } from 'vue';
import {ServerIcon,ShoppingCartIcon} from "@heroicons/vue/24/outline";
const icons = {
  ServerIcon: ServerIcon,
  ShoppingCartIcon: ShoppingCartIcon,
};
const menus = reactive([
    {name:"系统管理",id:10000,icon:"ServerIcon",
    child:[
        {name:"用户管理",id:100001,path:"/zht1"},
        {name:"部门管理",id:100002,path:"/zht1"}]},
    {name:"业务管理",id:20000,icon:"ShoppingCartIcon",
    child:[
        {name:"班组维修",id:20001,path:"/zht1"},
        {name:"工单管理",id:20002,path:"/zht1"}]}
]);
script>
<template>
  <div class="p-4">
    <div class="font-bold text-lg text-blue-600">LOGOdiv>
  div>

  <ul class="text-gray-700">
    <li class="mb-1" v-for="list in menus" :key="list.id">
        <a
        :href="list.path"
        class="
          flex
          items-center
          block
          p-2
          rounded-sm
          hover:text-white hover:bg-blue-400
        "
      >
      <component :is="icons[list.icon]" class="w-6 h-6 mr-2">component>
        <span>{{ list.name }}span>
      a>
    //二级菜单设置功能
      <ul class="mt-1">
        <li class="mb-1" v-for="list in list.child" :key="list.name">
          <a
            :href="list.link"
            class="block p-2 rounded-sm hover:bg-blue-400 hover:text-white"
          >
            <span class="pl-8">{{ list.name }}span>
          a>
        li>
      ul>
    li>
  ul>
template>
4.5.5 手风琴菜单设置
ment.vue中的代码加入以下功能,将菜单列表变成手风琴模式的菜单组件。将菜单列表中的一级菜单中增加show属性,来判断菜单手风琴组件开关属性。
const menus = reactive([
    {name:"系统管理",id:10000,icon:"ServerIcon",show:false,----默认关闭
    child:[
        {name:"用户管理",id:100001,path:"/zht1"},
        {name:"部门管理",id:100002,path:"/zht1"}]},
    {name:"业务管理",id:20000,icon:"ShoppingCartIcon",show:false,----默认关闭
    child:[
        {name:"班组维修",id:20001,path:"/zht1"},
        {name:"工单管理",id:20002,path:"/zht1"}]}
]);
子列表被 v-show 隐藏与显示,加入ChevronDownIcon 上下图标菜单。
<script setup>
import { reactive } from 'vue';
import {ServerIcon,ShoppingCartIcon,ChevronDownIcon} from "@heroicons/vue/24/outline";
const icons = {
  ServerIcon: ServerIcon,
  ShoppingCartIcon: ShoppingCartIcon,
};
const menus = reactive([
    {name:"系统管理",id:10000,icon:"ServerIcon",show:false,
    child:[
        {name:"用户管理",id:100001,path:"/zht1"},
        {name:"部门管理",id:100002,path:"/zht1"}]},
    {name:"业务管理",id:20000,icon:"ShoppingCartIcon",show:false,
    child:[
        {name:"班组维修",id:20001,path:"/zht1"},
        {name:"工单管理",id:20002,path:"/zht1"}]}
]);
//菜单展开与关闭事件
const toggle = (list) => {
    // menus.forEach(m=>{
    //     m.show = false;
    // });
  list.show = !list.show;
};
script>
<template>
  <div class="p-4">
    <div class="font-bold text-lg text-blue-600">LOGOdiv>
  div>

  <ul class="text-gray-700">
    <li class="mb-1" v-for="list in menus" :key="list.id">
        <div
        class="
            flex
            items-center
            justify-between
            p-2
            cursor-pointer
            rounded-sm
            hover:bg-blue-400 hover:text-white
        "
        @click="toggle(list)"
      >
      <div class="flex items-center">
         <component :is="icons[list.icon]" class="w-6 h-6 mr-2">component>
        <span>{{ list.name }}span>
      div>
      //隐藏与显示图标设置
    <ChevronDownIcon
        class="w-4 h-4 transform duration-300"
        :class="!list.show ? 'rotate-0' : '-rotate-180'"/>
    div>
        //隐藏与显示属性设置
      <ul class="mt-1" v-show="list.show">
        <li class="mb-1" v-for="list in list.child" :key="list.name">
          <a
            class="block p-2 rounded-sm hover:bg-blue-400 hover:text-white"
          >
            <span class="pl-8">{{ list.name }}span>
          a>
        li>
      ul>
    li>
  ul>
template>
<style scoped>

style>
2 手风琴菜动画效果
Vue 模板中加入 transition 标签。 transition 标签中设置动画效果。用transition 动画标签包围子列表的 ul 元素,将溢出隐藏CSS样式加入 ul 元素中。如果不加overflow-hidden,ul列表的动画效果会将文字重叠,无法正常工作。
  <transition>
      <ul class="mt-1 overflow-hidden" v-show="list.show">
            <li class="mb-1" v-for="list in list.child" :key="list.name">
          li>
      ul>
transition>
<style scoped>
.v-enter-from,
.v-leave-to {
  height: 0;
}
.v-enter-active,
.v-leave-active {
  transition: height 0.3s;
}
.v-enter-to,
.v-leave-from {
  height: 100px;
}
style>
加入黑夜模式样式到菜单组件中,在ul 元素的class=" dark:text-gray-300"中加入黑夜模式字体。
<script setup>
import { reactive } from 'vue';
import {ServerIcon,ShoppingCartIcon,ChevronDownIcon} from "@heroicons/vue/24/outline";
const icons = {
  ServerIcon: ServerIcon,
  ShoppingCartIcon: ShoppingCartIcon,
};
const menus = reactive([
    {name:"系统[管理",id:10000,icon:"ServerIcon",show:false,
    child
        {name:"用户管理",id:100001,path:"/zht1"},
        {name:"部门管理",id:100002,path:"/zht1"}]},
    {name:"业务管理",id:20000,icon:"ShoppingCartIcon",show:false,
    child:[
        {name:"班组维修",id:20001,path:"/zht1"},
        {name:"工单管理",id:20002,path:"/zht1"}]}
]);
const toggle = (list) => {
    // menus.forEach(m=>{
    //     m.show = false;
    // });
  list.show = !list.show;
};
script>
<template>
  <div class="p-4">
    <div class="font-bold text-lg text-blue-600">LOGOdiv>
  div>
  //加入黑夜模式字体
  <ul class="text-gray-700 dark:text-gray-300">
    <li class="mb-1" v-for="list in menus" :key="list.id">
        <div
        class="
            flex
            items-center
            justify-between
            p-2
            cursor-pointer
            rounded-sm
            hover:bg-blue-400 hover:text-white
        "
        @click="toggle(list)"
      >
      <div class="flex items-center">
         <component :is="icons[list.icon]" class="w-6 h-6 mr-2">component>
        <span>{{ list.name }}span>
      div>
    <ChevronDownIcon
        class="w-4 h-4 transform duration-300"
        :class="!list.show ? 'rotate-0' : '-rotate-180'"/>
    div>
    //动画部分
    <transition>
      <ul class="mt-1 overflow-hidden" v-show="list.show">
        <li class="mb-1" v-for="list in list.child" :key="list.name">
          <a
            class="block p-2 rounded-sm hover:bg-blue-400 hover:text-white"
          >
            <span class="pl-8">{{ list.name }}span>
          a>
        li>
      ul>
    transition>
    li>
  ul>
template>
<style scoped>
.v-enter-from,
.v-leave-to {
  height: 0;
}
.v-enter-active,
.v-leave-active {
  transition: height 0.3s;
}
.v-enter-to,
.v-leave-from {
  height: 100px;
}
style>
4.5.6 路由设置
导入路由组件 vue-router,将路由组件加入到项目中来。路由使用细节参考上面内容。
npm install vue-router@4
main.js设置
import { createApp } from 'vue'
import './style.css'
import router from './router'
import App from './App.vue'
const app = createApp(App)
app.use(router)
app.mount('#app')
components目录中创建index.vue和zht.vue两个页面。
index.vue
欢迎来到zht代码世界
zht.vue
业务内容一览
router.js
路由内容设置
import { createRouter, createWebHistory } from 'vue-router'
const router = createRouter({
    history: createWebHistory(import.meta.env.BASE_URL),
    routes: [
        {
            path: '/',
            name: 'index',
            component:()=>import('./components/index.vue'),
          } ,
        {
            path: '/zht1',
            name: 'zht1',
            component:()=>import('./components/zht.vue'),
          }
    ]
  })
export default router
App.vue
主页面设置方法是将设置在页面框架中的slot组件中。
<script setup>
import layouts from './page/layouts.vue';
script>
<template>
  <layouts><router-view>router-view>layouts>
template>
menu.vue菜单
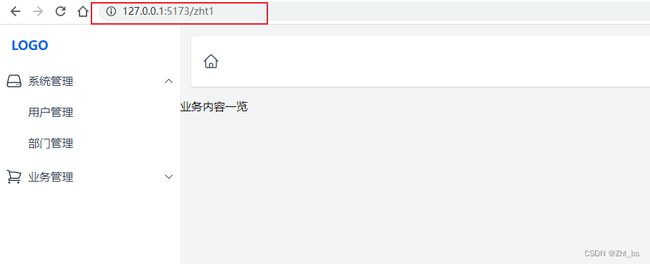
menu.vue菜单面设置菜单路由事件,点击菜单后触发事件路由框架页移动页面到路由页面中去。
<script setup>
import { useRouter  } from 'vue-router'
const router = useRouter();
const onpage=(t) =>{
 //路由页面内容
router.push({ path:t.path})
}
script>
<template>
        <li class="mb-1" v-for="list in list.child" :key="list.id">
          <a
            class="block p-2
                   rounded-sm hover:bg-blue-400
                   hover:text-white"
            @click="onpage(list)"  ----》页面路由事件
            >
            <span class="pl-8">{{ list.name }}span>
          a>
        li>
menu.vue路由转发完整代码内容。
<script setup>
import { reactive } from 'vue';
import { useRouter  } from 'vue-router'
import {ServerIcon,ShoppingCartIcon,ChevronDownIcon} from "@heroicons/vue/24/outline";
const icons = {
  ServerIcon: ServerIcon,
  ShoppingCartIcon: ShoppingCartIcon,
};
const menus = reactive([
    {name:"系统管理",id:10000,icon:"ServerIcon",show:false,
    child:[
        {name:"用户管理",id:100001,path:"/zht1"},
        {name:"部门管理",id:100002,path:"/zht1"}]},
    {name:"业务管理",id:20000,icon:"ShoppingCartIcon",show:false,
    child:[
        {name:"班组维修",id:20001,path:"/zht1"},
        {name:"工单管理",id:20002,path:"/zht1"}]}
]);
//菜单手风琴打开关闭
const toggle = (list) => {
    // menus.forEach(m=>{
    //     m.show = false;
    // });
  list.show = !list.show;
};
const router = useRouter();
//路由访问移动页面
const onpage=(t) =>{
router.push({ path:t.path})
}

script>
<template>
  <div class="p-4">
    <div class="font-bold text-lg text-blue-600">LOGOdiv>
  div>

  <ul class="text-gray-700 dark:text-gray-300">
    <li class="mb-1" v-for="list in menus" :key="list.id">
        <div
        class="
            flex
            items-center
            justify-between
            p-2
            cursor-pointer
            rounded-sm
            hover:bg-blue-400 hover:text-white
        "
        @click="toggle(list)"
      >
      <div class="flex items-center">
         <component :is="icons[list.icon]" class="w-6 h-6 mr-2">component>
        <span>{{ list.name }}span>
      div>
    <ChevronDownIcon
        class="w-4 h-4 transform duration-300"
        :class="!list.show ? 'rotate-0' : '-rotate-180'"/>
    div>

    <transition>
      <ul class="mt-1 overflow-hidden" v-show="list.show">
        <li class="mb-1" v-for="list in list.child" :key="list.id">
          <a
            class="block p-2 rounded-sm hover:bg-blue-400 hover:text-white"
            @click="onpage(list)"
            >
            <span class="pl-8">{{ list.name }}span>
          a>
        li>
      ul>
    transition>
    li>
  ul>
template>
<style scoped>
.v-enter-from,
.v-leave-to {
  height: 0;
}
.v-enter-active,
.v-leave-active {
  transition: height 0.3s;
}
.v-enter-to,
.v-leave-from {
  height: 100px;
}
style>


