深入了解Spring Boot 核心注解原理
SpringBoot目前是如火如荼,所以今天就跟大家来探讨下SpringBoot的核心注解@SpringBootApplication以及run方法,理解下springBoot为什么不需要XML,达到零配置
@SpringBootApplicationpublic class StartApplication{public static void main(String[] args){SpringApplication.run(StartApplication.class, args); }}
想必上面的类,大家都很熟悉吧
大家点进@SpringBootApplication来看
上面的元注解我们在这里不在做解释,相信大家在开发当中肯定知道,我们要来说@SpringBootConfiguration @EnableAutoConfiguration 这两个注解,到这里我们知道 SpringBootApplication注解里除了元注解,我们可以看到又是@SpringBootConfiguration,@EnableAutoConfiguration,@ComponentScan的组合注解,官网上也有详细说明,那我们现在把再看看这三个注解。
首先我们先来看 @SpringBootConfiguration,那我们点进来看
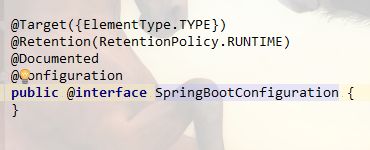
我们可以看到这个注解除了元注解以外,就只有一个@Configuration,那也就是说这个注解相当于@Configuration,所以这两个注解作用是一样的,那他是干嘛的呢,相信大家都知道,它是让我们能够去注册一些额外的Bean,并且导入一些额外的配置。
那@Configuration还有一个作用就是把该类变成一个配置类,不需要额外的XML进行配置。所以@SpringBootConfiguration就相当于@Configuration。
那下面我们来看下一个@EnableAutoConfiguration,这个注解官网说是 让Spring自动去进行一些配置,我们点击来看一下:
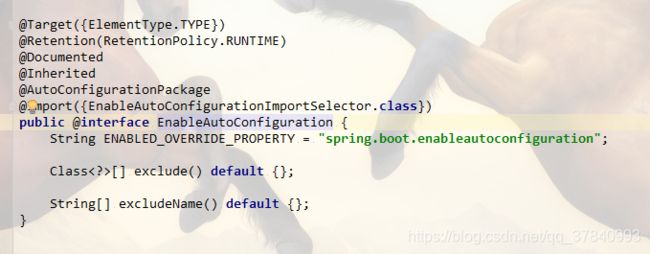
可以看到它是由 @AutoConfigurationPackage,@Import(EnableAutoConfigurationImportSelector.class)这两个而组成的,我们先说@AutoConfigurationPackage,他是说:让包中的类以及子包中的类能够被自动扫描到spring容器中。
我们来看@Import(EnableAutoConfigurationImportSelector.class)这个是核心,之前我们说自动配置,那他到底帮我们配置了什么,怎么配置的?
就和@Import(EnableAutoConfigurationImportSelector.class)息息相关,程序中默认使用的类就自动帮我们找到。我们来看EnableAutoConfigurationImportSelector.class
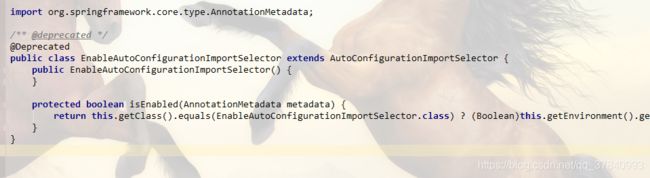
该类显示的是已经弃用,说明在高版本中,这个类已经被替换,但我们还是来看看它到底做了些什么,可以看到他继承了AutoConfigurationImportSelector我们继续来看AutoConfigurationImportSelector,这个类有一个方法
public String[] selectImports(AnnotationMetadata annotationMetadata) {if (!isEnabled(annotationMetadata)) {return NO_IMPORTS;}try {AutoConfigurationMetadata autoConfigurationMetadata = AutoConfigurationMetadataLoader.loadMetadata(this.beanClassLoader);AnnotationAttributes attributes = getAttributes(annotationMetadata);Listconfigurations = getCandidateConfigurations(annotationMetadata, attributes);configurations = removeDuplicates(configurations);configurations = sort(configurations, autoConfigurationMetadata);Setexclusions = getExclusions(annotationMetadata, attributes); checkExcludedClasses(configurations, exclusions);configurations.removeAll(exclusions);configurations = filter(configurations, autoConfigurationMetadata);fireAutoConfigurationImportEvents(configurations, exclusions);return configurations.toArray(new String[configurations.size()]);}catch (IOException ex) {throw new IllegalStateException(ex);}}
这个类会帮你扫描那些类自动去添加到程序当中。我们可以看到getCandidateConfigurations()这个方法,他的作用就是引入系统已经加载好的一些类,到底是那些类呢,我们点进去看一下
protected ListgetCandidateConfigurations(AnnotationMetadata metadata, AnnotationAttributes attributes) {Listconfigurations = SpringFactoriesLoader.loadFactoryNames( getSpringFactoriesLoaderFactoryClass(), getBeanClassLoader());Assert.notEmpty(configurations,"No auto configuration classes found in META-INF/spring.factories. If you "+ "are using a custom packaging, make sure that file is correct.");return configurations;}
这个类回去寻找的一个目录为META-INF/spring.factories,也就是说他帮你加载让你去使用也就是在这个META-INF/spring.factories目录装配的,他在哪里?

我们可以发现帮我们配置了很多类的全路径,比如你想整合activemq,或者说Servlet
可以看到他都已经帮我们引入了进来,我看随便拿几个来看
org.springframework.boot.autoconfigure.security.SecurityAutoConfiguration,\org.springframework.boot.autoconfigure.security.SecurityFilterAutoConfiguration,\org.springframework.boot.autoconfigure.security.FallbackWebSecurityAutoConfiguration,\org.springframework.boot.autoconfigure.security.oauth2.OAuth2AutoConfiguration,\
比如我们经常用的security,可以看到已经帮你配置好,所以我们的EnableAutoConfiguration主要作用就是让你自动去配置,但并不是所有都是创建好的,是根据你程序去进行决定。 那我们继续来看
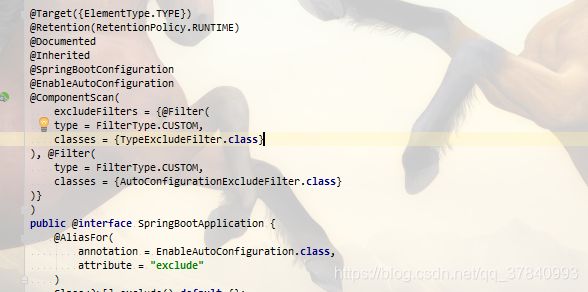
@ComponentScan(excludeFilters = { @Filter(type = FilterType.CUSTOM,classes = TypeExcludeFilter.class), @Filter(type = FilterType.CUSTOM,classes = AutoConfigurationExcludeFilter.class) })
这个注解大家应该都不陌生,扫描包,放入spring容器,那他在springboot当中做了什么策略呢?我们可以慢慢去思考,帮我们做了一个排除策略,他在这里结合SpringBootConfiguration去使用,为什么是排除,因为不可能一上来全部加载,因为内存有限。
那么我们来总结下@SpringbootApplication:就是说,他已经把很多东西准备好,具体是否使用取决于我们的程序或者说配置,那我们到底用不用?那我们继续来看一行代码
public static void main(String[] args){SpringApplication.run(StartEurekaApplication.class, args);}那们来看下在执行run方法到底有没有用到哪些自动配置的东西,比如说内置的Tomcat,那我们来找找内置Tomcat,我们点进run
public static ConfigurableApplicationContext run(Object[] sources, String[] args) {return new SpringApplication(sources).run(args);}
然后他调用又一个run方法,我们点进来看
public ConfigurableApplicationContext run(String... args) {//计时器StopWatch stopWatch = new StopWatch();stopWatch.start();ConfigurableApplicationContext context = null;FailureAnalyzers analyzers = null;configureHeadlessProperty();//监听器SpringApplicationRunListeners listeners = getRunListeners(args);listeners.starting();try {ApplicationArguments applicationArguments = new DefaultApplicationArguments(args);ConfigurableEnvironment environment = prepareEnvironment(listeners,applicationArguments);Banner printedBanner = printBanner(environment);//准备上下文context = createApplicationContext();analyzers = new FailureAnalyzers(context);//预刷新contextprepareContext(context, environment, listeners, applicationArguments,printedBanner);//刷新contextrefreshContext(context);//刷新之后的contextafterRefresh(context, applicationArguments);listeners.finished(context, null);stopWatch.stop();if (this.logStartupInfo) {new StartupInfoLogger(this.mainApplicationClass).logStarted(getApplicationLog(), stopWatch);}return context;}catch (Throwable ex) {handleRunFailure(context, listeners, analyzers, ex);throw new IllegalStateException(ex);}}
那我们关注的就是 refreshContext(context); 刷新context,我们点进来看
private void refreshContext(ConfigurableApplicationContext context) {refresh(context);if (this.registerShutdownHook) {try {context.registerShutdownHook();}catch (AccessControlException ex) {// Not allowed in some environments.}}}
我们继续点进refresh(context);
protected void refresh(ApplicationContext applicationContext) {Assert.isInstanceOf(AbstractApplicationContext.class, applicationContext);((AbstractApplicationContext) applicationContext).refresh();}
他会调用 ((AbstractApplicationContext) applicationContext).refresh();方法,我们点进来看:
public void refresh() throws BeansException, IllegalStateException {synchronized (this.startupShutdownMonitor) {// Prepare this context for refreshing.prepareRefresh();// Tell the subclass to refresh the internal bean factory.ConfigurableListableBeanFactory beanFactory = obtainFreshBeanFactory();// Prepare the bean factory for use in this context.prepareBeanFactory(beanFactory);try {// Allows post-processing of the bean factory in context subclasses.postProcessBeanFactory(beanFactory);// Invoke factory processors registered as beans in the context.invokeBeanFactoryPostProcessors(beanFactory);// Register bean processors that intercept bean creation.registerBeanPostProcessors(beanFactory);// Initialize message source for this context.initMessageSource();// Initialize event multicaster for this context.initApplicationEventMulticaster();// Initialize other special beans in specific context subclasses.onRefresh();// Check for listener beans and register them.registerListeners();// Instantiate all remaining (non-lazy-init) singletons.finishBeanFactoryInitialization(beanFactory);// Last step: publish corresponding event.finishRefresh();}catch (BeansException ex) {if (logger.isWarnEnabled()) {logger.warn("Exception encountered during context initialization - " +"cancelling refresh attempt: " + ex);}// Destroy already created singletons to avoid dangling resources.destroyBeans();// Reset 'active' flag.cancelRefresh(ex);// Propagate exception to caller.throw ex;}finally {// Reset common introspection caches in Spring's core, since we// might not ever need metadata for singleton beans anymore...resetCommonCaches();}}}
这点代码似曾相识啊 没错,就是一个spring的bean的加载过程我在,解析springIOC加载过程的时候介绍过这里面的方法,如果你看过Spring源码的话 ,应该知道这些方法都是做什么的。现在我们不关心其他的,我们来看一个方法叫做 onRefresh();方法
protected void onRefresh() throws BeansException {// For subclasses: do nothing by default.}
他在这里并没有实现,但是我们找他的其他实现,我们来找
![]()
我们看到还有Jetty,那我们来看TomcatServletWebServerFactory
@Overridepublic WebServer getWebServer(ServletContextInitializer... initializers) {Tomcat tomcat = new Tomcat();File baseDir = (this.baseDirectory != null) ? this.baseDirectory: createTempDir("tomcat");tomcat.setBaseDir(baseDir.getAbsolutePath());Connector connector = new Connector(this.protocol);tomcat.getService().addConnector(connector);customizeConnector(connector);tomcat.setConnector(connector);tomcat.getHost().setAutoDeploy(false);configureEngine(tomcat.getEngine());for (Connector additionalConnector : this.additionalTomcatConnectors) {tomcat.getService().addConnector(additionalConnector);}prepareContext(tomcat.getHost(), initializers);return getTomcatWebServer(tomcat);}
那这块代码,就是我们要寻找的内置Tomcat,在这个过程当中,我们可以看到创建Tomcat的一个流程。因为run方法里面加载的东西很多,所以今天就浅谈到这里。如果此文章有类同之处,请联系楼主删除。本文参考自https://mp.weixin.qq.com/s/k3IdPE-XZH5YrIt20amTVQ