【2022-02-11】自定义vue组件库脚手架指导
自定义组件库脚手架
- 1、项目初始化
-
-
- 创建项目
- 创建项目目录结构
-
- 2、配置webpack
-
-
- 常规配置
- 引入label
- 配置浏览器兼容性
- 引入样式
- 引入资源文件
- 引入vue
-
- 3、md配置
-
-
- 方式一:自定义loader(参考elementUI,可优化)
- 方式一优化:采用外部组件
- 方式二:使用vue-markdown-loader
- 方式三:使用resourceQuery的方式
-
- 4、md美化
-
-
- 文档美化
- 代码高亮
-
- 效果
- 配置路由
-
-
- 方案一:手动添加
- 方案二:使用`chokidar`
-
- 打包组件
1、项目初始化
创建项目
mkdir 项目名
cd 项目名
npm init -y
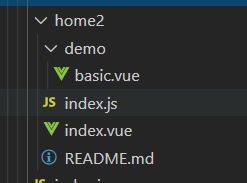
创建项目目录结构
| 文件 | 作用 |
|---|---|
| public/index.html | 文档模板,如果是移动端组件库,需要多个html作为template |
| src/index.js | 打包入口,如果是移动端组件库,需要多个js作为入口 |
| src/doc | 存放文档组件 |
2、配置webpack
常规配置
yarn add -D webpack webpack-cli webpack-dev-server webpack-merge html-webpack-plugin clean-webpack-plugin
| 依赖包 | 作用 |
|---|---|
| webpack | webpack的核心代码库 |
| webpack-cli | webpack命令行工具,提供一套命令,用来驱动当前项目的运行 |
| webpack-dev-server | 研发环境使用的webpack服务器 |
| webpack-merge | 合并webpack配置用 |
| html-webpack-plugin | 存放文档组件 |
| clean-webpack-plugin | 打包时清空上一次的构建产物 |
引入label
yarn add -D babel-loader @babel/core @babel/preset-env
yarn add -S core-js
| 依赖包 | 作用 |
|---|---|
| babel-loader | 新版本js加载器,用来将js编译成兼容性更好的低版本,需要同时配置.babelrc文件 |
| @babel/core | |
| @babel/preset-env | |
| core-js | @babel/preset-env需要依赖的代码库,因为依赖包对不同浏览器的支持情况不同,需要参于项目的生产构建 |
示例
{
  "presets": [
    [
      "@babel/preset-env",
      {
        "useBuiltIns": "usage", // 使用动态解析语法,根据兼容性转义
        "corejs": 3
      }
    ]
  ]
}
配置浏览器兼容性
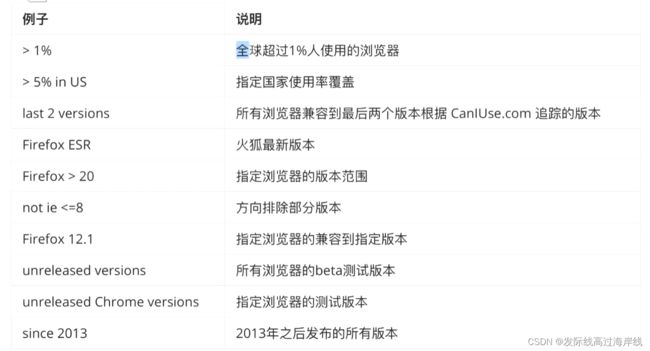
创建 .browserslistrc 文件
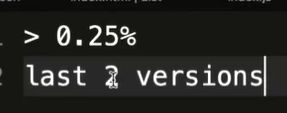
代表全世界使用率超过0.25的浏览器,兼容到最后两个版本,可以执行npx browserslist看到支持的浏览器的具体型号及版本

配置方式
引入样式
yarn add -D css-loader less-loader less style-loader postcss-loader postcss-preset-env postcss cssnano mini-css-extract-plugin
| 依赖包 | 作用 |
|---|---|
| css-loader | css文件加载器 |
| less-loader | less文件加载器 |
| less | |
| style-loader | 用来将css加入到dom中 |
| postcss-loader | 补全兼容性问题 |
| postcss-preset-env | |
| postcss | |
| cssnano | 优化压缩css |
| mini-css-extract-plugin | 打包时分离css文件 |
postcss可以看成css版的babel,做兼容性处理,如补全浏览器兼容性前缀(会自动识别browserslist里配置的浏览器兼容范围),自动处理单位的转换等等
创建 postcss.config.js
module.exports = {
  plugins: {
    'postcss-preset-env': {}, // 处理兼容性
    'cssnano': {}, // 压缩样式
  }
}
引入资源文件
yarn add -D file-loader copy-webpack-plugin
| 依赖包 | 作用 |
|---|---|
| file-loader | 文件加载器 |
| copy-webpack-plugin | 复制项目内的代码到构建后的文件夹中 |
引入vue
yarn add -S vue@2.6.14 vue-router@3.5.3
yarn add -D vue-loader vue-template-compiler
| 依赖包 | 作用 |
|---|---|
| vue | vue核心包 |
| vue-router | vue路由包 |
| vue-loader | 把vue文件转换为js |
| vue-template-compiler | 把template包裹的代码转换成render的渲染函数 |
3、md配置
方式一:自定义loader(参考elementUI,可优化)
适合
pc端组件库,在md中渲染出组件的样式,并可以查看所渲染组件的源代码
yarn add -D markdown-it-table-of-contents
yarn add -D markdown-it markdown-it-chain markdown-it-container markdown-it-anchor
| 依赖包 | 作用 |
|---|---|
| markdown-it | md文件转html |
| markdown-it-chain | 链式配置markdown-it |
| markdown-it-container | |
| markdown-it-anchor | |
| transliteration | |
| markdown-it-table-of-contents | md锚点 |
// webpack module中添加md的加载器
{
  test: /\.md$/,
  use: [
    {
      loader: 'vue-loader',
      options: {
        preserveWhitespace: false
      }
    },
    {
      loader: require.resolve('../plugins/md-loader/index.js'),
    },
  ]
},
// md-loader/config.js

const Config = require("markdown-it-chain"); // 支持链式配置markdown-it
const anchorPlugin = require('markdown-it-anchor'); //
const slugify = require('transliteration').slugify;
const containers = require('./container'); // 匹配内容块,解析以 ::: 包裹的内容
const overWriteFenceRule = require('./fence');

const config = new Config();

config.options
  .html(true)
  .end()

  .plugin('toc')
  .use(require('markdown-it-table-of-contents'), [{
    includeLevel: [2, 3]
  }])
  .end()

  .plugin('anchor')
  .use(anchorPlugin, [{
    permalink: true,
    permalinkBefore: true,
    permalinkSymbol: '$',
    level: 2,
    slugify: slugify,
  }])
  .before('toc')
  .end()

  .plugin("containers")
  .use(containers)
  .end();

const md = config.toMd(); // markdown-it 的实例
overWriteFenceRule(md);

module.exports = md;
// md-loader/container.js

// 匹配内容块,解析以 ::: 包裹的内容
const mdContainer = require("markdown-it-container");

module.exports = (md) => {
  md.use(mdContainer, "demo", {
    validate(params) {
      return params.trim().match(/^demo\s*(.*)$/);
    },
    render(tokens, idx) {
      const m = tokens[idx].info.trim().match(/^demo\s*(.*)$/);
      // 判断代码块开启标签 nesting === 1
      if (tokens[idx].nesting === 1) {
        // 判断是否包裹在代码块(fence)中
        const description = m && m.length > 1 ? m[1] : '';
        const content = tokens[idx + 1].type === "fence" ? tokens[idx + 1].content : "";
        // 返回以代码块包裹,并添加标记
        return `
        ${description ? `${md.render(description)}` : ''}

        `;
      }
      return "";
    },
  });

  md.use(mdContainer, "tip");
  md.use(mdContainer, 'warning');
}
// md-loader/fence.js
// 覆盖默认的 fence 渲染策略
module.exports = md => {
const defaultRender = md.renderer.rules.fence;
md.renderer.rules.fence = (tokens, idx, options, env, self) => {
const token = tokens[idx];
// 判断该 fence 是否在 :::demo 内
const prevToken = tokens[idx - 1];
const isInDemoContainer = prevToken && prevToken.nesting === 1 && prevToken.info.trim().match(/^demo\s*(.*)$/);
if (token.info === 'html' && isInDemoContainer) {
return `${md.utils.escapeHtml(token.content)}
`;
}
return defaultRender(tokens, idx, options, env, self);
};
};
// md-loader/index.js
const fs = require("fs");
const path = require("path");
const md = require("./config");
const cacheDir = "../../src/.rux";
const resolve = dir => path.resolve(__dirname, dir);
if (!fs.existsSync(resolve(cacheDir))) {
fs.mkdirSync(resolve(cacheDir));
}
module.exports = function (source) {
// 获取 md 文件转化后的内容
const content = md.render(source);
const startTag = ""; // 匹配关闭标签
const endTagLen = endTag.length;
let components = ""; // 存储组件示例
let importVueString = ""; // 存储引入组件声明
let uid = 0; // demo 的 uid
const outputSource = []; // 输出的内容
let start = 0; // 字符串开始位置
let commentStart = content.indexOf(startTag);
let commentEnd = content.indexOf(endTag, commentStart + startTagLen);
while (commentStart !== -1 && commentEnd !== -1) {
outputSource.push(content.slice(start, commentStart));
// 获取代码块内容
const commentContent = content.slice(
commentStart + startTagLen,
commentEnd
);
const componentNameId = `demoContainer${uid}`;
// 将文件写入本地
fs.writeFileSync(resolve(`${cacheDir}/${componentNameId}.vue`), commentContent, "utf-8");
// 声明内容插槽传入
outputSource.push(`<${componentNameId} />`);
// 添加引入声明
importVueString += `\nimport ${componentNameId} from '@/.rux/${componentNameId}';`;
// 添加组件声明
components += `${componentNameId},`;
// 重新计算下一次的位置
uid++;
start = commentEnd + endTagLen;
commentStart = content.indexOf(startTag, start);
commentEnd = content.indexOf(endTag, commentStart + startTagLen);
}
// 后续内容添加
outputSource.push(content.slice(start));
return `
${outputSource.join("")}
`;
};
使用示例
[[toc]]
## Alert 警告 1
用于页面中展示重要的提示信息。
### 基本用法
页面中的非浮层元素,不会自动消失。
:::demo Alert 组件提供四种主题,由 `type` 属性指定,默认值为 `info` 。
```html
测试 md 内置组件 -- {{ msg }}
```//
:::
需要在外部自行创建一个demo-block的组件,用来承接md解析的vue组件
需要共三个slot:default(描述)、source(示例)、highlight(代码)
示例:
<template>
  <div
    class="demo-block"
    :class="[blockClass, { hover: hovering }]"
    @mouseenter="hovering = true"
    @mouseleave="hovering = false"
  >
    <div class="source">
      <slot name="source"></slot>
    </div>
    <div class="meta" ref="meta">
      <div class="description" v-if="$slots.default">
        <slot></slot>
      </div>
      <div class="highlight">
        <slot name="highlight"></slot>
      </div>
    </div>
    <div
      class="demo-block-control"
      ref="control"
      :class="{ 'is-fixed': fixedControl }"
      @click="isExpanded = !isExpanded"
    >
      <transition name="arrow-slide">
        <i :class="[iconClass, { hovering: hovering }]"></i>
      </transition>
      <transition name="text-slide">
        <span v-show="hovering">{{ controlText }}</span>
      </transition>
    </div>
  </div>
</template>

...
方式一优化:采用外部组件
方案一原理: 把
md中的代码片段进行抽离,放置在内存下指定文件中进行使用
优化方案:如果我们一开始就引用的是外部的组件,即可省略掉这一步
优化原因:md和vue组件混淆在一起,无法使用格式化工具,且随着demo的增加,文档长度会越来越长,维护成本提升
// md-loader/index.js
/**
* 支持md中使用demo文件夹下的vue组件,以文件名为组件名使用
*/
const md = require('./config');
module.exports = function (source) {
const content = md.render(source, {
resourcePath: this.resourcePath
});
const startTag = '';
const endTagLen = endTag.length;
const tagReg = /\s*<([\w-_]+)\s*\/>\s*/;
let componenetsString = '';
let output = []; // 输出的内容
let start = 0; // 字符串开始位置
let commentStart = content.indexOf(startTag);
let commentEnd = content.indexOf(endTag, commentStart + startTagLen);
while (commentStart !== -1 && commentEnd !== -1) {
output.push(content.slice(start, commentStart));
const commentContent = content.slice(commentStart + startTagLen, commentEnd);
const matches = commentContent.match(tagReg);
if (matches) {
const demoComponentName = matches[1];
output.push(`<${demoComponentName} />`);
componenetsString += `${JSON.stringify(demoComponentName)}: ()=>import('./demo/${demoComponentName}.vue'),`;
}
start = commentEnd + endTagLen;
commentStart = content.indexOf(startTag, start);
commentEnd = content.indexOf(endTag, commentStart + startTagLen);
}
let pageScript = '';
if (componenetsString) {
pageScript = ``;
} else if (content.indexOf('') + ''.length;
pageScript = content.slice(0, start);
}
output.push(content.slice(start));
return `
${output.join('')}
${pageScript}
`;
};
// md-loader/fence.js
const path = require('path')
const fs = require('fs')
const tagReg = /\s*<([\w-_]+)\s*\/>\s*/;
// 覆盖默认的 fence 渲染策略
module.exports = md => {
const defaultRender = md.renderer.rules.fence;
md.renderer.rules.fence = (tokens, idx, options, env, self) => {
const token = tokens[idx];
// 判断该 fence 是否在 :::demo 内
const prevToken = tokens[idx - 1];
const isInDemoContainer = prevToken && prevToken.nesting === 1 && prevToken.info.trim().match(/^demos*(.*)$/);
if (token.info === 'html' && isInDemoContainer) {
const matches = token.content.match(tagReg);
if (matches) {
const componentName = matches[1];
const componentPath = path.resolve(env.resourcePath, `../demo/${componentName}.vue`);
const content = fs.readFileSync(componentPath, 'utf-8');
return `${md.utils.escapeHtml(content)}
`;
}
return '';
}
return defaultRender(tokens, idx, options, env, self);
};
};
使用方式
### 基本用法

页面中的非浮层元素,不会自动消失。


:::demo Alert 组件提供四种主题,由 `type` 属性指定,默认值为 `info` 。
```html

```/
:::
方式二:使用vue-markdown-loader
适合
移动端组件库,左侧菜单,中间md文档,右边iframe的组件显示区域
yarn add -D markdown-it markdown-it-chain markdown-it-container markdown-it-anchor transliteration
// vue-loader 15的配置
{
test: /\.md$/,
use: [
{ loader: 'vue-loader' },
{
loader: 'vue-markdown-loader/lib/markdown-compiler',
options: require('markdown-it')({
highlight: function (str, lang) {
if (lang && hljs.getLanguage(lang)) {
try {
return '' +
hljs.highlight(lang, str, true).value +
'
';
} catch (__) { }
}
return '' + md.utils.escapeHtml(str) + '
';
}
}),
}
]
},
配置后,通过loader的转化,md文件可以当作正常的vue组件进行使用
方式三:使用resourceQuery的方式
本例是vue组件的使用案例,react暂未应用
相当于方式一的另一种优化方案,原理是解析指定标签,把带有对应标签的文件内容绑定在某一个属性上。
使用时,在vue的组件上方添加,源码便可以作为属性加入到vue组件对象的内容 __sourceCode中
yarn add -D @vue/compiler-sfc
// webpack module中新加loader配置
{
  resourceQuery: /blockType=demo/,
  loader: require.resolve('../plugins/docs-loader.js')
}
// docs-loader.js

const fs = require('fs');
const { parse } = require('@vue/compiler-sfc');

const sourceType = ['template', 'script', 'styles']

const handlerSource = (source) => {
  if (!source) {
    return
  }
  let sourceStr = ''
  sourceType.forEach(typeItem => {
    if (source[typeItem] && !Array.isArray(source[typeItem])) {
      sourceStr += `<${typeItem}>${source[typeItem].content}${typeItem}>\n\n`
    }
    if (Array.isArray(source[typeItem])) {
      sourceStr += source[typeItem].map(
        sourceItem => `<${sourceItem.type}>${sourceItem.content}${sourceItem.type}>\n\n`
      ).join('')
    }
  })
  return sourceStr
}

module.exports = function (source, map) {
  // 1. 获取带有  标签的文件完整路径
  const { resourcePath } = this
  // 2. 读取文件内容
  const file = fs.readFileSync(resourcePath).toString()
  // 3. 利用
  const parsed = parse(file).descriptor
  // 3. 源码转换
  const sourceCode = handlerSource(parsed)
  const sourceCodeTitle = parsed.customBlocks[0]?.content || '示例'
  // 4. 将结果添加到 组件对象上面
  this.callback(
    null,
    `export default function (Component) {
        Component.options.__sourceCode = ${JSON.stringify(sourceCode)}
        Component.options.__sourceCodeTitle = ${JSON.stringify(sourceCodeTitle)}
      }`,
    map
  )
}
示例
### 基本用法

页面中的非浮层元素,不会自动消失。

<demo src="home/index.vue"></demo>
需要在外部提供一个自定义组件demo
<template>
  <div class="demo">
    <h2 ref="ho">{{ component.__sourceCodeTitle || title || "示例" }}</h2>
    <div class="demo-component">
      <component :is="component" />
    </div>
    <div class="demo-actions">
      <button @click="hideCode" v-if="codeVisible">隐藏代码</button>
      <button @click="showCode" v-else>查看代码</button>
    </div>
    <div class="demo-code" v-show="codeVisible" ref="code1">
      <pre class="language-html">
        <code ref="code" v-text="component.__sourceCode"/>
      </pre>
    </div>
  </div>
</template>

<script>
import highlightjs from "highlight.js";
import "highlight.js/styles/vs2015.css";

export default {
  name: "demo",
  props: {
    src: String,
    title: String,
  },
  data() {
    return {
      codeVisible: false,
    };
  },
  computed: {
    component() {
      const result = require(`@/view/pages/${this.src}`).default;
      return result;
    },
  },
  methods: {
    showCode() {
      this.codeVisible = true;
    },
    hideCode() {
      this.codeVisible = false;
    },
    init() {
      const codeEl = this.$refs.code;
      highlightjs.highlightBlock(codeEl);
    },
  },
  async mounted() {
    await this.$nextTick();
    this.init();
  },
};
</script>

<style lang="less" scoped>
@border-color: #d9d9d9;

.demo {
  border: 1px solid @border-color;
  margin: 16px 0 32px;

  > h2 {
    font-size: 20px;
    padding: 8px 16px;
    border-bottom: 1px solid @border-color;
  }

  &-component {
    padding: 16px;
  }

  &-actions {
    padding: 8px 16px;
    border-top: 1px dashed @border-color;
  }

  &-code {
    padding: 8px 16px;
    border-top: 1px dashed @border-color;

    > pre {
      line-height: 1.1;
      font-family: Consolas, "Courier New", Courier, monospace;
      margin: 0;
    }
  }
}
</style>
4、md美化
至此,md文件及其中的组件已可以正常显示,然后做一些小优化
文档美化
// md.less

.rux-container {
  height    : calc(100% - 80px);
  margin-top: 80px;

  &>.el-scrollbar__wrap {
    overflow-x: auto;
  }
}

.content {
  padding-top: 50px;

  &> {
    h3 {
      margin: 55px 0 20px;
    }

    table {
      border-collapse : collapse;
      background-color: #fff;
      font-size       : 14px;
      margin-bottom   : 45px;
      line-height     : 1.5em;

      strong {
        font-weight: normal;
      }

      td,
      th {
        border-bottom: 1px solid #dcdfe6;
        padding      : 15px;
        max-width    : 250px;
      }

      th {
        text-align : left;
        white-space: nowrap;
        color      : #909399;
        font-weight: normal;
      }

      td {
        color: #606266;
      }

      th:first-child,
      td:first-child {
        padding-left: 10px;
      }
    }

    ul:not(.timeline) {
      margin     : 10px 0;
      padding    : 0 0 0 20px;
      font-size  : 14px;
      color      : #5e6d82;
      line-height: 2em;
    }
  }
}

@media (max-width: 768px) {
  .content {
    padding-top: 0;
  }

  .content>table {
    overflow: auto;
    display : block;
  }
}
代码高亮
yarn add -D highlight.js
| 依赖包 | 作用 |
|---|---|
| highlight.js | 代码高亮 |
// index.js

import router from './router';
...
router.afterEach(route => {
  Vue.nextTick(() => {
    const blocks = document.querySelectorAll('pre code:not(.hljs)');
    Array.prototype.forEach.call(blocks, hljs.highlightBlock);
  });
});
效果
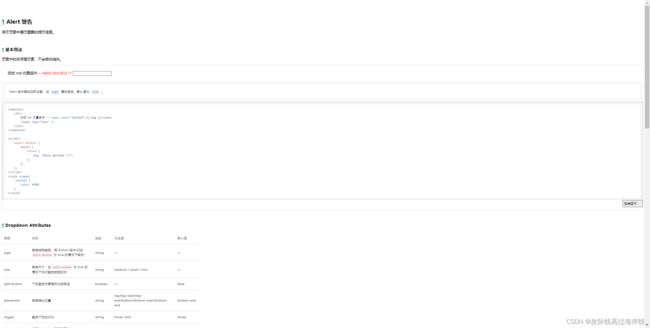
配置路由
路由目前采用手动输入到router.js中的方式,效率较为低下
优化方案:使用文件监听,创建文件夹时自动生成指定的路由目录
方案一:手动添加
import Vue from 'vue';
import VueRouter from 'vue-router';

Vue.use(VueRouter);

const routes = [
  {
    path: '/',
    redirect: '/home'
  },
];

// 在此处继续添加
const routeList = ['home1', 'home2'];

routeList.forEach((route) => {
  routes.push({
    path: `/${route}`,
    component: resolve => require([`@/view/pages/${route}/README.md`], resolve)
  });
});

export default new VueRouter({ routes });
方案二:使用chokidar
在启动时引用此文件
yarn add -D chokidar
// watcher.js

const { resolve, parse } = require('path')
const chokidar = require('chokidar')
const fs = require('fs')

const routeList = []

const watcher = chokidar.watch(resolve(__dirname, '../src/view/pages'), {
  ignored: /(^|[\/\\])\../
})

watcher
  .on('addDir', (path) => {
    let routeName = parse(path).name;
    if (routeName !== 'pages') {
      routeList.push(`'${routeName}'`)
      fs.writeFileSync(resolve(__dirname, '../src/route-list.js'), `module.exports = [${routeList}]`)
    }
  })
  .on('unlinkDir', (path) => {
    let routeName = parse(path).name;
    const itemIndex = routeList.findIndex((val) => {
      return val === `'${routeName}'`
    })
    routeList.splice(itemIndex, 1)
    fs.writeFileSync(resolve(__dirname, '../src/route-list.js'), `module.exports = [${routeList}]`)
  })

module.exports = watcher
自动生成文件后,修改router
import Vue from 'vue';
import VueRouter from 'vue-router';
import routeList from '../route-list.js';

Vue.use(VueRouter);

const routes = [
  {
    path: '/',
    component: resolve => require(['@/view/pages/home/demo/index.vue'], resolve)
  },
];

routeList.forEach((route) => {
  routes.push({
    path: `/${route}`,
    component: resolve => require([`@/view/pages/${route}/demo/index.vue`], resolve)
  });
});

const router = new VueRouter({ routes });

export default router;
打包组件
// webpack.prod.js

const path = require('path')
const { merge } = require('webpack-merge')
const { CleanWebpackPlugin } = require('clean-webpack-plugin')
const CopyWebpackPlugin = require('copy-webpack-plugin')
const base = require('./webpack.base')

const resolve = dir => path.resolve(__dirname, '../', dir)

const entrys = require('./getComponents.js')([
  resolve('src/view/pages'),
]);

module.exports = merge(base, {
  mode: 'production',
  devtool: 'source-map',
  // 入口文件
  entry: entrys,
  // 输出位置为dist目录,名字自定义,输出格式为umd格式
  output: {
    path: resolve('lib'),
    // filename: 'index.js',
    filename: '[name]/index.js',
    libraryTarget: 'umd',
    libraryExport: 'default',
    library: 'rux-mobile-vue'
  },
  plugins: [
    // 清空上一次的打包记录
    new CleanWebpackPlugin(),
    // 复制静态资源,以便实现UI换肤等功能
    new CopyWebpackPlugin({
      patterns: [
        { from: 'src/view/assets', to: 'assets' }
      ]
    }),
    // 打包结束后跳出
    {
      apply: (compiler) => {
        compiler.hooks.done.tap('DonePlugin', (stats) => {
          console.log('Compile is done !')
          setTimeout(() => {
            process.exit(0)
          })
        });
      }
    }
  ]
})
组件批量导出
import Home from './home';
import Home2 from './home2';

// 存储组件列表
const components = [
  Home,
  Home2,
];

// 定义 install 方法,接收 Vue 作为参数。如果使用 use 注册插件,则所有的组件都将被注册
const install = function (Vue) {
  // 遍历注册全局组件
  components.forEach(component => {
    Vue.component(component.name, component);
  });
};

// 判断是否是直接引入文件
if (typeof window !== 'undefined' && window.Vue) {
  install(window.Vue);
}
export default {
  // 导出的对象必须具有 install,才能被 Vue.use() 方法安装
  install,
  Home,
  Home2
};
组件单个导出
import Home from './index.vue';

// 按需注册
Home.install = function (Vue) {
  Vue.component(Home.name, Home);
};

export default Home;
在main.js中引用
// import * as UI from './pages' // 本地研发
import * as UI from '../../lib/index' // 打包测试
一个具有完备功能的组件库文档就搭建完毕了~
后续测试组件时,只需更换main.js里的组件库引用路径为打包后的文件即可