vue 后台系统中多页面标签
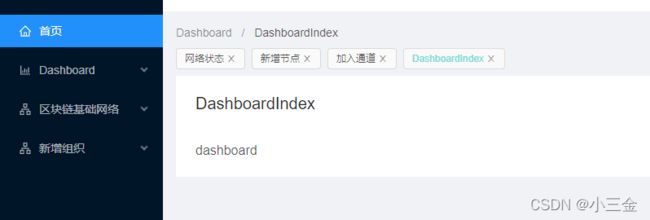
在后台开发中,常用一种页面标签工具,每次点击菜单栏时,会在页面区域上方增加一个【标签页】如下图,可关闭,可切换页面等功能,常见于后台管理系统中。

以前,我以为这个是利用tabs组件开发的,但是后来看了一些文章才发现,它实际上跟tabs组件没有任何关系(当然你可以用tabs做,实现过程不限于任何技术)
原理:
1 点击菜单栏时,将【菜单项】数据记录在vuex中,或者你存本地的storage中,怎么做都行,但你得保存下来
2 上方标签,通过读取我的路由链,然后用ant vue 【tag】标签渲染(当然你可以用自己方式做)
3 关闭,点击关闭后,要删除路由链,并且要做跳转,当然这里要做判断,如果关闭当前页,则往后面的跳,如果是最后一项,则跳转至开头第一项(路由链中,首页默认设置第一项)
目前,我只简单说到以上的功能,至于其它功能,你可以自己加。
实现:只做实现,质量暂时先不看中
1 vuex中设置路由链,打开你的store/index.js
![]()
import Vue from 'vue'
import router from '@/router'
import Vuex from 'vuex'
Vue.use(Vuex)

export default new Vuex.Store({
  state: {
    tagsRouter: [],
  },
  getters: {

    getTagsRouter(state) {
      //获取标签路由信息
      return state.tagsRouter
    },
  },
  mutations: {

    setRouterTagActive(state, routeItem) {
      //设置当前的tag页为活动页
      for (let i = 0; i < state.tagsRouter.length; i++) {
        let item = state.tagsRouter[i]
        state.tagsRouter[i].isActive = false
        if (state.tagsRouter[i].name === routeItem.name) {
          state.tagsRouter[i].isActive = true
        }
      }

      console.log(state.tagsRouter)
    },
    addRoute(state, routeItem) {
      //选择菜单后,添加至本地路由信息中
      let flog = false
      for (let i = 0; i < state.tagsRouter.length; i++) {
        let item = state.tagsRouter[i]
        if (state.tagsRouter[i].name === routeItem.name) {
          flog = true
          break
        }
      }
      if (!flog) {
        state.tagsRouter.push({
          path: routeItem.path,
          name: routeItem.name,
          meta: routeItem.meta,
        })
      }
    },
    delRoute(state, params) {
      //删除tags路由项
      if (state.tagsRouter.length != 0) {
        let itemIndex = 0
        for (let i = 0; i < state.tagsRouter.length; i++) {
          let item = state.tagsRouter[i]
          if (state.tagsRouter[i].meta.menuKey === params.item.meta.menuKey) {
            //
            itemIndex = i
            state.tagsRouter.splice(i, 1)
            break
          }
        }

        //跳除后的跳转
      }
    },
  },
  actions: {
    doSomething(context, val) {
      //应用:this.$store.dispatch("doSomething",{})
      //提交mutations内的方法:context.commit("setUser",val)
    },
  },
  modules: {},
})
2 设置下路由信息,打开router/index.js
路由信息可跟据你的来,我只是截取了一下自己的实验内容,meta中可添加自己的信息
import Vue from 'vue'
import VueRouter from 'vue-router'

import store from '@/store/index'
Vue.use(VueRouter)

// 页面跳转时的进度条
import NProgress from 'nprogress'
import 'nprogress/nprogress.css'

NProgress.configure({
  easing: 'ease', // 动画方式
  speed: 500, // 递增进度条的速度
  showSpinner: false, // 是否显示加载icon
  trickleSpeed: 200, // 自动递增间隔
  minimum: 0.3, // 初始化时的最小百分比
})


// routes设置根据你的项目来即可,我截取了一部分,可能会有错
const routes = [
  {
    path: '/',
    name: 'index',
    meta: { title: '首页', icon: 'home', menuKey: '1', menu: true },
    redirect: '/Dashboard/DashboardIndex',
    component: () =>
      import(/* webpackChunkName: "about" */ '../views/HomeView.vue'),
  },
  {
    path: '/Dashboard',
    name: 'Dashboard',
    meta: { title: 'Dashboard', icon: 'bar-chart', menuKey: '2' },
    component: () => import('../views/HomeView.vue'),
    children: [
      {
        path: 'DashboardIndex',
        name: 'DashboardIndex',
        meta: { title: 'DashboardIndex', icon: '', menuKey: '2.1' },
        component: () => import('@/views/dashboard/Dashboard.vue'),
      },
    ],
  },
  {
    path: '/block',
    name: 'block',
    meta: { title: '链基础网络', icon: 'apartment', menuKey: '3' },
    component: () => import('../views/HomeView.vue'),
    children: [
      {
        path: 'BlockChainSetting',
        name: 'BlockChainSetting',
        meta: { title: '链配置', icon: '', menuKey: '3.1' },
        component: () => import('@/views/blockchain/BlockChainSetting.vue'),
      },
      {
        path: 'BlockChainSetUp',
        name: 'BlockChainSetUp',
        meta: { title: '链搭建', icon: '', menuKey: '3.2' },
        component: () => import('@/views/blockchain/BlockChainSetUp.vue'),
      },
      {
        path: 'BlockChainNetInfo',
        name: 'BlockChainNetInfo',
        meta: { title: '网络状态', icon: '', menuKey: '3.3' },
        component: () => import('@/views/blockchain/BlockChainNetInfo.vue'),
      },
    ],
  }
]


//NProgress 该组件是页面跳转时,页面上方出现的一条进度条,要安装下,npm install --save nprogress

const router = new VueRouter({
  mode: 'hash',
  base: process.env.BASE_URL,
  routes,
})

router.beforeEach((to, from, next) => {
  // 每次切换页面时,调用进度条
  NProgress.start()
  if (to.meta.menuKey != undefined) {
    store.commit('addRoute', to)
    store.commit('setRouterTagActive', to)
  }

  next()
})

//当路由进入后:关闭进度条
router.afterEach(() => {
  // 在即将进入新的页面组件前,关闭掉进度条
  NProgress.done()
})

export default router
3 开发tags组件
4 引入到你的页面中,具体我不写了,你自己引
5 结果
其实,这个组件稍微有点麻烦,但原理就是,你如何处理每次点击的菜单项,把它存在哪,然后再渲染出来就行了。