谷粒商城-基础篇-商品服务2-品牌管理(P59-P69)+(P75)
目录
- 一、商品服务-API-品牌管理
-
- 1、使用逆向工程的前后端代码
- 2、效果优化及显示开关
- 3、云存储开通与使用
-
- (1)阿里云对象存储oss
- (2)oss整合测试
- (3)SpringCloud Alibaba
- 4、创建第三方模块(并完成添加上传功能)
-
- (1)创建模块`gulimall-third-party`
- (2)改进:服务端签名后直传
-
- (3) oss前端联调测试上传
- 5、表单校验&自定义校验器(前端校验)
- 6、JSR303数据校验(后端校验)
-
- (1)JSR303数据校验
- (2)统一异常处理
- (3)JSR303 分组检验
- (4)JSR303 自定义校验注解
- 7、品牌分类关联与级联更新
-
- (1)引入mybatis分页插件
- (2)品牌模糊查询
- (3)关联分类
商品服务-品牌管理
一、商品服务-API-品牌管理
1、使用逆向工程的前后端代码
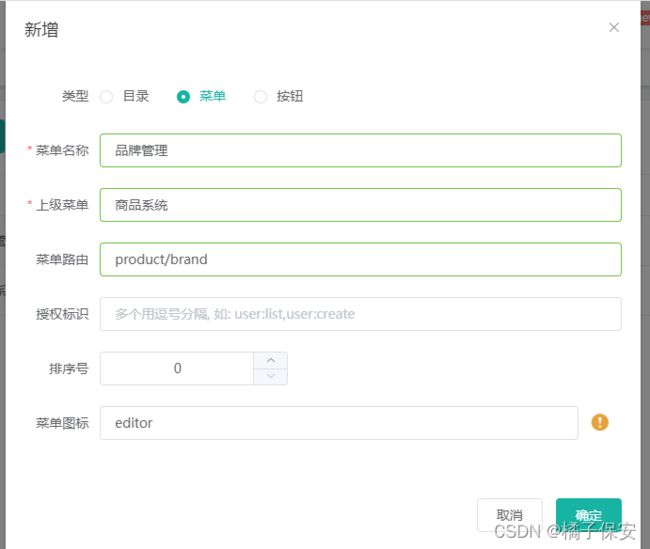
- 新增品牌管理菜单
- 把逆向生成的前端代码
/produt/main/resources/src/views/modules/product下的brand.vue和brand-add-or-update.vue复制到前端项目的gulimall-renren\gulimall-fast-vue\src\views\modules\product目录中
显示的页面没有新增和删除功能,这是因为权限控制的原因
- 解决权限问题
v-if="isAuth('product:brand:save')"判断是否有权限,更改为true
<el-button v-if="isAuth('product:brand:save')" type="primary" @click="addOrUpdateHandle()">新增</el-button>
<el-button v-if="isAuth('product:brand:delete')" type="danger" @click="deleteHandle()" :disabled="dataListSelections.length <= 0">批量删除</el-button>


 /**
 * 是否有权限
 * @param {*} key
 */
export function isAuth (key) {
  // return JSON.parse(sessionStorage.getItem('permissions') || '[]').indexOf(key) !== -1 || false
  return true
}
2、效果优化及显示开关
- 解决控制台语法检查报错
把build/webpack.base.conf.js中的语法检查注释掉
const createLintingRule = () => ({
    // test: /\.(js|vue)$/,
    // loader: 'eslint-loader',
    // enforce: 'pre',
    // include: [resolve('src'), resolve('test')],
    // options: {
    //   formatter: require('eslint-friendly-formatter'),
    //   emitWarning: !config.dev.showEslintErrorsInOverlay
    // }
})
- 快速显示开关
brand.vue
<el-table-column prop="showStatus" header-align="center" align="center" label="显示状态">

        <template slot-scope="scope">
          <el-switch v-model="scope.row.showStatus" active-color="#13ce66" inactive-color="#ff4949" :active-value="1" :inactive-value="0" @change="updateBrandStatus(scope.row)">
          el-switch>
        template>

el-table-column>
brand-add-or-update.vue
<el-form-item label="显示状态" prop="showStatus">

        <el-switch v-model="dataForm.showStatus" active-color="#13ce66" inactive-color="#ff4949" :active-value="1" :inactive-value="0" @change="updateBrandStatus(scope.row)">
        el-switch>
el-form-item>
- 完成状态修改开关
 // 1. 显示转态修改的方法
    updateBrandStatus(data) {
      console.log("最新信息", data)
      let { brandId, showStatus } = data;
      // 1. 发送请求修改状态
      this.$http({
        url: this.$http.adornUrl("/product/brand/update"),
        method: "post",
        data: this.$http.adornData({ brandId, showStatus: showStatus }, false)
      }).then(({ data }) => {
        this.$message({
          type: "success",
          message: "状态更新成功"
        })
      });

    },
3、云存储开通与使用
(1)阿里云对象存储oss
-
创建Bucket(作为项目)
-
这种方式是手动上传图片,实际上我们可以在程序中设置自动上传图片到阿里云
-
对象存储。

- 服务端签名后直传
上传的账号信息存储在应用服务器
上传先找应用服务器要一个policy上传策略,生成防伪签名

(2)oss整合测试
- 导入依赖
<dependency>
    <groupId>com.aliyun.oss</groupId>
    <artifactId>aliyun-sdk-oss</artifactId>
    <version>3.8.0</version>
</dependency>
- 测试上传功能
开通子账户
添加访问控制
   @Test
    public void testUpload() throws FileNotFoundException {

        String endpoint = "oss-cn-beijing.aliyuncs.com";

        // 云账号AccessKey有所有API访问权限
        String accessKeyId = "xxxxxx";
        String accessKeySecret = "xxxxxxx";

        // 创建OSSClient实例。
        com.aliyun.oss.OSS ossClient = new OSSClientBuilder().build(endpoint, accessKeyId, accessKeySecret);

        // 上传文件流。
        InputStream inputStream = new FileInputStream("C:\\Users\\文\\Desktop\\1.jpg");
        ossClient.putObject("gulimall-ljn", "1.jpg", inputStream);

        // 关闭OSSClient。
        ossClient.shutdown();
        System.out.println("上传成功.");
    }
(3)SpringCloud Alibaba
- 导入依赖
        <dependency>
            <groupId>com.alibaba.cloudgroupId>
            <artifactId>spring-cloud-starter-alicloud-ossartifactId>
        dependency>
application.yml中配置key,secret和endpoint相关信息
spring:
  cloud:
    alicloud:
      access-key: xxxx
      secret-key: xxxxx
      oss:
        endpoint: oss-cn-beijing.aliyuncs.com
- 测试
    @Autowired
    OSSClient ossClient;

    @Test
    public void testUpload() throws FileNotFoundException {

        // 上传文件流。
        InputStream inputStream = new FileInputStream("C:\\Users\\文\\Desktop\\1.jpg");
        ossClient.putObject("gulimall-ljn", "2.jpg", inputStream);

        // 关闭OSSClient。
        ossClient.shutdown();
        System.out.println("上传成功.");
    }
4、创建第三方模块(并完成添加上传功能)
(1)创建模块gulimall-third-party
- 导入依赖
引入common
依赖管理 中添加spring-cloud-alibaba-dependencies
 <dependencyManagement>

  <!--        对象存储oss-->
        <dependency>
            <groupId>com.alibaba.cloud</groupId>
            <artifactId>spring-cloud-starter-alicloud-oss</artifactId>
        </dependency>

        <!--        依赖common-->
        <dependency>
            <groupId>com.ljn.gulimall</groupId>
            <artifactId>gulimall-commom</artifactId>
            <version>0.0.1-SNAPSHOT</version>
        </dependency>

        <dependencies>
            <dependency>
                <groupId>com.alibaba.cloud</groupId>
                <artifactId>spring-cloud-alibaba-dependencies</artifactId>
                <version>2.1.0.RELEASE</version>
                <type>pom</type>
                <scope>import</scope>
            </dependency>
        </dependencies>
    </dependencyManagement>
- nacos相关配置
- 创建
gulimall-third-party命名空间 - 添加oss.yml(对象存储配置文件)
spring:
  cloud:
    alicloud:
      access-key: xxxxx
      secret-key: grbcDMCvxz0IR4r30DIrKU3ZGrfoZf
      oss:
        endpoint: oss-cn-beijing.aliyuncs.com
application.yml
server:
  port: 30000

spring:
  application:
    name: gulimall-third-party
  cloud:
    nacos:
      discovery:
        server-addr: 127.0.0.1:8848

logging:
  level:
    com.yxj.gulimall.product: debug
bootstrap.peoperties
spring.cloud.nacos.config.server-addr=127.0.0.1:8848
spring.cloud.nacos.config.namespace=d9ce505a-86f2-41e4-afbe-c4d62785b3ea
#加载nacos中的配置文件
spring.cloud.nacos.config.ext-config[0].data-id=oss.yml
spring.cloud.nacos.config.ext-config[0].group=DEFAULT_GROUP
spring.cloud.nacos.config.ext-config[0].refresh=true
- oss测试
  @Autowired
    OSSClient ossClient;

    @Test
    public void testUpload() throws FileNotFoundException {

        // 上传文件流。
        InputStream inputStream = new FileInputStream("C:\\Users\\文\\Desktop\\1.jpg");
        ossClient.putObject("gulimall-ljn", "4.jpg", inputStream);

        // 关闭OSSClient。
        ossClient.shutdown();
        System.out.println("上传成功.");
    }
(2)改进:服务端签名后直传
采用JavaScript客户端直接签名(参见JavaScript客户端签名直传)时,AccessKeyID和AcessKeySecret会暴露在前端页面,因此存在严重的安全隐患。
因此,OSS提供了服务端签名后直传的方案。
服务端签名后直传的原理如下:

- 编写
com.ljn.gulimall.thirdparty.controller.OssController类:获取服务端签名
@RestController
public class OssController {

    @Autowired
    OSS ossClient;

    @Value("${spring.cloud.alicloud.oss.endpoint}")
    String endpoint;

    @Value("${spring.cloud.alicloud.oss.bucket}")
    String bucket;

    @Value("${spring.cloud.alicloud.access-key}")
    String accessId;

    @Value("${spring.cloud.alicloud.secret-key}")
    String accessKey;

    @RequestMapping("/oss/policy")
    public Map<String, String> policy() {

        // host的格式为 bucketname.endpoint
        String host = "https://" + bucket + "." + endpoint;

        String format = new SimpleDateFormat("yyyy-MM-dd").format(new Date());
        // 用户上传文件时指定的前缀。
        String dir = format;

        Map<String, String> respMap = null;
        try {
            long expireTime = 30;
            long expireEndTime = System.currentTimeMillis() + expireTime * 1000;
            Date expiration = new Date(expireEndTime);
            PolicyConditions policyConds = new PolicyConditions();
            policyConds.addConditionItem(PolicyConditions.COND_CONTENT_LENGTH_RANGE, 0, 1048576000);
            policyConds.addConditionItem(MatchMode.StartWith, PolicyConditions.COND_KEY, dir);

            String postPolicy = ossClient.generatePostPolicy(expiration, policyConds);
            byte[] binaryData = postPolicy.getBytes("utf-8");
            String encodedPolicy = BinaryUtil.toBase64String(binaryData);
            String postSignature = ossClient.calculatePostSignature(postPolicy);

            respMap = new LinkedHashMap<String, String>();
            respMap.put("accessid", accessId);
            respMap.put("policy", encodedPolicy);
            respMap.put("signature", postSignature);
            respMap.put("dir", dir);
            respMap.put("host", host);
            respMap.put("expire", String.valueOf(expireEndTime / 1000));

        } catch (Exception e) {
            // Assert.fail(e.getMessage());
            System.out.println(e.getMessage());
        } finally {
            ossClient.shutdown();
        }
      return R.ok().put("data",respMap);
    }

}
- 测试:http://localhost:30000/oss/policy
- 返回签名数据
{
    "accessid":"xxxxxx",
    "policy":"eyJleHBpcmF0aW9uIjoiMjAyMS0wMi0xNFQxMDoyOToxMS43ODhaIiwiY29uZGl0aW9ucyI6W1siY29udGVudC1sZW5ndGgtcmFuZ2UiLDAsMTA0ODU3NjAwMF0sWyJzdGFydHMtd2l0aCIsIiRrZXkiLCIyMDIxLTAyLTE0Il1dfQ==",
    "signature":"0OXDXrQ1vRNl61N5IaZXRFckCKM=",
    "dir":"2021-02-14",
    "host":"https://gulimall-fermhan.oss-cn-qingdao.aliyuncs.com",
    "expire":"1613298551"}

}
- gate网关中配置路由规则
 # third-party 服务路由
        - id: third_party_route
            uri: lb://gulimall-gateway
            predicates:
              - Path=/api/thirdparty/**
            filters:
              - RewritePath=/api/thirdparty/(?>/?.*),/$\{segment}
以后在上传文件时的访问路径为http://localhost:88/api/thirdparty/oss/policy
(3) oss前端联调测试上传
- 上传组件upload

policy.js
import http from '@/utils/httpRequest.js'
export function policy() {
  return new Promise((resolve, reject) => {
    http({
      url: http.adornUrl("/thirdparty/oss/policy"),
      method: "get",
      params: http.adornParams({})
    }).then(({ data }) => {
      resolve(data);
    })
  });
}
singleUpload.vue
<template>
  <div>
    <el-upload
      action="http://gulimall-ljn.oss-cn-beijing.aliyuncs.com"
      :data="dataObj"
      list-type="picture"
      :multiple="false" :show-file-list="showFileList"
      :file-list="fileList"
      :before-upload="beforeUpload"
      :on-remove="handleRemove"
      :on-success="handleUploadSuccess"
      :on-preview="handlePreview">
      <el-button size="small" type="primary">点击上传el-button>
      <div slot="tip" class="el-upload__tip">只能上传jpg/png文件,且不超过10MBdiv>
    el-upload>

    <el-dialog :visible.sync="dialogVisible">
      <img width="100%" :src="fileList[0].url" alt="">
    el-dialog>

  div>
template>
<script>
   import {policy} from './policy'
   import { getUUID } from '@/utils'

  export default {
    name: 'singleUpload',
    props: {
      value: String
    },
    computed: {
      imageUrl() {
        return this.value;
      },
      imageName() {
        if (this.value != null && this.value !== '') {
          return this.value.substr(this.value.lastIndexOf("/") + 1);
        } else {
          return null;
        }
      },
      fileList() {
        return [{
          name: this.imageName,
          url: this.imageUrl
        }]
      },
      showFileList: {
        get: function () {
          return this.value !== null && this.value !== ''&& this.value!==undefined;
        },
        set: function (newValue) {
        }
      }
    },
    data() {
      return {
        dataObj: {
          policy: '',
          signature: '',
          key: '',
          ossaccessKeyId: '',
          dir: '',
          host: '',
          // callback:'',
        },
        dialogVisible: false
      };
    },
    methods: {
      emitInput(val) {
        this.$emit('input', val)
      },
      handleRemove(file, fileList) {
        this.emitInput('');
      },
      handlePreview(file) {
        console.log("123124214124")
        this.dialogVisible = true;
      },
      beforeUpload(file) {
        let _self = this;
        return new Promise((resolve, reject) => {
          policy().then(response => {
            _self.dataObj.policy = response.data.policy;
            _self.dataObj.signature = response.data.signature;
            _self.dataObj.ossaccessKeyId = response.data.accessid;
            _self.dataObj.key = response.data.dir + '/'+getUUID()+'_${filename}';
            _self.dataObj.dir = response.data.dir;
            _self.dataObj.host = response.data.host;
            resolve(true)
          }).catch(err => {
            reject(false)
          })
        })
      },
      handleUploadSuccess(res, file) {
        console.log("上传成功...")
        this.showFileList = true;
        this.fileList.pop();
        this.fileList.push({name: file.name, url: this.dataObj.host + '/' + this.dataObj.key.replace("${filename}",file.name) });
        this.emitInput(this.fileList[0].url);
      }
    }
  }
script>
<style>

style>
multiUpload.vue
<template>
  <div>
    <el-upload action="http://gulimall-ljn.oss-cn-beijing.aliyuncs.com" :data="dataObj" list-type="picture-card" :file-list="fileList" :before-upload="beforeUpload" :on-remove="handleRemove" :on-success="handleUploadSuccess" :on-preview="handlePreview" :limit="maxCount" :on-exceed="handleExceed">
      <i class="el-icon-plus"></i>
    </el-upload>
    <el-dialog :visible.sync="dialogVisible">
      <img width="100%" :src="dialogImageUrl" alt />
    </el-dialog>
  </div>
</template>
<script>
import { policy } from "./policy";
import { getUUID } from '@/utils'
export default {
  name: "multiUpload",
  props: {
    //图片属性数组
    value: Array,
    //最大上传图片数量
    maxCount: {
      type: Number,
      default: 30
    }
  },
  data() {
    return {
      dataObj: {
        policy: "",
        signature: "",
        key: "",
        ossaccessKeyId: "",
        dir: "",
        host: "",
        uuid: ""
      },
      dialogVisible: false,
      dialogImageUrl: null
    };
  },
  computed: {
    fileList() {
      let fileList = [];
      for (let i = 0; i < this.value.length; i++) {
        fileList.push({ url: this.value[i] });
      }

      return fileList;
    }
  },
  mounted() { },
  methods: {
    emitInput(fileList) {
      let value = [];
      for (let i = 0; i < fileList.length; i++) {
        value.push(fileList[i].url);
      }
      this.$emit("input", value);
    },
    handleRemove(file, fileList) {
      this.emitInput(fileList);
    },
    handlePreview(file) {
      this.dialogVisible = true;
      this.dialogImageUrl = file.url;
    },
    beforeUpload(file) {
      let _self = this;
      return new Promise((resolve, reject) => {
        policy()
          .then(response => {
            console.log("这是什么${filename}");
            _self.dataObj.policy = response.data.policy;
            _self.dataObj.signature = response.data.signature;
            _self.dataObj.ossaccessKeyId = response.data.accessid;
            _self.dataObj.key = response.data.dir + "/" + getUUID() + "_${filename}";
            _self.dataObj.dir = response.data.dir;
            _self.dataObj.host = response.data.host;
            resolve(true);
          })
          .catch(err => {
            console.log("出错了...", err)
            reject(false);
          });
      });
    },
    handleUploadSuccess(res, file) {
      this.fileList.push({
        name: file.name,
        // url: this.dataObj.host + "/" + this.dataObj.dir + "/" + file.name; 替换${filename}为真正的文件名
        url: this.dataObj.host + "/" + this.dataObj.key.replace("${filename}", file.name)
      });
      this.emitInput(this.fileList);
    },
    handleExceed(files, fileList) {
      this.$message({
        message: "最多只能上传" + this.maxCount + "张图片",
        type: "warning",
        duration: 1000
      });
    }
  }
};
</script>
<style>
</style>
- 使用组件:
brand-add-or-update.vue中
 <el-form-item label="品牌logo地址" prop="logo">
      <!-- 使用上传组件 -->
      <single-upload  v-model="dataForm.logo"></single-upload>
</el-form-item>

// 导入上传组件
import singleUpload from '../../../components/upload/singleUpload.vue';
export default {
  components: { singleUpload },
  ...
<template>
  <div>
    <el-upload action="http://gulimall-ljn.oss-cn-beijing.aliyuncs.com" :data="dataObj" list-type="picture-card" :file-list="fileList" :before-upload="beforeUpload" :on-remove="handleRemove" :on-success="handleUploadSuccess" :on-preview="handlePreview" :limit="maxCount" :on-exceed="handleExceed">
      <i class="el-icon-plus"></i>
    </el-upload>
    <el-dialog :visible.sync="dialogVisible">
      <img width="100%" :src="dialogImageUrl" alt />
    </el-dialog>
  </div>
</template>
<script>
import { policy } from "./policy";
import { getUUID } from '@/utils'
export default {
  name: "multiUpload",
  props: {
    //图片属性数组
    value: Array,
    //最大上传图片数量
    maxCount: {
      type: Number,
      default: 30
    }
  },
  data() {
    return {
      dataObj: {
        policy: "",
        signature: "",
        key: "",
        ossaccessKeyId: "",
        dir: "",
        host: "",
        uuid: ""
      },
      dialogVisible: false,
      dialogImageUrl: null
    };
  },
  computed: {
    fileList() {
      let fileList = [];
      for (let i = 0; i < this.value.length; i++) {
        fileList.push({ url: this.value[i] });
      }

      return fileList;
    }
  },
  mounted() { },
  methods: {
    emitInput(fileList) {
      let value = [];
      for (let i = 0; i < fileList.length; i++) {
        value.push(fileList[i].url);
      }
      this.$emit("input", value);
    },
    handleRemove(file, fileList) {
      this.emitInput(fileList);
    },
    handlePreview(file) {
      this.dialogVisible = true;
      this.dialogImageUrl = file.url;
    },
    beforeUpload(file) {
      let _self = this;
      return new Promise((resolve, reject) => {
        policy()
          .then(response => {
            console.log("这是什么${filename}");
            _self.dataObj.policy = response.data.policy;
            _self.dataObj.signature = response.data.signature;
            _self.dataObj.ossaccessKeyId = response.data.accessid;
            _self.dataObj.key = response.data.dir + "/" + getUUID() + "_${filename}";
            _self.dataObj.dir = response.data.dir;
            _self.dataObj.host = response.data.host;
            resolve(true);
          })
          .catch(err => {
            console.log("出错了...", err)
            reject(false);
          });
      });
    },
    handleUploadSuccess(res, file) {
      this.fileList.push({
        name: file.name,
        // url: this.dataObj.host + "/" + this.dataObj.dir + "/" + file.name; 替换${filename}为真正的文件名
        url: this.dataObj.host + "/" + this.dataObj.key.replace("${filename}", file.name)
      });
      this.emitInput(this.fileList);
    },
    handleExceed(files, fileList) {
      this.$message({
        message: "最多只能上传" + this.maxCount + "张图片",
        type: "warning",
        duration: 1000
      });
    }
  }
};
</script>
<style>
</style>
- 开始上传时的跨域问题:在oss中基础设置中设置即可

- 测试

5、表单校验&自定义校验器(前端校验)
- 修改
brand.vue,自定义显示logo
 <el-table-column prop="logo" header-align="center" align="center" label="品牌logo地址">
        <template slot-scope="scope">
          <img :src="scope.row.logo" style="width:100px ; height:80pxx" />
        </template>
      </el-table-column>
- 在
brand-add-or-update.vue中自定义检验规则
 // v-model.number
 <el-form-item label="排序" prop="sort">
        <el-input v-model.number="dataForm.sort" placeholder="排序"></el-input>
     	 </el-form-item>
</el-form>

 firstLetter: [
          {
            validator: (rule, value, callback) => {
              if (value == "" && value != 0) {
                callback(new Error("首字母必须填写"));
              } else if (!/^[a-zA-Z]$/.test(value)) {
                callback(new Error("首字母必须a-z或者A-Z之间"));
              } else {
                callback();
              }
            },
            trigger: "blur",
          },
        ],
        sort: [{
          validator: (rule, value, callback) => {
            if (value == "") {
              callback(new Error("排序字段必须填写"));
            } else if (!Number.isInteger(parseInt(value)) || parseInt(value) < 0) {
              callback(new Error("排序字段必须是一个大于等于0的整数"));
            } else {
              callback();
            }
          }, trigger: "blur"
        }]
6、JSR303数据校验(后端校验)
(1)JSR303数据校验
product服务的BrandEntity中添加校验,注解并定义自己的message提示
- 参考
import javax.validation.constraints包下,如:
	@NotBlank(message = "品牌名不能为空")
	private String name;

	@NotEmpty
    @URL(message = "logo地址必须合法")
    private String logo;

    @Pattern(regexp = "/^[a-zA-Z]$/", message = "检索首字母必须是一个字母")
    private String firstLetter;

    @Min(value = 0,message = "排序必须大于等于0")
    private Integer sort;
- controller 的方法中添加
@Valid注解开启校验
- 新版本springboot需要添加
validation启动器
 <dependency>
     <groupId>org.springframework.boot</groupId>
     <artifactId>spring-boot-starter-validation</artifactId>
     <version>2.3.7.RELEASE</version>
</dependency>
如:
 @RequestMapping("/save")
    public R save(@Valid @RequestBody BrandEntity brand){
		brandService.save(brand);

        return R.ok();
    }
- 自定义封装
给校验的Bean后,紧跟一个BindResult,就可以获取到校验的结果。拿到校验的结果,就可以自定义的封装。
   @RequestMapping("/save")
    public R save(@Valid @RequestBody BrandEntity brand, BindingResult result) {
        if (result.hasErrors()) {
            Map<String, String> map = new HashMap<>();
            //1.获取错误的校验结果
            result.getFieldErrors().forEach((item) -> {
                //获取发生错误时的message
                String message = item.getDefaultMessage();
                //获取发生错误的字段
                String field = item.getField();
                map.put(field, message);
            });
            return R.error(400, "提交的数据不合法").put("data", map);
        } else {

            brandService.save(brand);
        }

        return R.ok();
    }
这种是针对于该请求设置了一个内容校验,如果针对于每个请求都单独进行配置,显然不是太合适,实际上可以统一的对于异常进行处理。
(2)统一异常处理
- 统一异常处理
@ControllerAdvice
-
可以使用SpringMvc所提供的
@ControllerAdvice,通过basePackages能够说明处理哪些路径下的异常。 -
抽取一个异常处理类:
com.ljn.gulimall.product.exception.GuliMallExceptionControllerAdvice
@Slf4j
@RestControllerAdvice(basePackages = "com.ljn.gulimall.product.controller")
public class GuliMallExceptionControllerAdvice {
	// 数据校验异常
    @ExceptionHandler(value = Exception.class)
    public R handleValidException(MethodArgumentNotValidException exception) {

        Map<String, String> map = new HashMap<>();
        // 1. 获取数据校验的错误结果
        BindingResult bindingResult = exception.getBindingResult();
        // 2. 遍历获取结果
        bindingResult.getFieldErrors().forEach(fieldError -> {
            String message = fieldError.getDefaultMessage();
            String field = fieldError.getField();
            map.put(field, message);
        });

        log.error("数据校验出现问题{},异常类型{}", exception.getMessage(), exception.getClass());

        return R.error(400, "数据校验出现问题").put("data", map);
    }
  //     默认异常
    @ExceptionHandler(value = Throwable.class)
    public R handleException(Throwable throwable) {
        log.error("未知异常{},异常类型{}", throwable.getMessage(), throwable.getClass());
        return R.error(400, "数据校验出现问题");
    }
}
- 错误状态码设置
- 为了定义这些错误状态码,我们可以单独定义一个常量类,用来存储这些错误状态码
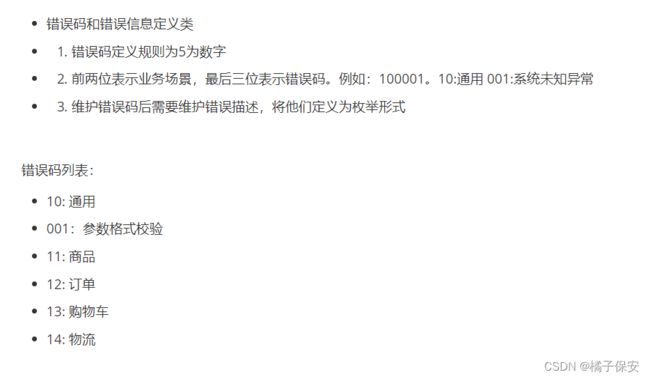
public enum BizCodeEnume {

    UNKNOW_EXEPTION(10000, "系统未知异常"),

    VALID_EXCEPTION(10001, "参数格式校验失败");

    private int code;
    private String msg;


    BizCodeEnume(int code, String msg) {
        this.code = code;
        this.msg = msg;
    }

    public int getCode() {
        return code;
    }

    public String getMsg() {
        return msg;
    }
}
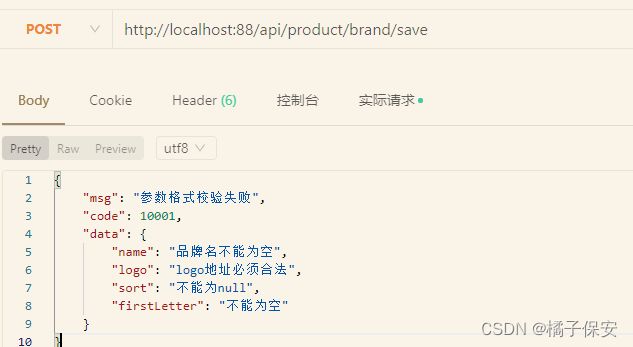
测试:
(3)JSR303 分组检验
@Validated注解指定分组- 标注上
groups,指定什么情况下才需要进行校验 - 默认情况下,在分组校验情况下,没有指定指定分组的校验注解,将不会生效,它只会在不分组的情况下生效。
如:指定在更新和添加的时候,都需要进行校验。新增时不需要带id,修改时必须带id
@NotNull(message = "修改必须定制品牌id", groups = {UpdateGroup.class})
@Null(message = "新增不能指定id", groups = {AddGroup.class})
@TableId
private Long brandId;

@RequestMapping("/save")
public R save(@Validated(AddGroup.class) @RequestBody BrandEntity brand) {
    brandService.save(brand);

    return R.ok();
}
(4)JSR303 自定义校验注解
- 编写自定义检验注解
@Documented
@Constraint(validatedBy = {})
@Target({ElementType.METHOD, ElementType.FIELD, ElementType.ANNOTATION_TYPE, ElementType.CONSTRUCTOR, ElementType.PARAMETER, ElementType.TYPE_USE})
@Retention(RetentionPolicy.RUNTIME)
public @interface ListValue {

    // 使用该属性去Validation.properties中取
    String message() default "{com.ljn.common.valid.ListValue.message}";

    Class<?>[] groups() default {};

    Class<? extends Payload>[] payload() default {};

    int[] value() default {};
}
common创建文件ValidationMessages.properties配置文件
com.ljn.common.valid.ListValue.message=必须提交指定的值
- 编写自定义校验器
ConstraintValidator
public class ListValueConstraintValidator implements ConstraintValidator<ListValue, Integer> {

    private Set<Integer> set = new HashSet<>();

    // 初始化
    @Override
    public void initialize(ListValue constraintAnnotation) {

        int[] value = constraintAnnotation.value();
        for (int i : value) {
            set.add(i);
        }
    }

    // 判断是否校验成功
    @Override
    public boolean isValid(Integer value, ConstraintValidatorContext constraintValidatorContext) {
        return set.contains(value);
    }
}
- 关联校验器和检验注解
@Constraint(validatedBy = { ListValueConstraintValidator.class})
一个校验注解可以匹配多个校验器
7、品牌分类关联与级联更新
(1)引入mybatis分页插件
mp自带的分页是内存分页,性能低,所以需要手动写分页配置,使用物理分页
在prduct 服务下,新建config文件夹,MyBatisConfig类
@Configuration
@EnableTransactionManagement
@MapperScan("com.ljn.gulimall.product.dao")
public class MyBatisConfig {

    // 引入分页插件
    @Bean
    public PaginationInterceptor paginationInterceptor() {

        PaginationInterceptor paginationInterceptor = new PaginationInterceptor();
        //设置请求的页面大于最大页后操作,true调回到首页,false继续请求
        paginationInterceptor.setOverflow(true);
        // 设置最大单页限制
        paginationInterceptor.setLimit(1000);
        return paginationInterceptor;

    }
}
(2)品牌模糊查询
修改com.ljn.gulimall.product.service.impl.BrandServiceImpl
   @Override
    public PageUtils queryPage(Map<String, Object> params) {
        // 1、获取key
        String key = (String) params.get("key");
        QueryWrapper<BrandEntity> queryWrapper = new QueryWrapper<>();

        if (!StringUtils.isEmpty(key)) {
            queryWrapper.eq("brand_id", key).or().like("name", key);
        }

        IPage<BrandEntity> page = this.page(
                new Query<BrandEntity>().getPage(params),
                queryWrapper
        );

        return new PageUtils(page);
    }
(3)关联分类
- 新增的华为、小米、oppo都应该是手机下的品牌,但是
品牌对分类可能是一对多的,比如小米对应手机和电视 多对多的关系应该有relation表 ,如pms_category_brand_relation品牌关联分类表
- 获取品牌关联分类,修改
com.ljn.gulimall.product.controller.CategoryBrandRelationController
	/**
     * 获取当前品牌关联的所有分类列表
     */
    @GetMapping("/catelog/list")
    public R catelogList(@RequestParam("brandId") Long brandId) {
        List<CategoryBrandRelationEntity> data = categoryBrandRelationService.list(
                new QueryWrapper<CategoryBrandRelationEntity>()
                        .eq("brandId", brandId)
        );


        return R.ok().put("data", data);
    }
- 新增品牌与分类关联
分类名本可以在brand表中,但因为关联查询对数据库性能有影响,在电商中大表数据从不做关联,哪怕分步查也不用关联.
所以像name这种冗余字段可以保存,优化save,保存时用关联表存好,但select时不用关联
   /**
     * 保存
     */
    @RequestMapping("/save")
    public R save(@RequestBody CategoryBrandRelationEntity categoryBrandRelation) {
        // 自定义sava
        categoryBrandRelationService.saveDetail(categoryBrandRelation);

        return R.ok();
    }
com.ljn.gulimall.product.service.impl.CategoryBrandRelationServiceImpl
	 @Autowired
    BrandDao brandDao;

    @Autowired
    CategoryDao categoryDao;

 // 保存详细信息
    @Override
    public void saveDetail(CategoryBrandRelationEntity categoryBrandRelation) {
        // 1.获取id
        Long brandId = categoryBrandRelation.getBrandId();
        Long catelogId = categoryBrandRelation.getCatelogId();
        // 2.根据id获取详情
        BrandEntity brandEntity = brandDao.selectById(brandId);
        CategoryEntity categoryEntity = categoryDao.selectById(catelogId);
        // 3.将名字设置到关联关系
        categoryBrandRelation.setBrandName(brandEntity.getName());
        categoryBrandRelation.setCatelogName(categoryEntity.getName());
        // 4.保存完整信息
        this.save(categoryBrandRelation);
    }
- 优化:保持冗余字段的数据一致
如果分类表里的name发送变化,那么品牌表里的分类name字段应该同步变化。
所以应该修改brandController,使之update时检测分类表里的name进行同步
    /**
     * 修改
     */
    @RequestMapping("/update")
    public R update(@Validated(UpdateGruop.class) @RequestBody BrandEntity brand) {
        // 修改为更新细节
        brandService.updateDetail(brand);

        return R.ok();
    }
BrandServiceImpl
 	@Autowired
    CategoryBrandRelationService categoryBrandRelationService;

    @Override
    public void updateDetail(BrandEntity brand) {
        // 保证冗余字段的数据一致
        // 1. 更新自己表中的数据
        this.updateById(brand);
        // 2.同步更新其他关联表中的数据
        if(!StringUtils.isEmpty(brand.getName())){
            categoryBrandRelationService.updateBrand(brand.getBrandId(),brand.getName());

            //TODO 更新其他关联
        }
    }
CategoryBrandRelationServiceImpl
   @Override
    public void updateBrand(Long brandId, String name) {
        CategoryBrandRelationEntity relationEntity = new CategoryBrandRelationEntity();
        relationEntity.setBrandId(brandId);
        relationEntity.setBrandName(name);
        this.update(relationEntity, new QueryWrapper<CategoryBrandRelationEntity>().eq("brand_id", brandId));
    }
- 同步分类(用第二种方式)
CategoryBrandRelationServiceImpl
   @Override
    public void updateCategory(Long catId, String name) {
    	// 这里使用baseMapper
        this.baseMapper.updateCategory(catId, name);
    }
CategoryBrandRelationDao
@Mapper
public interface CategoryBrandRelationDao extends BaseMapper<CategoryBrandRelationEntity> {

   void updateCategory(@Param("catId") Long catId, @Param("name") String name);
}
CategoryBrandRelationDao.xml
   <update id="updateCategory">
        update  pms_category_brand_relation set catelog_name=#{name} where catelog_id=#{catId}
    update>