Linkerd2初探
Linkerd2初探
-
- 部署环境
- Linkerd简介
- 安装Linkerd客户端
- 在k8s上安装Linkerd控制平面(服务端)
- 实验:数据平面代理注入demo应用
- 安装viz插件(可视化面板)
-
- 部署grafana
- 其他
部署环境
k8s环境:
KIND 模拟kubernetes 1.21.1
kubectl 1.21.1
操作系统:
Ubuntu 18.04.1
Linkerd:
2.12.0
以下步骤是按照官方的Geting Started文档来完成的。本文侧重怎样将linkerd部署、运行起来,并简单介绍了Linkerd在一个模拟应用中的使用,以及Linkerd可视化面板。
Linkerd简介
Linkerd是一种服务网格(sevice mesh)的实现。官方主页上介绍它是一种超轻量化,超便捷,超强的服务网格,它是CNCF孵化的开源项目,对于kubernetes来说是安全可靠,无需修改应用代码,为应用程序添加可观察性(observability)、安全性(security)和可靠性(reliability)功能。
Linkerd 是 Kubernetes 的一个完全开源的服务网格实现。它通过为你提供运行时调试、可观测性、可靠性和安全性,使运行服务更轻松、更安全,所有这些都不需要对你的代码进行任何更改。
Linkerd 通过在每个服务实例旁边安装一组超轻、透明的代理(sidecar)来工作。这些代理会自动处理进出服务的所有流量。由于它们是透明的,这些代理充当高度仪表化的进程外网络堆栈,向控制平面发送遥测数据并从控制平面接收控制信号。

安装Linkerd客户端
直接从官网下载安装
curl --proto '=https' --tlsv1.2 -sSfL https://run.linkerd.io/install | sh
或者从github下载可执行文件
将安装包放到 /usr/local/bin下
chmod +x linkerd2-cli-stable-2.12.0-rc2-linux-arm64
cp linkerd2-cli-stable-2.12.0-rc2-linux-arm64 /usr/local/bin/linkerd
检查系统:
linkerd check --pre

在k8s上安装Linkerd控制平面(服务端)
linkerd install | kubectl apply -f -
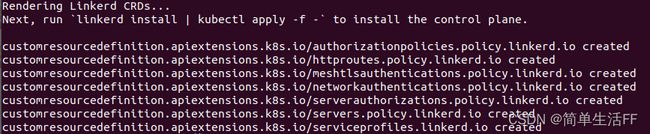
但是实际安装时提示先要安装 CRDs
Linkerd CRDs must be installed first. Run linkerd install with the --crds flag.
linkerd install --crds | kubectl apply -f -
完成上面后,开始部署控制平面
linkerd install --ignore-cluster > linkerd-install.yaml
sudo kubectl apply -f linkerd-install.yaml
或者直接
linkerd install | sudo kubectl apply -f -
安装过程会在k8s集群上完成一系列设置和部署,以下为安装过程的输出
namespace/linkerd created
clusterrole.rbac.authorization.k8s.io/linkerd-linkerd-identity created
clusterrolebinding.rbac.authorization.k8s.io/linkerd-linkerd-identity created
serviceaccount/linkerd-identity created
clusterrole.rbac.authorization.k8s.io/linkerd-linkerd-destination created
clusterrolebinding.rbac.authorization.k8s.io/linkerd-linkerd-destination created
serviceaccount/linkerd-destination created
secret/linkerd-sp-validator-k8s-tls created
validatingwebhookconfiguration.admissionregistration.k8s.io/linkerd-sp-validator-webhook-config created
secret/linkerd-policy-validator-k8s-tls created
validatingwebhookconfiguration.admissionregistration.k8s.io/linkerd-policy-validator-webhook-config created
clusterrole.rbac.authorization.k8s.io/linkerd-policy created
clusterrolebinding.rbac.authorization.k8s.io/linkerd-destination-policy created
role.rbac.authorization.k8s.io/linkerd-heartbeat created
rolebinding.rbac.authorization.k8s.io/linkerd-heartbeat created
clusterrole.rbac.authorization.k8s.io/linkerd-heartbeat created
clusterrolebinding.rbac.authorization.k8s.io/linkerd-heartbeat created
serviceaccount/linkerd-heartbeat created
clusterrole.rbac.authorization.k8s.io/linkerd-linkerd-proxy-injector created
clusterrolebinding.rbac.authorization.k8s.io/linkerd-linkerd-proxy-injector created
serviceaccount/linkerd-proxy-injector created
secret/linkerd-proxy-injector-k8s-tls created
mutatingwebhookconfiguration.admissionregistration.k8s.io/linkerd-proxy-injector-webhook-config created
configmap/linkerd-config created
secret/linkerd-identity-issuer created
configmap/linkerd-identity-trust-roots created
service/linkerd-identity created
service/linkerd-identity-headless created
deployment.apps/linkerd-identity created
service/linkerd-dst created
service/linkerd-dst-headless created
service/linkerd-sp-validator created
service/linkerd-policy created
service/linkerd-policy-validator created
deployment.apps/linkerd-destination created
cronjob.batch/linkerd-heartbeat created
deployment.apps/linkerd-proxy-injector created
service/linkerd-proxy-injector created
secret/linkerd-config-overrides created
等待直到Pod启动成功(第一次需要下载镜像,时间跟网络环境有关)
![]()
检查Linkerd是否部署成功
linkerd check
部署成功会返回以下内容
Linkerd core checks
===================

kubernetes-api
--------------
√ can initialize the client
√ can query the Kubernetes API

kubernetes-version
------------------
√ is running the minimum Kubernetes API version
√ is running the minimum kubectl version

linkerd-existence
-----------------
√ 'linkerd-config' config map exists
√ heartbeat ServiceAccount exist
√ control plane replica sets are ready
√ no unschedulable pods
√ control plane pods are ready
√ cluster networks contains all node podCIDRs
√ cluster networks contains all pods

linkerd-config
--------------
√ control plane Namespace exists
√ control plane ClusterRoles exist
√ control plane ClusterRoleBindings exist
√ control plane ServiceAccounts exist
√ control plane CustomResourceDefinitions exist
√ control plane MutatingWebhookConfigurations exist
√ control plane ValidatingWebhookConfigurations exist
√ proxy-init container runs as root user if docker container runtime is used

linkerd-identity
----------------
√ certificate config is valid
√ trust anchors are using supported crypto algorithm
√ trust anchors are within their validity period
√ trust anchors are valid for at least 60 days
√ issuer cert is using supported crypto algorithm
√ issuer cert is within its validity period
√ issuer cert is valid for at least 60 days
√ issuer cert is issued by the trust anchor

linkerd-webhooks-and-apisvc-tls
-------------------------------
√ proxy-injector webhook has valid cert
√ proxy-injector cert is valid for at least 60 days
√ sp-validator webhook has valid cert
√ sp-validator cert is valid for at least 60 days
√ policy-validator webhook has valid cert
√ policy-validator cert is valid for at least 60 days

linkerd-version
---------------
√ can determine the latest version
√ cli is up-to-date

control-plane-version
---------------------
√ can retrieve the control plane version
√ control plane is up-to-date
√ control plane and cli versions match

linkerd-control-plane-proxy
---------------------------
√ control plane proxies are healthy
√ control plane proxies are up-to-date
√ control plane proxies and cli versions match

Status check results are √
实验:数据平面代理注入demo应用
使用官方的Emojivoto应用来体验Linkerd,这个应用由三个服务(web、emoji、voting)组成,另外vote-bot模拟发起投票。开发者在这个应用中设置了异常,当给某个表情投票时会返回404页面。这是开发者故意设置的,用来在linkerd面板(linkerd viz)中观察这个失败的情况。

新建应用emoji用于实验
# http://run.linkerd.io/emojivoto.yml
kubectl apply -f emojivoto.yml
或者
curl --proto '=https' --tlsv1.2 -sSfL https://run.linkerd.io/emojivoto.yml  | kubectl apply -f -
暴露对外访问的端口
kubectl -n emojivoto port-forward svc/web-svc 8080:80
(注意:此时emoji应用每个pod的container数量都是1)

应用启动正常

将上面示例应用加入到service mesh中,向其添加Linkerd的数据平面代理(data plane proxies)
直接运行下面的命令
kubectl get -n emojivoto deploy -o yaml | linkerd inject - | kubectl apply -f -
# 也可以使用如下脚本注入
kubectl annotate ns emojivoto linkerd.io/inject=enabled
kubectl rollout restart deploy -n emojivoto

上面的命令检索在 emojivoto 命名空间中运行的所有deployments,通过 linkerd inject 运行清单,然后将其重新应用到集群。
linkerd inject 命令向 pod spec 添加注解(annotations),指示 Linkerd 将代理(proxy)作为容器添加(“注入”)到 pod spec 中。
然后通过管道传输到 kubectl apply,Kubernetes 将执行滚动部署(rolling deploy)并使用数据平面的代理更新每个 pod,所有这些都没有任何停机时间。
添加数据平面代理后,每个pod中容器数量从1个变成2个,比之前多了一个Linkerd的sidecar代理容器。

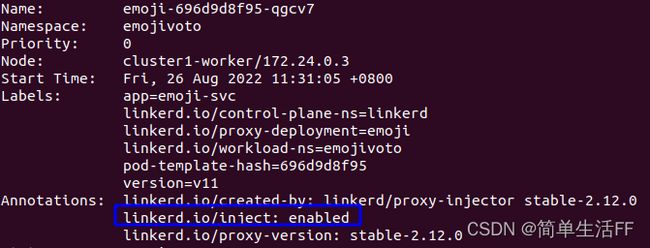
查看某个Pod其中的sidecar容器如下:

Pod增加了注解:linkerd.io/inject: enabled
This annotation triggers automatic proxy injection when the resources are created or updated.
NOTE: Adding the annotation to existing pods does not automatically mesh them. For existing pods, after adding the annotation you will also need to recreate or update the resource (e.g. by using kubectl rollout restart to perform a rolling update)to trigger proxy injection.
查看数据平面状态:
linkerd -n emojivoto check --proxy

安装viz插件(可视化面板)
安装viz插件,Linkerd-Viz插件包含Linkerd的可观察性和可视化组件,可以看到服务调用成功率, 每秒请求数等信息,还能在deployment页面中看到从源到目的的调用路径及情况。安装命令如下
linkerd viz install | kubectl apply -f -
直接把pod的端口暴露
kubectl -n linkerd-viz port-forward web-7cccdbd9b6-vmrbp 8084:8084

因为emoji应用中设置了调用投票服务会有失败的概率,所以可以看到有应用的SR(success rate)不到100%。
部署grafana
参考:hook-grafana-with-linkerd-viz-dashboard
如果linkerd viz已经部署,先停止
sudo linkerd viz uninstall | sudo kubectl delete -f -
使用helm部署grafana
helm repo add grafana https://grafana.github.io/helm-charts
helm install grafana -n grafana --create-namespace grafana/grafana \
  -f https://raw.githubusercontent.com/linkerd/linkerd2/main/grafana/values.yaml  -f
为grafana增加AuthorizationPolicy
sudo kubectl apply -f authzpolicy-grafana.yaml
# authzpolicy-grafana.yaml
apiVersion: policy.linkerd.io/v1alpha1
kind: AuthorizationPolicy
metadata:
  namespace: linkerd-viz
  name: grafana
spec:
  targetRef:
    group: policy.linkerd.io
    kind: Server
    name: prometheus-admin
  requiredAuthenticationRefs:
    - kind: ServiceAccount
      name: grafana
      namespace: grafana
开启viz,部署时指定了grafana的端口(默认配置情况)
linkerd viz install --set grafana.url=grafana.grafana:3000 | kubectl apply -f -
可以从最右边的grafana图标打开grafana面板


其他
# viz卸载
linkerd viz uninstall
# 反注入
kubectl get deploy -o yaml -n emojivoto | linkerd uninject - |  kubectl apply -f -
# 卸载linkerd
sudo linkerd  uninstall | sudo kubectl delete -f -