CentOS下搭建Nginx服务器
目录
- 一、CentOS系统及Nginx服务器的介绍
-
- 1、CentOS系统
- 2、Nginx服务器
- 二、Xshell与Xftp
-
- 1、Xshell与Xftp的作用
- 2、获取Xshell与Xftp
- 3、Xshell的安装与使用
- 4、Xftp的安装与使用
- 三、安装Nginx的依赖库
-
- 1、准备工作
- 2、安装openssl
- 3、安装zlib
- 4、安装pcre
- 四、安装Nginx
-
- 1、安装命令
- 2、启动Nginx
- 3、查看nginx进程号及运行情况
- 4、可能出现的报错
- 五、测试Nginx配置的默认web服务器是否能正常运行
- 六、设置开机自启动
-
- 1、命令方式
- 2、脚本方式
- 七、创建个人网站
-
- 1、简单配置Nginx(修改nginx.conf)
- 2、开启外网访问
- 八、参考
一、CentOS系统及Nginx服务器的介绍
1、CentOS系统
CentOS(Community Enterprise Operating System,中文意思是社区企业操作系统)是Linux发行版之一,它是来自于Red Hat Enterprise Linux依照开放源代码规定释出的源代码所编译而成。由于出自同样的源代码,因此有些要求高度稳定性的服务器以CentOS替代商业版的Red Hat Enterprise Linux使用。两者的不同,在于CentOS完全开源。
CentOS 是一个基于Red Hat Linux 提供的可自由使用源代码的企业级Linux发行版本。每个版本的 CentOS都会获得十年的支持(通过安全更新方式)。新版本的 CentOS 大约每两年发行一次,而每个版本的 CentOS 会定期(大概每六个月)更新一次,以便支持新的硬件。这样,建立一个安全、低维护、稳定、高预测性、高重复性的 Linux 环境。
2、Nginx服务器
Nginx是一款轻量级的Web 服务器/反向代理服务器及电子邮件(IMAP/POP3)代理服务器,在BSD-like 协议下发行。其特点是占有内存少,并发能力强,事实上nginx的并发能力在同类型的网页服务器中表现较好,中国大陆使用nginx网站用户有:百度、京东、新浪、网易、腾讯、淘宝等。
二、Xshell与Xftp
1、Xshell与Xftp的作用
1.1、Xshell是一个强大的安全终端模拟软件,它支持SSH1, SSH2, 以及Microsoft Windows 平台的TELNET 协议。Xshell 通过互联网到远程主机的安全连接以及它创新性的设计和特色帮助用户在复杂的网络环境中享受他们的工作。Xshell可以在Windows界面下用来访问远端不同系统下的服务器,从而比较好的达到远程控制终端的目的。除此之外,其还有丰富的外观配色方案以及样式选择。
1.2、Xftp是一个功能强大的SFTP、FTP 文件传输软件。使用了 Xftp 以后,MS Windows 用户能安全地在 UNIX/Linux 和 Windows PC 之间传输文件。Xftp 能同时适应初级用户和高级用户的需要。它采用了标准的 Windows 风格的向导,它简单的界面能与其他 Windows 应用程序紧密地协同工作,此外它还为高级用户提供了众多强劲的功能特性。。
2、获取Xshell与Xftp
Xshell与Xftp的下载地址:https://www.netsarang.com/zh/xshell/
或在此下载,Xshell-6.0.0204p与Xftp-6.0.0199p链接(提取码:yxdv ):https://pan.baidu.com/s/1gPxk0m3nHmqX9cP3MLeQbQ
如果是个人学习研究的话可以点击右边的【家庭和学校用户的免费许可证】下的【免费授权页面】后填写姓名及邮箱就可以获取免费版的Xshell与Xftp。

3、Xshell的安装与使用
3.1、Xshell的安装
双击后按提示一直点击下一步即可。
3.2、Xshell的登录
打开Xshell软件,点击左上角的【文件】→【新建】,填入【名称】、【主机IP】后点击连接即可连接到远程计算机。

4、Xftp的安装与使用
4.1、Xftp的安装
双击后按提示一直点击下一步即可。
4.2、Xftp的登录
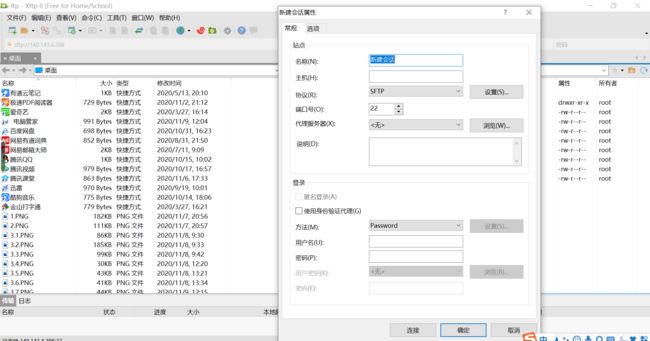
打开Xftp软件,点击左上角的【文件】→【新建】,填入【名称】、【主机IP】、【用户名】、【密码】后点击连接即可连接到远程计算机,实现实现本地计算机与远程计算机的文件传输。

三、安装Nginx的依赖库
1、准备工作
1.1、获取Nginx依赖的三个包
Nginx的安装依赖于以下三个包,意思就是在安装Nginx之前首先必须安装一下的三个包,安装顺序为以下顺序:openssl库、zlib库、pcre库。
①SSL功能需要openssl库,下载地址:https://www.openssl.org/
②gzip模块需要zlib库,下载地址:http://www.zlib.net/
③rewrite模块需要pcre库,下载地址:http://www.pcre.org/
1.2、获取Nginx包,下载地址: http://nginx.org/en/download.html
1.3、使用Xshell软件,在登录远程计算机后安装gcc编译环境,不然在安装包时会出错,命令:yum -y install gcc gcc-c++
1.4、使用Xftp软件把下载好的四个压缩包传输至远程计算机中。
注:记住压缩包在远程计算机中的路径。我的文件是存放在/usr/local下。
注:我的四个安装包分别为openssl-1.1.1h.tar.gz、zlib-1.2.11.tar.gz、pcre-8.00.tar.gz、nginx-1.19.4.tar.gz。
也可以在安装前查看是否已存在,命令:
rpm -q openssl
rpm -q zlib
rpm -q pcre
rpm -q nginx
2、安装openssl
2.1、安装命令
①cd /usr/local //打开文件夹
②tar -zxvf openssl-1.1.1h.tar.gz //解压
③cd openssl-1.1.1h //打开目录
④./config //执行配置文件
⑤make //编译所有
⑥make install //安装
2.2、可能出现的报错

解决办法:更新或安装perl。
(1)查看是否已安装perl,命令:rpm -q perl
(2)查询perl的真实安装路径,命令:whereis perl
(3)下载新版本perl,下载地址:http://www.cpan.org/src
(4)安装,命令:
①
cd 安装包路径
②tar -zxvf 安装包名称
③cd 安装目录路径
④./Configure -des -Dprefix=/usr
⑤make
⑥make install
(5)查询perl是否安装成功,命令:perl -version
3、安装zlib
安装命令:
①cd /usr/local
②tar -zxvf zlib-1.2.11.tar.gz
③cd zlib-1.2.11
④./configure
⑤make
⑥make install
4、安装pcre
安装命令:
①cd /usr/local
②tar -zxvf pcre-8.00.tar.gz
③cd pcre-8.00
④./configure
⑤make
⑥make install
四、安装Nginx
1、安装命令
①cd /usr/local
②tar -zxvf nginx-1.19.4.tar.gz
③cd nginx-1.19.4
④useradd nginx //添加新的用户账号
⑤//配置nginx
./configure --user=nginx --group=nginx --prefix=/usr/local/nginx/ --with-http_stub_status_module --with-http_ssl_module
说明:
// --user=nginx --group=nginx:设置nginx允许的用户和组为nginx
//–prefix=/usr/local/nginx/:设置nginx安装路径
// --with-http_stub_status_module:安装允许状态模块
// --with-http_ssl_module:安装ssl模块
//更多参数请参看 ./configure --help
注:此时nginx的安装路径已改变,可通过whereis nginx命令查看nginx的安装路径。
⑥make && make install
⑦检查是否安装成功,命令:cd /usr/local/nginx/sbin、./nginx -t
显示如下,安装成功
nginx: the configuration file /usr/local/nginx/conf/nginx.conf syntax is ok
nginx: configuration file /usr/local/nginx/conf/nginx.conf test is successful
⑧ln -s /usr/local/nginx/sbin/nginx /usr/sbin/ //创建软链接,功能是为某一个文件在另外一个位置建立一个同不的链接;用法是:ln –s 源文件 目标文件。
⑨安装完成后查看Nginx的相关环境配置信息是否正确 ,命令:/usr/local/nginx/sbin/nginx –V
2、启动Nginx
启动Nginx,命令:/usr/local/nginx/sbin/nginx -c /usr/local/nginx/conf/nginx.conf 或 cd /usr/local/nginx/sbin、./nginx
停止Nginx,命令:
pkill -9 nginx
3、查看nginx进程号及运行情况
查看nginx进程号及运行情况,命令:ps -ef | grep nginx
测试端口,命令:
netstat -na | grep 80
4、可能出现的报错
4.1、报错如下图所示

这是因为没有安装nginx用户导致的无法启动,解决办法:
命令:
①useradd -s /sbin/nologin -M nginx
②id nginx
③/usr/local/nginx/sbin/nginx
④netstat -tlunp | grep nginx//查看nginx进程监听端口
4.2、报错如下图所示

解决办法,参考:https://www.cnblogs.com/Primzahl/p/9261760.html
4.3、报错如下图所示

原因是文件/usr/local/nginx下没有权限,解决办法:
命令:
①su//配置权限需要切换到root用户下
②chnod -R 777 usr/local/nginx/
五、测试Nginx配置的默认web服务器是否能正常运行
1、通过linux自带命令links 进行测试,命令:links 127.0.0.1
注:出现 welcome to nginx!说明nginx服务启动成功
2、通过浏览器测试,在浏览器输入:自己的IP,出现下图则说明安装成功。

六、设置开机自启动
如果你的是云计算机则无需设置此步。
1、命令方式
将nginx启动命令添加到/etc/rc.local ,命令:
1)echo "/usr/local/nginx/sbin/nginx -c /usr/local/nginx/conf/nginx.conf" >> /etc/rc.local
2)cat /etc/rc.local | grep nginx
3)/usr/local/nginx/sbin/nginx -c /usr/local/nginx/conf/nginx.conf
2、脚本方式
通过设置System V 脚本,使用server命令启动nginx服务。
①在/etc/init.d/下创建nginx启动脚本文件,命令:cd /etc/init.d/、vim nginx //打开目录后,在目录下用vim命令创建nginx文件,并把脚本代码复制进去后保存退出。脚本代码如下:
#!/bin/sh
#
# nginx - this script starts and stops the nginx daemon
#
# chkconfig: - 85 15
# description: Nginx is an HTTP(S) server, HTTP(S) reverse \
#   proxy and IMAP/POP3 proxy server
# processname: nginx
# config: /etc/nginx/nginx.conf
# config: /etc/sysconfig/nginx
# pidfile: /var/run/nginx.pid
# Source function library.
. /etc/rc.d/init.d/functions
# Source networking configuration.
. /etc/sysconfig/network
# Check that networking is up.
[ "$NETWORKING" = "no" ] && exit 0
    nginx="/usr/local/nginx/sbin/nginx"
    prog=$(basename $nginx)
    NGINX_CONF_FILE="/usr/local/nginx/conf/nginx.conf"
[ -f /etc/sysconfig/nginx ] && . /etc/sysconfig/nginx
    lockfile=/var/lock/subsys/nginx

start() {
    [ -x $nginx ] || exit 5
    [ -f $NGINX_CONF_FILE ] || exit 6
    echo -n $"Starting $prog: "
    daemon $nginx -c $NGINX_CONF_FILE
    retval=$?
    echo
[ $retval -eq 0 ] && touch $lockfile
    return $retval
}

stop() {
    echo -n $"Stopping $prog: "
    killproc $prog -QUIT
    retval=$?
    echo
[ $retval -eq 0 ] && rm -f $lockfile
    return $retval
    killall -9 nginx
}

restart() {
    configtest || return $?
    stop
    sleep 1
    start
}

reload() {
    configtest || return $?
    echo -n $"Reloading $prog: "
    killproc $nginx -HUP
    RETVAL=$?
    echo
}

force_reload() {
    restart
}

configtest() {
    $nginx -t -c $NGINX_CONF_FILE
}

rh_status() {
    status $prog
}

rh_status_q() {
    rh_status >/dev/null 2>&1
}

case "$1" in
    start)
        rh_status_q && exit 0
        $1
    ;;
    stop)
        rh_status_q || exit 0
        $1
    ;;
    restart|configtest)
        $1
    ;;
    reload)
        rh_status_q || exit 7
        $1
    ;;
    force-reload)
        force_reload
    ;;
    status)
        rh_status
    ;;
    condrestart|try-restart)
        rh_status_q || exit 0
    ;;
    *)
        echo $"Usage: $0 {start|stop|status|restart|condrestart|try-restart|reload|force-reload|configtest}"
        exit 2
esac
②修改脚本权限,命令:chmod 755 nginx
③将脚本文件加入到chkconfig中,命令:chkconfig --add nginx
④设置nginx开机在3和5级别自动启动,命令:chkconfig --level 35 nginx on
⑤测试nginx脚本文件是否能够正常使用,命令如下:
1)/etc/init.d/nginx restart
2)/etc/init.d/nginx reload
3)/etc/init.d/nginx stop
七、创建个人网站
1、简单配置Nginx(修改nginx.conf)
1)cd /usr/local/nginx/conf
2)vim nginx.conf //在nginx.conf文件中,可以修改网页文件路径、端口号、网站主界面等。
3)cd /usr/local/nginx/sbin
4)./nginx
或使用Xftp软件利用视图的方式修改,修改后要重启Nginx:

2、开启外网访问
开放端口,让外部环境可以访问。如果不开放端口,外部环境访问不了。
启动Nginx时,如果显示:nginx: [emerg] bind() to 0.0.0.0:80 failed (98: Address already in use),则说明端口80被占用( Nginx默认端口为80)。此时需要检查一下80端口被什么占用,命令:fuser -n tcp 80。杀死对应的进程,命令:kill -9 对应的PID

重新启动nginx,命令:cd /usr/local/nginx/sbin、./nginx
注:端口冲突时,也可以在配置文件nginx.conf中修改端口号。
八、参考
1、Linux(Centos)之安装Nginx及注意事项
https://www.cnblogs.com/hanyinglong/p/5102141.html#_label0
2、在linux服务器上安装xshell、xftp、nginx,部署前端打包的dist项目
https://www.it610.com/article/1279291702787457024.htm
3、Nginx Linux详细安装部署教程
https://www.cnblogs.com/taiyonghai/p/6728707.html
