centos7.5 Nginx+rtmp 搭建流媒体服务器
centos7.5 Nginx+rtmp 搭建流媒体服务器
一. gcc 安装
安装 nginx 需要先将官网下载的源码进行编译,编译依赖 gcc 环境,如果没有 gcc 环境,则需要安装:
yum -y install gcc gcc-c++
二. PCRE pcre-devel 安装
PCRE(Perl Compatible Regular Expressions) 是一个Perl库,包括 perl 兼容的正则表达式库。nginx 的 http 模块使用 pcre 来解析正则表达式,所以需要在 linux 上安装 pcre 库,pcre-devel 是使用 pcre 开发的一个二次开发库。nginx也需要此库。命令:
yum install -y pcre pcre-devel
三. zlib 安装
zlib 库提供了很多种压缩和解压缩的方式, nginx 使用 zlib 对 http 包的内容进行 gzip ,所以需要在 Centos 上安装 zlib 库。
yum install -y zlib zlib-devel
四. OpenSSL 安装
OpenSSL 是一个强大的安全套接字层密码库,囊括主要的密码算法、常用的密钥和证书封装管理功能及 SSL 协议,并提供丰富的应用程序供测试或其它目的使用。nginx 不仅支持 http 协议,还支持 https(即在ssl协议上传输http),所以需要在 Centos 安装 OpenSSL 库。
1、第一种安装方式
yum install -y openssl openssl-devel
2、第二种安装方式(源码编译安装)
sudo wget https://www.openssl.org/source/openssl-1.1.0e.tar.gz

sudo tar -zxvf openssl-1.1.0e.tar.gz

cd openssl-1.1.0e/

sudo ./config

sudo make

sudo make install
3、第三种安装方式(已经使用此方案,安装成功)
# 查看openssl版本
openssl version
下载openssl
sudo wget https://www.openssl.org/source/openssl-1.1.0e.tar.gz解压并编译安装
tar -zxvf openssl-1.1.1c.tar.gz
cd openssl-1.1.1c
./config --prefix=/usr/local/openssl   #如果此步骤报错,需要安装perl以及gcc包
make && make install
mv /usr/bin/openssl /usr/bin/openssl.bak
ln -sf /usr/local/openssl/bin/openssl /usr/bin/openssl
echo "/usr/local/openssl/lib" >> /etc/ld.so.conf
ldconfig -v                    # 设置生效
# 查看openssl版本
openssl version
五、安装nginx 跟rtmp MP4模块
1.官网下载直接下载.tar.gz安装包
下载Nginx
wget http://nginx.org/download/nginx-1.12.1.tar.gz下载 Rtmp
wget https://github.com/arut/nginx-rtmp-module/archive/v1.2.0.tar.gz
下载flv和mp4支持模块
wget http://h264.code-shop.com/download/nginx_mod_h264_streaming-2.2.7.tar.gz
2.解压
tar -zxvf nginx-1.12.1.tar.gz
tar -zxvf nginx_mod_h264_streaming-2.2.7.tar.gz
tar -zxvf v1.2.0.tar.gz
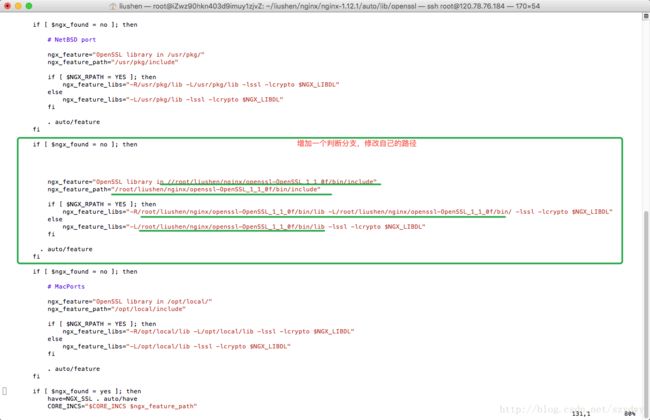
3、修改配置nginx openssl 的配置文件,否则会找不到openssl库
修改配置文件不然会报openssl库找不到错误
修改 /home/nginxdir/nginx-1.12.1/auto/lib/openssl/conf文件
增加下面这个分支替换增加的路径
if [ $ngx_found = no ]; then

            ngx_feature="OpenSSL library in //root/liushen/nginx/openssl-OpenSSL_1_1_0f/bin/include"
            ngx_feature_path="/root/liushen/nginx/openssl-OpenSSL_1_1_0f/bin/include"

            if [ $NGX_RPATH = YES ]; then
                ngx_feature_libs="-R/root/liushen/nginx/openssl-OpenSSL_1_1_0f/bin/lib -L/root/liushen/nginx/openssl-OpenSSL_1_1_0f/bin/ -lssl -lcrypto $NGX_LIBDL"
            else
                ngx_feature_libs="-L/root/liushen/nginx/openssl-OpenSSL_1_1_0f/bin/lib -lssl -lcrypto $NGX_LIBDL"
            fi
          . auto/feature
        fi
增加后截图如下:
4、生成Makefile
第1种方案直接编译生成带有指定模块功能的nginx服务程序:
./configure --prefix=/usr/local/nginx --add-module=../nginx-rtmp-module-1.2.0 --add-module=../nginx_mod_h264_streaming-2.2.7 --with-http_ssl_module --with-pcre=/home/nginx_dir/nginxdir/pcre-8.35 --with-zlib=/home/nginx_dir/nginxdir/zlib-1.2.11 --user=www --group=www --with-http_flv_module --with-http_mp4_module --with-http_stub_status_module
make && make install
注意:
4.1、依赖包的路径,最好是加进去,不过不加也可以
4.2、第2种方案:先编译安装nginx-rtmp-module-1.2.0 ,然后后期再编译nginx_mod_h264_streaming-2.2.7 ,然后删除安装目录中的nginx文件,将/home/nginxdir/nginx-1.12.1/objs下的编译好的nginx文件,复制到安装目录/usr/local/nginx/sbin
4.3、编译时如果报weberror的错误,将/home/nginxdir/nginx-1.12.1/objs/Makefile 中的-weberror删除掉,重新编译,其余的错误,就是那里报错,注释哪里
4.4.修改配置文件。进入 /usr/local/nginx/conf 文件夹。增添rtmp部分
rtmp {
    server {
        listen 1935;  #监听的端口
        chunk_size 4000;
        application live {  #rtmp推流请求路径
            live on;

recorder rec1 {
                record all manual;
                record_unique on;
                record_notify on;
                record_max_size 512M;
                #record_interval 0s;
                 record_path /usr/local/nginx/html/flv_file;
                 record_suffix .flv;
               # exec_record_done /usr/local/nginx/shell/upload2oss.sh $path $filename $basename;
                }

        }
    }
}
http server块中添加如下部分:
root /usr/local/nginx/html/flv_file/;

#limit_rate_after 5m; ####在flv视频文件下载了5M以后开始限速
#limit_rate 512k; ####速度限制为512K

index index.html;

charset utf-8;

location ~ \.flv {

flv;

}

location ~ \.mp4$ {
mp4;
}

error_page 500 502 503 504 /50x.html;

location = /50x.html {

root html;

}


        location / {
            root   html;
            index  index.html index.htm;
        }

location /control {
                rtmp_control all;
        }
5、进入 /usr/local/nginx/sbin文件夹,执行./nginx启动nginx
备注:nginx.conf配置文件1内容如下:
user root root;

worker_processes  1;
#error_log  logs/error.log;

events {
    worker_connections  1024;
}

# RTMP configuration
rtmp {
    server {
		listen 1935; # Listen on standard RTMP port
		chunk_size 4000;
		# ping 30s;
		# notify_method get;

		# This application is to accept incoming stream
		application live {
			live on; # Allows live input
          recorder rec1{
                        record all manual;
                        #record_unique on;
                       # record_notify on;
                        record_max_size 512M;
#                       record_interval 0s;
                        record_path /home/xujianjun/mp4dir;
                        record_suffix .flv;
			exec_record_done '/usr/local/bin/ffmpeg' -y -i /home/xujianjun/mp4dir/test1.flv -vcodec libx264 -f mp4 /home/xujianjun/mp4dir/test_record.mp4 2>>/home/xujianjun/mp4dir/test_record.log;
#                       exec_record_done /usr/local/nginx/shell/upload2oss.sh $path $filename $basename;
}
			# for each received stream, transcode for adaptive streami			# This single ffmpeg command takes the input and transforms
			# This single ffmpeg command takes the input and transforms
			# the source into 4 different streams with different bitrates
			# and qualities. # these settings respect the aspect ratio.
#			exec_push  /usr/local/bin/ffmpeg -i rtmp://localhost:1935/$app/$name -async 1 -vsync -1
#						-c:v libx264 -c:a aac -b:v 256k  -b:a 64k  -vf "scale=480:trunc(ow/a/2)*2"  -tune zerolatency -preset superfast -crf 23 -f flv rtmp://localhost:1935/show/$name_low
#						-c:v libx264 -c:a aac -b:v 768k  -b:a 128k -vf "scale=720:trunc(ow/a/2)*2"  -tune zerolatency -preset superfast -crf 23 -f flv rtmp://localhost:1935/show/$name_mid
#						-c:v libx264 -c:a aac -b:v 1024k -b:a 128k -vf "scale=960:trunc(ow/a/2)*2"  -tune zerolatency -preset superfast -crf 23 -f flv rtmp://localhost:1935/show/$name_high
#						-c:v libx264 -c:a aac -b:v 1920k -b:a 128k -vf "scale=1280:trunc(ow/a/2)*2" -tune zerolatency -preset superfast -crf 23 -f flv rtmp://localhost:1935/show/$name_hd720
#						-c copy -f flv rtmp://localhost:1935/show/$name_src;
#			drop_idle_publisher 10s;
		}
application vod {
    play /home/xujianjun/mp4dir;
}


		# This is the HLS application
		application show {
			live on; # Allows live input from above application
			deny play all; # disable consuming the stream from nginx as rtmp

			hls on; # Enable HTTP Live Streaming
			hls_fragment 3;
			hls_playlist_length 20;
			hls_path /mnt/hls/;  # hls fragments path
			# Instruct clients to adjust resolution according to bandwidth
			hls_variant _src BANDWIDTH=4096000; # Source bitrate, source resolution
			hls_variant _hd720 BANDWIDTH=2048000; # High bitrate, HD 720p resolution
			hls_variant _high BANDWIDTH=1152000; # High bitrate, higher-than-SD resolution
			hls_variant _mid BANDWIDTH=448000; # Medium bitrate, SD resolution
			hls_variant _low BANDWIDTH=288000; # Low bitrate, sub-SD resolution

			# MPEG-DASH
            dash on;
            dash_path /mnt/dash/;  # dash fragments path
			dash_fragment 3;
			dash_playlist_length 20;
		}
	}
}


http {
	sendfile off;
	tcp_nopush on;
	directio 512;
	# aio on;

	# HTTP server required to serve the player and HLS fragments
	server {
		listen 8080;

    location / {
                    root /usr/local/nginx/html/flv_file;
                    index index.html;
                  }


 #   location /ts {
  #           ts_live 1935 app=live;
   #      }
        location /control {
            rtmp_control all;
        }
        location /rtmp_stat {
            rtmp_stat all;
            rtmp_stat_stylesheet /stat.xsl;
        }

        location /xstat {
            rtmp_stat all;
        }

#        location /sys_stat {
 #           sys_stat;
  #      }

#     location /live {
 #           flv_live 1935;
  #       }

         location /files {
	         alias /home/xujianjun/mp4dir;
	         autoindex on;
	         autoindex_exact_size off;
	         autoindex_localtime on;
	         add_header Cache-Control no-store;
         }


		# Serve HLS fragments
		location /hls {
			types {
				application/vnd.apple.mpegurl m3u8;
				video/mp2t ts;
			}

			root /mnt;

            add_header Cache-Control no-cache; # Disable cache

			# CORS setup
			add_header 'Access-Control-Allow-Origin' '*' always;
			add_header 'Access-Control-Expose-Headers' 'Content-Length';

			# allow CORS preflight requests
			if ($request_method = 'OPTIONS') {
				add_header 'Access-Control-Allow-Origin' '*';
				add_header 'Access-Control-Max-Age' 1728000;
				add_header 'Content-Type' 'text/plain charset=UTF-8';
				add_header 'Content-Length' 0;
				return 204;
			}
		}

        # Serve DASH fragments
        location /dash {
            types {
                application/dash+xml mpd;
                video/mp4 mp4;
            }

			root /mnt;

			add_header Cache-Control no-cache; # Disable cache


            # CORS setup
            add_header 'Access-Control-Allow-Origin' '*' always;
            add_header 'Access-Control-Expose-Headers' 'Content-Length';

            # Allow CORS preflight requests
            if ($request_method = 'OPTIONS') {
                add_header 'Access-Control-Allow-Origin' '*';
                add_header 'Access-Control-Max-Age' 1728000;
                add_header 'Content-Type' 'text/plain charset=UTF-8';
                add_header 'Content-Length' 0;
                return 204;
            }
        }

		# This URL provides RTMP statistics in XML
		location /stat {
			rtmp_stat all;
			rtmp_stat_stylesheet stat.xsl; # Use stat.xsl stylesheet
		}

		location /stat.xsl {
			# XML stylesheet to view RTMP stats.
			root /usr/local/nginx/html;
		}

	}
}
nginx.conf配置文件参考模板2:
user root root;
#user  nobody;
worker_processes  1;

#error_log  logs/error.log;
#error_log  logs/error.log  notice;
#error_log  logs/error.log  info;

#pid        logs/nginx.pid;


events
{
    worker_connections  1024;
}

rtmp
{
    server
    {
        listen 1935;  #监听的端口
        chunk_size 4000;

        application live
        {  #rtmp推流请求路径
            live on;

            recorder rec1
            {
                record all manual;
                #record_unique on;
                #record_notify on;
                record_max_size 512M;
                #record_interval 0s;
                record_path /usr/local/nginx/html/flv_file;
                record_suffix .flv;
                # exec_record_done /usr/local/nginx/shell/upload2oss.sh $path $filename $basename;
            }

        }

        application vod
        {
            play /usr/local/nginx/html/flv_file/;
        }


    }
}


http
{
    include       mime.types;
    default_type  application/octet-stream;

    #log_format  main  '$remote_addr - $remote_user [$time_local] "$request" '
    #                  '$status $body_bytes_sent "$http_referer" '
    #                  '"$http_user_agent" "$http_x_forwarded_for"';

    #access_log  logs/access.log  main;

    sendfile        on;
    #tcp_nopush     on;

    #keepalive_timeout  0;
    keepalive_timeout  65;

    #gzip  on;

    server
    {
        listen       80;
        server_name  localhost;

        #charset koi8-r;

        #access_log  logs/host.access.log  main;


        root /usr/local/nginx/html/flv_file/;

        #limit_rate_after 5m; ####在flv视频文件下载了5M以后开始限速
        #limit_rate 512k; ####速度限制为512K

        index index.html;

        charset utf-8;

        location ~ \.flv
        {

            flv;

        }

        location ~ \.mp4$
        {
            mp4;
        }

        error_page 500 502 503 504 /50x.html;

        location = /50x.html
        {

            root html;

        }

        location /
        {
            root   html;
            index  index.html;
        }

        location /control
        {
            rtmp_control all;
        }
        location /javawebapps
        {
            root html;
            index index.html;
        }


        location /files
        {
            alias /usr/local/nginx/html/flv_file;
            autoindex on;
            autoindex_exact_size off;
            autoindex_localtime on;
            add_header Cache-Control no-store;
        }

        location /stat
        {
			rtmp_stat all;
			rtmp_stat_stylesheet stat.xsl; # Use stat.xsl stylesheet
		}

		location /stat.xsl
        {
            # XML stylesheet to view RTMP stats
            root /usr/local/nginx/html;
        }


        #error_page  404              /404.html;

        # redirect server error pages to the static page /50x.html
        #
        #     error_page   500 502 503 504  /50x.html;
        #      location = /50x.html
        #      {
        #           root   html;
        #      }

        # proxy the PHP scripts to Apache listening on 127.0.0.1:80
        #
        #      location ~ \.php$
        #      {
        #           proxy_pass   http://127.0.0.1;
        #      }

        # pass the PHP scripts to FastCGI server listening on 127.0.0.1:9000
        #
        #      location ~ \.php$
        #      {
        #           root           html;
        #           fastcgi_pass   127.0.0.1:9000;
        #           fastcgi_index  index.php;
        #           fastcgi_param  SCRIPT_FILENAME  /scripts$fastcgi_script_name;
        #           include        fastcgi_params;
        #      }

        # deny access to .htaccess files, if Apache's document root
        # concurs with nginx's one
        #
        #     location ~ /\.ht
        #     {
        #           deny  all;
        #     }
    }

    server
    {
        listen       8888;#默认端口是80,如果端口没被占用可以不用修改
        server_name  localhost;

        #charset koi8-r;

        #access_log  logs/host.access.log  main;
        root        /home/vue_project/dist;#vue项目的打包后的dist

        location /
        {
            try_files $uri $uri/ @router;#需要指向下面的@router否则会出现vue的路由在nginx中刷新出现404
            index  index.html index.htm;
        }
        #对应上面的@router,主要原因是路由的路径资源并不是一个真实的路径,所以无法找到具体的文件
        #因此需要rewrite到index.html中,然后交给路由在处理请求资源
        location @router
        {
            rewrite ^.*$ /index.html last;
        }


        #只需要将前端相关的html文件和js文件放到以下配置的指定目录即可使用
        location /
        {
            root /home/vue_project/webapps/;
            index  index.html;
        }


        #.......其他部分省略
    }

    # another virtual host using mix of IP-, name-, and port-based configuration
    #
    #server
    #   {
    #       listen       8000;
    #       listen       somename:8080;
    #       server_name  somename  alias  another.alias;

    #       location /
    #       {
    #           root   html;
    #           index  index.html index.htm;
    #       }
    #    }


    # HTTPS server
    #
    #server
    #    {
    #       listen       443 ssl;
    #       server_name  localhost;

    #       ssl_certificate      cert.pem;
    #       ssl_certificate_key  cert.key;

    #       ssl_session_cache    shared:SSL:1m;
    #       ssl_session_timeout  5m;

    #       ssl_ciphers  HIGH:!aNULL:!MD5;
    #       ssl_prefer_server_ciphers  on;

    #       location /
    #       {
    #           root   html;
    #           index  index.html index.htm;
    #       }
    #    }

}
搭建期间所碰到的问题:
nginx: [error] open() "/usr/local/nginx//logs/nginx.pid" failed
首先ps aux | grep nginx查看nginx进程号
这里会发现跑了两个,我们要杀死nginx:master 和worker 这2个主进程,我这里的主进程号事27767 27768
使用kill -9 27767杀死
使用kill -9 27768杀死
此问题参考网址1:https://blog.csdn.net/weixin_44352609/article/details/93242894
此问题参考网址2:https://blog.csdn.net/weixin_45525272/article/details/107980445
其实只要正常执行 sudo ./nginx -s stop
再运行 sudo ./nginx
一般都是可以的
参考网址:
centos7 搭建Nginx+rtmp流媒体服务器
CentOS7升级OpenSSL版本
搭建nginx rtmp流媒体服务器(超详细)
nginx搭建mp4、flv流媒体服务器
RTMP 流媒体服务器视频直播录制并上传至OSS实现