RTX2080+CUDA11.7+CUDNN8.6.0+ubuntu20.04+python3.8.10 部署和安装
下载ubuntu
Ubuntu分为桌面版(desktop)和服务器版(Server),ubuntu server没有GUI,没有一大堆的桌面软件。Ubuntu(乌班图)是一个以桌面应用为主的Linux操作系统,它的命名来自于非洲南部祖鲁语或豪萨语的“ubuntu”一词,翻译成中文就是“人性”、“我的存在是因为大家的存在”的意思
教程:
Ubuntu20.04+GeForce RTX 2080 SUPER+cuda11.1+cudnn8.0.4+openCV4.4.0编译
原文链接:https://blog.csdn.net/weixin_48728769/article/details/126989849
国内镜像下载
个人推荐:清华大学开源软件镜像站
下载地址:清华大学开源软件镜像站 | Tsinghua Open Source Mirror
本人下载:ubuntu-20.04.5-desktop-amd64.iso
中科大源 :http://mirrors.ustc.edu.cn/ubuntu-releases
阿里云开源镜像站 :http://mirrors.aliyun.com/ubuntu-releases
兰州大学开源镜像站 :http://mirror.lzu.edu.cn/ubuntu-releases
北京理工大学开源:http://mirror.bit.edu.cn/ubuntu-releases
浙江大学 : http://mirrors.zju.edu.cn/ubuntu-releases
163网易开源镜像站: http://mirrors.163.com/ubuntu-releases

制作Ubuntu启动盘
ultralSO试用版,插入u盘
点击【文件】 → 【打开】 → 【选择现在好的ubuntu镜像文件】
点击【启动】 → 【写入硬盘映像】 → 【格式化】格式化硬盘 → 点击【写入】 → 刻录完成。
安装Ubuntu系统
教程
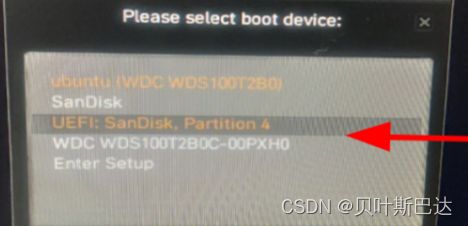
插入第一步做好的系统盘,开机,出现主板图标时按下F11/F12(不同电脑和主板有所差别,可以根据自己的电脑型号查找)进入快速启动项界面
选择UEFI开头的选项,然后再选择ubuntu
选择制做好的系统盘先会检测磁盘,等待检测完成即可


安装Ubuntu系统是用来做开发,语言选择English,点击"Install Ubuntu"
"Keyboard layout"同样选择英文
如果有无线网卡的话,会弹出连网的界面,这里选择不连接WIFI
“Updates and other software”界面,我选择的是"Minimal installation",这样安装过程会快一些,而且不会安装一些不需要的软件。(Normal installation会安装web浏览器、公用程序、办公软件、游戏和媒体播放器,Minimal installation只会安装web浏览器和基本实用程序)
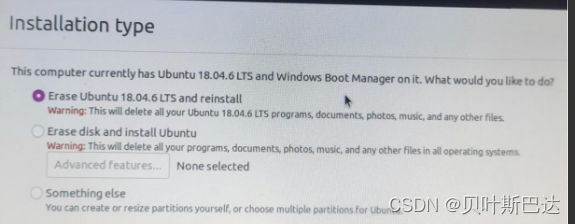
“Installation type”界面选择“Something else”,自己进行分区
EFI一定要放在最前面
EFI:主分区,建议不小于512M,这里我分配了2G
挂载点 / :逻辑分区,ext4日志文件系统,用于存放系统,建议根据自己的磁盘大小分配的大一点,这里我分配了200G(磁盘共1T)
swap(交换空间):逻辑分区,大小与电脑的真实内存大小一致,这里我的是32G内存
挂载点 /home :逻辑分区,ext4日志文件系统,将剩余空间全部分配给它
如果之前有Ubuntu的系统还没卸载,那么选择!
点击完就会直接开始选择时区,直接点击地图选shanghai
输入用户名和密码:hyy:hyy666168
重启
重启前出现please remove the installation medium:
原因: 原因是安装完成后没有拔掉优盘
重启后输入df -h 感觉和之前的ubuntu18.04是采用相同的磁盘分区
重启后进入页面
最小安装后没有office软件。按提示完成livepatch配置,然后联网
打开终端“Ctrl + Alt + T”,输入sudo apt-get update
查看df -h


安装输入法
卸载输入法:
sudo apt-get purge ibus
先安装fcitx
方法一:
sudo apt-get install fcitx-table-wbpy
sudo apt remove fcitx-ui-classic
安装输入法码表,这里装的五笔拼音
sudo apt-get install fcitx-table-wbpy
其他输入法如下:
拼音:fcitx-pinyin、fcitx-sunpinyin、fcitx-googlepinyin、fcitx-sogoupinyin
五笔:fcitx-table、fcitx-table-wubi、fcitx-table-wbpy
下载搜狗输入法的安装包
要选择与自己系统位数一致的安装包,我的系统是64位,所以我下载64位的安装包
安装依赖:
sudo apt install libqt5qml5 libqt5quick5 libqt5quickwidgets5 qml-module-qtquick2 sudo apt install libgsettings-qt1找到安装包: sudo dpkg -i sogoupinyin_2.1.0.0082_amd64.deb
报错:dpkg: error processing archive sogoupinyin_4.0.1.2800_x86_64.deb (--install): installing sogoupinyin would break fcitx-ui-qimpanel, and deconfiguration is not permitted (--auto-deconfigure might help) Errors were encountered while processing: sogoupinyin_4.0.1.2800_x86_64.deb
解决方法 sudo apt-get remove fcitx-ui-qimpanel按照这个Ubuntu搜狗输入法安装指南进行配置
https://blog.csdn.net/qq_39779233/article/details/128086129
安装谷歌浏览器
sudo dpkg -i xxx.deb
软件中心无法打开
Ubuntu 20.04 默认把软件中心换成了 snap, 感觉 snap 应用老出状况, snap 应用不但体积大, 安装好的应用还不时就崩溃, 所以如果要把电脑里的所有 snap 应用全部替换了, snapd 也卸载了.
下面这三句可以有效的解决
sudo apt install ubuntu-software sudo snap remove snap-store //删除snap商店 sudo apt purge snapd //apt-get purge 会同时清除软件包和软件的配置文件 删除已安装的软件包(不保留配置文件),删除软件包,同时删除相应依赖软件包;可参考Ubuntu 20.04软件中心问题
安装英伟达驱动
查看GPU型号(你自己知道显卡型号就不用查了,直接下一步;通用查看显卡型号命令:lspci | grep -i vga
01:00.0 VGA compatible controller: NVIDIA Corporation TU104 [GeForce RTX 2080 Rev. A] (rev a1) 01:00.1 Audio device: NVIDIA Corporation TU104 HD Audio Controller (rev a1) 01:00.2 USB controller: NVIDIA Corporation TU104 USB 3.1 Host Controller (rev a1) 01:00.3 Serial bus controller [0c80]: NVIDIA Corporation TU104 USB Type-C UCSI Controller (rev a1)根据自己的显卡型号,到NVIDIA官网下载对应的驱动 (这里的网址只是GeForce类型的驱动,如果是TITAN或Quadro等可以在这个网址下载,下载步骤类似)
https://www.nvidia.cn/geforce/drivers/
教程:
Ubunut20.04/22.04安装NVIDIA驱动
Ubuntu20.04、22.04安装nvidia显卡驱动——超详细、最简单

安装cuda前准备
安装驱动前一定要更新软件列表和安装必要软件、依赖(必须)
sudo apt-get update #更新软件列表
sudo apt-get install g++
sudo apt-get install gcc
sudo apt-get install make
查看GPU型号(你自己知道显卡型号就不用查了,直接下一步;通用查看显卡型号命令:lspci | grep -i vga)
卸载原有驱动
sudo apt-get remove --purge nvidia*
禁用nouveau(nouveau是通用的驱动程序)(必须)
sudo gedit /etc/modprobe.d/blacklist.conf 或者(blacklist-nouveau.conf)
在打开的blacklist.conf末尾添加如下,保存文本关闭
blacklist nouveau
options nouveau modeset=0
在终端输入sudo update-initramfs –u更新,更新结束后重启电脑(必须)
sudo update-initramfs –u 输入后报错:
报错:Extra argument '–u' Usage: update-initramfs {-c|-d|-u} [-k version] [-v] [-b directory] Options: -k version Specify kernel version or 'all' -c Create a new initramfs -u Update an existing initramfs -d Remove an existing initramfs -b directory Set alternate boot directory -v Be verbose See update-initramfs(8) for further details.
原因上一步加多了个:冒号,删掉
上面的
blacklist nouveau options nouveau modeset=0 blacklist vga16fb blacklist rivafb blacklist rivatv blacklist nvidiafb成功,先删掉-u再重新打上去就ok
hyy@hyy-SY-YL-Z390:~/下载$ sudo update-initramfs -u
update-initramfs: Generating /boot/initrd.img-5.15.0-46-generic
重启后在终端输入如下,没有任何输出表示屏蔽成功
lsmod | grep nouveau报错:重启后发现界面变形了?变宽了,而且报错ACPI BIOS Error
需要你重装nvidia驱动
关闭Secure Boot
如果没有禁用secure boot,会导致NVIDIA驱动安装失败,或者不正常。 因为secure boot会阻止第三方源安装驱动,只要保证安装源可靠,禁用并不会带来多大隐患。
开机界面F1或del键进入BIOS,一般在"Security 安全”或者“Boot 启动"中找到“Secure Boot 安全启动”。
将“Secure Boot”选项切换成"Enabled"表示开启,"Disabled"则是关闭(有些BIOS中SecureBoot是灰色的, 只能通过删除密钥文件关闭)。
设置完成后,按F10键确认保存BIOS配置即可。
进入方式:
重启电脑,同时按“F1键”、“F2键”、“Del键”即可进入。
开机在未亮屏之前反复按F2进入设置界面
个人电脑是按del键进入,本机初始就是disable

不安装lightdm
这一步也可以不安装lightdm,使用ubuntu20.04、22.04自带的gdm3显示管理器,直观的区别就是gdm3的登陆窗口在显示器正中间,而lightdm登录窗口在偏左边,正常使用没有区别。其他的区别这里不做探究
安装驱动
过程教程:安装nvidia驱动
进入图形化界面之前,保证自己的电脑系统语言是英文!
安装过程需要在非图形化界面中进行,输入以下命令进入非图形化界面
sudo telinit 3 #进入文本界面 【 要回到图形化界面输入sudo telinit 5 输入你的用户名和密码登录】,进入后中文会不显示,所以系统语言建议改为英文
cd {你的NVIDIA安装文件路径} sudo chmod 777 NVIDIA-Linux-x86_64-430.26.run #给你下载的驱动赋予可执行权限,才可以安装 sudo ./NVIDIA-Linux-x86_64-430.26.run --no-opengl-files #安装,禁用opengl这样安装才不会出现循环登陆的问题安装发现:An alternate method of installing the NVIDIA driver was detected. (xxxxxxxxxxxxx).Please review the message provided by the maintainer of this alternate installation method and decide how to proceed:检测到另一种安装NVIDIA驱动程序的方法。(xxxxxxxxxxxxx)。请查看此备用安装方法的维护人员提供的消息,并决定如何继续:
选continue installation
原文链接:https://blog.csdn.net/weixin_44842237/article/details/127958306
Install nvidia’s 32-bit compatibility libraries? No
这个选择NO,如果选择yes会出现安装报错
Would you like to run the nvidia-xconfigutility to automatically update your x configuration so that the NVIDIA x driver will be used when you restart x? Any pre-existing x confile will be backed up. 是否要运行nvidia-xconfigutility来自动更新x配置,以便在重新启动x时使用nvidia x驱动程序?将备份任何预先存在的x confile。
选择 Yes 继续
原文链接:https://blog.csdn.net/qq_46107892/article/details/122616172
返回图形界面
sudo telinit 5 输入你的用户名和密码登录
界面变回正常
输入nvidia-smi正常 8192g
reboot
发现仍然存在ACPI BIOS Error, 但图形界面能进入
BIOS版本不能完整地支持ACPI高级模式,ACPI就是Advanced Configuration and Power Interface的缩写,意思是“高级配置与电源接口”。这是英特尔、微软和东芝共同开发的一种电源管理标准。
解决办法:
1、升级BIOS
2、在BIOS里面禁用ACPI
(开机进入BIOS,选择Power Management Setup - ACPI Function Disabled)
安装完驱动后发现nvidia-smi显示了cuda的最高支持版本
cuda 11.7
安装cuda 11.7、cudnn8.6.0
CUDA 12.0 Update 1 和 CUDA 12.0 GA的区别?
GA:第一次提出,update小的升级
教程:
Ubuntu18.04+RTX2080+cuda10+tensorflow
cuda和显卡驱动的适配表格
Ubuntu20.04、22.04安装nvidia显卡驱动——超详细、最简单
本人下载显卡驱动为:NVIDIA-Linux-x86_64-515.65.01.run
所有cuda版本:https://developer.nvidia.com/cuda-toolkit-archive
选择版本:https://developer.download.nvidia.com/compute/cuda/11.7.0/local_installers/cuda_11.7.0_515.43.04_linux.run
安装cuda
官网同时提供了安装指令,很良心。注意运行指令需要cd到包含该文件的文件夹目录下。
wget https://developer.download.nvidia.com/compute/cuda/11.7.0/local_installers/cuda_11.7.0_515.43.04_linux.run sudo sh cuda_11.7.0_515.43.04_linux.run
安装教程
步骤:
输入accept。
点击空格,取消安装驱动,然后选择Install
选择upgrade all
以下不是报错:代表安装完成
=========== = Summary = =========== Driver: Not Selected Toolkit: Installed in /usr/local/cuda-11.7/ Please make sure that - PATH includes /usr/local/cuda-11.7/bin - LD_LIBRARY_PATH includes /usr/local/cuda-11.7/lib64, or, add /usr/local/cuda-11.7/lib64 to /etc/ld.so.conf and run ldconfig as root To uninstall the CUDA Toolkit, run cuda-uninstaller in /usr/local/cuda-11.7/bin ***WARNING: Incomplete installation! This installation did not install the CUDA Driver. A driver of version at least 515.00 is required for CUDA 11.7 functionality to work. To install the driver using this installer, run the following command, replacingwith the name of this run file: sudo .run --silent --driver Logfile is /var/log/cuda-installer.log
输入gedit ~/.bashrc命令打开文件,在文件结尾输入以下语句,保存。
export PATH=/usr/local/cuda-11.7/bin${PATH:+:${PATH}} export LD_LIBRARY_PATH=/usr/local/cuda-11.7/lib64${LD_LIBRARY_PATH:+:${LD_LIBRARY_PATH}}安装成功!
hyy@hyy-SY-YL-Z390:~$ gedit ~/.bashrc
hyy@hyy-SY-YL-Z390:~$ source ~/.bashrc
hyy@hyy-SY-YL-Z390:~$ nvcc -V
nvcc: NVIDIA (R) Cuda compiler driver Copyright (c) 2005-2022 NVIDIA Corporation Built on Tue_May__3_18:49:52_PDT_2022 Cuda compilation tools, release 11.7, V11.7.64 Build cuda_11.7.r11.7/compiler.31294372_0


安装cudnn
cudnn的下载地址:https://developer.nvidia.com/rdp/cudnn-archive
选择版本:https://developer.nvidia.com/compute/cudnn/secure/8.6.0/local_installers/11.8/cudnn-linux-x86_64-8.6.0.163_cuda11-archive.tar.xz
用归档工具解压文件
更改usr/local/cuda/文件夹下面的include和lib64文件夹的权限。
cd /usr/local/cuda
sudo chmod 666 include
路径:/home/hyy/Downloads/cudnn-linux-x86_64-8.6.0.163_cuda11-archive
sudo cp /home/hyy/Downloads/cudnn-linux-x86_64-8.6.0.163_cuda11-archive/include/cudnn*.h /usr/local/cuda/includesudo cp /home/hyy/Downloads/cudnn-linux-x86_64-8.6.0.163_cuda11-archive/lib/libcudnn* /usr/local/cuda/lib64sudo chmod a+r /usr/local/cuda/include/cudnn*.h /usr/local/cuda/lib64/libcudnn*验证是否安装成功,执行命令:
sudo cat /usr/local/cuda/include/cudnn_version.h | grep CUDNN_MAJOR -A 2 1
如图:
安装成功

安装python
ubuntu 20.04 自带Python 3.8.10
sudo apt install python3-virtualenv
E: dpkg 被中断,您必须手工运行 ‘sudo dpkg --configure -a’ 解决此问题。
之前安装某个包被中断了,输入sudo dpkg --configure -a
E: 无法获得锁 /var/lib/dpkg/lock-frontend。锁正由进程 7771(dpkg)持有、N: 请注意,直接移除锁文件不一定是合适的解决方案,且可能损坏您的系统、E: 无法获取 dpkg 前端锁 (/var/lib/dpkg/lock-frontend),是否有其他进程正占用它
解决
sudo rm /var/lib/dpkg/lock-frontend sudo rm /var/lib/dpkg/lock之前安装的程序,安装中断后失败了,影响安装其他包,在卸载sudo apt-get --purge remove lightdm这个包时候在处理时有错误发生:由于出现了太多错误,处理过程被中止了。E: Sub-process /usr/bin/dpkg returned an error code (1)
解决方法:https://blog.csdn.net/stickmangod/article/details/85316142/
现将info文件夹更名 sudo mv /var/lib/dpkg/info /var/lib/dpkg/info.bk 新建一个新的info文件夹 sudo mkdir /var/lib/dpkg/info 安装修复 sudo apt-get update sudo apt-get install -f 执行完上一步操作后,在info文件夹下生成一些文件,现将这些文件全部移到info.bk文件夹下 sudo mv /var/lib/dpkg/info/* /var/lib/dpkg/info.bk 把自己新建的info文件夹删掉 sudo rm -rf /var/lib/dpkg/info 恢复原有info文件夹,修改名字 sudo mv /var/lib/dpkg/info.bk /var/lib/dpkg/infosudo apt install python3-virtualenv
virtualenv -p /usr/bin/python3.8 venv_38
source venv_38/bin/activate
配置阿里云源
apt-get
apt-get的源设置通过/etc/apt/sources.list文件进行,修改文件的内容即可
$ sudo gedit /etc/apt/sources.list
把里面的内容改成国内源的设置,常见的设置有清华大学、阿里云的源等。如下
清华大学 deb https://mirrors.tuna.tsinghua.edu.cn/ubuntu/ bionic main restricted universe multiverse deb https://mirrors.tuna.tsinghua.edu.cn/ubuntu/ bionic-updates main restricted universe multiverse deb https://mirrors.tuna.tsinghua.edu.cn/ubuntu/ bionic-backports main restricted universe multiverse deb https://mirrors.tuna.tsinghua.edu.cn/ubuntu/ bionic-security main restricted universe multiverse deb https://mirrors.tuna.tsinghua.edu.cn/ubuntu/ bionic-proposed main restricted universe multiverse deb-src https://mirrors.tuna.tsinghua.edu.cn/ubuntu/ bionic main restricted universe multiverse deb-src https://mirrors.tuna.tsinghua.edu.cn/ubuntu/ bionic-updates main restricted universe multiverse deb-src https://mirrors.tuna.tsinghua.edu.cn/ubuntu/ bionic-backports main restricted universe multiverse deb-src https://mirrors.tuna.tsinghua.edu.cn/ubuntu/ bionic-security main restricted universe multiverse deb-src https://mirrors.tuna.tsinghua.edu.cn/ubuntu/ bionic-proposed main restricted universe multiverse 阿里云 deb http://mirrors.aliyun.com/ubuntu/ bionic main restricted universe multiverse deb http://mirrors.aliyun.com/ubuntu/ bionic-security main restricted universe multiverse deb http://mirrors.aliyun.com/ubuntu/ bionic-updates main restricted universe multiverse deb http://mirrors.aliyun.com/ubuntu/ bionic-proposed main restricted universe multiverse deb http://mirrors.aliyun.com/ubuntu/ bionic-backports main restricted universe multiverse deb-src http://mirrors.aliyun.com/ubuntu/ bionic main restricted universe multiverse deb-src http://mirrors.aliyun.com/ubuntu/ bionic-security main restricted universe multiverse deb-src http://mirrors.aliyun.com/ubuntu/ bionic-updates main restricted universe multiverse deb-src http://mirrors.aliyun.com/ubuntu/ bionic-proposed main restricted universe multiverse deb-src http://mirrors.aliyun.com/ubuntu/ bionic-backports main restricted universe multiverse 中科大 deb https://mirrors.ustc.edu.cn/ubuntu/ bionic main restricted universe multiverse deb-src https://mirrors.ustc.edu.cn/ubuntu/ bionic main restricted universe multiverse deb https://mirrors.ustc.edu.cn/ubuntu/ bionic-updates main restricted universe multiverse deb-src https://mirrors.ustc.edu.cn/ubuntu/ bionic-updates main restricted universe multiverse deb https://mirrors.ustc.edu.cn/ubuntu/ bionic-backports main restricted universe multiverse deb-src https://mirrors.ustc.edu.cn/ubuntu/ bionic-backports main restricted universe multiverse deb https://mirrors.ustc.edu.cn/ubuntu/ bionic-security main restricted universe multiverse deb-src https://mirrors.ustc.edu.cn/ubuntu/ bionic-security main restricted universe multiverse deb https://mirrors.ustc.edu.cn/ubuntu/ bionic-proposed main restricted universe multiverse deb-src https://mirrors.ustc.edu.cn/ubuntu/ bionic-proposed main restricted universe multiverse修改文件内容之后,运行
sudo apt update
pip
mkdir ~/.pip
vi ~/.pip/pip.conf
[global] index-url = https://mirrors.aliyun.com/pypi/simple/ [install] trusted-host = mirrors.aliyun.com
安装pytorch
教程:https://blog.csdn.net/qq_41990268/article/details/127827522
根据官网:https://pytorch.org/get-started/locally/
python=3.9.13
>>> import torch >>> torch.cuda.is_available() True >>> torch.__version__ '1.13.0+cu117'