Qt多线程编程
本章介绍Qt多线程编程。
1.方法
Qt多线程编程通常有2种方法:
1)通过继承QThread类,实现run()方法。
2)采用QObject::moveToThread()方法。
方法2是Qt官方推荐的方法,也是本文要介绍的。
2.步骤
1)创建Worker类
这里的Worker类就是我们需要作复杂的数据处理的地方(doWork()函数),需要注意的是Worker类需要继承QObject类。
class Worker : public QObject
{
    Q_OBJECT
public:
    explicit Worker(QObject *parent = nullptr);

signals:
    void resultReady(int result);

public slots:
    void doWork(int parameter);
};
2)实例化QThread对象和Work对象(包含耗时的数据处理)
在需要使用线程的类中,实例化QThread对象和Worker对象。
workerThread = new QThread(this);
worker = new Worker();
3)QObject::moveToThread()方法
使用QObject::moveToThread()方法将Worker对象的事件循环全部交由QThread对象处理。
worker->moveToThread(workerThread);4)信号,槽绑定这里列出必要的信号和槽绑定,包括起始信号,结束信号的槽绑定。
connect(this, SIGNAL(startWork(int)), work, SLOT(doWork(int)));
connect(workerThread, &QThread::finished, worker, &QObject::deleteLater);
这样,线程使用者就可以向Worker对象发信号来执行相应的操作,同样,Worker对象也可以将结果发给线程使用者。
5)启动线程
workerThread->start();6)善后处理
当使用线程的对象销毁时,需要作必要的处理。在其析构函数中添加:
workerThread->quit();
workerThread->wait();
3.实例
以Controller对象中实现多线程为例。这里为了演示,在Worker线程中作加法运算来模拟耗时的数据处理。在Controller类和Worker类各定义了信号和槽来实现Worker类和Controller类之间的交互。
1)Worker类:
#ifndef WORKER_H
#define WORKER_H

#include

class Worker : public QObject
{
    Q_OBJECT
public:
    explicit Worker(QObject *parent = nullptr);

signals:
    void resultReady(int result);

public slots:
    void doWork(int parameter);
};

#endif // WORKER_H
#include "worker.h"
#include
#include
Worker::Worker(QObject *parent) : QObject(parent)
{
}
void Worker::doWork(int parameter)
{
int sum = 0;
qDebug() << "Thread2 ID: " << QThread::currentThreadId();
for (int i = 1; i <= parameter; i++)
sum += i;
emit resultReady(sum);
} 2)Controller类:
#ifndef CONTROLLER_H
#define CONTROLLER_H

#include
#include "worker.h"


class Controller : public QObject
{
    Q_OBJECT
public:
    explicit Controller(QObject *parent = nullptr);
    ~Controller();

signals:
    void startWork(int parameter);

public slots:
    void handleResult(int result);

private:
    QThread *workerThread;
    Worker *worker;
};

#endif // CONTROLLER_H
#include "controller.h"
#include
#include
Controller::Controller(QObject *parent) : QObject(parent)
{
workerThread = new QThread(this);
worker = new Worker();
worker->moveToThread(workerThread);
connect(this, SIGNAL(startWork(int)), worker, SLOT(doWork(int)));
connect(workerThread, &QThread::finished, worker, &QObject::deleteLater);
connect(worker, SIGNAL(resultReady(int)), this, SLOT(handleResult(int)));
workerThread->start();
}
Controller::~Controller()
{
workerThread->quit();
workerThread->wait();
}
void Controller::handleResult(int result)
{
qDebug() << result;
} 3)主函数:
#include
#include
#include
#include "controller.h"


int main(int argc, char *argv[])
{
    QCoreApplication a(argc, argv);

    qDebug() << "Thread1 ID: " << QThread::currentThreadId();

    Controller c;

    emit c.startWork(100);

    return a.exec();
}
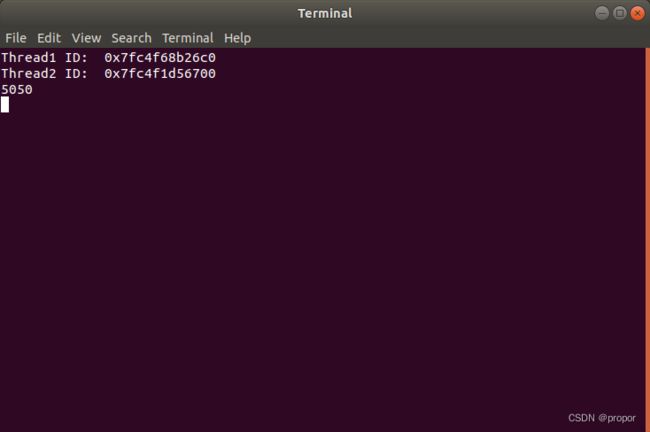
4)运行结果:
总结:本文介绍了采用QObject::moveToThread()方法实现Qt多线程编程的方法。
