flutter聊天界面-TextField输入框buildTextSpan实现@功能展示高亮功能
flutter聊天界面-TextField输入框buildTextSpan实现@功能展示高亮功能
最近有位朋友讨论的时候,提到了输入框的高亮展示。在flutter TextField中需要插入特殊样式的标签,比如:“请 @张三 回答一下”,这一串字符在TextField中输入,当输入@时 弹出好友列表选择,然后将 “@张三”高亮显示在TextField中。
https://blog.csdn.net/gloryFlow/article/details/132889374
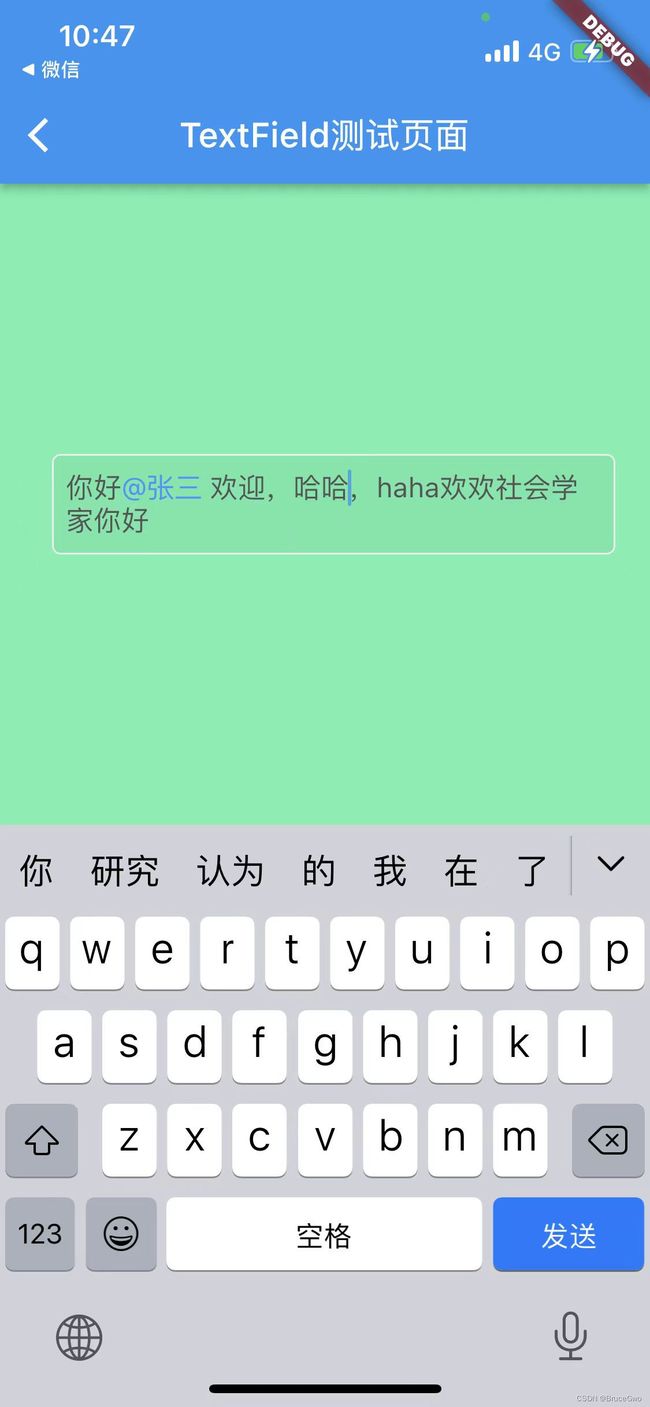
效果图如下
一、TextEditingController中的buildTextSpan
在TextField中,我们找到TextEditingController的buildTextSpan方法。
buildTextSpan功能如下:根据当前编辑值生成[TextSpan],默认情况下,使组成范围内的文本显示为带下划线。继承可以重写此方法以自定义文本的外观。
我这里继承TextEditingController,重写buildTextSpan方法,
List textSpans = RichTextHelper.getRichText(value.text);
    if (composingRegionOutOfRange) {
      return TextSpan(style: style, children: textSpans);
    }
完整代码如下
import 'package:flutter/material.dart';
import 'package:flutter_lab/rich_text_helper.dart';

class TextFieldController extends TextEditingController {
  /// Builds [TextSpan] from current editing value.
  ///
  /// By default makes text in composing range appear as underlined. Descendants
  /// can override this method to customize appearance of text.
  @override
  TextSpan buildTextSpan(
      {required BuildContext context,
      TextStyle? style,
      required bool withComposing}) {
    assert(!value.composing.isValid ||
        !withComposing ||
        value.isComposingRangeValid);
    // If the composing range is out of range for the current text, ignore it to
    // preserve the tree integrity, otherwise in release mode a RangeError will
    // be thrown and this EditableText will be built with a broken subtree.
    final bool composingRegionOutOfRange =
        !value.isComposingRangeValid || !withComposing;

    print(
        "--- composingRegionOutOfRange:${composingRegionOutOfRange},withComposing:${withComposing},value.isComposingRangeValid:${value.isComposingRangeValid}");
    List textSpans = RichTextHelper.getRichText(value.text);
    if (composingRegionOutOfRange) {
      return TextSpan(style: style, children: textSpans);
    }

    print("+++ composingRegionOutOfRange:${composingRegionOutOfRange}");
    final TextStyle composingStyle =
        style?.merge(const TextStyle(decoration: TextDecoration.underline)) ??
            const TextStyle(decoration: TextDecoration.underline);
    return TextSpan(
      style: style,
      children: [
        TextSpan(text: value.composing.textBefore(value.text)),
        TextSpan(
          style: composingStyle,
          text: value.composing.textInside(value.text),
        ),
        TextSpan(text: value.composing.textAfter(value.text)),
      ],
    );
  }
}
二、设置@高亮
实现将 “@张三”高亮显示在TextField中,需要正则表达是,匹配到@功能正则表达式:String regexStr =
r"@[@]*[@ ]+[^@]* ";
使用RegExp
String regexStr =
        r"@[^@]*[^@ ]+[^@]* ";
    RegExp exp = RegExp('$regexStr');
具体代码如下
import 'package:flutter/material.dart';

class RichTextHelper {
  //图文混排
  static getRichText(String text) {
    List textSpans = [];

    String regexStr =
        r"@[^@]*[^@ ]+[^@]* ";
    RegExp exp = RegExp('$regexStr');

    //正则表达式是否在字符串[input]中有匹配。
    if (exp.hasMatch(text)) {
      Iterable matches = exp.allMatches(text);

      int index = 0;
      int count = 0;
      for (var matche in matches) {
        count++;
        String c = text.substring(matche.start, matche.end);
        //匹配到的东西,如表情在首位
        if (index == matche.start) {
          index = matche.end;
        }
        //匹配到的东西,如表情不在首位
        else if (index < matche.start) {
          String leftStr = text.substring(index, matche.start);
          index = matche.end;
          textSpans.add(
            TextSpan(
              text: spaceWord(leftStr),
              style: getDefaultTextStyle(),
            ),
          );
        }

        //匹配到的网址
        if (RegExp(regexStr).hasMatch(c)) {
          textSpans.add(
            TextSpan(
              text: spaceWord(c),
              style:
              TextStyle(color: Colors.blueAccent, fontSize: 16),
            ),
          );
        }

        //是否是最后一个表情,并且后面是否有字符串
        if (matches.length == count && text.length > index) {
          String rightStr = text.substring(index, text.length);
          textSpans.add(
            TextSpan(
              text: spaceWord(rightStr),
              style: getDefaultTextStyle(),
            ),
          );
        }
      }
    } else {
      textSpans.add(
        TextSpan(
          text: spaceWord(text),
          style: getDefaultTextStyle(),
        ),
      );
    }

    return textSpans;
  }

  static TextStyle getDefaultTextStyle() {
    return TextStyle(
      fontSize: 16,
      fontWeight: FontWeight.w400,
      fontStyle: FontStyle.normal,
      color: Colors.black87,
      decoration: TextDecoration.none,
    );
  }

  static String spaceWord(String text) {
    if (text.isEmpty) return text;
    String spaceWord = '';
    for (var element in text.runes) {
      spaceWord += String.fromCharCode(element);
      spaceWord += '\u200B';
    }
    return spaceWord;
  }
}
三、创建TextField
创建需要显示的TextField,设置输入框的onTap、onChanged、focusNode、TextEditingController等
代码如下
// 输入框
class InputTextField extends StatefulWidget {
  const InputTextField({
    Key? key,
    this.inputOnTap,
    this.inputOnChanged,
    this.inputOnSubmitted,
    this.inputOnEditingCompleted,
    this.autofocus = false,
    required this.textEditingController,
  }) : super(key: key);

  final inputOnTap;
  final inputOnChanged;
  final inputOnSubmitted;
  final inputOnEditingCompleted;
  final bool autofocus;
  final TextEditingController textEditingController;

  @override
  State createState() => _InputTextFieldState();
}

class _InputTextFieldState extends State {
  FocusNode editFocusNode = FocusNode();

  @override
  void initState() {
    // TODO: implement initState
    super.initState();
  }

  //获取焦点
  void getFocusFunction(BuildContext context) {
    FocusScope.of(context).requestFocus(editFocusNode);
  }

  //失去焦点
  void unFocusFunction() {
    editFocusNode.unfocus();
  }

  @override
  void dispose() {
    // TODO: implement dispose
    editFocusNode.unfocus();
    editFocusNode.dispose();
    super.dispose();
  }

  @override
  Widget build(BuildContext context) {
    return Container(
      padding: EdgeInsets.only(
        left: 10.0,
        top: 5.0,
        bottom: 5.0,
      ),
      constraints: BoxConstraints(
        minHeight: 40.0,
        maxHeight: 120.0,
      ),
      child: TextField(
        onTap: () {
          widget.inputOnTap();
        },
        onChanged: (string) {
          widget.inputOnChanged(string);
        },
        onEditingComplete: () {
          widget.inputOnEditingCompleted();
        },
        onSubmitted: (string) {
          widget.inputOnSubmitted(string);
        },
        minLines: 1,
        maxLines: null,
        keyboardType: TextInputType.multiline,
        textAlignVertical: TextAlignVertical.center,
        autofocus: widget.autofocus,
        focusNode: editFocusNode,
        controller: widget.textEditingController,
        textInputAction: TextInputAction.send,
        decoration: InputDecoration(
          contentPadding: EdgeInsets.symmetric(vertical: 10, horizontal: 8.0),
          filled: true,
          isCollapsed: true,
          floatingLabelBehavior: FloatingLabelBehavior.never,
          hintText: "说点什么吧~",
          hintStyle: TextStyle(
            fontSize: 14,
            fontWeight: FontWeight.w400,
            fontStyle: FontStyle.normal,
            color: ColorUtil.hexColor(0xACACAC),
            decoration: TextDecoration.none,
          ),
          enabledBorder: OutlineInputBorder(
            /*边角*/
            borderRadius: const BorderRadius.all(
              Radius.circular(5.0), //边角为30
            ),
            borderSide: BorderSide(
              color: ColorUtil.hexColor(0xf7f7f7), //边框颜色为绿色
              width: 1, //边线宽度为1
            ),
          ),
          focusedBorder: OutlineInputBorder(
            borderRadius: const BorderRadius.all(
              Radius.circular(5.0), //边角为30
            ),
            borderSide: BorderSide(
              color: ColorUtil.hexColor(0xECECEC), //边框颜色为绿色
              width: 1, //宽度为1
            ),
          ),
        ),
      ),
    );
  }
}
四、TextField赋text演示
最后我们可以在输入框TextField设置文本
TextFieldController textEditingController = TextFieldController();

textEditingController.text = "你好@张三 欢迎,哈哈,haha";
完整代码如下
class TextFieldRich extends StatefulWidget {
  const TextFieldRich({super.key});

  @override
  State createState() => _TextFieldRichState();
}

class _TextFieldRichState extends State {
  TextFieldController textEditingController = TextFieldController();

  @override
  void initState() {
    // TODO: implement initState
    super.initState();
    textEditingController.text = "你好@张三 欢迎,哈哈,haha";
  }

  @override
  void dispose() {
    // TODO: implement dispose
    super.dispose();
  }

  @override
  Widget build(BuildContext context) {
    Size scrSize = MediaQuery.of(context).size;
    return Scaffold(
      appBar: AppBar(
        // Here we take the value from the MyHomePage object that was created by
        // the App.build method, and use it to set our appbar title.
        title: Text('TextField测试页面'),
      ),
      body: Container(
        width: scrSize.width,
        height: scrSize.height,
        color: Colors.greenAccent,
        alignment: Alignment.center,
        padding: EdgeInsets.symmetric(vertical: 20.0, horizontal: 20.0),
        child: InputTextField(textEditingController: textEditingController),
      ),
    );
  }
}
至此可以看到效果图中@张三 高亮显示了。
五、小结
flutter聊天界面-TextField输入框buildTextSpan实现@功能展示高亮功能。该示例中,光标会有问题,暂时没做修改,后续抽空修改。
https://blog.csdn.net/gloryFlow/article/details/132889374
学习记录,每天不停进步。
