SSM后端整合(纯注解)
1 准备工作
-
第一步:导包
-
ch.qos.logback logback-classic 1.2.3 org.logback-extensions logback-ext-spring 0.1.5 org.projectlombok lombok 1.16.22 org.slf4j jcl-over-slf4j 1.7.25 org.mybatis mybatis 3.5.7 com.github.pagehelper pagehelper 5.2.1 mysql mysql-connector-java 8.0.32 com.alibaba druid 1.2.16 junit junit 4.13 test org.springframework spring-test 5.2.10.RELEASE test org.springframework spring-jdbc 5.2.10.RELEASE org.mybatis mybatis-spring 1.3.0 org.springframework spring-webmvc 5.2.10.RELEASE javax.servlet servlet-api 2.5 com.fasterxml.jackson.core jackson-databind 2.12.0
-
-
第二步:(mybatis配置)jdbc.properties和JdbcConfig配置类和MybatisConfig配置类
-
jdbc.driver=com.mysql.cj.jdbc.Driver jdbc.url=jdbc:mysql://localhost:3306/user?useUnicode=true&characterEncoding=utf-8&serverTimezone=UTC jdbc.username=root jdbc.password=123456 -
public class JdbcConfig { @Value("${jdbc.driver}") private String driver; @Value("${jdbc.url}") private String url; @Value("${jdbc.username}") private String username; @Value("${jdbc.password}") private String password; @Bean public DataSource dataSource() { DruidDataSource ds = new DruidDataSource(); ds.setDriverClassName(driver); ds.setUrl(url); ds.setUsername(username); ds.setPassword(password); return ds; } @Bean public DataSourceTransactionManager transactionManager(DataSource dataSource){ DataSourceTransactionManager transactionManager = new DataSourceTransactionManager(); transactionManager.setDataSource(dataSource); return transactionManager; } } -
public class MybatisConfig { @Bean public SqlSessionFactoryBean sqlSessionFactoryBean(DataSource dataSource){ //快速定义工厂类 SqlSessionFactoryBean ssfb = new SqlSessionFactoryBean(); //定义别名 ssfb.setTypeAliasesPackage("com.gnozt.pojo"); //将数据源放入工厂 ssfb.setDataSource(dataSource); return ssfb; } @Bean //定义映射接口和映射文件,接口和文件必须在同一个包下,但是通常我们将文件放在resource下 public MapperScannerConfigurer mapperScannerConfigurer(){ MapperScannerConfigurer msc = new MapperScannerConfigurer(); //读取映射文件 msc.setBasePackage("com.gnozt.dao"); return msc; } }
-
-
第三步:(spring配置)SpringConfig配置类
-
@Configuration
@ComponentScan({"com.gnozt.dao","com.gnozt.service"})
@PropertySource("classpath:jdbc.properties")
@Import({JdbcConfig.class, MybatisConfig.class})
public class SpringConfig {
}
-
-
第四步:(springmvc配置)ServletConfig配置类和SpringMvcConfig配置类
-
public class ServletConfig extends AbstractAnnotationConfigDispatcherServletInitializer{ @Override protected Class[] getRootConfigClasses() { return new Class[]{SpringConfig.class}; } @Override protected Class[] getServletConfigClasses() { return new Class[]{SpringMvcConfig.class}; } @Override protected String[] getServletMappings() { return new String[]{"/"}; } } -
@Configuration
@ComponentScan("com.gnozt.controller")
@EnableWebMvc
public class SpringMvcConfig extends WebMvcConfiguration{
    @Override
    public void addResourceHandlers(ResourceHandlerRegistry registry){
        //对静态资源的放行,是以webapp目录为基础,如不需要可将此方法去掉,也不用继承类了
        registry.addResourceHandler("/pages/**").addResourceLocations("/pages/");
    }
}
-
-
第五步:pojo类准备
-
@Data
@AllArgsConstructor
@NoArgsConstructor
public class User {
    private Integer id;
    private String username;
    private String password;
}
-
2 功能操作
-
第一步:编写UserMapper接口和UserMapper.xml映射文件
-
public interface UserMapper { //添加数据 Integer addUser(User user); //查询所有 ListselectAll(); //通过id查询 User selectById(Integer id); //动态修改数据 Integer updateById(User user); //删除数据 Integer deleteById(Integer id); //批量删除 (@Param("usernames")可以写在参数前面,指定数组名称) Integer deleteByIds(int[] ids); } -
insert into t_user values(#{id},#{username},#{password}); update t_user username = #{username}, password = #{password} delete from t_user where id = #{id}; delete from t_user where id in #{id} ;
-
-
第二步:UserService接口和UserServiceImpl实现类
-
public interface UserService { //添加数据 Boolean addUser(User user); //查询所有 ListselectAll(); //通过id查询 User selectById(Integer id); //动态修改数据 Boolean updateById(User user); //删除数据 Boolean deleteById(Integer id); //批量删除 (@Param("usernames")可以写在参数前面,指定数组名称) Boolean deleteByIds(int[] ids); } -
UserServiceImpl实现类
-
@Service public class UserServiceImpl implements UserService { @Resource private UserMapper userMapper; @Override public Boolean addUser(User user) { Integer integer = userMapper.addUser(user); if (integer>0){ return true; } return false; } @Override public ListselectAll() { return userMapper.selectAll(); } @Override public User selectById(Integer id) { return userMapper.selectById(id); } @Override public Boolean updateById(User user) { Integer integer = userMapper.updateById(user); if (integer>0){ return true; } return false; } @Override public Boolean deleteById(Integer id) { Integer integer = userMapper.deleteById(id); if (integer>0){ return true; } return false; } @Override public Boolean deleteByIds(int[] ids) { Integer integer = userMapper.deleteByIds(ids); if (integer>0){ return true; } return false; } }
-
-
第三步:UserController控制器
-
@RestController @RequestMapping("/users") public class UserController { @Resource private UserService userService; @PostMapping public boolean addUser(@RequestBody User user) { return userService.addUser(user); } @GetMapping public ListselectAll() { return userService.selectAll(); } @GetMapping("/{id}") public User selectById(@PathVariable Integer id) { return userService.selectById(id); } @PutMapping public boolean updateById(@RequestBody User user) { return userService.updateById(user); } @DeleteMapping("/{id}") //路径上的id跟形参中id连接 ---- 形参中的id又与代码中的调用方法中的id连接 public boolean deleteById(@PathVariable Integer id) { return userService.deleteById(id); } @DeleteMapping public boolean deleteByIds(@RequestParam int[] ids) { return userService.deleteByIds(ids); } }
-
-
第四步:测试
-
测试分为service层测试和controller层测试
-
service层测试用代码测试
-
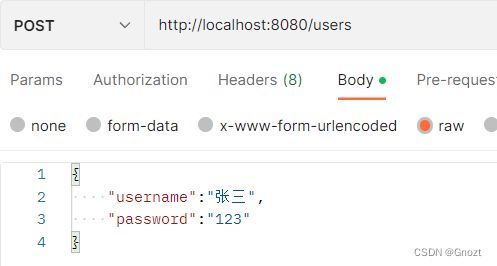
controller层测试使用postman工具,按照请求路径和方式携带参数测试
-
-
-
service层测试
-
@RunWith(SpringJUnit4ClassRunner.class) @ContextConfiguration(classes = SpringConfig.class) public class Test02 { @Autowired private UserService userService; @Test public void addtest01() throws IOException { User user = new User(); user.setUsername("武先生"); user.setPassword("521"); boolean insert = userService.addUser(user); System.out.println(insert); } @Test public void selectalltest() throws IOException { Listusers = userService.selectAll(); System.out.println(users); } @Test public void selectByIdtest() throws IOException { User user = userService.selectById(1); System.out.println(user); } @Test public void updateByIdtest() throws IOException { User user = new User(); user.setId(10); user.setUsername("武先生"); user.setPassword("666"); boolean integer = userService.updateById(user); System.out.println(integer); } @Test public void deleteByIdtest() throws IOException { boolean integer = userService.deleteById(22); System.out.println(integer); } @Test public void deleteByIdstest() throws IOException { int[] ids = {20,21}; boolean integer = userService.deleteByIds(ids); System.out.println(integer); } }
-
-
controller层测试
-
查询所有
-
-
根据id查询
-
-
新增
-
-
修改
-
-
批量删除
-
-
根据id删除
-
-


3 前后端交互格式
-
第一步:定义与前端沟通好的增删改查成功或者失败的码值
-
public class Code { public static final Integer SAVE_OK = 20011; //保存成功 public static final Integer DELETE_OK = 20021; //删除成功 public static final Integer UPDATE_OK = 20031; //修改成功 public static final Integer GET_OK = 20041; //查询成功 public static final Integer SAVE_ERR = 20010; //保存失败 public static final Integer DELETE_ERR = 20020; //删除失败 public static final Integer UPDATE_ERR = 20030; //修改失败 public static final Integer GET_ERR = 20040; //查询失败 public static final Integer SYSTEM_ERR = 50001; //系统异常 public static final Integer SYSTEM_NUKNOW_ERR = 59999; //系统未知异常 }
-
-
第二步:定义一个返回给前端统一格式的实体类
-
@Data
@AllArgsConstructor  //所有参构造
@NoArgsConstructor   //无参构造
public class ResultMsg {
    private Integer code;
    private Object data;
    private String msg;
}
-
-
第三步:修改你的controller类增删改查的返回值
-
@RestController @RequestMapping("/users") public class UserController { @Resource private UserService userService; @PostMapping public ResultMsg addUser(@RequestBody User user) { Boolean flag = userService.addUser(user); Integer code = flag ? Code.SAVE_OK : Code.SAVE_ERR; String msg = flag ? "数据添加成功" : "数据添加失败"; return new ResultMsg(code,flag,msg); } @GetMapping public ResultMsg selectAll() { Listusers = userService.selectAll(); Integer code = users != null ? Code.GET_OK : Code.GET_ERR; String msg = users != null ? "数据查询成功" : "数据查询失败"; return new ResultMsg(code,users,msg); } @GetMapping("/{id}") public ResultMsg selectById(@PathVariable Integer id) { User user = userService.selectById(id); Integer code = user != null ? Code.GET_OK : Code.GET_ERR; String msg = user != null ? "数据查询成功" : "数据查询失败"; return new ResultMsg(code,user,msg); } @PutMapping public ResultMsg updateById(@RequestBody User user) { Boolean flag = userService.updateById(user); Integer code = flag ? Code.UPDATE_OK : Code.UPDATE_ERR; String msg = flag ? "数据修改成功" : "数据修改失败"; return new ResultMsg(code,flag,msg); } @DeleteMapping("/{id}") //路径上的id跟形参中id连接 ---- 形参中的id又与代码中的调用方法中的id连接 public ResultMsg deleteById(@PathVariable Integer id) { Boolean flag = userService.deleteById(id); Integer code = flag ? Code.DELETE_OK : Code.DELETE_ERR; String msg = flag ? "数据删除成功" : "数据删除失败"; return new ResultMsg(code,flag,msg); } @DeleteMapping public ResultMsg deleteByIds(@RequestParam int[] ids) { Boolean flag = userService.deleteByIds(ids); Integer code = flag ? Code.DELETE_OK : Code.DELETE_ERR; String msg = flag ? "数据删除成功" : "数据删除失败"; return new ResultMsg(code,flag,msg); } }
-
4 异常处理
-
项目异常分类
-
业务异常
-
指的是用户输入年龄等信息的时候,填写的不是整数,而是字符串等
-
-
系统异常
-
项目运行过程中可预计且无法避免的异常
-
比如:你获取的数据为空,
-
-
-
其他异常
-
变成人员未预期到的异常
-
-
-
处理方式
-
业务异常
-
提醒用户规范操作
-
-
系统异常
-
发送固定消息传递给用户,安抚用户(比如网络繁忙,请稍后等)
-
发送特定消息给维护人员(暂时不做)
-
记录日志(暂时不做)
-
-
其他异常
-
发送固定消息传递给用户,安抚用户(网络繁忙,请稍后等)
-
发送特定的消息给编程人员,提醒维护,并且纳入前业务异常或者系统异常(暂时不做)
-
记录日志(暂时不做)
-
-
-
操作步骤:
-
第一步:在controller包下编写异常统一处理类(因为只能由mvc扫描)
-
@RestController
public class ExceptionAdvice {
    @ExceptionHandler(Exception.class)
    public ResultMsg doException(Exception ex){
//         发生异常数据肯定为空,所以这里data直接写null就行
         return new ResultMsg(Code.SYSTEM_NUKNOW_ERR,null,"网络繁忙,请稍后重试!");
     }
 }
-
-
第二步:我们还可以自己定义异常类,比如业务异常BussiException和系统异常SystemException (定义方法都是一样的,如下一样,只在你认为异常的地方抛出不同的自定义异常类就可以了)
-
public class SystemException extends RuntimeException{ private Integer code; public SystemException(Integer code) { this.code = code; } public SystemException(Integer code, String message) { super(message); this.code = code; } }
-
-
第三步:定义完我们自己的异常类后,我们可以在我们自己认为哪里会出错的地方try{}catch{}抛出我们自己定义的异常,并给一个我们自己定义的异常编码,和异常信息
-
//Code.SYSTEM_ERR 是我们自己定义的异常编码类中的值,为50001
try{
   int i = 1/0;
}catch (Exception ex){
    throw new SystemException(Code.SYSTEM_ERR,"网络繁忙,请稍后!");
}
-
-
第四步:在统一异常处理类中,将我们定义的异常分离出来
-
@RestControllerAdvice
public class ExceptionAdvice {

    //未知异常
    @ExceptionHandler(Exception.class)
    public ResultMsg doException(Exception ex){
//         发生异常数据肯定为空,所以这里data直接写null就行
         return new ResultMsg(Code.SYSTEM_NUKNOW_ERR,null,"网络繁忙,请稍后重试!");
     }

     //系统异常,我们自己定义的
     @ExceptionHandler(SystemException.class)
     public ResultMsg doSystemException(SystemException ex){
         //获取抛出的我们自己定义的异常信息编码,和信息
         return new ResultMsg(ex.getCode(),null,ex.getMessage());
     }
 }
-