安全框架实战总结之SpringSecurity+Oauth2(二)
1、Oauth2
1.1、Oauth2简介
- 第三方认证技术方案最主要是解决认证协议的通用标准问题,因为要实现跨系统认证,各系统之间要遵循一定的接口协议。
- Oauth协议为用户资源的授权提供了一个安全的、开放而又简易的标准。同时,任何第三方都可以使用OAUTH认证服务,任何服务提供商都可以实现自身的OAUTH认证服务,因而Oauth2是开放的。
- 业界提供了OAUTH的多种实现如PHP、JavaScript,Java,Ruby等各种语言开发包,大大节约了程序员的时间,因而Oauth是简易的。
- 互联网很多服务如Open API,很多大公司如Google,Yahoo,Microsoft等都提供了OAUTH认证服务,这些都足以说明Oauth标准逐渐成为开放资源授权的标准。Oauth协议目前发展到2.0版本,1.0版本过于复杂,2.0版本已得到广泛应用。
Oauth 协议
详情请参考:https://baike.baidu.com/item/oAuth/7153134?fr=aladdin
1.2、Oauth2认证举例
-
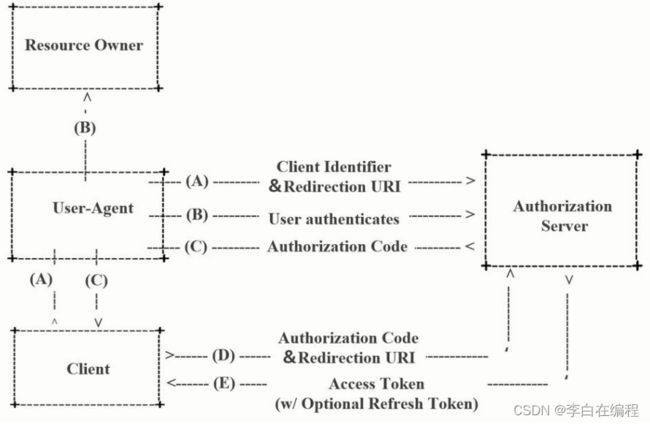
1)用户访问网站的登录页面,点击微信的图标以微信账号登录系统,用户是自己在微信中信息的资源拥有者。 点击"微信"出现一个二维码,此时用户扫描二维码,开始授权给网站。
-
2)资源拥有者同意给客户端授权
资源拥有者扫描二维码表示资源拥有者同意给客户端授权,微信会对资源拥有者的身份进行验证,验证通过后,微信会询问用户是否给网站授权,让其访问自己的微信数据,用户点击"确认登录"表示同意授权,微信认证服务器会颁发一个授权码,并重定向到网站。 -
3)客户端获取到授权码,请求认证服务器,申请令牌
此过程用户看不到,客户端应用程序请求认证服务器,请求携带授权码。 -
4)认证服务器向客户端响应令牌
认证服务器验证了客户端请求的授权码,如果合法则给客户端颁发令牌,令牌是客户端访问资源的通行证。此交互过程用户看不到,当客户端拿到令牌后,用户在网站看到已经登录成功。 -
5)客户端请求资源服务器的资源
客户端携带令牌,访问资源 服务器的资源。网站携带令牌请求访问微信服务器 获取用户的基本信息。 -
6)资源服务器返回受保护的资源
资源服务器校验令牌的合法性,如果合法则向用户响应资源的信息内容。
注意:资源服务器和认证服务器可以是一个服务,也可以是分开的服务,如果是分开的服务资源,服务器通常要请求认证服务器来校验令牌的合法性。
Oauth2.0认证流程如下:
引自 Oauth2.0协议rfc6749
1.3、角色
1)客户端
本身不存储资源,需要通过资源拥有者的授权去请求资源服务器的资源,比如:Android客户
端、Web客户端(浏览器端)、微信客户端等。
2)资源拥有者
通常为用户,也可以是应用程序,即该资源的拥有者。
3)授权服务器(认证服务器)
用来对资源拥有的身份进行认证、对访问资源进行授权。客户端要想访问资源需要通过认证服务器由资源拥有者授权后方可访问。
4)资源服务器
存储资源的服务器,比如,网站用户管理服务器存储了网站用户信息,网站相册服务器存储了用户的相册信息,微信的资源服务存储了微信的用户信息等。客户端最终访问资源服务器获取资源信息。
1.4、常用术语
- 客户凭授权服务器证(Client Credentials):客户端的ClientId和密码用于认证客户
- 令牌(tokens):授权服务器在接收到客户请求后,颁发的访问令牌
- 作用域(scopes):客户请求访问令牌时,由资源拥有者 额外指定的细分权限
1.5、令牌类型
- 授权码:仅用于授权码授权类型,用于交换获取访问令牌和刷新令牌
- 访问令牌:用于代表一个用户或服务直接去访问受保护的资源
- 刷新令牌:用于去授权服务器获取一个刷新访问令牌
- BearerToken:不管谁拿到Token都可以访问资源,类似用户拿着现金去购物
- Proof of Possession(POP) Token:可以校验client是否对Token有明确的拥有权
1.6、特点
- 优点:
更安全,客户端不接触用户密码,服务器端更易集中保护
广泛传播并被持续采用
短寿命和封装的token
资源服务器和授权服务器解耦
集中式授权,简化客户端
HTTP/JSON友好,易于请求和传递token
考虑多种客户端架构场景
客户可以具有不同的信任级别
- 缺点:
协议框架太宽泛,造成各种实现的兼容性和互操作性差
不是一个认证协议,本身并不能告诉你任何用户信息。
2、授权模式
2.1、授权码模式(最复杂、最流行、最安全的授权模式)
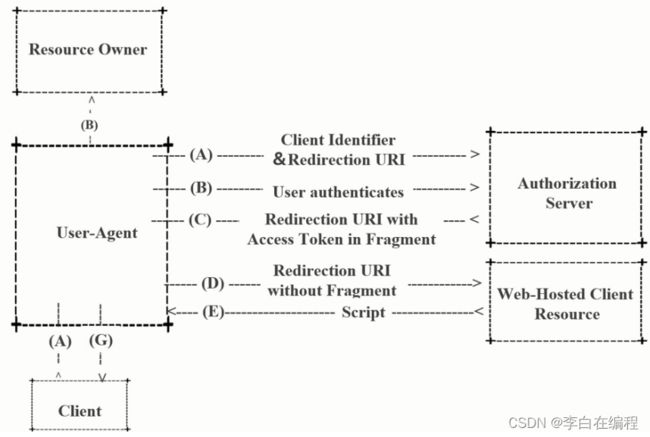
2.2、简化授权模式
2.3、密码模式(公司内部开发了多个应用)
2.4、客户端模式
2.5、刷新令牌
3. SpringSecurity+Oauth2
3.1、授权服务器
Authorize Endpoint :授权端点,进行授权
Token Endpoint :令牌端点,经过授权拿到对应的Token
Introspection Endpoint :校验端点,校验Token的合法性
Revocation Endpoint :撤销端点,撤销授权
3.2、Spring Security Oauth2项目搭建
- 流程:
1)用户访问,此时没有Token。Oauth2RestTemplate会报错,这个报错信息会被
Oauth2ClientContextFilter捕获并重定向到认证服务器
2)认证服务器通过Authorization Endpoint进行授权,并通过
AuthorizationServerTokenServices生成授权码并返回给客户端
3)客户端拿到授权码去认证服务器通过Token Endpoint调用
AuthorizationServerTokenServices生成Token并返回给客户端
4)客户端拿到Token去资源服务器访问资源,一般会通过Oauth2AuthenticationManager调 用ResourceServerTokenServices进行校验。校验通过可以获取资源。
1)导入依赖
<parent>
        <groupId>org.springframework.bootgroupId>
        <artifactId>spring-boot-starter-parentartifactId>
        <version>2.2.2.RELEASEversion>
        <relativePath/>
    parent>
    <properties>
        <java.version>1.8java.version>
        <spring-cloud.version>Greenwich.SR2spring-cloud.version>
    properties>

    <dependencies>
        <dependency>
            <groupId>org.springframework.cloudgroupId>
            <artifactId>spring-cloud-starter-oauth2artifactId>
        dependency>

        <dependency>
            <groupId>org.springframework.cloudgroupId>
            <artifactId>spring-cloud-starter-securityartifactId>
        dependency>

        <dependency>
            <groupId>org.springframework.bootgroupId>
            <artifactId>spring-boot-starter-webartifactId>
        dependency>
        <dependency>
            <groupId>org.springframework.bootgroupId>
            <artifactId>spring-boot-starter-testartifactId>
            <scope>testscope>
        dependency>
    dependencies>

    <dependencyManagement>
        <dependencies>
            <dependency>
                <groupId>org.springframework.cloudgroupId>
                <artifactId>spring-cloud-dependenciesartifactId>
                <version>${spring-cloud.version}version>
                <type>pomtype>
                <scope>importscope>
            dependency>
        dependencies>
    dependencyManagement>

    <build>
        <plugins>
            <plugin>
                <groupId>org.springframework.bootgroupId>
                <artifactId>spring-boot-maven-pluginartifactId>
            plugin>
        plugins>
    build>
2)编写实体类
import org.springframework.security.core.GrantedAuthority;
import org.springframework.security.core.userdetails.UserDetails;

import java.util.Collection;
import java.util.List;

public class User implements UserDetails {

    private String username;
    private String password;
    private List<GrantedAuthority> authorities;

    public User() {
    }

    public User(String username, String password, List<GrantedAuthority> authorities) {
        this.username = username;
        this.password = password;
        this.authorities = authorities;
    }

    @Override
    public Collection<? extends GrantedAuthority> getAuthorities() {
        return authorities;
    }

    @Override
    public String getPassword() {
        return password;
    }

    @Override
    public String getUsername() {
        return username;
    }

    @Override
    public boolean isAccountNonExpired() {
        return true;
    }

    @Override
    public boolean isAccountNonLocked() {
        return true;
    }

    @Override
    public boolean isCredentialsNonExpired() {
        return true;
    }

    @Override
    public boolean isEnabled() {
        return true;
    }
}
3)编写Service
- 编写自定义登录逻辑
//  自定义登录逻辑
@Service
public class UserService implements UserDetailsService {

    @Autowired
    private PasswordEncoder passwordEncoder;

    @Override
    public UserDetails loadUserByUsername(String username) throws UsernameNotFoundException {
        return new User("admin",passwordEncoder.encode("123456"),
                AuthorityUtils.commaSeparatedStringToAuthorityList("admin"));

    }
}
4)编写配置类
- SecurityConfig
import org.springframework.context.annotation.Bean;
import org.springframework.context.annotation.Configuration;
import org.springframework.security.config.annotation.web.builders.HttpSecurity;
import org.springframework.security.config.annotation.web.configuration.EnableWebSecurity;
import org.springframework.security.config.annotation.web.configuration.WebSecurityConfigurerAdapter;
import org.springframework.security.crypto.bcrypt.BCryptPasswordEncoder;
import org.springframework.security.crypto.password.PasswordEncoder;

@Configuration
@EnableWebSecurity  // 开启WebSecurity的相关配置
public class SecurityConfig extends WebSecurityConfigurerAdapter {

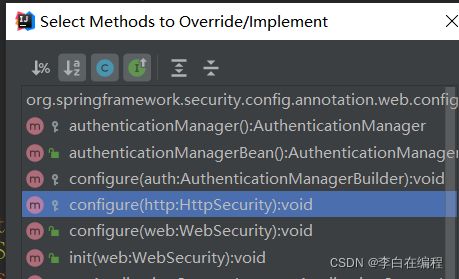
  @Override
   protected void configure(HttpSecurity http) throws Exception {

  http.csrf().disable()
  // 请求放行, 授权服务器的端点都是oauth(见3.1中的图解)
                 .authorizeRequests().antMatchers("/oauth/**", "/login/**", "/logout/**").permitAll()
                 .anyRequest() .authenticated()
                 .and()
                 .formLogin() .permitAll();
    }
    @Bean
    public PasswordEncoder getPasswordEncoder(){
        return new BCryptPasswordEncoder();
    }
}
import org.springframework.beans.factory.annotation.Autowired;
import org.springframework.context.annotation.Configuration;
import org.springframework.security.crypto.password.PasswordEncoder;
import org.springframework.security.oauth2.config.annotation.configurers.ClientDetailsServiceConfigurer;
import org.springframework.security.oauth2.config.annotation.web.configuration.AuthorizationServerConfigurerAdapter;
import org.springframework.security.oauth2.config.annotation.web.configuration.EnableAuthorizationServer;

// 授权服务器的配置
@Configuration
@EnableAuthorizationServer
public class MyAuthorizationServerConfig extends AuthorizationServerConfigurerAdapter {

    @Autowired
    private PasswordEncoder passwordEncoder;

    @Override
    public void configure(ClientDetailsServiceConfigurer clients) throws Exception {
        //  //设置登录的用户信息存储在内存中
        clients.inMemory()
                // client的Id
                .withClient("admin")
                // 对client的密码进行加密
                .secret(passwordEncoder.encode("112233"))
                // 重定向地址,获取授权码(在授权成功跳转)
                .redirectUris("http://www.baidu.com")
                //  配置申请的权限范围
                .scopes("all")
                // 设置模式为 授权码模式
                .authorizedGrantTypes("authorization_code");
    }
}
- 资源配置类 ResourceConfig
import org.springframework.context.annotation.Configuration;
import org.springframework.security.config.annotation.web.builders.HttpSecurity;
import org.springframework.security.oauth2.config.annotation.web.configuration.EnableResourceServer;
import org.springframework.security.oauth2.config.annotation.web.configuration.ResourceServerConfigurerAdapter;

@Configuration
@EnableResourceServer
public class ResourceConfig extends ResourceServerConfigurerAdapter {


    @Override
    public void configure(HttpSecurity http) throws Exception {

        http.authorizeRequests()
             // 所有的请求都要被认证
                .anyRequest().authenticated()
                .and()
                .requestMatchers()
                .antMatchers("/user/**"); //配置需要保护的资源路径
    }
}
5)测试(获取授权码)
- 发送请求:
http://localhost:8080/oauth/authorize?response_type=code&client_id=admin&redirect_uri
=http://www.baidu.com&scope=all
- 来到SpringSecurity提供的登录页,使用admin、123456登录。

- scope.all选项 选中Approve,点击
Authorize授权按钮 来获取授权码,页面会来到百度首页,如图所示,url末尾,code的参数值就是授权码(V03Bs4)


6)根据授权码获取token(POST请求)
- 使用postman,授权类型选择
Basic Auth,post请求栏:localhost:8080/oauth/token,
- 填写请求体Body

上图中的key-value在MyAuthorizationServerConfig类中配置。
- grant_type :授权类型,填写authorization_code,表示授权码模式
- code :授权码,就是刚刚获取的授权码(跳转到百度页面url中的请求参数code),注意:授权码只使用一次就无效了,授权码失效后需要重新申请。
- client_id :客户端标识
- redirect_uri :申请授权码时的跳转url,一定和申请授权码时用redirect_uri一致。
- scope :授权范围。
- 认证失败服务端返回 401 Unauthorized
注意:此时无法请求到令牌,访问服务器会报错
7)根据token(access_token的值)获取服务器的资源
-
授权类型改为
Bearer Token,左侧Token栏输入 access_token的值,发送POST请求:localhost:8080/user/getCurrentUser
-
发送请求后,就可以在Body中获取到登录的用户信息。
-
注意:授权码(code)只能请求一次,如果没有请求成功,则需要再次发送请求。
3.4、密码模式
1)修改配置信息
- 修改MyAuthorizationServerConfig类,重写方法
void configure(AuthorizationServerEndpointsConfigurer endpoints)
   @Autowired
    private AuthenticationManager authenticationManager;

    @Autowired
    private UserService userService;

     // 使用密码模式的配置
    @Override
    public void configure(AuthorizationServerEndpointsConfigurer endpoints) throws Exception {

        endpoints.userDetailsService(userService)  //  使用自定义的登录逻辑
                .authenticationManager(authenticationManager);

    }
授权模式添加上密码模式"password":
.authorizedGrantTypes("authorization_code","password");
- 修改SecurityConfig配置类,添加组件AuthenticationManager
    @Bean
    @Override
    public AuthenticationManager authenticationManagerBean() throws Exception {
        return super.authenticationManagerBean();
    }
2)测试
grant_type:授权类型,password 表示密码模式
username、password:对应自定义登录逻辑类UserService中的配置,因为密码模式是把用户名和密码传给客户端,客户端直接去请求,故不需要client_id。
scope:授权范围
- 发送POST请求:localhost:8080/oauth/token,获取Token(access_token属性)。

- 获取到令牌后,授权类型改为"Bearer Token",Token栏填入
access_token的值,发送POST请求:localhost:8080/user/getCurrentUser,结果如下,成功访问服务资源。

3.5、 在Redis中存储Token
1)添加依赖
        <dependency>
            <groupId>org.springframework.bootgroupId>
            <artifactId>spring-boot-starter-data-redisartifactId>
        dependency>


        <dependency>
            <groupId>org.apache.commonsgroupId>
            <artifactId>commons-pool2artifactId>
        dependency>
    dependencies>
2)编写配置
application.properties:
# 配置启动Redis服务的主机,我虚拟机的IP为192.168.40.130
spring.redis.host=192.168.40.130
- RedisConfig
import org.springframework.beans.factory.annotation.Autowired;
import org.springframework.context.annotation.Bean;
import org.springframework.context.annotation.Configuration;
import org.springframework.data.redis.connection.RedisConnectionFactory;
import org.springframework.security.oauth2.provider.token.store.redis.RedisTokenStore;

@Configuration
public class RedisConfig {

// redis 连接工厂
    @Autowired
    private RedisConnectionFactory connectionFactory;


    @Bean
    public RedisTokenStore redisTokenStore(){
        return new RedisTokenStore(connectionFactory);
    }
}
3)在认证服务器配置中指定令牌的存储策略为Redis
修改MyAuthorizationServerConfig配置类,添加如下代码:
  @Autowired
    private AuthenticationManager authenticationManager;

    @Autowired
    private UserService userService;

    @Autowired
    private RedisTokenStore redisTokenStore;

    @Override
    public void configure(AuthorizationServerEndpointsConfigurer endpoints) throws Exception {

        endpoints.userDetailsService(userService)  //  使用自定义的登录逻辑
                .authenticationManager(authenticationManager)
                // 配置令牌的存储位置(存在Redis中)
                .tokenStore(redisTokenStore);

    }
MyAuthorizationServerConfig完整代码如下:
import org.springframework.beans.factory.annotation.Autowired;
import org.springframework.context.annotation.Configuration;
import org.springframework.security.authentication.AuthenticationManager;
import org.springframework.security.crypto.password.PasswordEncoder;
import org.springframework.security.oauth2.config.annotation.configurers.ClientDetailsServiceConfigurer;
import org.springframework.security.oauth2.config.annotation.web.configuration.AuthorizationServerConfigurerAdapter;
import org.springframework.security.oauth2.config.annotation.web.configuration.EnableAuthorizationServer;
import org.springframework.security.oauth2.config.annotation.web.configurers.AuthorizationServerEndpointsConfigurer;
import org.springframework.security.oauth2.provider.token.store.redis.RedisTokenStore;

// 授权服务器的配置
@Configuration
@EnableAuthorizationServer
public class MyAuthorizationServerConfig extends AuthorizationServerConfigurerAdapter {

    @Autowired
    private PasswordEncoder passwordEncoder;

    @Autowired
    private AuthenticationManager authenticationManager;

    @Autowired
    private UserService userService;

    @Autowired
    private RedisTokenStore redisTokenStore;

    @Override
    public void configure(AuthorizationServerEndpointsConfigurer endpoints) throws Exception {

        endpoints.userDetailsService(userService)  //  使用自定义的登录逻辑
                .authenticationManager(authenticationManager)
                // 配置令牌的存储位置(存在Redis中)
                .tokenStore(redisTokenStore);

    }

    @Override
    public void configure(ClientDetailsServiceConfigurer clients) throws Exception {
        //  //设置登录的用户信息存储在内存中
        clients.inMemory()
                // client的Id
                .withClient("admin")
                // 对client的密码进行加密
                .secret(passwordEncoder.encode("112233"))
                // 重定向地址,获取授权码
                .redirectUris("http://www.baidu.com")
                //  配置申请的权限范围
                .scopes("all")
                // 设置模式为 授权码模式(加入"password")
         .authorizedGrantTypes("password");
    }
}
4)测试
使用密码模式请求token,授权类型选择"Basic Auth",username为admin,password为112233(账号,密码配置在MyAuthorizationServerConfig类中),设置请求体Body,发送POST请求:localhost:8080/oauth/token

如此,请求的Token存储在Redis中。

同样,如前面讲到的一样,可以根据获取到token去请求资源。
授权类型改为"Bearer Token",输入刚才获取到令牌,发送GET请求:localhost:8080/user/getCurrentUser


