Flowable流程审批使用
本文需对flowable 有一点了解,若新入门请先详细阅读官方中文文档:https://tkjohn.github.io/flowable-userguide/
请假实例
请假流程设计及xml文件
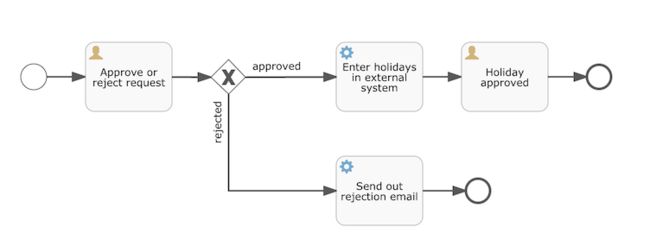
请假流程holiday-request.bpmn20.xml
process文件下
<?xml version="1.0" encoding="UTF-8"?>
<definitions xmlns="http://www.omg.org/spec/BPMN/20100524/MODEL"
  xmlns:xsi="http://www.w3.org/2001/XMLSchema-instance"
  xmlns:xsd="http://www.w3.org/2001/XMLSchema"
  xmlns:bpmndi="http://www.omg.org/spec/BPMN/20100524/DI"
  xmlns:omgdc="http://www.omg.org/spec/DD/20100524/DC"
  xmlns:omgdi="http://www.omg.org/spec/DD/20100524/DI"
  xmlns:flowable="http://flowable.org/bpmn"
  typeLanguage="http://www.w3.org/2001/XMLSchema"
  expressionLanguage="http://www.w3.org/1999/XPath"
  targetNamespace="http://www.flowable.org/processdef">

  <process id="holidayRequest" name="Holiday Request" isExecutable="true">

    <startEvent id="startEvent"/>
    <sequenceFlow sourceRef="startEvent" targetRef="approveTask"/>

    <userTask id="approveTask" name="Approve or reject request"/>
    <sequenceFlow sourceRef="approveTask" targetRef="decision"/>

    <exclusiveGateway id="decision"/>
    <sequenceFlow sourceRef="decision" targetRef="externalSystemCall">
      <conditionExpression xsi:type="tFormalExpression">
        <![CDATA[
          ${approved}
        ]]>
      </conditionExpression>
    </sequenceFlow>
    <sequenceFlow  sourceRef="decision" targetRef="sendRejectionMail">
      <conditionExpression xsi:type="tFormalExpression">
        <![CDATA[
          ${!approved}
        ]]>
      </conditionExpression>
    </sequenceFlow>

    <serviceTask id="externalSystemCall" name="Enter holidays in external system"
        flowable:class="org.flowable.CallExternalSystemDelegate"/>
    <sequenceFlow sourceRef="externalSystemCall" targetRef="holidayApprovedTask"/>

    <userTask id="holidayApprovedTask" name="Holiday approved"/>
    <sequenceFlow sourceRef="holidayApprovedTask" targetRef="approveEnd"/>

    <serviceTask id="sendRejectionMail" name="Send out rejection email"
        flowable:class="org.flowable.SendRejectionMail"/>
    <sequenceFlow sourceRef="sendRejectionMail" targetRef="rejectEnd"/>

    <endEvent id="approveEnd"/>

    <endEvent id="rejectEnd"/>

  </process>

</definitions>
1、初始化ProcessEngine流程引擎实例。
    ProcessEngineConfiguration cfg = new StandaloneProcessEngineConfiguration()
      .setJdbcUrl("jdbc:mysql://localhost:3306/dbname?useUnicode=true&characterEncoding=UTF-8")
      .setJdbcUsername("****")
      .setJdbcPassword("****")
      .setJdbcDriver("com.mysql.jdbc.Driver")
      //是否创建或更新数据库表
      .setDatabaseSchemaUpdate(ProcessEngineConfiguration.DB_SCHEMA_UPDATE_TRUE)
    ProcessEngine processEngine = cfg.buildProcessEngine();
  }
2、部署请假流程到引擎中
将流程定义部署至Flowable引擎,需要使用RepositoryService,其可以从ProcessEngine对象获取。使用RepositoryService,可以通过XML文件的路径创建一个新的部署(Deployment),并调用deploy()方法实际执行:
RepositoryService repositoryService = processEngine.getRepositoryService();

Deployment deployment = repositoryService.createDeployment()
  .addClasspathResource("holiday-request.bpmn20.xml")
  .deploy();
现在可以通过API查询验证流程定义已经部署在引擎中;通过RepositoryService创建的
ProcessDefinitionQuery对象实现查询:
ProcessDefinition processDefinition = repositoryService.createProcessDefinitionQuery()
  .deploymentId(deployment.getId())
  .singleResult();
System.out.println("Found process definition : " + processDefinition.getName());
3、创建流程实例(提交请假申请)
使用RuntimeService启动一个流程实例。收集的数据作为一个java.util.Map实例传递,其中的键就是之后用于获取变量的标识符。这个流程实例使用key启动。这个key就是BPMN 2.0 XML文件中设置的id属性,在这个例子里是holidayRequest。
RuntimeService runtimeService = processEngine.getRuntimeService();

//使用map封装请假相关的信息数据(请假申请人,请假天数,请假理由等)
Map<String, Object> variables = new HashMap<String, Object>();
variables.put("employee", "zhangsan");
variables.put("nrOfHolidays", 4);
variables.put("description", "我要请假4天");
//每次创建提交一个请假申请,就会创建一个请假流程的实例
ProcessInstance processInstance = runtimeService.startProcessInstanceByKey("holidayRequest", variables);
4、查询待办任务
通过TaskService创建一个TaskQuery,查询(指定人员/组)待审批的任务
TaskService taskService = processEngine.getTaskService();

List<Task> tasks = taskService.createTaskQuery().taskCandidateGroup("managers").list();
System.out.println("You have " + tasks.size() + " tasks:");
for (int i=0; i<tasks.size(); i++) {
  System.out.println((i+1) + ") " + tasks.get(i).getName());
}
5、审批任务
人工审批任务(人工审批/用户任务/userTask)
//同意或拒绝请假申请
boolean approved = true;
variables = new HashMap<String, Object>();
variables.put("approved", approved);
//通过complete()提交审批
taskService.complete(task.getId(), variables);
系统任务:领导审批通过或拒绝都将通过系统发送邮件通知:
以审批通过为例:发送邮件通过xml中配置的org.flowable.CallExternalSystemDelegate类实现。
审批通过后自动调用该类中的excute()方法
<serviceTask id="externalSystemCall" name="Enter holidays in external system"
        flowable:class="org.flowable.CallExternalSystemDelegate"/>
CallExternalSystemDelegate类需实现JavaDelegate接口,在excute()方法中实现相应功能。
package org.flowable;

import org.flowable.engine.delegate.DelegateExecution;
import org.flowable.engine.delegate.JavaDelegate;

public class CallExternalSystemDelegate implements JavaDelegate {

    public void execute(DelegateExecution execution) {
        System.out.println("Calling the external system for employee "
            + execution.getVariable("employee"));
    }

}
集成SpringBoot
添加maven依赖
<dependency>
    <groupId>org.flowable</groupId>
    <artifactId>flowable-spring-boot-starter</artifactId>
    <version>${flowable.version}</version>
</dependency>
配置数据库连接
spring.datasource.url=jdbc:mysql://127.0.0.1:3306/flowable-spring-boot?characterEncoding=UTF-8
spring.datasource.username=flowable
spring.datasource.password=flowable
database-schema-update: true
集成SpringBoot的优点:
- 无需创建初始化ProcessEngine流程引擎:自动创建并初始化,即无需步骤1;
- 无需部署相关流程,自动部署process下所有流程,即步骤2;
- 无需手动通过ProcessEngine获取RuntimeService 、RepositoryService 、TaskService
等各种服务; 直接使用@Autowired 即可; 例:
@Autowired
private RuntimeService runtimeService;