最全的ansible自动化运维问题查询指南
问题一:如何安装部署ansible
- 环境:
需要一台服务器,以及2台以上的台客户机。
- ansible服务器:
先设置域名解析:
vim /etc/hosts
- 192.168.190.190 ansible
- 192.168.190.191 host1
- 192.168.190.192 host2
- 用yum下载ansible
yum -y install ansible   \\安装ansible
rpm -qc ansible     \\验证是否安装成功
问题二:安装完ansible如何测试使用?
- 如果客户端特别多的时候我们就需要用到免密赖操作,节约时间
在服务器端输入:
ssh-keygen然后回车就可以了
将公钥发放出去:
ssh-copy-id +客户机IP
成功后可以实验一下:ssh root@主机IP
- 配置主机清单:
进入配置文件中增加:
vim /etc/ansible/hosts
- host1
- host2
- … …
测试连通性:
ansible host1 -m ping
问题三:Inventroy-主机清单的高级使用?
为什么要学高级使用?方便管理数量庞大的服务器。
- 增加主机组:
vim /etc/ansible/hosts
[webserver]   \\中括号内为组名
host1
host2       \\将host1和host2分为一个组方便管理
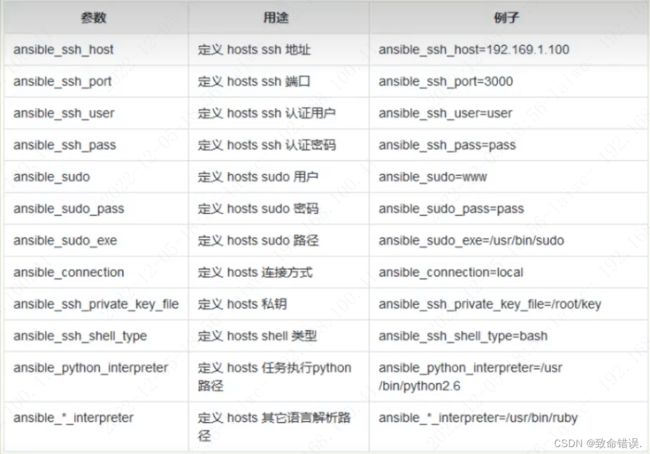
- 增加用户名和密码:
vim /etc/ansible/hosts
host[1:2] ansible_ssh_user='root' ansible_ssh_pass='888888'
配置完成后可以免用户名和密码登入
- 更改端口号:
vim /etc/ssh/sshd_config
找到port更改后面的数字就是改变了端口,再去修改配置文件
vim /etc/ansible/hosts
host[1:2] ansible_ssh_user='root' ansible_ssh_pass='888888' ansible_ssh_port='端口号'
- 简化主机清单设置:
vim /etc/ansible/hosts

[webserver:vars]
ansible_ssh_user='root'
ansible_ssh_pass='888888'
这样设置的话webserver底下的主机都会拥有这个配置
- 自定义主机列表:
vim hostlist
[docker]
host1
host2
[docker:vars]
ansible_ssh_user='root'
ansible_ssh_pass='888888'
把文件拷走就可以直接用了:
ansible -i hostlist docker -m ping -o
问题四:Ad-Hoc点对点模式.模块的使用?
- 复制模块:
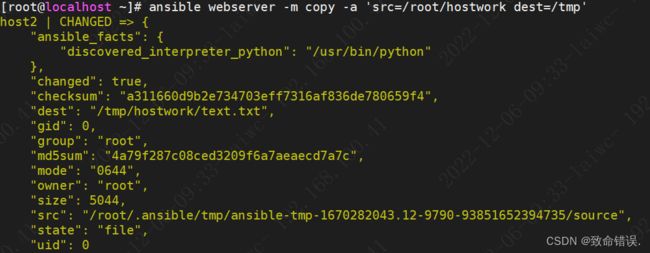
ansible webserver -m copy -a 'sre=/etc/host dest=/tmp' \\-a是属性的的意思
- 拓展: 后面也可以加owner=root group=bin mod=777 来改变文件属性
- 拓展: 后面加backup=yes 使文件具有备份功能
- 拓展: 命令输出后是黄色的话代表修改成功,绿色是不变,红色为失败
2.用户模块:
- 修改用户增加、删除
ansible webserver -m user -a 'name=hahaha state=present'    \\统一创建用户

ansible webserver -m user -a 'name=hahaha state=absent'      \\统一删除用户
- 修改shell
ansbile webserver -m user -a 'name=hahaha shell=/sbin/nologin append=yes' \\更改用户shell
- 修改用户密码
echo '123456' | openssl passwd -1 -stdin      \\生成加密密码
ansible webserver -m user -a 'name=hahaha password="ESCr.cV8SgFtc"'   \\统一生成密码
3.软件包管理
ansible webserver -m yum -a 'name="httpd" state=latest'    \\下载apache
ansible webserver -m yum -a 'name="httpd" state=absent'    \\卸载apache
4.服务模块:
ansible webserver -m service -a 'name=httpd statu=started'   \\开启apache服务
ansible webserver -m service -a 'name=httpd statu=started enable=yes'   \\开启开机自启动
5.文件模块:
ansible webserver -m file -a 'path=/tmp/666.txt mode=777 state=touch'   \\创建一个666.txt的文件
ansible webserver -m file -a 'path=/tmp/666 mode=777 state=directory'     \\创建一个666的目录
6.收集模块:
ansible webserver -m setup -a 'filter=ansible_all_ipv4_addresses' \\查询主机ipv4地址
3-6模块只列举了最简单的例子,举一反三请用
ansible-doc 模块名
7.shell模块:
shell模块功能最为强大,可以拥有前面所用到的全部模块。
ansible webserver -m shell -a 'hostname' -o               \\查看主机名
ansible webserver -m shell -a 'yum -y install httpd' -o   \\下载apache
ansible webserver -m shell -a 'useradd hhh' -o             \\创建hhh用户
ansible webserver -m shell -a 'touch /tmp/666.txt' -o      \\创建文件
... ...以此类推
问题五:YAML语言的使用?
通YAML写一个简单的剧本,完成web的安装,配置,启动的全过程
- 准备工作环境:
ansible webserver -m yum -a 'name=httpd state=removed' -o       \\卸载apache
ansible webserver -m yum -a 'name=httpd-tools state=removed' -o  \\不卸载干净重新安装会报错

yum -y install httpd   \\准备配置文件
mkdir apache           \\创建apache目录
cd apache               \\进入目录
cp -rf /etc/httpd/conf/httpd.conf .   \\复制apache的配置文件到当前目录下
用vim 改一下端口为8080
- 编写YAML文件
vim apache.yaml  \\创建文件
 - hosts: webserver
   tasks:
   - name: install apache packages    \\neme后面接的相当于对下面模块的注释
     yum: name=httpd state=present    \\注意格式空格
   - name: cope apache conf
     copy: src=./httpd.conf dest=/etc/httpd/conf/httpd.conf
   - name: ensure apache is running
     service: name=httpd state=started enabled=yes
- 写完了得测试一下YAML文件的可用性
ansible-playbook apache.conf --syntax-check   \\测试语法有没有错误
ansible-playbook apache.conf --list-tasks     \\将全部任务列出来
ansible-playbook apache.conf --list-hosts     \\将全部主机列出来

这样即为语法没有错误,但是还要仔细检查参数。如果报错往以下几方面考虑:
- 有没有注意空格。
- 有没有注意对齐。
- 指令拼写有没有错误。
- 查看报错提示。
最后用
ansible-playbook apache.yaml一键执行下去
问题六:改了配置文件后如何生效?
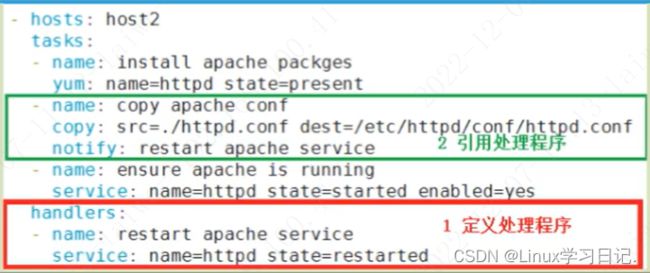
如果我们改了配置文件,例如改了端口号,那如何让这个生效呢?生效是需要重启的,但是这样写,之后不管你干啥,你动一下他就会重启一下,用户心态就炸了。所以得到handlers
  handlers:
 - name: restart apache service
   service: name=nttpd state=restarted

   (引用处理程序)
   notify: restart apache service  \\这个名字必须和上面的name一模一样
问题七:Role角色扮演?
有剧本就有角色,理解为要演出什么剧本就得派特定的角色上去即可。这些角色需要我们提前创建好,这样一旦剧本需要用得上,直接派角色上去就好了。
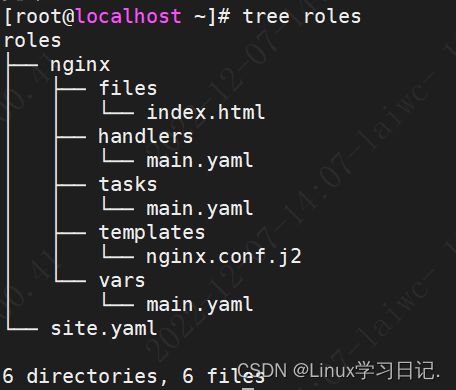
1.目录结构:
mkdir roles/nginx/{files,handlers,tasks,templates,vars} -p    \\创建多个目录
touch roles/site.yaml roles/nginx/{handlers,tasks,vars}/main.yaml   \\创建文件
echo 1234 > /root/roles/nginx/files/index.html   \\创建文件
yum -y install nginx && cp /etc/nginx/nginx.conf /root/roles/nginx/templates/nginx.conf.j2     \\将配置文件拷贝到templates目录下
2.编写任务:
vim /roles/nginx/tesks/main.yaml
---
- name: install epel-release packge
  yum: name=epel-release state=latest
- name: install nginx packge
  yum: name=nginx state=latest
- name: copy index.html
  copy: src=index.html dest=/usr/share/nginx/html/index.html
- name: copy nginx.conf
  copy: src=nginx.conf.j2 dest=/etc/nginx/nginx.conf
  notify: restart nginx
- name: make nginx service running
  service: name=nginx state=started enable=yes
  开头---是规则,必须写
3.配置文件:
vim roles/nginx/templates/nginx.conf.j2
4.编写变量:
vim /roles/nginx/vars/main.yaml
worker_connections: 10240
5.编写处理程序:
vim /roles/nginx/handlers/main.yaml

---
- name: restart nginx
  service: name=nginx state=retarted
6.编写总剧本:
vim /roles/site.yaml

---
 - hosts: host1
  roles:
 - nginx


