csx c# dll_在Visual Studio中使用C#脚本(CSX脚本)生成代码
csx c# dll
介绍 (Introduction)
CSX scripts are very powerful because they can use C# and the full .NET Framework. In this article, I'll show step by step instructions and scripts to run CSX scripts (C# Scripts), with references to external assemblies (3rd party libraries, including NuGet packages), using Powershell scripts which can be invoked directly from Visual Studio. I'll also show some tricks to make the scripts work without modifications across your development team. In the end, I'll use a simple code generation library to generate POCOs based on AdventureWorks database schema.
CSX脚本非常强大,因为它们可以使用C#和完整的.NET Framework。 在这篇文章中,我将展示一步一步的指示和脚本运行CSX脚本(C#脚本),与外部组件 ( 第三方库,包括的NuGet包 ) 的引用 , 使用它可以直接从Visual Studio中调用PowerShell脚本 。 我还将展示一些技巧,以使脚本在整个开发团队中无需修改即可工作。 最后,我将使用一个简单的代码生成库来基于AdventureWorks数据库架构生成POCO。
C#脚本(CSX文件) (C# Scripts (CSX Files))
C# Script Files (CSX) were introduced with Roslyn and can be executed in Roslyn or other compatible cross-platform scripting engines like dotnet-script or even with C# REPL (called csi.exe).
C#脚本文件(CSX)是随Roslyn引入的,可以在Roslyn或其他兼容的跨平台脚本引擎(如dotnet-script或什至与C#REPL (称为csi.exe ) 。
Those scripting engines have some limitations (like lack of namespaces), but they allow us to virtually invoke any C# code, which gives us some amazing features like strong typing, compile-time checking, full IDE support (with debugging), cross-platform (dotnet core), full access to all .NET Framework (including not only SqlServer libraries but also some amazing third-party libraries like Dapper, Newtonsoft JSON, and others). So if we're talking about automation, we get a full-fledged language with a familiar syntax, instead of relying for example on PowerShell. And if we're talking about code generation we also get a full-fledged language with a familiar syntax, instead of relying on a templating-engine which would only offer a subset of features of the underlying language.
这些脚本引擎有一些局限性(例如缺少名称空间),但是它们允许我们虚拟地调用任何C#代码,这为我们提供了一些令人惊奇的功能,例如强类型 , 编译时检查 , 完整的IDE支持 (带有调试功能 ), 跨平台 (dotnet核心),对所有.NET Framework的完全访问权限(不仅包括SqlServer库,还包括一些了不起的第三方库,例如Dapper , Newtonsoft JSON等)。 因此,如果我们在谈论自动化,我们将获得具有熟悉语法的全面语言,而不必依赖于PowerShell。 而且,如果我们谈论的是代码生成,那么我们还将获得一种具有熟悉语法的功能完善的语言,而不是依赖仅提供基础语言功能子集的模板引擎。
样本CSX脚本 (Sample CSX Script)
CSX scripts inside Visual Studio have some support for Intellisense (auto-completion) and compile-time checks, but those features work much better in CS files. So it's a good idea to put as much as possible into cs files and as little as possible in CSX scripts. I like to use CSX only for basic things like loading libraries, setting connection strings, settings paths, and invoking the real code in CS files.
Visual Studio中的CSX脚本对Intellisense(自动完成)和编译时检查提供了一些支持,但是这些功能在CS文件中的工作要好得多。 因此,最好将尽可能多的cs文件放入CSX脚本中。 我只想将CSX用于基本功能,例如加载库,设置连接字符串,设置路径以及调用CS文件中的实际代码。
MyProgram.cs (MyProgram.cs)
public class MyProgram
{
   public void MyMethod()
   {
      Console.WriteLine("Hello from MyMethod");
   }
}
MyScript.csx (MyScript.csx)
#load "MyProgram.cs"

new MyProgram().MyMethod();
Console.WriteLine("Hello Code-Generation!");
使用C#REPL(CSI.EXE)运行CSX脚本 (Running CSX Script using C# REPL (CSI.EXE))
Visual Studio ships with a command-line REPL called CSI that can be used to run .csx scripts.
Visual Studio附带了一个称为CSI的命令行REPL , 可用于运行.csx脚本 。
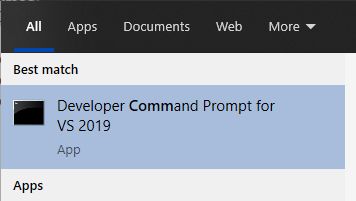
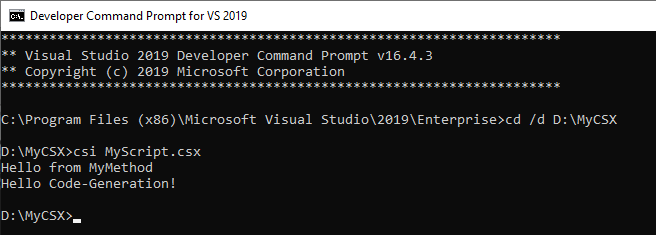
You can run CSI.EXE directly from Visual Studio Developer Command Prompt (csi MyScript.csx):
您可以直接从Visual Studio开发人员命令提示符( csi MyScript.csx )运行CSI.EXE :
装配参考 (Assembly References)
In the same sense that it's a good idea to use simple statements in CSX to invoke more complex CS code, it's also a good idea to load external assemblies when you can rely on existing libraries.
从相同的意义上讲,在CSX中使用简单的语句来调用更复杂的CS代码是一个好主意,在您可以依赖现有库时加载外部程序集也是一个好主意。
CSX allows loading assembly references by using the #r directive in the top of your scripts:
CSX允许通过使用脚本顶部的#r指令来加载程序集引用 :
// CSI.EXE requires absolute paths for loading external assemblies:
#r "C:\Users\drizin\.nuget\packages\dapper\2.0.35\lib\netstandard2.0\Dapper.dll"

#load "File1.cs"
#load "File2.cs"
#load "MyProgram.cs"

new MyProgram().MyMethod();
Console.WriteLine("Hello Code-Generation!");
NuGet软件包 (NuGet Packages)
If you need to reference a NuGet package, you can just rely on NuGet tools (and Visual Studio build process) to automatically restore the packages required by your script. For achieving that, you can just add the CSX as part of a Visual Studio project, so when each developer tries to build the project Visual Studio will download the missing packages, and the developer just needs to fix the assemblies location.
如果需要引用NuGet程序包,则可以仅依靠NuGet工具(和Visual Studio生成过程)来自动还原脚本所需的程序包。 为此,您可以将CSX添加为Visual Studio项目的一部分,因此,当每个开发人员尝试构建该项目时,Visual Studio都会下载缺少的包 ,而开发人员只需要修复程序集的位置即可。
从PowerShell调用C#REPL(以运行CSX脚本) (Invoking C# REPL (to run CSX scripts) from PowerShell)
Although you can run CSI.exe directly from Visual Studio Developer Command Prompt, invoking it through PowerShell is very helpful for a few reasons:
尽管您可以直接从Visual Studio开发人员命令提示符运行CSI.exe , 但出于以下几个原因,通过PowerShell调用它非常有用:
- You can run outside of Visual Studio. You don't even need Visual Studio to run CSX. 您可以在Visual Studio之外运行。 您甚至不需要Visual Studio来运行CSX。
- PowerShell allows us to reference external assemblies using relative paths (more about this below). PowerShell允许我们使用相对路径引用外部程序集(有关此内容的更多信息,请参见下文)。
To invoke CSI using Powershell, we must know the location of csi.exe.
要使用Powershell调用CSI,我们必须知道csi.exe的位置。
CSI is shipped with Visual Studio, but there are different possible folders for that according to your Visual Studio version. Even if you don't have Visual Studio, you can still install CSI by using the NuGet package Microsoft.Net.Compilers.Toolset.
CSI随Visual Studio一起提供,但是根据您的Visual Studio版本,可能有不同的文件夹。 即使没有Visual Studio,仍然可以使用NuGet包Microsoft.Net.Compilers.Toolset安装CSI。
So the first step is to search for csi.exe in multiple locations as I show in the sample Powershell script RunMyScript.ps1 below:
因此,第一步是在多个位置搜索csi.exe ,如我在示例Powershell脚本RunMyScript.ps1中所示。 下面:
# Locate CSI.EXE by searching common paths
$csi = (
  "$Env:userprofile\.nuget\packages\microsoft.net.compilers.toolset\3.6.0\tasks\net472\csi.exe",
  "$Env:programfiles
   (x86)\Microsoft Visual Studio\2019\Enterprise\MSBuild\Current\Bin\Roslyn\csi.exe",
  "$Env:programfiles
   (x86)\Microsoft Visual Studio\2019\Professional\MSBuild\Current\Bin\Roslyn\csi.exe",
  "$Env:programfiles
   (x86)\Microsoft Visual Studio\2019\Community\MSBuild\Current\Bin\Roslyn\csi.exe",
  "$Env:programfiles
   (x86)\Microsoft Visual Studio\2017\Enterprise\MSBuild\15.0\Bin\Roslyn\csi.exe",
  "$Env:programfiles
   (x86)\Microsoft Visual Studio\2017\Professional\MSBuild\15.0\Bin\Roslyn\csi.exe",
  "$Env:programfiles
   (x86)\Microsoft Visual Studio\2017\Community\MSBuild\15.0\Bin\Roslyn\csi.exe"
) | Where-Object { Test-Path $_ } | Select-Object -first 1

$dir = Split-Path $MyInvocation.MyCommand.Path
$script = Join-Path $dir "MyScript.csx"

& $csi $script
To launch the PowerShell script from the command line, it's just about running:
要从命令行启动PowerShell脚本,只需运行:
Powershell Full-Path-To-Your-Script-ps1
从Visual Studio IDE运行 (Running from Visual Studio IDE)
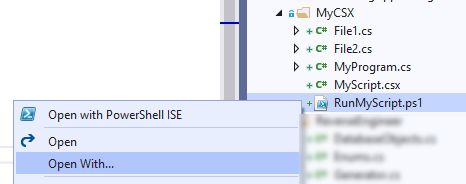
To run from Visual Studio, you can just add the PS1 to your project or solution, right-click the file, and click the option "Open with PowerShell ISE", which is the IDE for editing/running PowerShell scripts.
要从Visual Studio运行,您只需将PS1添加到您的项目或解决方案中,右键单击该文件,然后单击选项“ 使用PowerShell ISE打开 ”,这是用于编辑/运行PowerShell脚本的IDE。
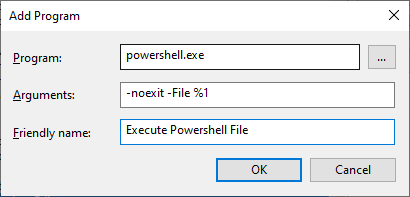
Another alternative is that you can add new actions to your right-button actions - you can click "Open With..." and configure PowerShell to be executed directly from Visual Studio:
另一种选择是,您可以向右键单击操作中添加新操作-您可以单击“ 打开方式... ”,并将PowerShell配置为直接从Visual Studio执行:
The list of possible actions will include this new option of invoking PS1 scripts directly from the IDE, and you can also set this as the default action for opening PS1 files.
可能的操作列表将包括此直接从IDE调用PS1脚本的新选项,您还可以将其设置为打开PS1文件的默认操作。
允许未签名的脚本 (Allowing Unsigned Scripts)
If you have never executed unsigned PowerShell scripts, you may have to enable PowerShell unsigned scripts by running PowerShell as Administrator (both the x64 version and in the x86 version which is what's executed from inside Visual Studio) and running this:
如果您从未执行过未签名的PowerShell脚本,则可能必须通过以管理员身份运行PowerShell(x64版本和x86版本,这是从Visual Studio内部执行的)来启用PowerShell未签名的脚本,然后运行以下命令:
Set-ExecutionPolicy -ExecutionPolicy Unrestricted
相对大会参考 (Relative Assembly References)
One of the major problems with CSI is that the #r directive (for loading assembly references) doesn’t accept NuGet-like references or environment variables so all assembly references should be specified with full paths. This is not a showstopper but it’s a little annoying since it makes it harder to share code among multiple developers since each developer would have to fix their references.
CSI的主要问题之一是#r指令(用于加载程序集引用) 不接受 类似NuGet的引用或环境变量,因此所有程序集引用都应使用完整路径指定 。 这不是一个大问题,但是有点烦人,因为这使得在多个开发人员之间共享代码更加困难,因为每个开发人员都必须修复他们的引用。
As we've seen before, CSX expects absolute references like this:
正如我们之前所见,CSX期望这样的绝对引用:
#r "C:\Users\drizin\.nuget\packages\dapper\2.0.35\lib\netstandard2.0\Dapper.dll"
One of the advantages of using PowerShell (as described above) is that we can use environment-variables and use #r directive with relative paths. In the PowerShell script, we just have to locate the base path where your assemblies are located and pass that to CSI so it can search for assemblies in this folder, like this:
使用PowerShell的优势之一(如上所述)是我们可以使用环境变量,并在相对路径中使用#r指令 。 在PowerShell脚本中,我们只需要找到程序集所在的基本路径并将其传递给CSI,以便它可以在此文件夹中搜索程序集,如下所示:
$assemblies = "${env:userprofile}\.nuget\packages\";
& $csi /lib:"$assemblies" $script
And then in the CSX, you can use relative paths like this:
然后在CSX中,您可以使用类似的相对路径 :
#r "dapper\2.0.35\lib\netstandard2.0\Dapper.dll"
PackageReference(NuGet 4)与packages.config(NuGet 3) (PackageReference (NuGet 4) vs packages.config (NuGet 3))
The new MSBuild format ("SDK-Style", which uses PackageReference inside the csproj) installs the NuGet packages in this per-user folder.
新的MSBuild格式(“ SDK样式”,在csproj内使用PackageReference )将NuGet软件包安装在每个用户文件夹中。
The old MSBuild format ("non-SDK-Style", before Visual Studio 2017, which uses packages.config) installs the NuGet packages in the "packages" folder under the Solution folder.
旧的MSBuild格式(在Visual Studio 2017之前的“ non-SDK-Style”,使用packages.config )将NuGet软件包安装在Solution文件夹下的“ packages ”文件夹中。
We can adjust our PowerShell scripts according to where our project will restore NuGet packages:
我们可以根据项目在哪里还原NuGet软件包来调整PowerShell脚本:
$csi = ... # (locate your csi.exe)
$dir = Split-Path $MyInvocation.MyCommand.Path
$script = Join-Path $dir "MyScript.csx"

# Call csi.exe and specify that libraries referenced by #r directives
# should search in a few nuget locations

# New NuGet 4.0+ (PackageReference) saves User-specific packages
# in "%userprofile%\.nuget\packages\"
$nuget1 = "${env:userprofile}\.nuget\packages\";

# New NuGet 4.0+ (PackageReference) saves Machine-wide packages
# in "%ProgramFiles(x86)%\Microsoft SDKs\NuGetPackages\"
$nuget2 = "${env:ProgramFiles(x86)}\Microsoft SDKs\NuGetPackages\";

# Old NuGet (packages.config) saves packages in "\packages" folder at solution level.
# Locate by searching a few levels above
$nuget3 = (
    (Join-Path $dir ".\packages\"),
    (Join-Path $dir "..\packages\"),
    (Join-Path $dir "..\..\packages\"),
    (Join-Path $dir "..\..\..\packages\"),
    (Join-Path $dir "..\..\..\..\packages\")
) | Where-Object { Test-Path $_ } | Select-Object -first 1

# if you're using new NuGet format (PackageReference defined inside csproj)
& $csi /lib:"$nuget1" $script

# if you're using old NuGet format (packages.config)
# & $csi /lib:"$nuget3" $script
And our CSX would use relative references:
我们的CSX将使用相对引用:
// CSX can load libraries by defining their relative paths

// New NuGets (PackageReference) are installed under "${env:userprofile}\.nuget\packages\"
// or "${env:ProgramFiles(x86)}\Microsoft SDKs\NuGetPackages\")
// and have this format:
#r "dapper\2.0.35\lib\netstandard2.0\Dapper.dll"

// Old NuGets (packages.config) are installed under "(SolutionFolder)\packages"
// and have this format
// #r "Dapper.2.0.35\lib\netstandard2.0\Dapper.dll"

//...
new MyProgram().MyMethod();
Console.WriteLine("Hello Code-Generation!");
So cool and so easy, isn’t it?
很酷又很容易,不是吗?
创建一个简单的POCO生成器 (Creating a Simple POCO Generator)
This article up to now was cross-posted from this article in my blog. I'll skip some steps for brevity, but in this other post, I've created a tool to extract schemas from a SQL database and save it as a JSON file.
到目前为止,这篇文章是在我的博客中与该文章交叉发布的 。 为了简洁起见,我将跳过一些步骤,但是在另一篇文章中 ,我创建了一个工具来从SQL数据库提取架构并将其另存为JSON文件。
Based on this JSON schema and using CodegenCS code generator library, we can easily generate POCOs:
基于此JSON模式并使用CodegenCS代码生成器库 ,我们可以轻松生成POCO:
public class SimplePOCOGenerator
{
  CodegenContext generatorContext = new CodegenContext();

  public void Generate()
  {
     DatabaseSchema schema = JsonConvert.DeserializeObject(
        File.ReadAllText(_inputJsonSchema));

     foreach (var table in schema.Tables)
        GeneratePOCO(table);

     // This saves one .cs for each table
     generatorContext.SaveFiles(outputFolder: targetFolder);

     // This will add each .cs to our csproj file (if using old format)
     //generatorContext.AddToProject(csProj, targetFolder);
  }

  void GeneratePOCO(DatabaseTable table)
  {
      var writer = generatorContext[table.TableName + ".cs"];
      writer
          .WriteLine(@"using System;")
          .WriteLine(@"using System.Collections.Generic;")
          .WriteLine(@"using System.ComponentModel.DataAnnotations;")
          .WriteLine(@"using System.ComponentModel.DataAnnotations.Schema;")
          .WriteLine(@"using System.Linq;")
          .WriteLine();

      writer.WithCBlock($"namespace {myNamespace}", () =>
      {
         writer.WithCBlock($"public partial class {table.TableName}", () =>
         {
             foreach (var column in table.Columns)
                GenerateProperty(writer, table, column);
         });
      });
  }

    void GenerateProperty(CodegenOutputFile writer, DatabaseTable table,
                          DatabaseTableColumn column)
    {
        string propertyName = GetPropertyNameForDatabaseColumn(table, column.ColumnName);
        string typeDefinition = GetTypeDefinitionForDatabaseColumn(table, column);
        if (column.IsPrimaryKeyMember)
            writer.WriteLine("[Key]");
        if (propertyName.ToLower() != column.ColumnName.ToLower())
            writer.WriteLine($"[Column(\"{column.ColumnName}\")]");
        writer.WriteLine($"public {typeDefinition} {propertyName} {{ get; set; }}");
    }
}
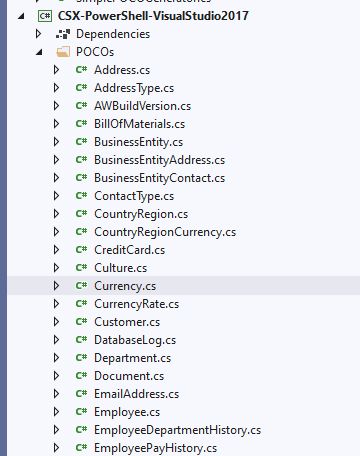
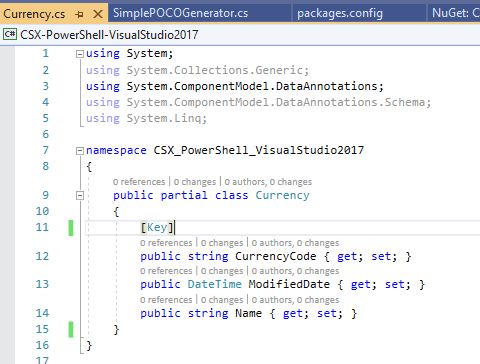
The end result is one POCO for each table:
最终结果是每个表一个POCO:
And the POCO can be used by your favorite micro-ORM:
您最喜欢的微型ORM可以使用POCO:
So cool and so easy, isn’t it? I hope you enjoyed this article as much as I did!
很酷又很容易,不是吗? 希望您和我一样喜欢这篇文章!
The full source code for this article is available for download (at the top) and it's also published here.
本文的完整源代码可以下载(在顶部),并且也已在此处发布。
Code contains CSX and PowerShell scripts both for SDK-style and non-SDK-style projects:
代码包含用于SDK风格和非SDK风格项目的CSX和PowerShell脚本:
Visual Studio 2017+ (SDK-style project, which is also used by dotnetcore)
Visual Studio 2017+(SDK风格的项目,dotnetcore也使用)
In SDK-style format, the NuGet packages are stored per-user profile
以SDK样式格式,NuGet软件包按用户配置文件存储
Visual Studio <=2015 (non-SDK-style project)
Visual Studio <= 2015(非SDK风格的项目)
In non-SDK-style format, the NuGet packages are stored under the
NuGet软件包以非SDK样式格式存储在
solution folder, and source files must be explicitly described in csproj.
解决方案文件夹和源文件必须在csproj中明确描述。
The POCO generator code above was just a simplified version (for brevity), but in the attached sources, you'll find the complete code, which allows both generating the POCOs in multiple files or in a single file.
上面的POCO生成器代码只是简化版本(为简便起见),但是在随附的源代码中,您会找到完整的代码,该代码允许同时在多个文件或单个文件中生成POCO。
Disclaimer: I'm the author of the CodegenCS code generator library.
免责声明 :我是CodegenCS代码生成器库的作者 。
翻译自: https://www.codeproject.com/Articles/5273898/Code-Generation-using-Csharp-Scripts-CSX-Scripts-i
csx c# dll
