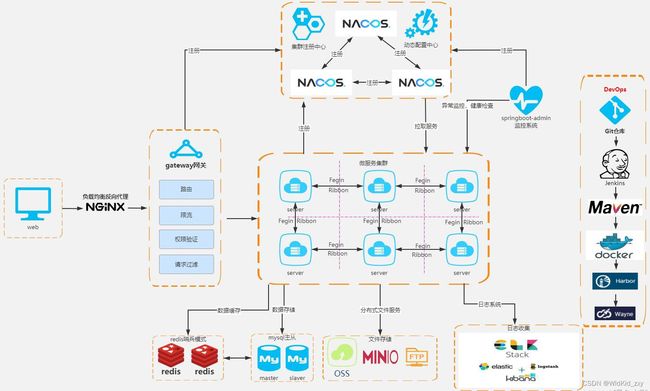
Spring Cloud Alibaba基础入门,一周学会基操!
Spring Cloud Alibaba基础入门,一周学会基操!
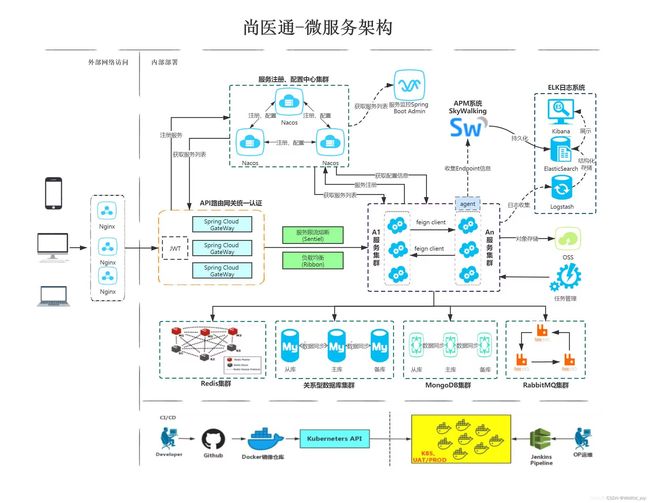
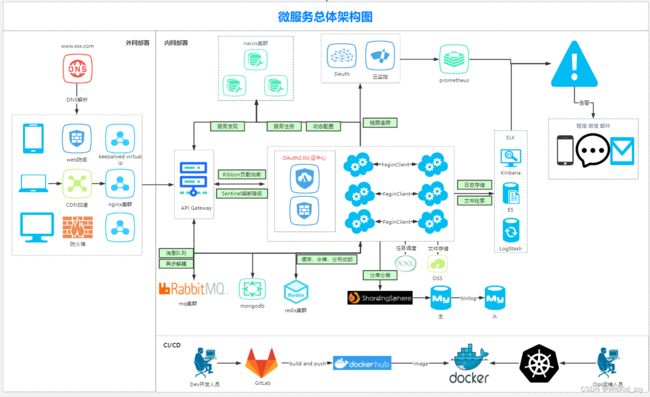
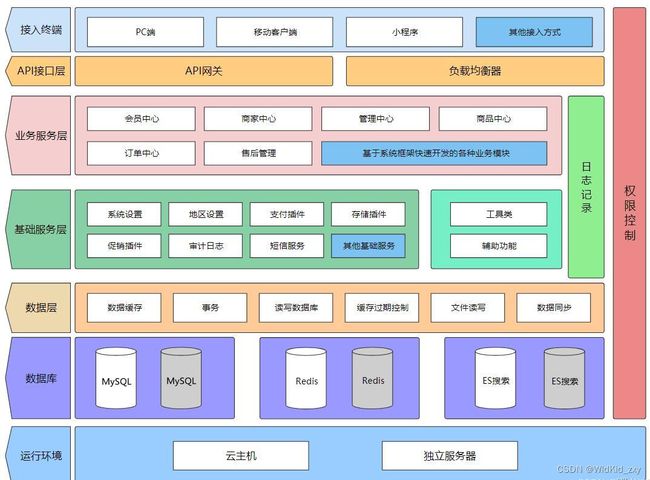
服务拆分:
1.不同微服务,不要重复开发相同业务
2.微服务数据独立,不要访问其它微服务的数据库
3.微服务可以将自己的业务暴露为接口,供其它微服务调用
4. 大白话了解微服务,访问:https://www.cnblogs.com/skabyy/p/11396571.html
一、分布式项目搭建
环境:jdk1.8+ maven 3.2+
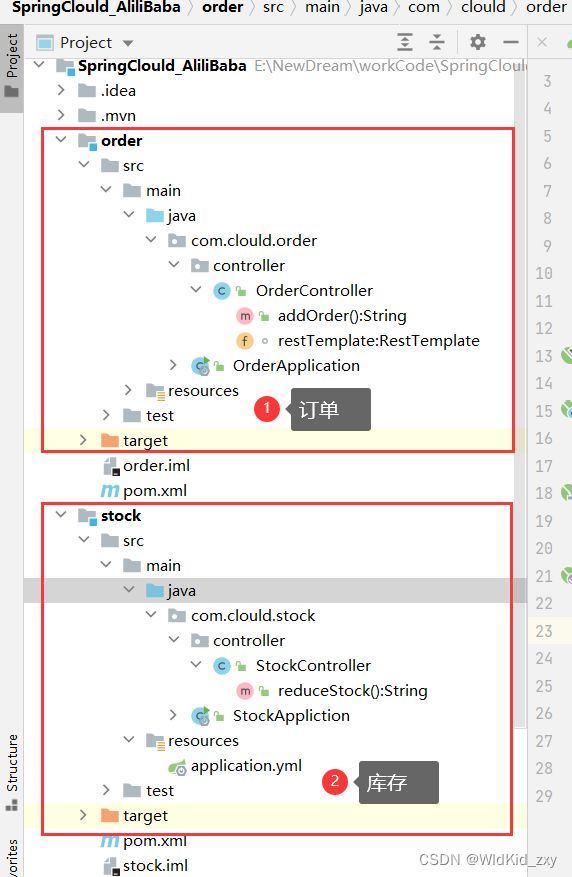
在ider 中选 Spring Initializr 创建一个 springBoot 项目。在这个项目中添加模块 Order订单 与 Stock 库存 ,入下图的目录结构!
maven依赖与 yalm
   <dependencies>
        <dependency>
            <groupId>org.springframework.boot</groupId>
            <artifactId>spring-boot-starter-web</artifactId>
        </dependency>
    </dependencies>

 两个子模块的端口号修改成

server:
  port: 8010

server:
  port: 8011
订单代码:
@RestController
@RequestMapping("/order")
public class OrderController {

    @Autowired
    RestTemplate restTemplate;

    @RequestMapping("/add")
    public String addOrder() {
        System.out.println("下单成功");
         /* restTemplate 日常维护是相对麻烦   以后将 采用  注册中心*/
        String msg = restTemplate.getForObject("http://127.0.0.1:8011/stock/reduce", String.class);
        return "Hellow Spring-Cloud--下单成功\nmsg==" + msg;
    }

}
库存代码:
@RestController
@RequestMapping("/stock")
public class StockController {

    @RequestMapping("/reduce")
    public String reduceStock() {
        System.out.println("减少库存 -1");
        return "Hellow Spring-Cloud--减少库存";
    }

}
在postMan测试下订单请求:
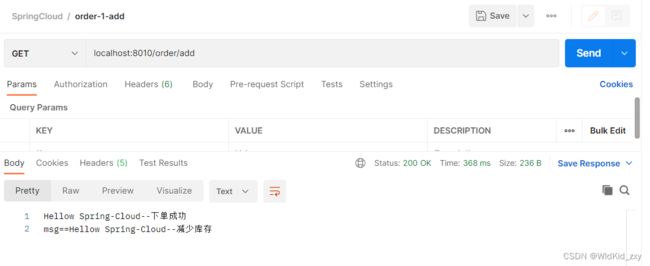
由于系统调用之间的url 地址会变化 ,导致日常维护与项目拓展带来不便,就引入了服务注册。 以前调用是restTemplate.getForObject(“http://127.0.0.1:8011/stock/reduce”, String.class); 如果假如服务注册,就以后调用服务的名称,名称中含有url 地址。
二、Spring Cloud Alibaba 改造搭建
Spring Cloud Alibaba 与SpringBoot 有版本适配问题,官网或者gitHub查看适配问题
https://spring.io/projects/spring-cloud-alibaba#learn
版本确定:
Spring Cloud Alibaba:2.2.5.RELEASE
Spring Boot :2.3.2.RELEASE
Spring Cloud:Hoxton.SR8
将主项目的maven 修改成
<project xmlns="http://maven.apache.org/POM/4.0.0" xmlns:xsi="http://www.w3.org/2001/XMLSchema-instance"
         xsi:schemaLocation="http://maven.apache.org/POM/4.0.0 https://maven.apache.org/xsd/maven-4.0.0.xsd">
    <modelVersion>4.0.0modelVersion>
    <modules>
        <module>ordermodule>
        <module>stockmodule>
    modules>


    <properties>
        <java.version>11java.version>
        <springBoot.version>2.3.2.RELEASEspringBoot.version>
        <springCloudAlilibaba.version>2.2.5.RELEASEspringCloudAlilibaba.version>
    properties>


    <dependencyManagement>

        <dependencies>

            <dependency>
                <groupId>com.alibaba.cloudgroupId>
                <artifactId>spring-cloud-alibaba-dependenciesartifactId>
                <version>${springCloudAlilibaba.version}version>
                <type>pomtype>
                <scope>importscope>
            dependency>

            <dependency>

                <groupId>org.springframework.bootgroupId>
                <artifactId>spring-boot-starter-parentartifactId>
                <version>${springBoot.version}version>
                <type>pomtype>
                <scope>importscope>
            dependency>


            <dependency>
                <groupId>org.springframework.cloudgroupId>
                <artifactId>spring-cloud-dependenciesartifactId>
                <version>Hoxton.SR8version>
                <type>pomtype>
                <scope>importscope>
            dependency>
        dependencies>
    dependencyManagement>
project>
三、Nacos介绍
3.1.Nacos介绍
一个更易于构建原生应用的动态服务发现、配置和服务管理平台。
Nacos: Dynamic Naming and Configuration Service
Nacos就是注册中心+配置中心的组合–>等价于 Nacos=Eureka+Config+Bus
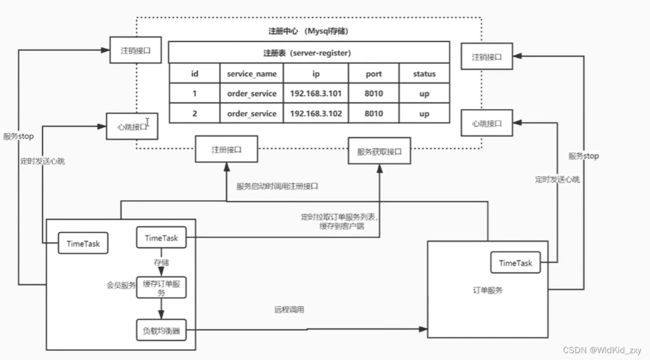
分布式系统调用其他系统很难维护与拓展,以为调用的ip 会变化,会增多
restTemplate.getForObject(“http://127.0.0.1:8011/stock/reduce”, String.class); 而注册中心 就可以用数据存储的形式进行调用(如下图),调用名称,包含许多数据信息,方便维护!
3.2.Nacos服务器安装
下载地址:nacos 1.4.2
Nacos官方文档:https://nacos.io/zh-cn/docs/quick-start.html
Nacos下载地址:https://github.com/alibaba/nacos/releases

将下载的文件解压,并且修改 的启动模式为单机standalone(默认为启动是集群cluster),以及修改配置文件application.properties。
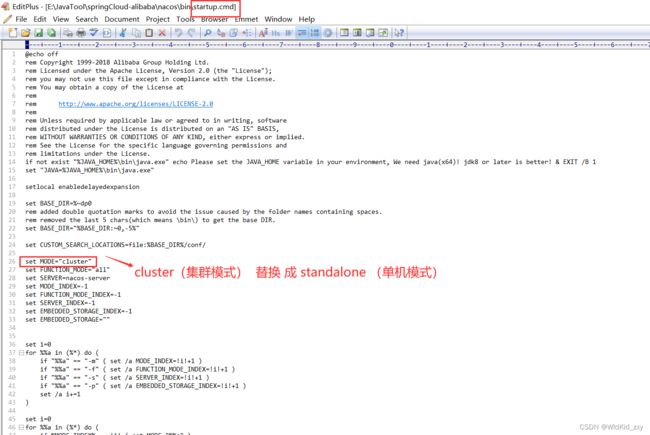

启动文件 startup.cmd
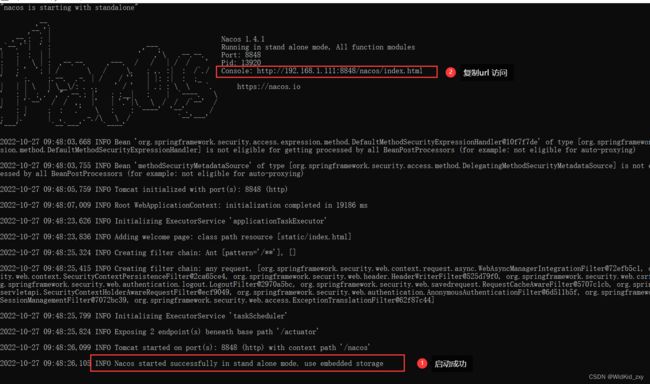
默认账号:nacos 默认密码 : nacos !
访问:http://192.168.1.111:8848/nacos/index.html
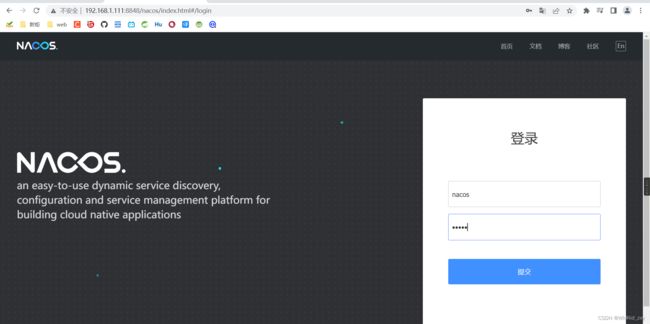
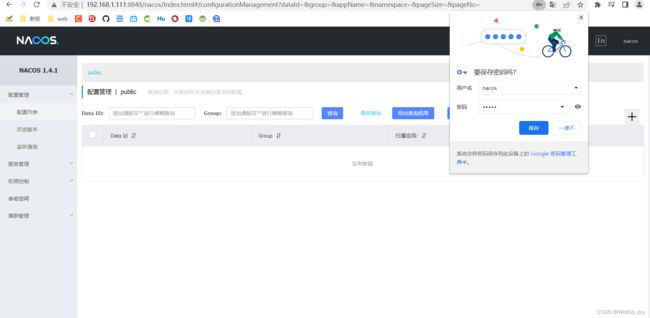
3.3.项目文件修改
3.3.1
(1)将SpringClould_AliliBaba 项目下的子模块复制出来order-nacos,stock-nacos;
(2)修改 order-nacos 与 stock-nacos 的maven ID artifactId;
(3)SpringClould_AliliBaba 添加 order-nacos 、 stock-nacos;
(4)删除 order.iml 与 stock.iml 文件 。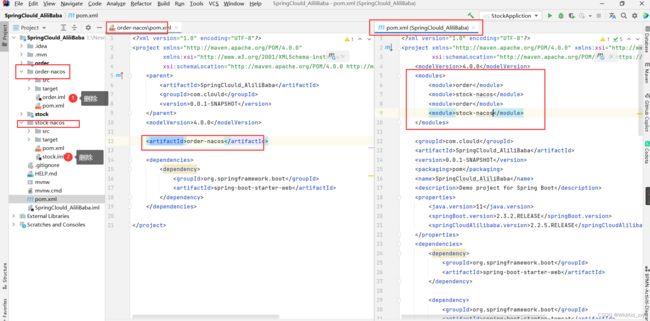
错误注意(没出错 忽略…):
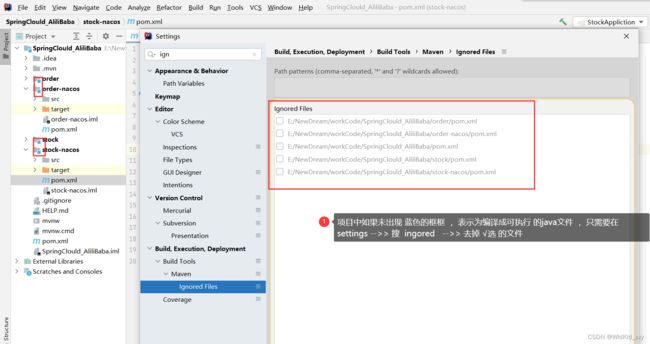
3.3.2.order-nacos 与 stock -nacos maven依赖添 与application.yml 配置
(1)maven
        <dependency>
            <groupId>com.alibaba.cloudgroupId>
            <artifactId>spring-cloud-starter-alibaba-nacos-discoveryartifactId>
        dependency>
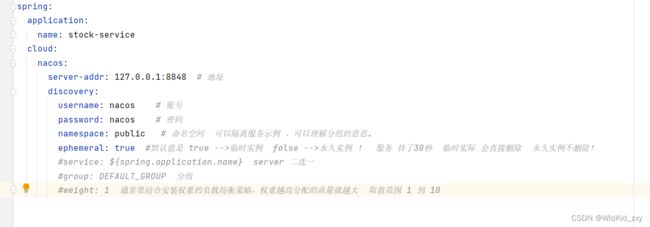
(2)application.yml
spring:
  application:
    name: stock-service
  cloud:
    nacos:
      server-addr: 127.0.0.1:8848  # 地址
      discovery:
        username: nacos    # 账号
        password: nacos    # 密码
        namespace: public   # 命名空间  可以隔离服务示例 ,可以理解分组的意思。
(3可选)在SpringBoot主类上添加注解 @EnableDiscoveryClient
(4)运行order-nacos 、stock-naos,访问 nacos 管理页面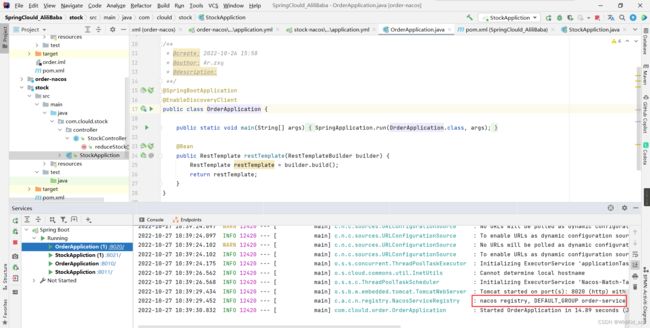
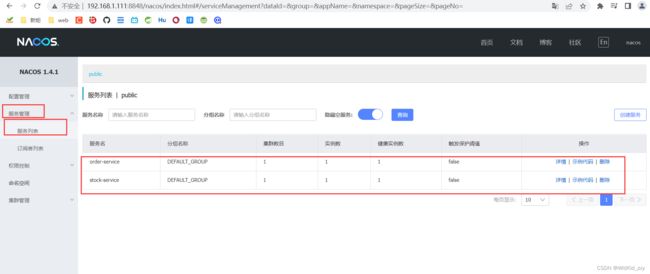
如果将springboot项目中的stock-nacos 停止运行 ,等过 15秒 (nacos 有健康心跳的实时监控机制),stock-service 中的 健康实例数会变为0 。
(5)服务调用
(1) 在Order-nacos 的SpringBoot主类 中的@Bean 后添加**@LoadBalanced** 注解,实现复制均衡!

(2)将order-nacos 中addOrder的 访问 url 修改成服务名称:stock-service
 @RequestMapping("/add")
    public String addOrder() {
        System.out.println("下单成功");
        /* restTemplate 日常维护是相对麻烦   以后将 采用  注册中心*/
        String msg = restTemplate.getForObject("http://stock-service/stock/reduce", String.class);
        return "Hellow Spring-Cloud--下单成功\nmsg==" + msg;
    }
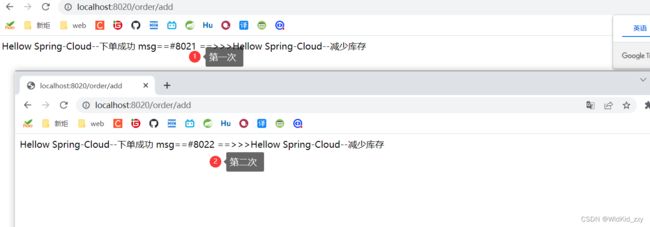
3.4初识负载均衡,@LoadBalanced 是轮休机制。nacos默认启用的是ribbon
(1)复制 stockApplication
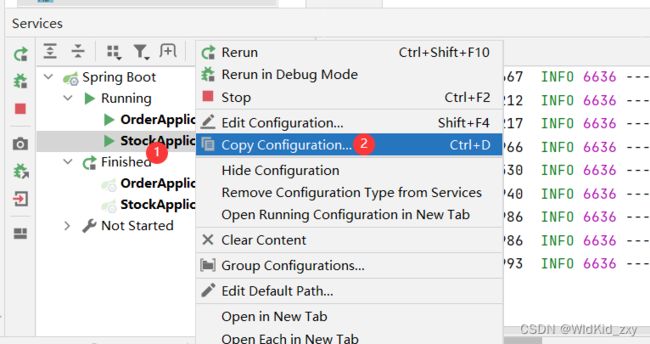
(2)设置
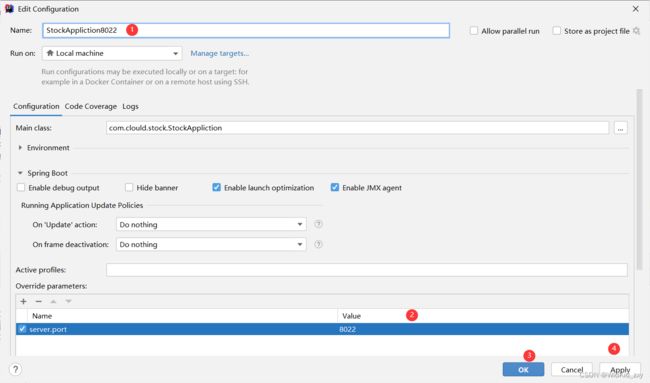
(3)代码修改,直管的打印出端口号。以及访问服务。查看结果!
    @Value("${server.port}")
    String port;

    @RequestMapping("/reduce")
    public String reduceStock() {
        System.out.println("减少库存 -1");
        return "#" + port + "  ==>>>Hellow Spring-Cloud--减少库存";
    }
3.5Nacos 文档学习
官方文档API:https://nacos.io/zh-cn/docs/open-api.html
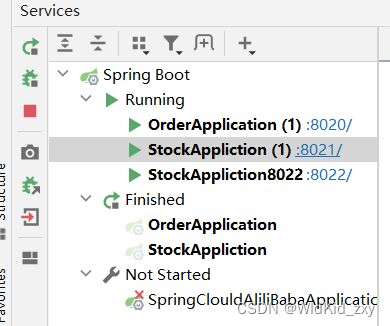
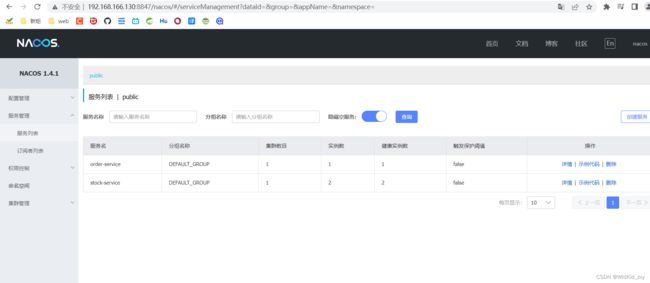
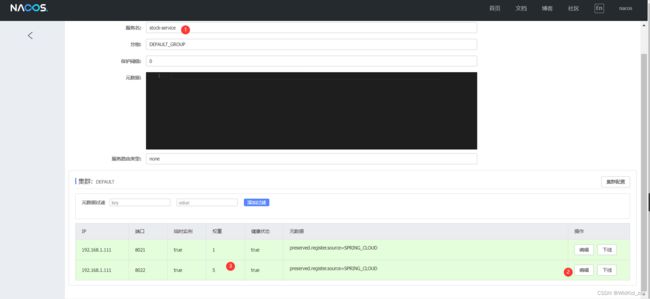
- 注意区分 服务名与实例,order-server 只有一个微服务实例,stock-service 有两个微服务实例,刚刚复制出来了8022的服务,一个就三个微服务。

- 命名空间:区分不同环境,比如 生产环境,测试环境,开发环境等等,达到分组的目的。
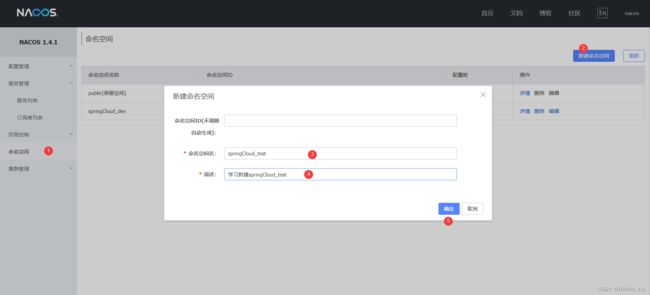
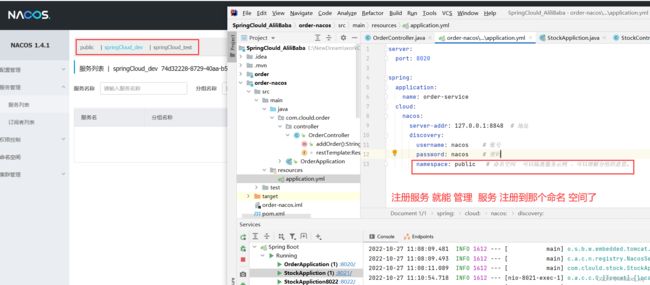
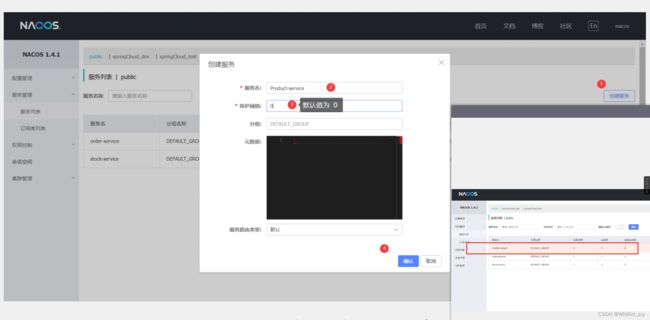
- 空服务创建,可以等待注册,相当于 在这新建的空服务被注册的覆盖掉了。
- 服务详情
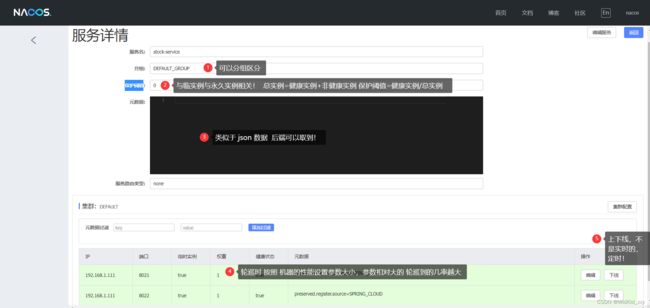
保护阈值的作用:当保护保护阈值低于时 会启用挂掉的服务(永久服务,非临时服务,临时服务会被删除)。
永久实例与临时实例设置,永久实例挂了不会被删除,临时实例挂了30s 后会被直接删除。

3.6(选学)Nacos 集群搭建
集群官方文档:https://nacos.io/zh-cn/docs/cluster-mode-quick-start.html
1. 预备环境准备(自行安装)
请确保是在环境中安装使用:
(1) 、64 bit OS Linux/Unix/Mac,推荐使用Linux系统。
(2) 、64 bit JDK 1.8+;下载.配置。
(3) 、Maven 3.2.x+;下载.配置。
(4)、 Msql 5.7+ 下载安装
(5)、 Nginx 下载安装
(6) 、3个或3个以上Nacos节点才能构成集群。
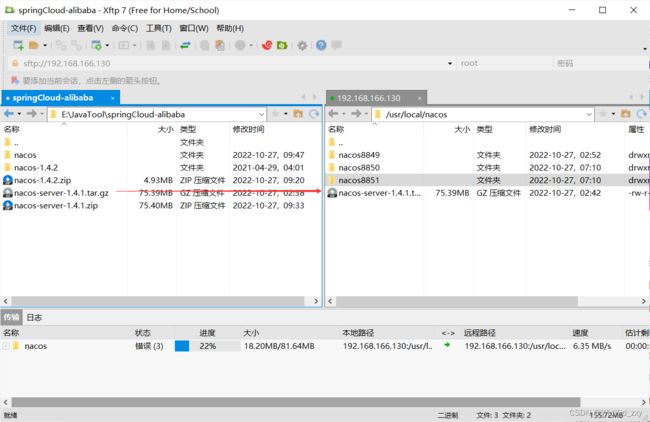
2.nacos 下载 linux 版本,利用xshell 上传到linux系统中 /usr/local/nacs 目录下,解压复制3 份!
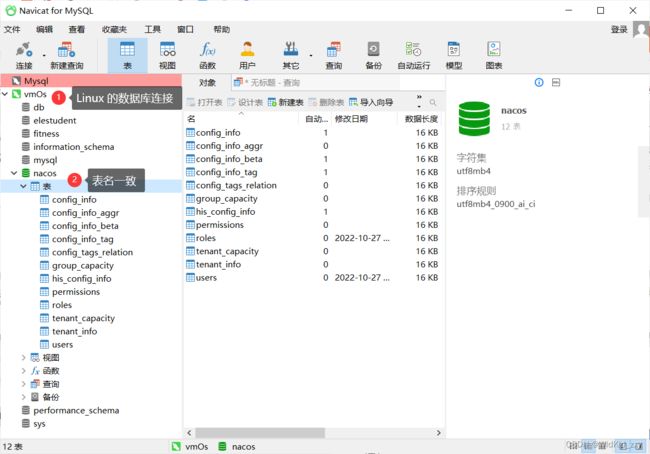
3.在Navicat 中 倒入数据库的数据 nacos-mysql.sql
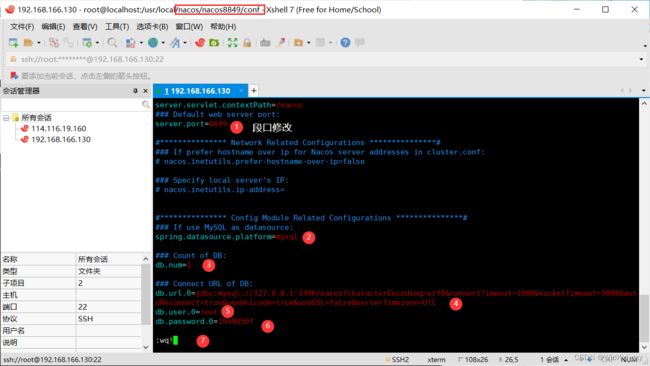
4 修改配置文件(以nacos8849为例子) nacos\conf application.properties
本次采用的mysql 数据源 就是为了将 注册的服务持久化!保证数据的一致性!
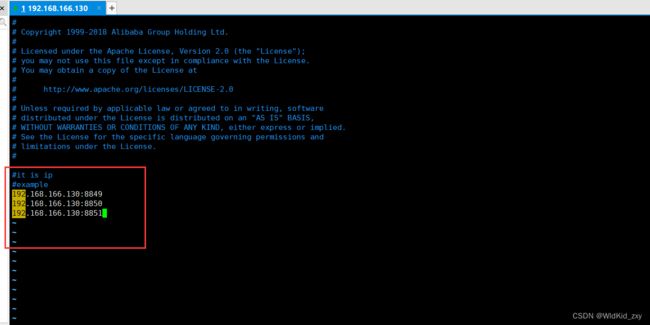
5 将 conf 文件目录下lcluster.conf.example改为cluster.conf,添加节点配置
(1)、 cp cluster.conf.example cluster.conf
(2)、 添加nacos 端口 127.0.0.1:端口或者是 虚拟机的 ip +端口
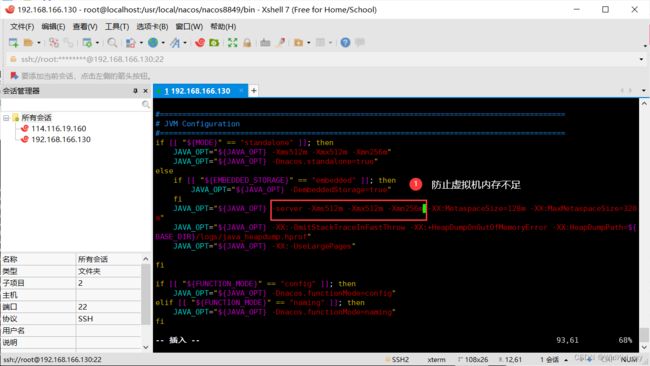
6 修改 nacos\bin\ startup.sh 文件 。防止虚拟机内存不足!
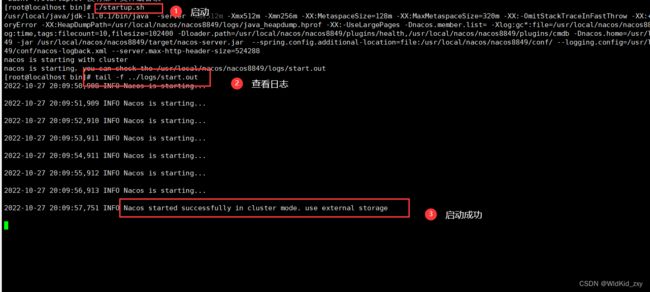
7 启动nacos 8849
开放8848、8850、8851 的端口
     #开放端口
      firewall-cmd --zone=public --add-port=1935/tcp --permanent
     #重启防火墙
     firewall-cmd --reload
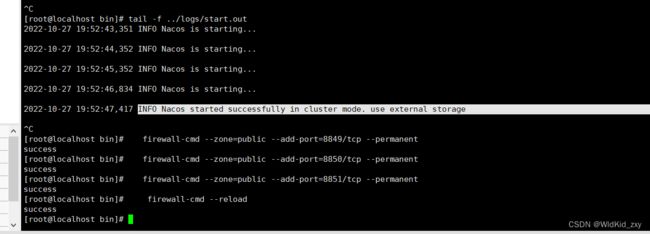
电脑上访问:http://192.168.166.130:8849/nacos/index.html#/login 出现nacos 登入画面!
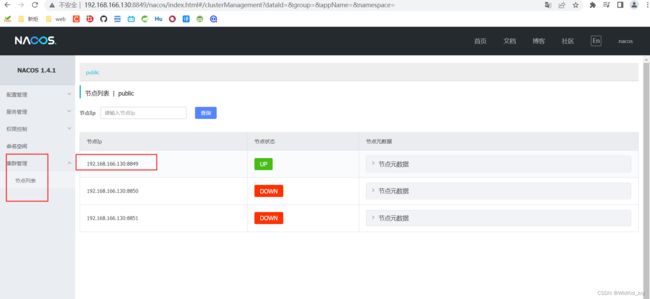
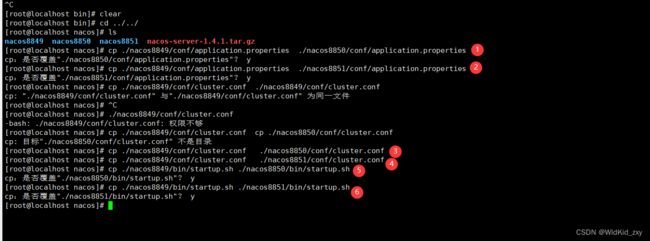
8 将 application.properties、 cluster.conf、startup.sh三个文件 复制到8850 8851 下,并且修改端口。启动8850 、8851
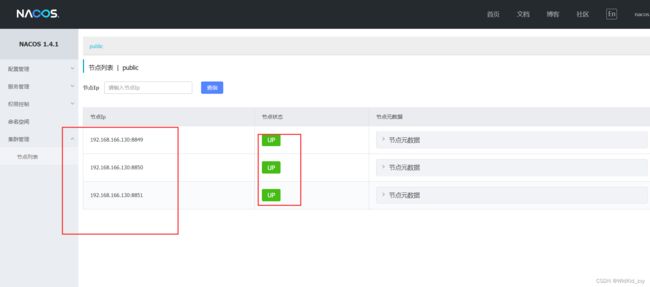
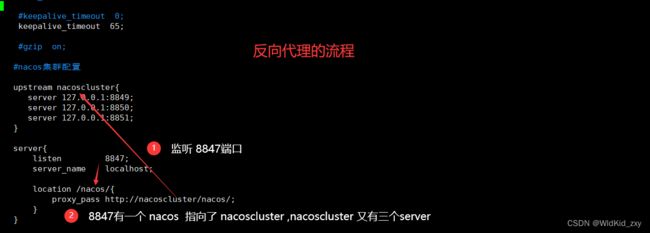
9. nacos集群配置 ,修改conf/nginx.conf 以及Linux 对外开放端口( listen 8847)
   #nacos集群配置
   upstream nacoscluster{
      server 127.0.0.1:8849;
      server 127.0.0.1:8850;
      server 127.0.0.1:8851;
   }
   server{
       listen         8847;
       server_name    localhost;

       location /nacos/{
           proxy_pass http://nacoscluster/nacos/;
       }
   }
访问 http://192.168.166.130:8847/nacos/
成功进入,表示配置成功!
10 修改 order-nacos 与stock-nacos 的 application.yml ,启动项目!
spring:
  application:
    name: order-service
  cloud:
    nacos:
      #server-addr: 127.0.0.1:8848  #  windos 地址
      server-addr: 192.168.166.130:8847  # Linux 地址
      discovery:
        username: nacos    # 账号
        password: nacos    # 密码
        namespace: public   # 命名空间  可以隔离服务示例 ,可以理解分组的意思。
访问:http://192.168.166.130:8847/nacos
效果:
四、微服务的Ribbon—负载均衡
4.1初识Ribbon
目前主流的负载方案分为以下两种:
- 集中式负载均衡,在消费者和服务提供方中间使用独立的代理方式进行负载,有硬件的(比如 交换机,F5),也有软件的(比如 Nginx)。
- 客户端根据自己的请求情况做负载均衡,Ribbon 就属于客户端自己做负载均衡。
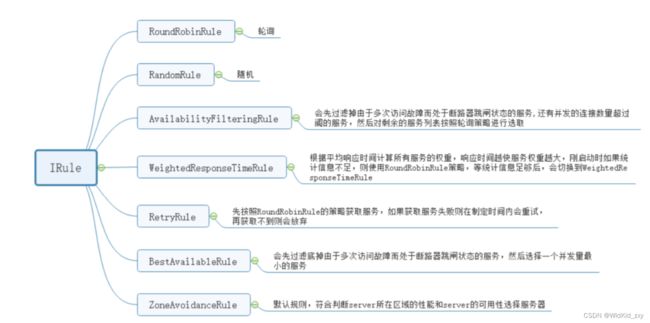
Spring Cloud Ribbon是基于Netflix Ribbon 实现的一套客户端的负载均衡工具,Ribbon客户端组件提供一系列的完善的配置,如超时,重试等。通过Load Balancer获取到服务提供的所有机器实例,Ribbon会自动基于某种规则(轮询,随机)去调用这些服务。Ribbon也可以实现我们自己的负载均衡算法。
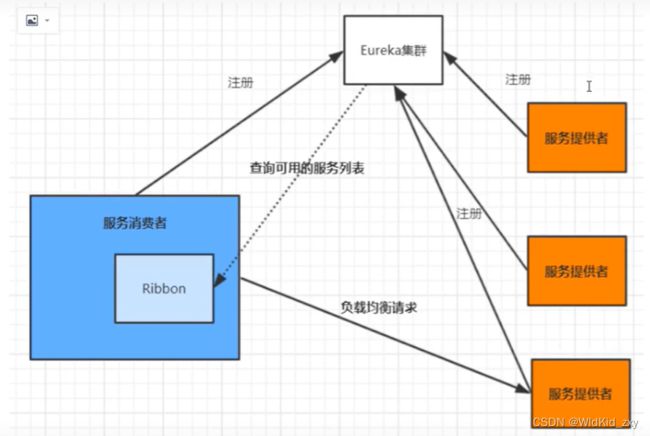
(1)客户端图:例如spring cloud中的ribbon,客户端会有一个服务器地址列表,在发送请求前通过负载均衡算法选择一个服务器,然后进行访问,这就是客户端负载均衡;即在客户端就进行负载均衡算法分配。
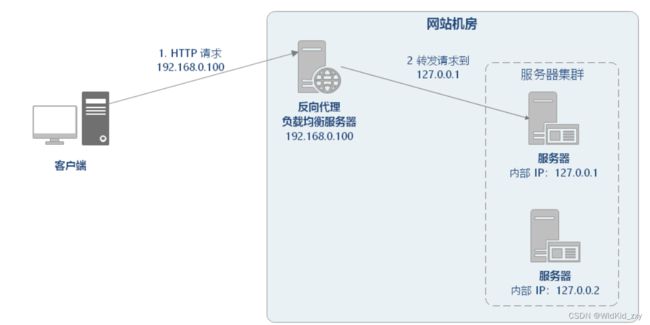
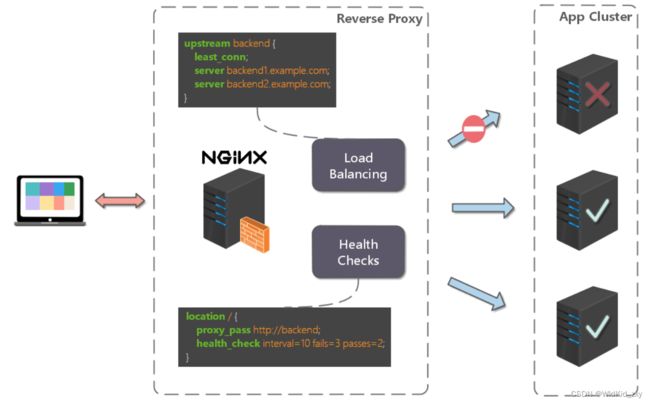
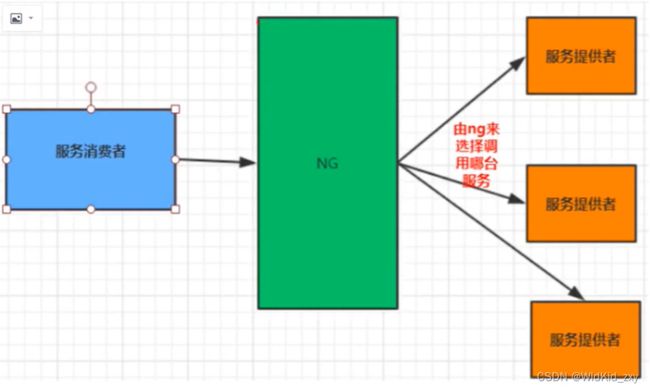
(2) 服务端图:例如Nginx,通过Nginx进行负载均衡,先发送请求,然后通过负载均衡算法,在多个服务器之间选择一个进行访问;即在服务器端再进行负载均衡算法分配。需要在nginx配置所有的服务提供者信息。
1.客户端负载均衡就是自己想去吃地锅鸡,有很多家蛙来哒,掏出手机,手机就是中间件,
手机可以根据评分,根据距离来选择一家地锅鸡让你选择一家去吃。
2.服务端负载均衡就是我自己知道附近所有的地锅鸡,我自己选择一家去吃。
轮休的机制:
- 随机,通过随机选择服务进行执行,一般这种方式使用较少;
- 轮训,负载均衡默认实现方式,请求来之后排队处理;
- 加权轮训,通过对服务器性能的分型,给高配置,低负载的服务器分配更高的权重,均衡各个服务器的压力;
- 地址Hash,通过客户端请求的地址的HASH值取模映射进行服务器调度。 ip —>hash
最小链接数,即使请求均衡了,压力不一定会均衡,最小连接数法就是根据服务器的情况,比如请求积压数等参数,将请求分配到当前压力最小的服务器上。 最小活跃数
4.2正向代理与反向代理
- 正向代理:发生在 客户端,是由用户主动发起的。软件就是典型的正向代理,客户端通过主动访问代理服务器,让代理服务器获得需要的外网数据,然后转发回客户端。
1) 多种负载均衡算法:支持多种负载均衡算法,以应对不同的场景需求。

2) 可以监控服务器:基于 HTTP 协议,可以监控转发服务器的状态,
如:系统负载、响应时间、是否可用、连接数、流量等,从而根据这些数据调整负载均衡的策略。
反向代理的 缺点:
1) 额外的转发开销:反向代理的转发操作本身是有性能开销的,可能会包括创建连接,等待连接响应,
分析响应结果等操作。

2) 增加系统复杂度:反向代理常用于做分布式应用的水平扩展,但反向代理服务存在以下问题,
为了解决以下问题会给系统整体增加额外的复杂度和运维成本:

3)反向代理服务如果自身宕机,就无法访问站点,所以需要有 高可用 方案,常见的方案有:
主备模式(一主一备)、双主模式(互为主备)。

4)反向代理服务自身也存在性能瓶颈,随着需要转发的请求量不断攀升,需要有 可扩展 方案。
4.3ribbon 负载均衡策略修改
- order-stock 是服务的提供方,负载均衡策略是在消费端调用的!
1、将order-nacos复制一份命名成 order-ribbon,删除 .iml 文件 修改maven的 artifactId,在SpringCloud AliliBaba 添加子模块 module。
2.yaml 文件配置,与权重设置
##########   负载均衡配置(负载均衡在服务的调用方起作用!!!)
#给某个微服务配置负载均衡规则(无提示)
stock-service:
  ribbon:
    # 负载均衡规则 、NFLoadBalancerRuleclassName-----关键字,爽按  shift   输入  NacosRule 进class 类负载 完整路径
    NFLoadBalancerRuleClassName: com.alibaba.cloud.nacos.ribbon.NacosRule
启动Order-Ribbon2019 、Stock-Service8021、Stock-Service8022 ,设置权重!
并且多次加载访问:http://localhost:8019/order/add
Stock-Service8022会发现的频率会多余Stock-Service8021
五、Feign—介绍
5.1初始Feign
Feign是Netflix开发的一个轻量级RESTful的HTTP服务客户端(用它来发起请求, 远程调用的),是以Java接口注解的方式调用Http请求,而不用像Java中通过封装 HTTP请求报文的方式直接调用,Feign被广泛应用在Spring Cloud 的解决方案中。类似于Dubbo,服务消费者拿到服务提供者的接口,然后像调用本地接口方法一样 去调用,实际发出的是远程的请求!
我们以前利用 RestTemplate 发起远程调用的代码:
代码可读性差,编程体验不统一,参数复杂URL难以维护。Feign 是一个声明式的 http 客户端;其作用就是帮助我们优雅的实现 http 请求的发送,解决上面提到的问题。
- Feign可帮助我们更加便捷,优雅的调用HTTP API:不需要我们去拼接url然后 呢调用restTemplate的api,在SpringCloud中,使用Feign非常简单,创建一个 接口(在消费者–服务调用方这一端),并在接口上添加一些注解,代码就完成 了;
- SpringCloud对Feign进行了增强,使Feign支持了SpringMVC注解 (OpenFeign);
- 本质:封装了Http调用流程,更符合面向接口化的编程习惯,类似于Dubbo的服务 调用;
- Feign 是在 服务的消费端。
5.2Spring Cloud Alibaba快速整合OpenFeian(Feign)
1.将order-nacos复制一份命名成 order-feign,删除 .iml 文件 修改maven的 artifactId,在SpringCloud AliliBaba 添加子模块 module,以及修改yaml 端口8030。
2.order-feign依赖添加
   <!--openfeign 的依赖添加!-->

            org.springframework.cloud
            spring-cloud-starter-openfeign
3.添加RestTemplate 请求 所在的Controller 对应的Feign接口,例如

4.在 order-Service 添加接口Feign接口,删除主类上的 LoadBalanced,添加注解@EnableFeignClients
(1)接口:
/*
 *  path指定调用rest接口所在的 服务名
 * * path指定调用rest接口所在的 Controller指定的 @RequestMapping,  Controller指定的无指定的就不用填写!
 */
@FeignClient(name = "stock-service", path = "/stock")
public interface StockFeignService {
    //声明需要调用的rest接口对应的   方法名字、接口格式
    @RequestMapping("/reduce")
    String reduceStock();
}

/**
 * @Value("${server.port}") String port;
 * @RequestMapping("/reduce") public String reduceStock() {
 * System.out.println("减少库存 -1");
 * return "#" + port + "  ==>>>Hellow Spring-Cloud--减少库存";
 * }
 */
(2)调用
    @Autowired
    StockFeignService stockFeignService;

    @RequestMapping("/add")
    public String addOrder() {
        System.out.println("下单成功--Feign");
        String msg = stockFeignService.reduceStock();
        return "Hellow Spring-Cloud--下单成功(Feign)\nmsg==" + msg;
    }
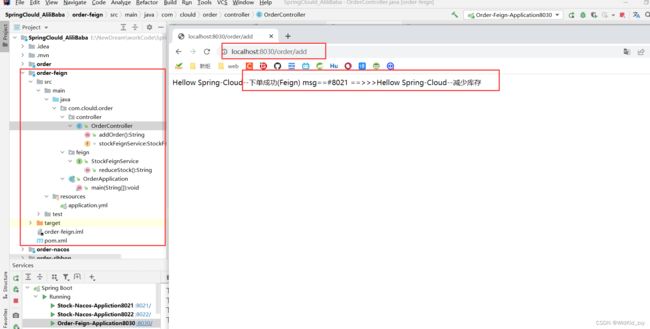
(3)运行结果(目录层级)
访问:http://localhost:8030/order/add
5.3OpenFeign的自定义配置与使用(选学)
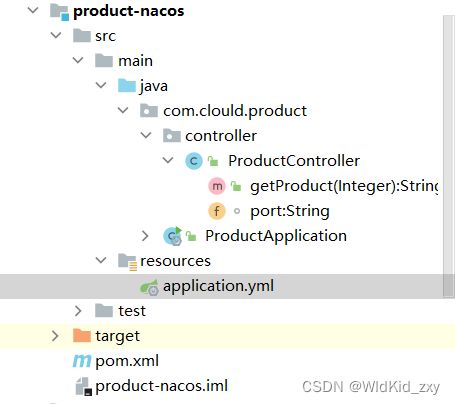
(!!!注意)创建一个Product-Service子项目
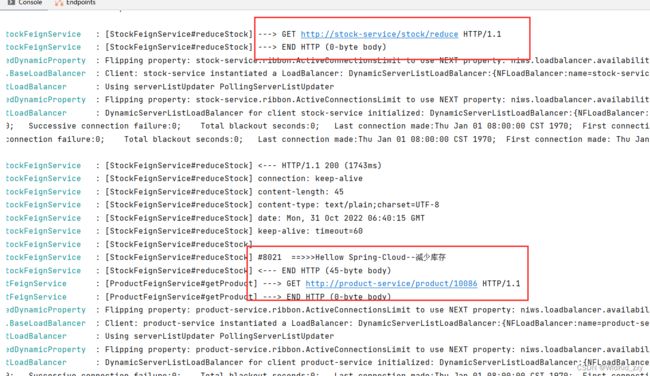
有时候我们遇到Bug,比如接口调用失败、参数没收到等问题,或者想看看调用性能,就需要配置Feign的日志了,以此让 Feign 把请求信息输出来。
1.日志设置
通过源码可以看到日志等级有4种,分别是:
- NONE【性能最佳,适用于生产】:不记录任何日志(默认值)。
- BASIC【适用于生产环境追踪问题】∶仅记录请求方法、URL、响应状态代码以及执行时间.
- HEADERS:记录BASIC级别的基础上,记录请求和响应的header.
- FULL【比较适用于开发及测试环境定位问题】∶记录请求和响应的header、body和元数据。
(1)ProductController类,并且端口号为8040
@RestController
@RequestMapping("/product")
public class ProductController {

    @Value("${server.port}")
    String port;

    @RequestMapping("/{id}")
    public String getProduct(@PathVariable Integer id) {
        System.out.println("查找id== [" + id + "]   的商品INfo......");
        return "###" + port + "\t[" + id + "]....>>>Info";
    }
}
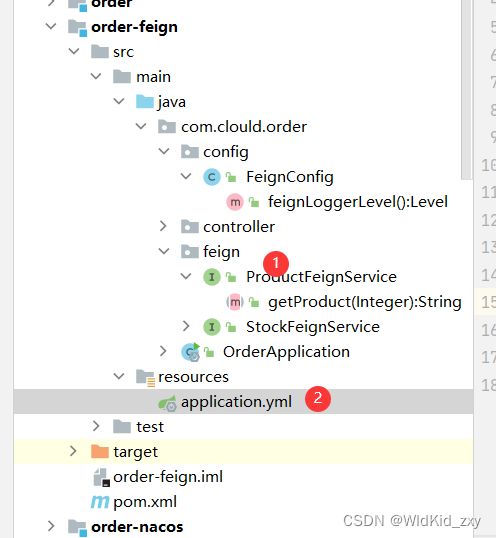
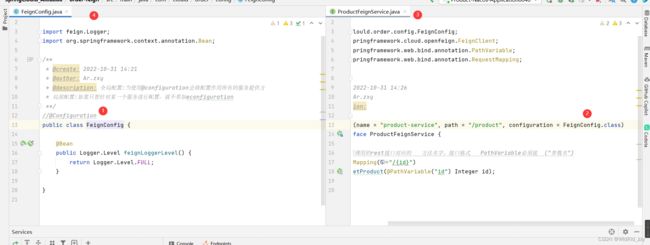
(2)ProductFeignService 添加rest对应Controller的请求方法与地址
@FeignClient(name = "product-service", path = "/product")
public interface ProductFeignService {

    //声明需要调用的rest接口对应的   方法名字、接口格式   PathVariable必须接  ("参数名")
    @RequestMapping("/{id}")
    String getProduct(@PathVariable("id") Integer id);
}
(3)在order-feign 模块下 添加配置类,并且在其yaml 设置日志级别
/**
 * @create: 2022-10-31 14:21
 * @author: Ar.zxy
 * @description: 全局配置:当使用@configuration会将配置作用所有的服务提供方
 * 局部配置:如果只想针对某一个服务进行配置,就不要加econfiguration
 **/
@Configuration
public class FeignConfig {

    @Bean
    public Logger.Level feignLoggerLevel() {
        return Logger.Level.FULL;
    }

}
logging:
  level:
    com.clould.order.feign: debug
(4)运行结果查看
访问:http://localhost:8030/order/add
*(5局部配置日志)
- 配置类
- 配置文件yaml
#Feign 的日志级别
feign:
  client:
    config:
      product-service:
        loggerLever: BASIC
2.契约配置(选看)
openFeign 默认使用Spring MVC 契约,也就是要用Spring MVC的注解,要想(或者需要)使用Feign的默认契约,也就是使用Feign原生的注解,则需要如下改动:
1.增加契约配置类
package cn.tju.edu.config;

import feign.Contract;
import org.springframework.context.annotation.Bean;
import org.springframework.context.annotation.Configuration;

@Configuration
public class ContractConfig {
    @Bean
    public Contract getContract(){
        return new feign.Contract.Default();
    }
}
2.修改Feign接口中方法上的注解:
package cn.tju.edu.service;
import cn.tju.edu.config.InfoServiceConfig;
import feign.RequestLine;
import org.springframework.cloud.openfeign.FeignClient;
import org.springframework.web.bind.annotation.RequestMapping;

@FeignClient(name="demoservice", configuration = {InfoServiceConfig.class})
public interface InfoService {

    @RequestLine("GET /test")
    String test();
}
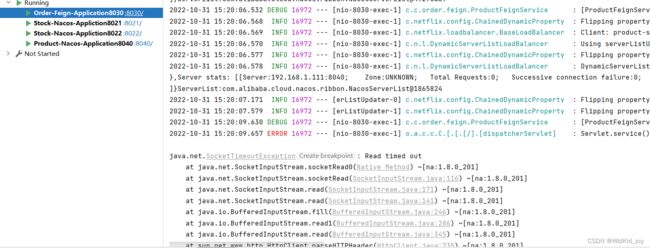
3.超时间设置
1.yaml 文件:
feign:
  client:
    config:
      product-service:
        loggerLevel: BASIC
        #contract: feign.Contract.Default #设置为默认的契约
        connectTimeout: 5000  #连接超时
        readTimeout: 3000     #请求处理超时
![]()
六 Nacos-config简单运用
在没有配置中心之前,传统应用配置的存在以下痛点
-
采用本地静态配置,无法保证实时性:修改配置不灵活且需要经过较长的测试发布周期,无法尽快通知到客户端,还有些配置对实时性要求很高,比方说主备切换配置或者碰上故障需要修改配置,这时通过传统的静态配置或者重新发布的方式去配置,那么响应速度是非常慢的,业务风险非常大
-
易引发生产事故:比如在发布的时候,容易将测试环境的配置带到生产上,引发生产事故。
-
配置散乱且格式不标准:有的用properties格式,有的用xml格式,还有的存DB,团队倾向自造轮子,做法五花八门。
-
配置缺乏安全审计、版本控制、配置权限控制功能:谁?在什么时间?修改了什么配置?无从追溯,出了问题也无法及时回滚到上一个版本;无法对配置的变更发布进行认证授权,所有人都能修改和发布配置。
使用配置中心的好处
-
通过配置中心,可以使得配置标准化、格式统一化
-
当配置信息发生变动时,修改实时生效,无需要重新重启服务器,就能够自动感知相应的变化,并将新的变化统一发送到相应程序上,快速响应变化。比方说某个功能只是针对某个地区用户,还有某个功能只在大促的时段开放,使用配置中心后只需要相关人员在配置中心动态去调整参数,就基本上可以实时或准实时去调整相关对应的业务。
-
通过审计功能还可以追溯问题
修改conf/application.properties文件,增加支持MySQL数据源配置,添加(目前只支持mysql)数据源的url、用户名和密码。配置样例如下:
spring.datasource.platform=mysql
db.num=1
db.url.0=jdbc:mysql://localhost:3306/nacos?characterEncoding=utf8&connectTimeout=1000&socketTimeout=3000&autoReconnect=true
db.user=root
db.password=
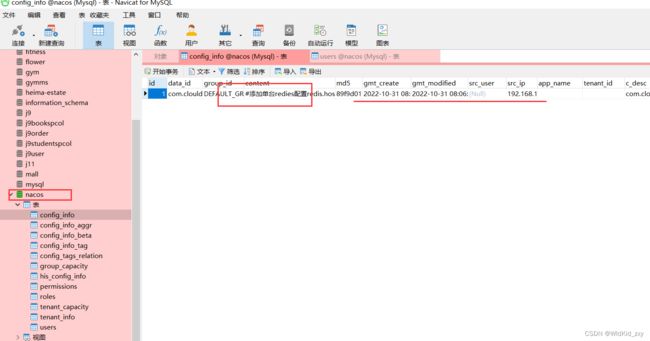
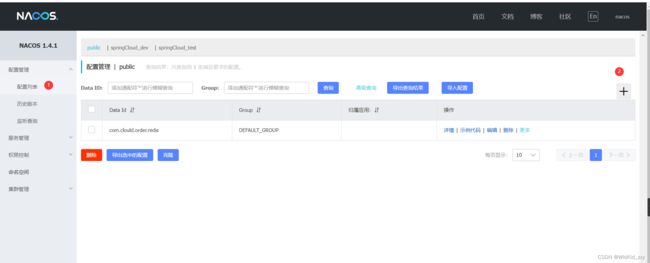
6.1.配置管理
访问nacos 管理页面:
http://192.168.1.111:8848/nacos/index.html
官网API:
https://nacos.io/zh-cn/docs/open-api.html
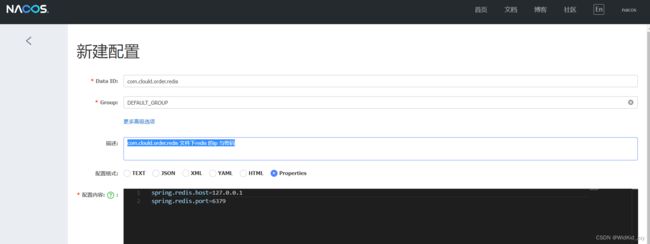
- 添加配置信息 -com.clould.order.redis
- 历史版本
在com.clould.order.redis 添加连接超时时间
连接超时时间(毫秒)
spring.redis.timeout = 1000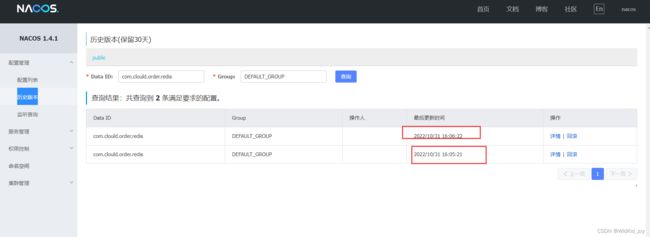
配置中心可以回滚
- 监听查询 看看配置文件有没有正确的被客服端使用。
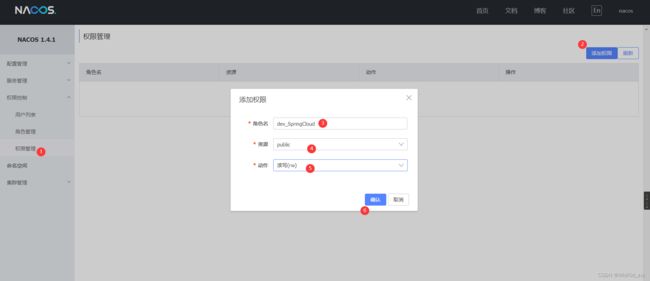
6.2.权限控制
1.修改配置文件,application.properties中enabled=true
2 先添加角色,在权限绑定
6.3Nacos-config Client读取配置
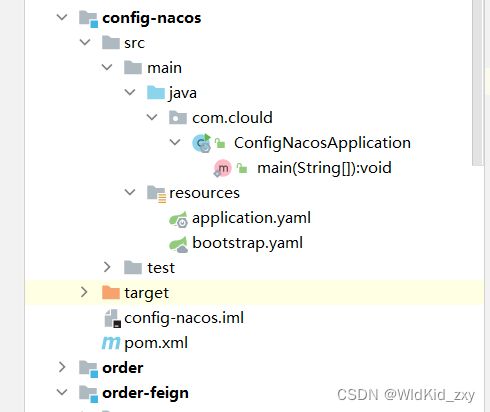
1.创建一个新的模块 config-nacos,以及添加依赖
配置管理中的配置列表有数据信息(沿用上面的 com.clould.order.redis)
目录层级
2.ConfigNacosApplication主类
/**
 * @create: 2022-10-31 16:36
 * @author: Ar.zxy
 * @description:
 **/
@SpringBootApplication
public class ConfigNacosApplication {

    public static void main(String[] args) {
        ConfigurableApplicationContext application = SpringApplication.run(ConfigNacosApplication.class, args);
        String redisHost = application.getEnvironment().getProperty("redis.host");
        String redisPort = application.getEnvironment().getProperty("redis.port");
        System.err.println("IP:" + redisHost + "端口:" + redisPort);
    }
}
3.配置文件
application
server:
  port: 8050
bootstrap
spring:
  application:
    #会自动根据服务名拉dataid 对应的配置文件。
    name: com.clould.order.redis
  cloud:
    nacos:
      server-addr: 127.0.0.1:8848  #  windos 地址
      username: nacos
      password: nacos
      config:
        namespace: public
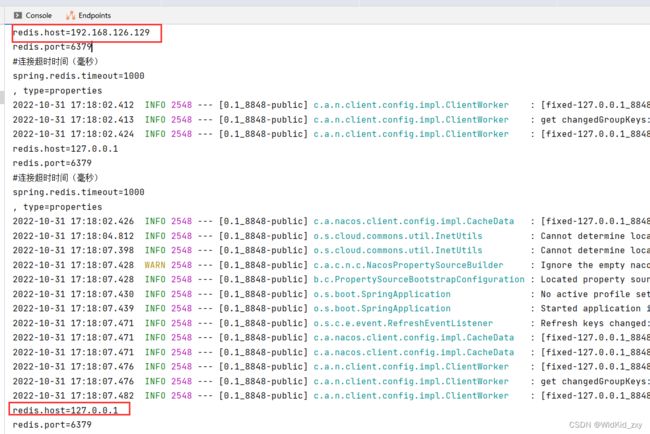
4 运行,并修改nacos 控制台 实时观看结果
将 redis.host=192.168.126.129 修改成 redis.host=127.0.0.1
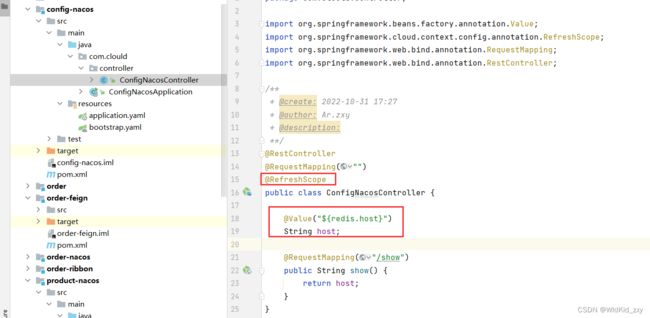
Nacos-config—@RefreshScope注解实时获取参数信息
@Vuale{“${redis.host}”}不能实时获取信息的
七、Alibaba微服务组件Sentinel
7.1.服务雪崩
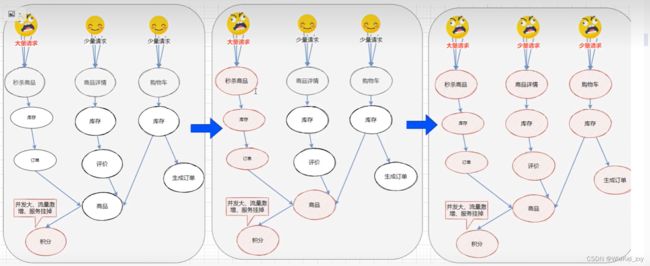
服务雪崩效应是一种因“服务提供者的不可用”(原因)导致“服务调用者不可用”(结果),并将不可用逐渐放大的现象。
造成服务雪崩的原因有很多,包括硬件原因,网络原因,软件原因等等。这里,我们只谈从软件方面,解决服务雪崩的几种解决方案和解决套路,以此来了解微服务架构中相关的技术栈的由来以及使用理由。
- 超时:造成线程的挤压都是因为同步远程调用长时间没有得到回复造成的,所以设置超时时间,可以减少线程的长时间占用,避免线程挤压。
- 限流:对服务进行限流,避免服务因并发量过大而造成服务崩掉。
- 熔断:对已经挂掉的服务,直接不再进行调用,而是直接返回结果,这就是熔断。以此避免已经挂掉的服务对调用者造成的影响。
- 隔离:用户的请求将不再直接访问服务,而是通过线程池中的空闲线程来访问服务,如果线程池已满,则会进行降级处理,用户的请求不会被姐塞,至少可以看到一个执行结果(例如返回友好的提示信息),而不是无休止的等待或者看到系统崩溃。
- 服务降级:有服务熔断,必然要有服务降级。所训维级,就是当某个股务熔断之后,服务将不再被调用,此时客户端可以自己准备一个本地的t llack(回退)回调,返回一个缺省值。例如:(备用接口缓存imock数据)。这样做,虽然服务水平下降,但好歹可用,比直接挂掉要强,当然这也要看适合的业务场景。
7.2.Sentinel 介绍
官方:https://sentinelguard.io/zh-cn/docs/basic-api-resource-rule.html
官方文档:https://github.com/alibaba/Sentinel/wiki
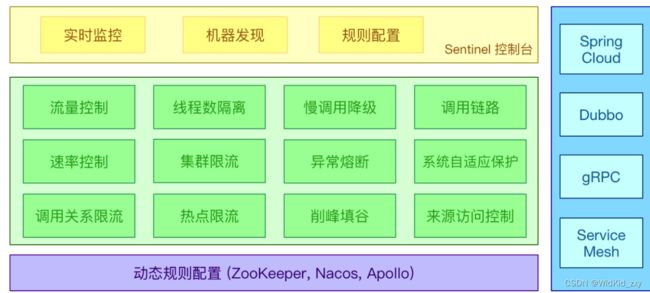
Sentinel 是面向分布式服务架构的流量控制组件,主要以流量为切入点,从限流、流量整形、熔断降级、系统负载保护、热点防护等多个维度来帮助开发者保障微服务的稳定性。
Sentinel的特性
- 丰富的应用场景:Sentinel 承接了阿里巴巴近 10 年的双十一大促流量的核心场景,例如秒杀(即突 发流量控制在系统容量可以承受的范围)、消息削峰填谷、集群流量控制、实时熔断下游不可用应用等。
- 完备的实时监控:Sentinel 同时提供实时的监控功能。您可以在控制台中看到接入应用的单台机器秒级数据,甚至 500 台以下规模的集群的汇总运行情况。
- 广泛的开源生态:Sentinel 提供开箱即用的与其它开源框架/库的整合模块,例如与 Spring Cloud、Dubbo、gRPC 的整合。您只需要引入相应的依赖并进行简单的配置即可快速地接入 Sentinel。
- 完善的 SPI 扩展点:Sentinel 提供简单易用、完善的 SPI 扩展接口。您可以通过实现扩展接口来快速地定制逻辑。例如定制规则管理、适配动态数据源等。
X个9表示在系统1年时间的使用过程中,系统可以正常使用时间与总时间(1年)之比,我们通过下面的计算来感受下X个9在不同级别的可靠性差异。
- 3个9:(1-99.9%)36524=8.76小时,表示该系统在连续运行1年时间里最多可能的业务中断时间是8.76小时。
- 4个9:(1-99.99%)36524=0.876小时=52.6分钟,表示该系统在连续运行1年时间里最多可能的业务中断时间是52.6分钟。
- 5个9:(1-99.999%)36524*60=5.26分钟,表示该系统在连续运行1年时间里最多可能的业务中断时间是5.26分钟。
7.3.sentinel控制台安装使用
*启动 Sentinel 控制台需要 JDK 版本为 1.8 及以上版本
1.快速开始:https://sentinelguard.io/zh-cn/docs/quick-start.html
2.下载控制台:https://sentinelguard.io/zh-cn/docs/dashboard.html
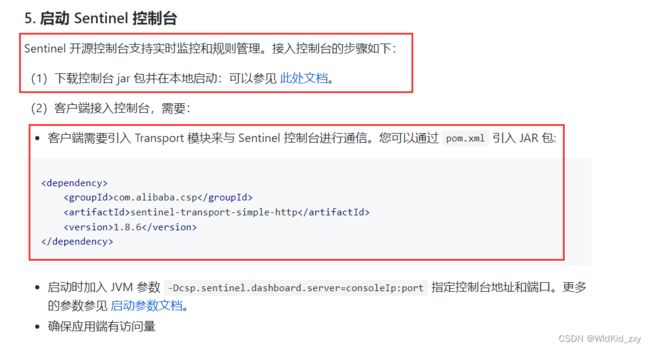
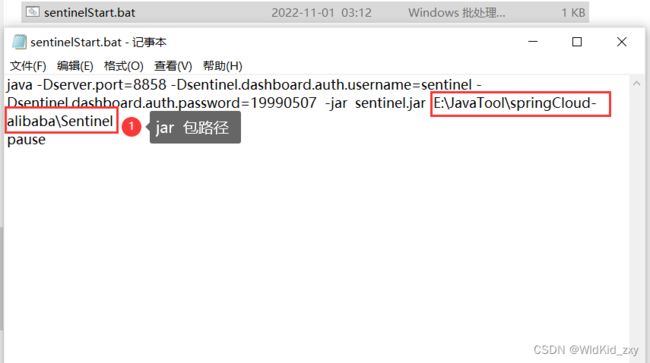
3.修改端口号为8858,:
java -Dserver.port=8858 -Dsentinel.dashboard.auth.username=sentinel -Dsentinel.dashboard.auth.password=19990507 -jar sentinel.jar
访问:http://localhost:8858/
7.4.sentinel—整合springcloud alibaba
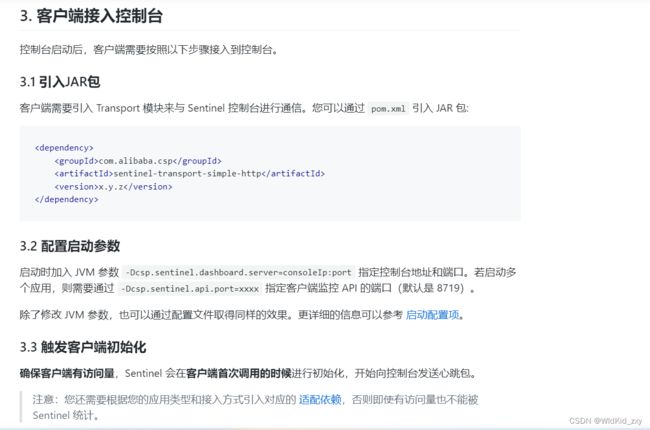
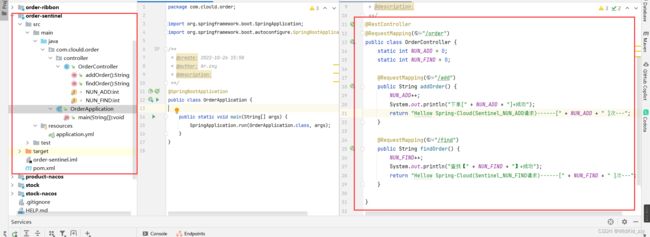
1.将order-nacos复制一份命名成 order-sentinel,删除 .iml 文件 修改maven的 artifactId,在SpringCloud AliliBaba 添加子模块 module,以及修改yaml 端口8060。
2.maven依赖,yaml 文件与项目启动。
    <dependencies>
        <dependency>
            <groupId>org.springframework.bootgroupId>
            <artifactId>spring-boot-starter-webartifactId>
        dependency>


        <dependency>
            <groupId>com.alibaba.cloudgroupId>
            <artifactId>spring-cloud-starter-alibaba-sentinelartifactId>
        dependency>
    dependencies>
server:
  port: 8060

spring:
  application:
    name: order-sentinel
  cloud:
    sentinel:
      transport:
        dashboard: 127.0.0.1:8858
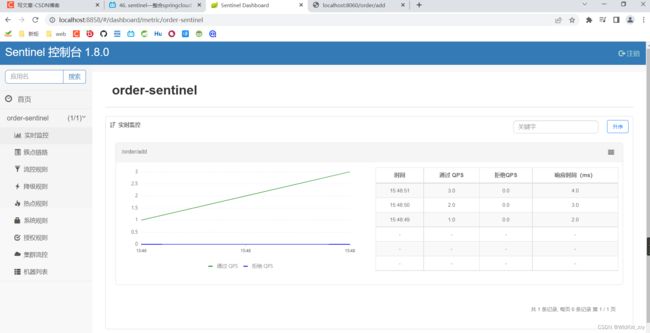
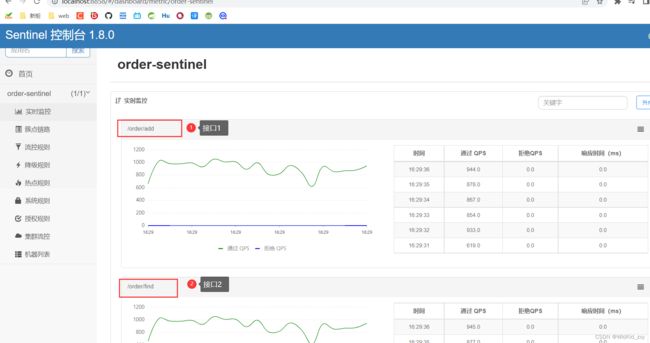
3.登入控制台(无数据),(每次)浏览器访问接口后才有数据,因为没有持久化。
在访问:http://localhost:8060/order/add
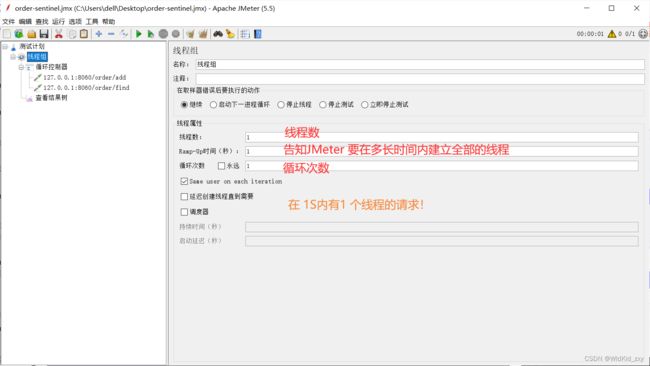
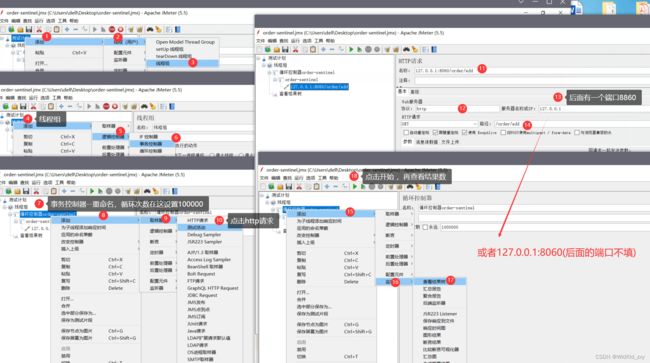
4.下载jmeter 模拟持续访问
jmter官网下载: https://jmeter.apache.org/download_jmeter.cgi
7.5.流控规则
-
TPS:(Transactions Per Second),即每秒处理的事务总数。
(1)一个事务包括三个动作,即用户操作客户端去请求服务端,服务端内部进行处理,服务端向客户端返回响应结果。
(2)即这三个动作组成的一个整体,我们称之为一个事务,若在一秒内,服务端可以完成N个事务,则我们就说这个服务端的TPS为N。
(3)一般来说,评价系统的性能主要看系统的TPS,系统的整体性能取决于性能最低的模块的TPS值。即一个木桶的容量有多大取决于它的最短板。 -
QPS:(Queries Per Second),即每秒处理的请求总数
(1)客户端请求一个地址时(即一个完整的事务操作),比如百度首页,其实不是只有一个html请求,还会产生很多其他的请求,比如css、js、jpg等等。即一个事务可能不只有一个请求,也可能会包含多个请求。
(2)若在一秒内,服务端可以处理的客户端请求的总数为M,那么我们就说这个服务端的QPS为M。
(3)QPS更能具体反映系统的吞吐能力。 -
TPS与QPS的区别
(1)若在一秒内,用户请求了百度首页并看到了首页全貌,这样就完成了一个事务(TPS=1),但其实向服务端发起了N多次请求(QPS=N)。
(2)若在一秒内,我们请求一个单调的网页,此网页只有一个html,不包含任何其他内部链接,即这个事务只会向服务端发起一次请求,那么此时自然TPS就等于QPS了 -
流量控制(fow contro):其原理是监控应用流量的QPS或并发线程数等指标,当达到指定的阈值时对流量进行控制,以避免被瞬时的流量高峰冲垮,从而保障应用的高可用性。
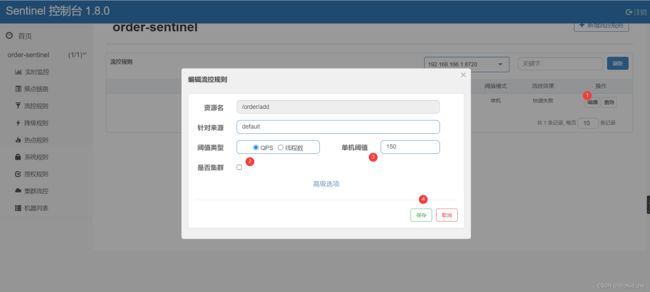
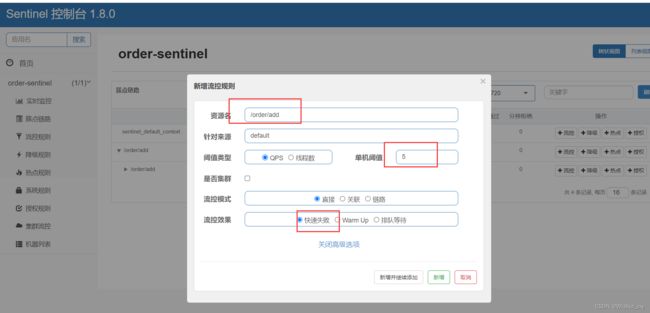
7.5.1QPS流控的方式(直接)
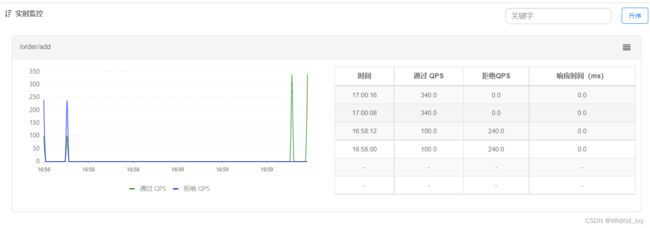
1.设置流量控制 QPS 的阈值 设置为100
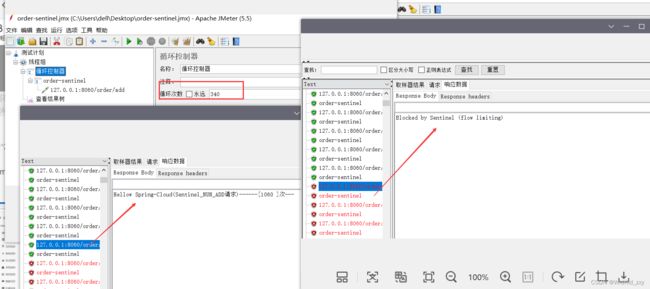
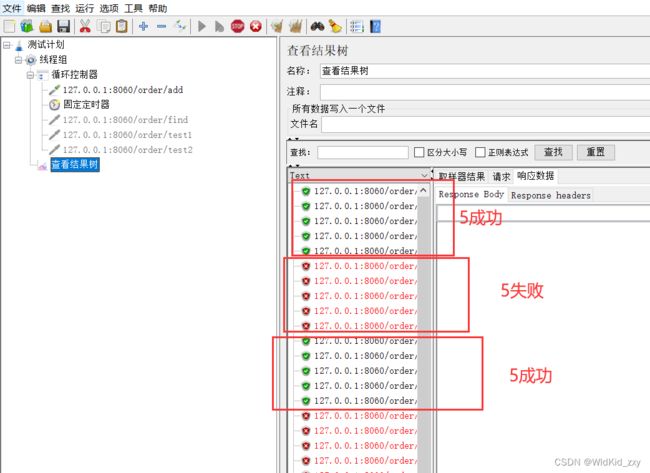
2.jmeter模拟
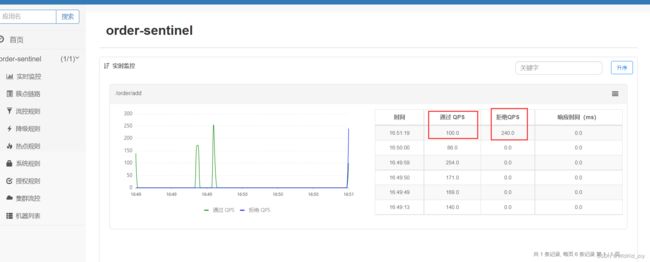
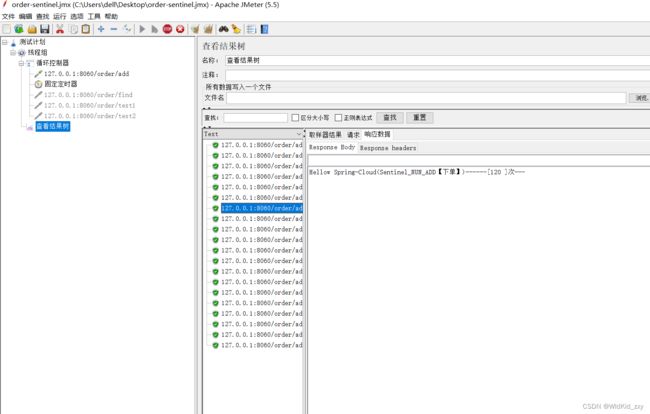
- jmeter循环340次,由于QPS 设置成100 ,其余的240 被限流。
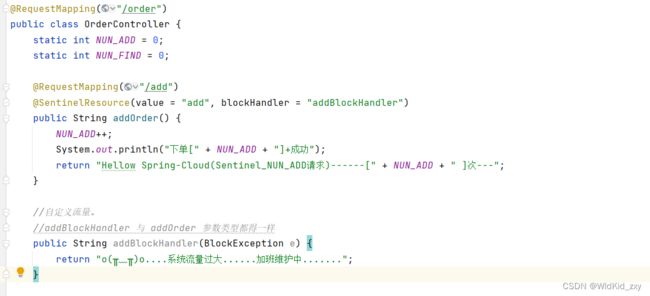
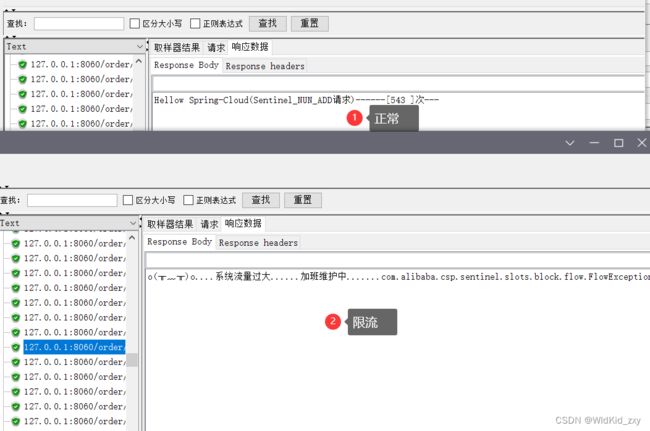
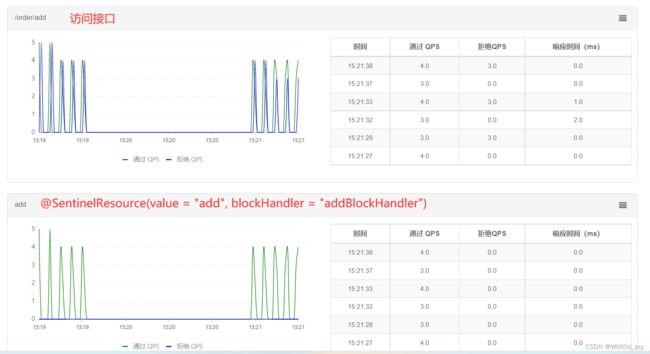
7.5.2自定义异常流量返回
@RestController
@RequestMapping("/order")
public class OrderController {
    static int NUN_ADD = 0;
    static int NUN_FIND = 0;

    @RequestMapping("/add")
    @SentinelResource(value = "add", blockHandler = "addBlockHandler")
    public String addOrder() {
        NUN_ADD++;
        System.out.println("下单[" + NUN_ADD + "]+成功");
        return "Hellow Spring-Cloud(Sentinel_NUN_ADD请求)------[" + NUN_ADD + " ]次---";
    }

    //自定义流量。
    //addBlockHandler 与 addOrder 参数类型都得一样
    public String addBlockHandler(BlockException e) {
        return "o(╥﹏╥)o....系统流量过大......加班维护中......." + e;
    }
    @RequestMapping("/find")
    public String findOrder() {
        NUN_FIND++;
        System.out.println("查找【" + NUN_FIND + "】+成功");
        return "Hellow Spring-Cloud(Sentinel_NUN_FIND请求)------[" + NUN_FIND + " ]次---";
    }
}
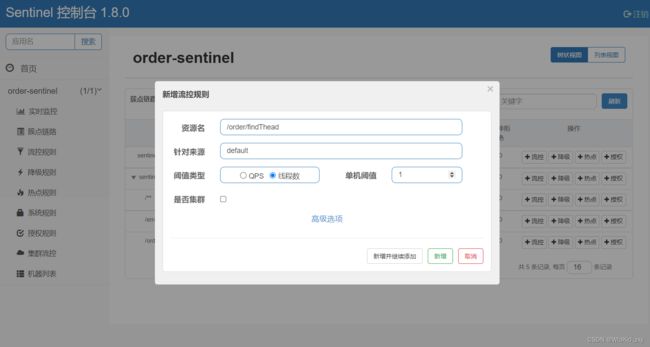
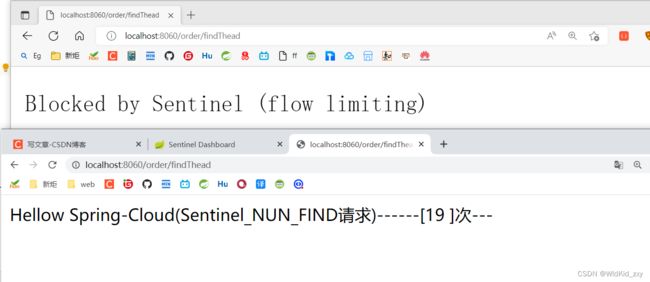
7.5.3线程流控的方式(直接)
@RequestMapping("/findThead")
    public String findThead() throws InterruptedException {
        NUN_FIND++;
        System.out.println("查找【" + NUN_FIND + "】+成功");
        //休眠5秒
        TimeUnit.SECONDS.sleep(5);
        return "Hellow Spring-Cloud(Sentinel_NUN_FIND请求)------[" + NUN_FIND + " ]次---";
    }
两个浏览器同时访问
7.5.4 Sentinel中的三种流控模式
| 流控模式 | 说明 |
|---|---|
| 直接 | 统计当前资源的请求,触发阈值时对当前资源直接限流,也是默认的模式 |
| 关联 | 统计与当前资源相关的另一个资源,触发阈值时,对当前资源限流 |
| 链路 | 统计从指定链路访问到本资源的请求,触发阈值时,对指定链路限流 |
QPS与线程控流都是直接限流模式
7.5.5关联限流
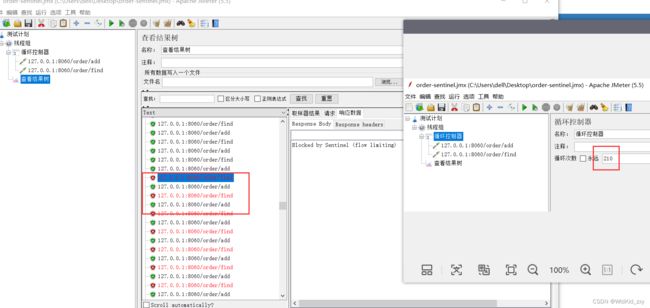
用上面已经写好的两个接口,add 与 find 接口进行测试,让查询订单 find 限流,但是是由 add 触发 find 进行限流的(当add 访问量大 就让find 限流)!
1、限流规则添加
限流find 当 1秒中add 有 100个请求就限制find请求
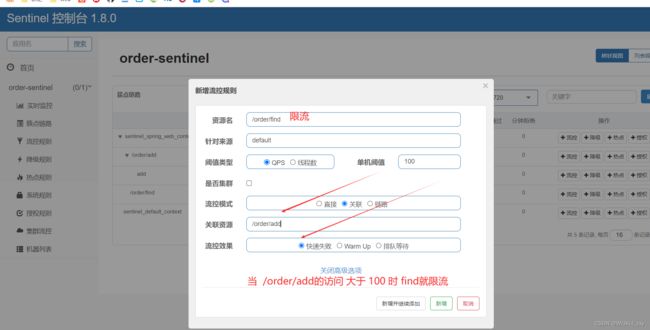 2.jmeter 循环设置为 210(线程组的数据 ,线程数=1,Ramp-Up Period=1,循环=1)
7.5.6链路限流
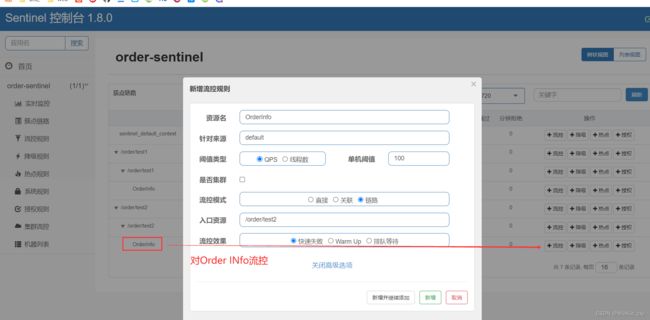
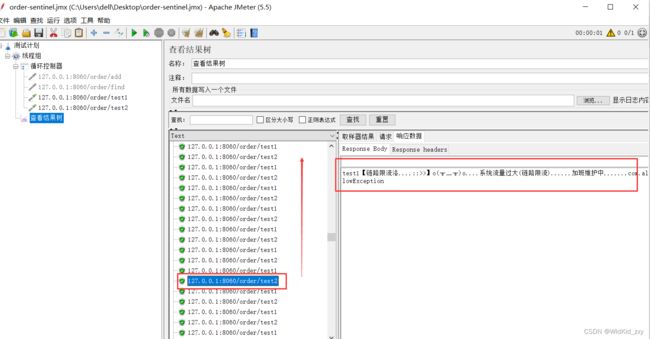
order被test1 、test2两个接口调用,当只想限制一个资源限流是就需要链路流行!
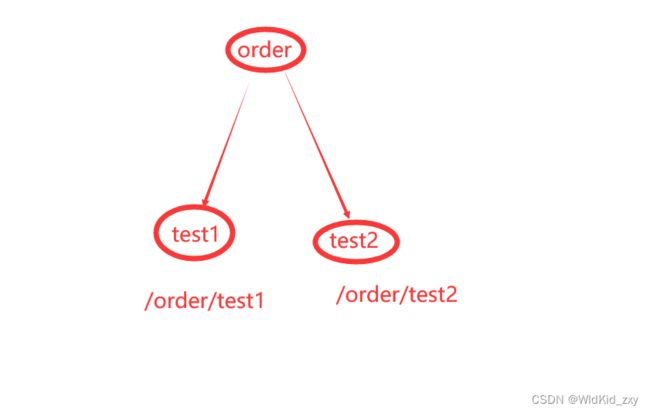
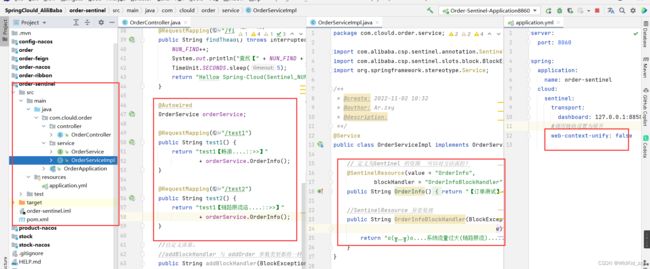
1.添加两个接口 test1、 test1 、接口类 orderInfo、自定义异常处理(SentinelResource下需要自定义)
    @Autowired
    OrderService orderService;

    @RequestMapping("/test1")
    public String test1() {
        return "test1【畅游....::>>】"
                + orderService.OrderInfo();
    }

    @RequestMapping("/test2")
    public String test2() {
        return "test1【链路限流洛....::>>】"
                + orderService.OrderInfo();
    }
(2)service代码
@Service
public class OrderServiceImpl implements OrderService {

    // 定义为Sentinel 的资源  可以对方法流控!
    @SentinelResource(value = "OrderInfo",
            blockHandler = "OrderInfoBlockHandler")
    public String OrderInfo() {
        return "【订单测试】---####";
    }

    //SentinelResource 异常处理
    public String OrderInfoBlockHandler(BlockException
                                                e) {
        return "o(╥﹏╥)o....系统流量过大(链路限流)......加班维护中......." + e;
    }
}
(3)yaml 代码
  cloud:
    sentinel:
      transport:
        dashboard: 127.0.0.1:8858
      #调用链路设置为展开
      web-context-unify: false
2.Sentinel设置 /order/test2 设置阈值 100
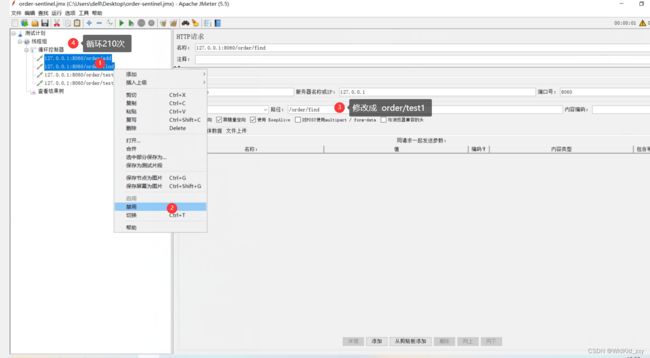
3.禁用order/add、 order/find(方便查看) ,新建两个http 请求 /order/test1 、 /order/test2 ,jmeter 循环210 次。
order/test1 210 次循环 正常,而 order/test1 超过100次就不正常,限流了!
7.6.Sentinel流控效果
| 名称 | 说明 |
|---|---|
| 快速失败 | 达到阈值后,新的请求会被立即拒绝并抛出FlowException异常。是默认的处理方 式快速失败 |
| warm up | 预热模式,对超出阈值的请求同样是拒绝并抛出异常。但这种模式阈值会动态变化, 从一个较小值逐渐增加到最大阈值。 |
| 排队等待 | 让所有的请求按照先后次序排队执行,两个请求的间隔不能小于指定时长 |
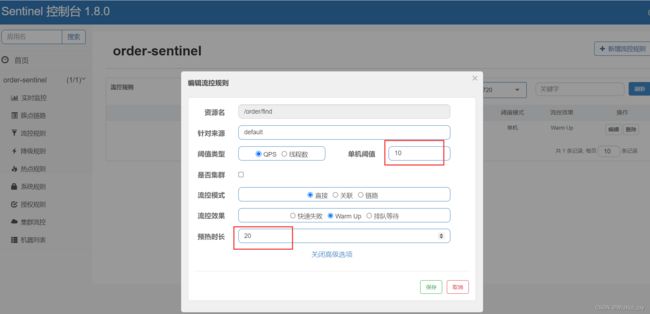
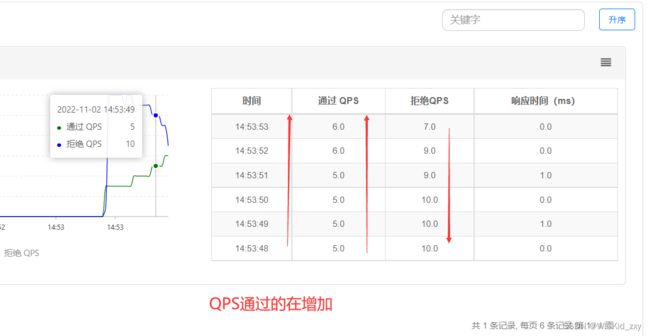
7.6.1warm up预热(应对激增浏览)
冷加载因子: codeFactor默认是3,即请求QPS 从 threshold / 3开始,经预热时长逐渐升至设定的QPS阈值。
1、给 order/find 设置限流预热规则。
2.jmeter设置
线程数:300,Ramp-Up时间(秒):20,循环次数:1。
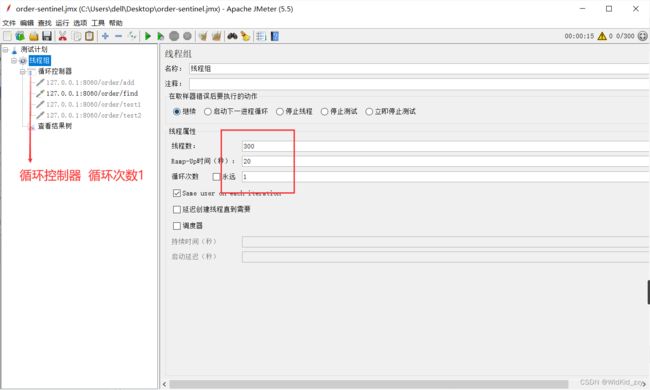
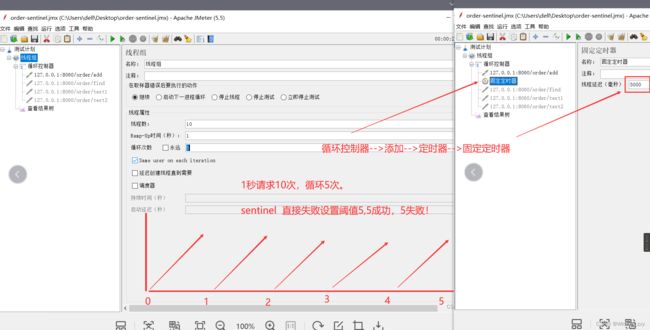
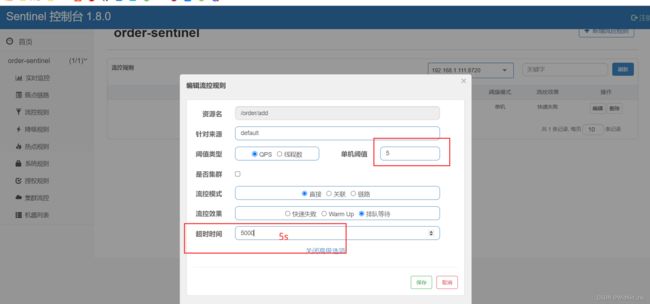
7.6.2排队等待(应对脉冲流量)
再次运行jmeter, 结果树:全部通过
****** 个别失败也正常 ******
7.7.熔断降级规则
除了流量控制以外,对调用链路中不稳定的资源进行熔断降级也是保障高可用的重要措施之一。一个服务常常会调用别的模块,可能是另外的一个远程服务、数据库,或者第三方 API 等。例如,支付的时候,可能需要远程调用银联提供的 API;查询某个商品的价格,可能需要进行数据库查询。然而,这个被依赖服务的稳定性是不能保证的。如果依赖的服务出现了不稳定的情况,请求的响应时间变长,那么调用服务的方法的响应时间也会变长,线程会产生堆积,最终可能耗尽业务自身的线程池,服务本身也变得不可用。现代微服务架构都是分布式的,由非常多的服务组成。不同服务之间相互调用,组成复杂的调用链路。
以上的问题在链路调用中会产生放大的效果。复杂链路上的某一环不稳定,就可能会层层级联,最终导致整个链路都不可用。因此我们需要对不稳定的弱依赖服务调用进行熔断降级,暂时切断不稳定调用,避免局部不稳定因素导致整体的雪崩。熔断降级作为保护自身的手段,通常在客户端(调用端)进行配置。
Sentinel 提供以下几种熔断策略:
-
慢调用比例 (SLOW_REQUEST_RATIO):选择以慢调用比例作为阈值,需要设置允许的慢调用 RT(即最大的响应时间),请求的响应时间大于该值则统计为慢调用。当单位统计时长(statIntervalMs)内请求数目大于设置的最小请求数目,并且慢调用的比例大于阈值,则接下来的熔断时长内请求会自动被熔断。经过熔断时长后熔断器会进入探测恢复状态(HALF-OPEN 状态),若接下来的一个请求响应时间小于设置的慢调用 RT 则结束熔断,若大于设置的慢调用 RT 则会再次被熔断。
-
异常比例 (ERROR_RATIO):当单位统计时长(statIntervalMs)内请求数目大于设置的最小请求数目,并且异常的比例大于阈值,则接下来的熔断时长内请求会自动被熔断。经过熔断时长后熔断器会进入探测恢复状态(HALF-OPEN 状态),若接下来的一个请求成功完成(没有错误)则结束熔断,否则会再次被熔断。异常比率的阈值范围是 [0.0, 1.0],代表 0% - 100%。
-
异常数 (ERROR_COUNT):当单位统计时长内的异常数目超过阈值之后会自动进行熔断。经过熔断时长后熔断器会进入探测恢复状态(HALF-OPEN 状态),若接下来的一个请求成功完成(没有错误)则结束熔断,否则会再次被熔断。
熔断降级规则(DegradeRule)包含下面几个重要的属性
| Field | 说明 | 默认值 |
|---|---|---|
| resource | 资源名,即规则的作用对象 | |
| grade | 熔断策略,支持慢调用比例/异常比例/异常数策略 | 慢调用比例 |
| count | 慢调用比例模式下为慢调用临界 RT(超出该值计为慢调用);异常比例/异常数模式下为对应的阈值 | |
| timeWindow | 熔断时长,单位为 s | |
| minRequestAmount | 熔断触发的最小请求数,请求数小于该值时即使异常比率超出阈值也不会熔断(1.7.0 引入) | 5 |
| statIntervalMs | 统计时长(单位为 ms),如 60*1000 代表分钟级(1.8.0 引入) | 1000 ms |
| slowRatioThreshold | 慢调用比例阈值,仅慢调用比例模式有效(1.8.0 引入) |
7.7.1.慢调用比例
1.添加接口
    static int NUM_FUSING = 0;

    @RequestMapping("/Fusing")
    public String Fusing() throws InterruptedException {
        System.out.println("[熔断]>>>>");
        NUM_FUSING++;
        TimeUnit.SECONDS.sleep(2);
        return "【熔断】....." + NUM_FUSING;
    }
2.设置熔断机制
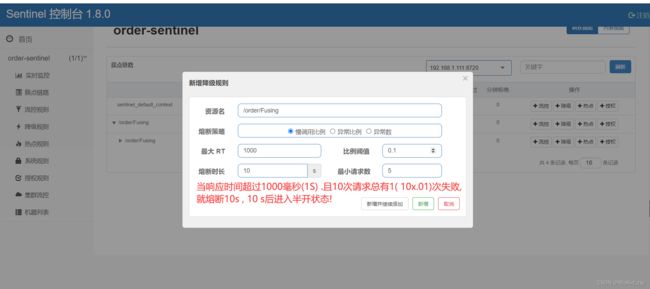
当响应时间超过1000毫秒(1S) .且5次请求总有1( 5x.01)次失败,就熔断10s , 10 s后进入半开状态!
半开状态一出现满调用,直接熔断!
3.jmeter设置、测试
线程组设置:线程数:10,Ramp-Up时间(秒):1,循环次数:1
循环控制器:1
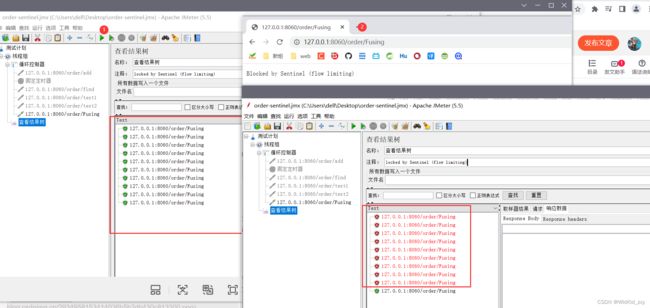
当执行了jmeter 紧跟着在浏览器访问http://127.0.0.1:8060/order/Fusing就会出现熔断(进入半开状态)。再紧接着再次运行jmeter
直接熔断。
7.7.2 异常比例
1.添加代码
    //熔断--异常比例
    @RequestMapping("/FusingErr")
    public String FusingErr() throws InterruptedException {
        System.out.println("[熔断--异常比例]>>>>");
        int i = 1 / 0;
        return "【熔断-异常比例】....." ;
    }
2.sentinel 控制台设置
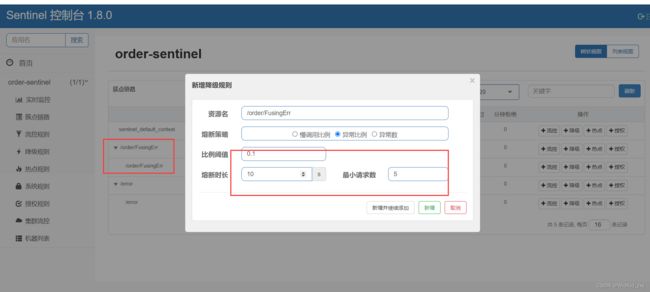
3.jmter设置
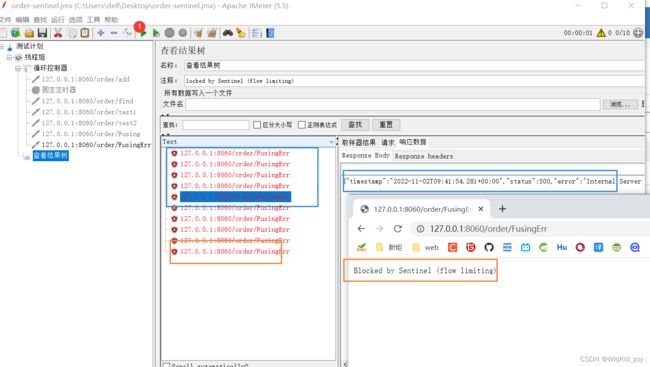
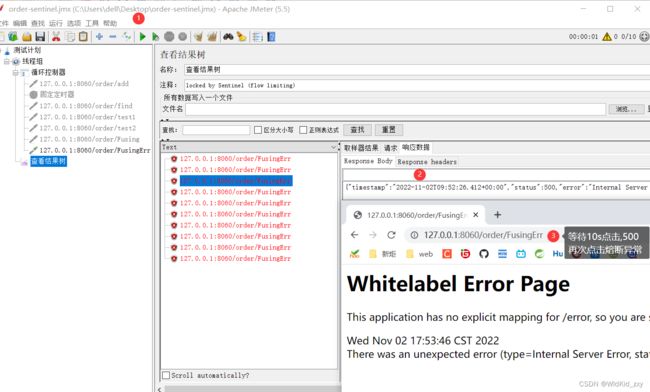
线程组设置:线程数:10,Ramp-Up时间(秒):1,循环次数:1
循环控制器:1
7.7.3. 异常数
重启8060
访问:127.0.0.1:8060/order/FusingErr
1.sentinel 控制台设置
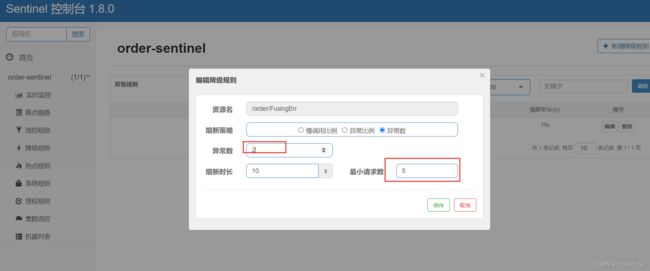
2.Jmeter设置
线程组设置
线程数:10,Ramp-Up时间(秒):1,循环次数:1
循环控制器:1
7.7.4.sentinel与openfeign整合
(1)项目创建
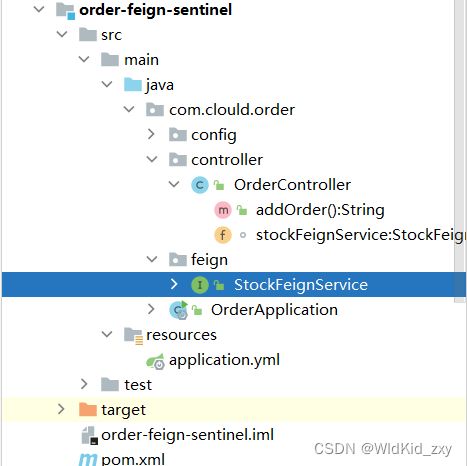
1.将order-feign复制一份命名成 order-feign-sentinel,删除 .iml 文件 修改maven的 artifactId,在SpringCloud AliliBaba 添加子模块 module,以及修改yaml 端口8061。
(1)java代码Controller:
@RestController
@RequestMapping("/order")
public class OrderController {

    @Autowired
    StockFeignService stockFeignService;

    @RequestMapping("/add")
    public String addOrder() {
        System.out.println("下单成功--Feign");
        String msg = stockFeignService.stockReserve();
        return "下单成功(Feign)\nmsg==" + msg + "\nLoadingOver........";
    }
}
(2)java代码Service
@FeignClient(value = "stock-service", path = "/stock")
public interface StockFeignService {

    @RequestMapping("/stockReserve")
    public String stockReserve();
}
(3)yaml 配置:
server:
  port: 8061

spring:
  application:
    name: order-service
  cloud:
    nacos:
      server-addr: 127.0.0.1:8848  #  windos 地址
      #server-addr: 192.168.166.130:8847  # Linux 地址
      discovery:
        username: nacos    # 账号
        password: nacos    # 密码
        namespace: public   # 命名空间  可以隔离服务示例 ,可以理解分组的意思。
访问:http://localhost:8061/order/add
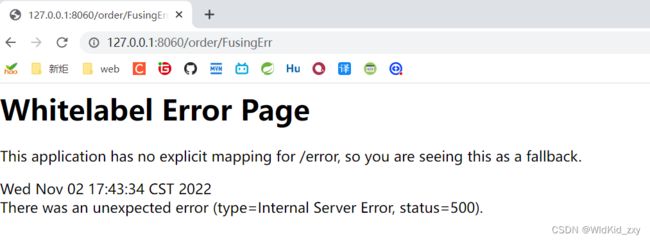
就会报500 异常
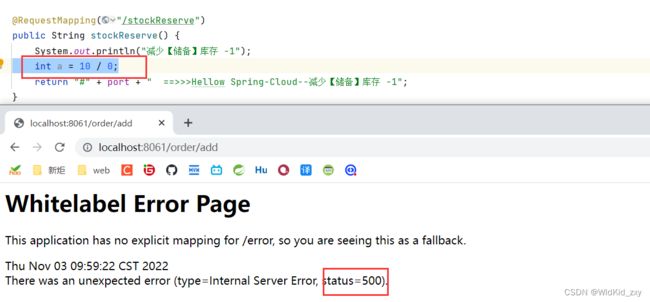
(2)项目改建
这时候就用sentinel 降级处理
(1) 在order-feign-sentinel 中添加maven 依赖
        <dependency>
            <groupId>com.alibaba.cloudgroupId>
            <artifactId>spring-cloud-starter-alibaba-sentinelartifactId>
        dependency>
2.添加一个 StockFeignServiceFallback 降级处理类,implements实现去重写StockFeignService对应的方法
StockFeignService上更换 @FeignClient 类容
/**
 * @create: 2022-11-03 10:08
 * @author: Ar.zxy
 * @description:降级处理的类,需要实现接口
 **/
@Component
public class StockFeignServiceFallback implements StockFeignService {

    public String stockReserve() {
        return "Sentinel 【降级处理....】";
    }
}
(3)yalm文件配置
feign:
  sentinel:
    #openfeign整合sentinel 默认是false
    enabled: true
访问:http://localhost:8061/order/add
@FeignClient(value = "stock-service", path = "/stock", fallback = StockFeignServiceFallback.class)*
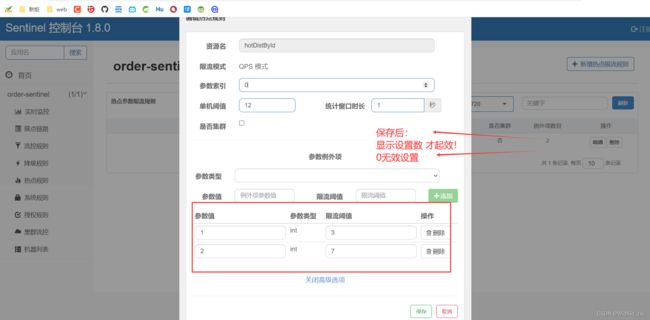
7.7.5.热点规则
何为热点?热点即经常访问的数据。很多时候我们希望统计某个热点数据中访问频次最高的 Top N 数据,并对其访问进行限制。比如:
- 商品 ID 为参数,统计一段时间内最常购买的商品 ID 并进行限制。
- 用户 ID 为参数,针对一段时间内频繁访问的用户 ID 进行限制。
热点参数限流会统计传入参数中的热点数据,并根据配置的限流阈值与模式,对包含热点参数的资源调用进行限流。热点参数限流可以看做是一种特殊的流量控制,仅对包含热点参数的资源调用生效。其中,Sentinel会利用 LRU 策略统计最近最常访问的热点参数,结合令牌桶算法来进行参数级别的流控。
在order-sentinel 添加
1.java代码:
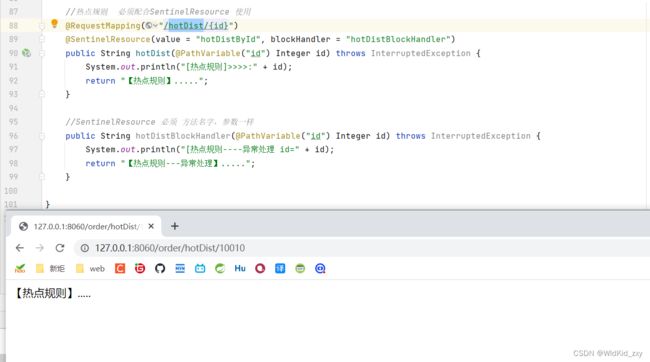
   //热点规则  必须配合SentinelResource 使用
    @RequestMapping("/hotDist/{id}")
    @SentinelResource(value = "hotDistById", blockHandler = "hotDistBlockHandler")
    public String hotDist(@PathVariable("id") Integer id) throws InterruptedException {
        System.out.println("[热点规则]>>>>:" + id);
        return "【热点规则】.....";
    }

    //SentinelResource 必须 方法名字,参数一样
    public String hotDistBlockHandler(@PathVariable("id") Integer id) throws InterruptedException {
        System.out.println("[热点规则----异常处理 id=" + id);
        return "【热点规则---异常处理】.....";
    }
2.访问(首次访问sentinel数据才会有):http://127.0.0.1:8060/order/hotDist/10010
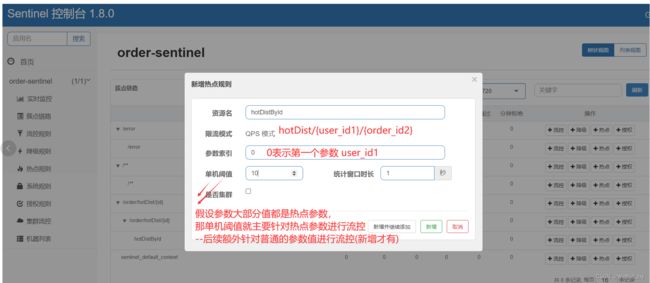
3.sentinel设置:
4.Jmeter设置
(1)线程数:10,Ramp-Up时间(秒):1,循环次数:1。
(2) 添加http请求
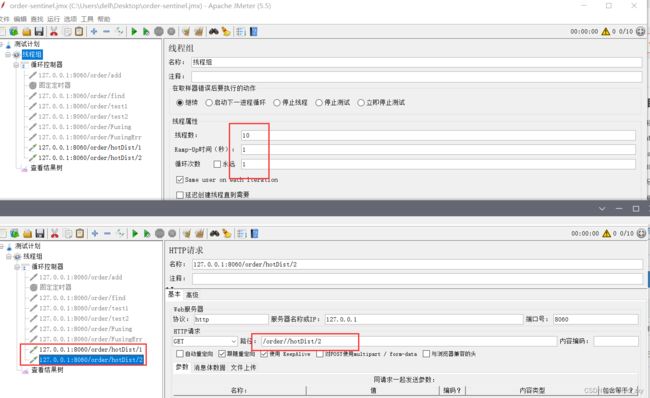
运行Jmeter:
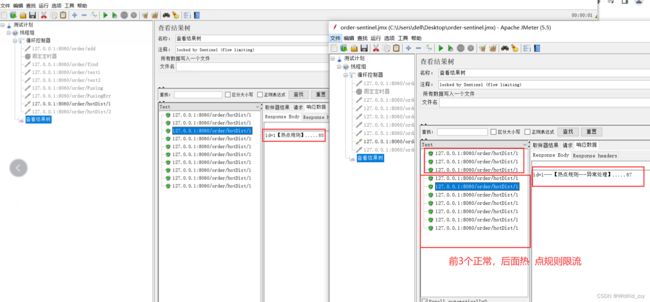
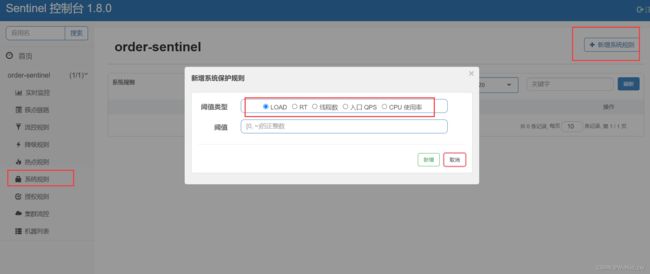
7.7.6.系统规则
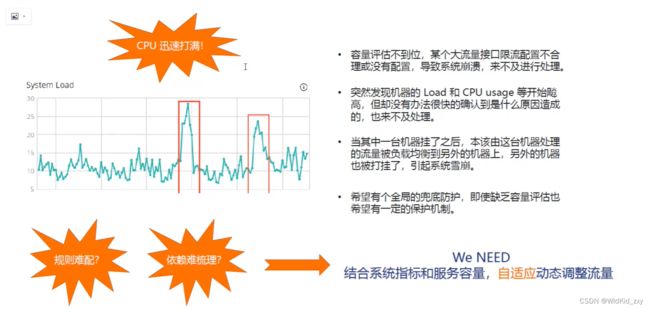
Sentinel 系统自适应限流从整体维度对应用入口流量进行控制,结合应用的 Load、CPU 使用率、总体平均 RT、入口 QPS 和并发线程数等几个维度的监控指标,通过自适应的流控策略,让系统的入口流量和系统的负载达到一个平衡,让系统尽可能跑在最大吞吐量的同时保证系统整体的稳定性。
- Load 自适应(仅对 Linux/Unix-like 机器生效):系统的 load1(1分钟平均负载) 作为启发指标,进行自适应系统保护。当系统 load1(1分钟平均负载) 超过设定的启发值(阈值),且系统当前的并发线程数超过估算的系统容量时才会触发系统保护(BBR 阶段)。系统容量由系统的 maxQps(秒级统计的最大QPS) * minRt(秒级统计的最小响应时间) 估算得出。设定参考值一般是 CPU cores * 2.5。
- CPU usage(1.5.0+ 版本):当系统 CPU 使用率超过阈值即触发系统保护(取值范围 0.0-1.0),比较灵敏。
- 平均 RT:当单台机器上所有入口流量的平均 RT 达到阈值即触发系统保护,单位是毫秒。
- 并发线程数:当单台机器上所有入口流量的并发线程数达到阈值即触发系统保护。
- 入口 QPS:当单台机器上所有入口流量的 QPS 达到阈值即触发系统保护。
7.7.7.Sentinel数据持久化
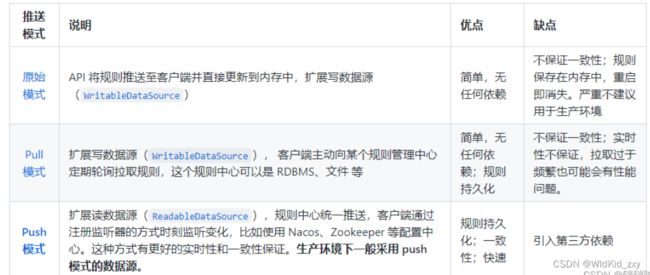
每次服重启服务 ,配置的规则就咩了,是因为数据都是存在内存中,Sentinel的数据持久化的模式有以下三种。
1.在order-sentinel 添加依赖
        <dependency>
            <groupId>com.alibaba.cspgroupId>
            <artifactId>sentinel-datasource-nacosartifactId>
        dependency>
2.nacos配置设置
访问启动nacos: http://127.0.0.1:8848/nacos/index.html
新建配置
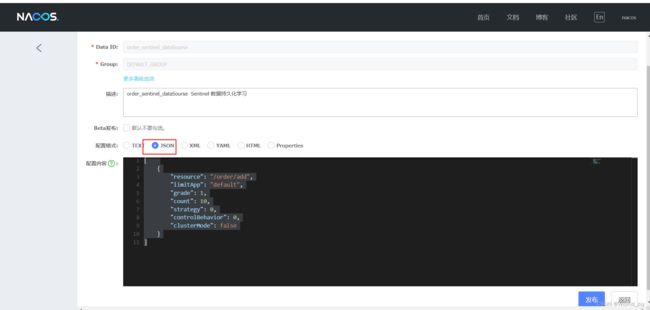
[
    {
        "resource": "/order/add",
        "limitApp": "default",
        "grade": 1,
        "count": 10,
        "strategy": 0,
        "controlBehavior": 0,
        "clusterMode": false
    }
]
---------------具体内容含义-----------------
resource:资源名称;
limitApp:来源应用;
grade:阈值类型,0表示线程数,1表示QPS;
count:单机阈值;
strategy:流控模式,0表示直接,1表示关联,2表示链路;
controlBehavior:流控效果,0表示快速失败,1表示Warm Up,2表示排队等待;
clusterMode:是否集群。
3.yaml配置
spring:
  application:
    name: order-sentinel
  cloud:
    sentinel:
      transport:
        dashboard: 127.0.0.1:8858
      #调用链路设置为展开
      web-context-unify: false

      #sentinal 数据持久化
      datasource:
        flow-rule: #可以自定义
          nacos:
            server-add: 127.0.0.1:8848
            username: nacos
            password: nacos
            dataId: order_sentinel_dataSourse
            rule-type: flow
4.sentinel持久化测试效果:
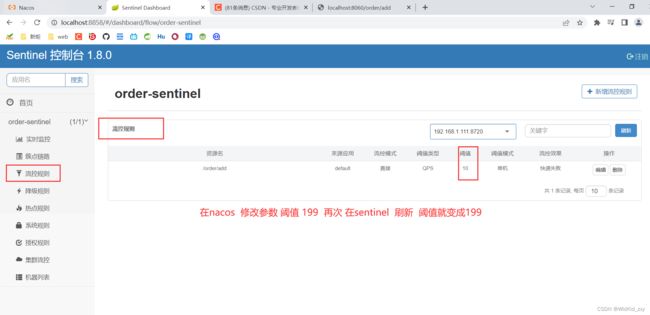
访问生成资源:http://localhost:8060/order/add
在Nacos 修改阈值 ,再查看 Sentinel 的阈值变化!
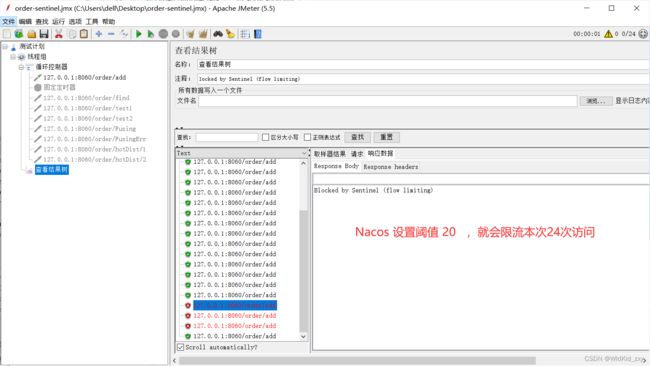
5.JMter测试:
线程组设置:线程数:24,Ramp-Up时间(秒):1,循环次数:1
循环控制器:1
问题1:在Sentinel 修改阈值 ,如何在 Nacos 持久化?
问题2:Sentinel 集群?
八、Spring Cloud微服务组件Gateway
Spring Cloud Gateway是Spring Cloud的一个全新项目,该项目是基于Spring5.0,Spring Boot 2.0和Project Reactor等响应式编程和事件流技术开发的网关,它旨在为微服务架构提供一种简单有效的统一的API路由管理方式。
- 网关的角色是作为一个 API 架构,用来保护、增强和控制对于 API 服务的访问。API 网关是一个处于应用程序或服务(提供 REST API 接口服务)之前的系统,用来管理授权、访问控制和流量限制等,这样 REST API 接口服务就被 API 网关保护起来,对所有的调用者透明。因此,隐藏在 API 网关后面的业务系统就可以专注于创建和管理服务,而不用去处理这些策略性的基础设施。
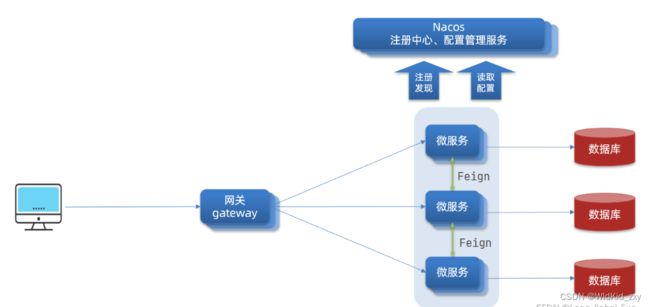
网关的核心功能特性:
- 请求路由
- 权限控制
- 限流
8.1初识gateway
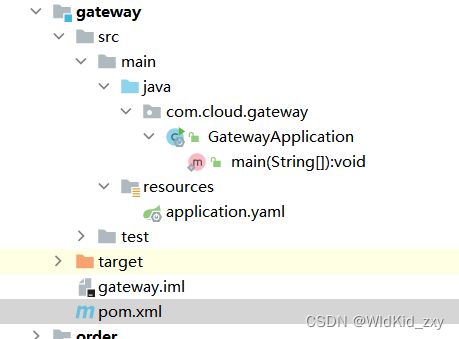
在 SpringClould_AliliBaba 新建maven 模块 gateway
(1)目录层级:
(2)添加maven 依赖
        <dependency>
            <groupId>org.springframework.cloudgroupId>
            <artifactId>spring-cloud-starter-gatewayartifactId>
        dependency>
(3)yaml配置
server:
  port: 8071
spring:
  application:
    name: api-gateway

  cloud:
    #gateway 配置
    gateway:
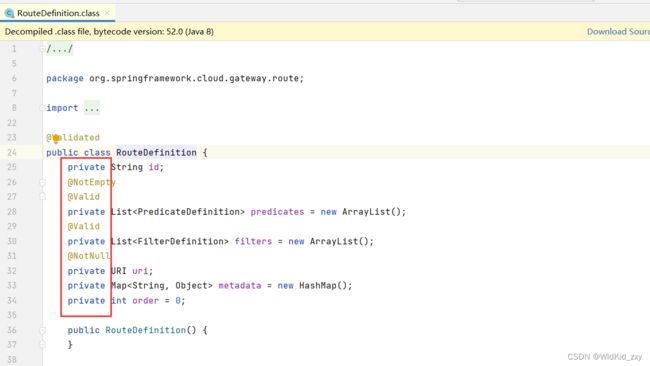
      #路由规则  可以点击进入: -->>routes-->>  RouteDefinition -->>属性查看
      routes:
        - id: order_route  #路由唯一标识
          uri: localhost:8020
          #断言 用于路由规则的匹配
          predicates:
            - Path=/order-serv/**
            #http://127.0.0.1:8071/order-serv/order/add
          filters:
            - StripPrefix=1 #去掉第一级的路径 order-serv  满足断言 就去掉一级路径 路由到--->>> http://127.0.0.1:8020/order/add
        #- id: stock_route  #路由唯一标识
(4)启动8020 与8070服务
访问:http://127.0.0.1:8071/order-serv/order/add
未完待续…
JMeter文件
<jmeterTestPlan version="1.2" properties="5.0" jmeter="5.5">
  <hashTree>
    <TestPlan guiclass="TestPlanGui" testclass="TestPlan" testname="测试计划" enabled="true">
      <stringProp name="TestPlan.comments">stringProp>
      <boolProp name="TestPlan.functional_mode">falseboolProp>
      <boolProp name="TestPlan.tearDown_on_shutdown">trueboolProp>
      <boolProp name="TestPlan.serialize_threadgroups">falseboolProp>
      <elementProp name="TestPlan.user_defined_variables" elementType="Arguments" guiclass="ArgumentsPanel" testclass="Arguments" testname="用户定义的变量" enabled="true">
        <collectionProp name="Arguments.arguments"/>
      elementProp>
      <stringProp name="TestPlan.user_define_classpath">stringProp>
    TestPlan>
    <hashTree>
      <ThreadGroup guiclass="ThreadGroupGui" testclass="ThreadGroup" testname="线程组" enabled="true">
        <stringProp name="ThreadGroup.on_sample_error">continuestringProp>
        <elementProp name="ThreadGroup.main_controller" elementType="LoopController" guiclass="LoopControlPanel" testclass="LoopController" testname="循环控制器" enabled="true">
          <boolProp name="LoopController.continue_forever">falseboolProp>
          <stringProp name="LoopController.loops">1stringProp>
        elementProp>
        <stringProp name="ThreadGroup.num_threads">1stringProp>
        <stringProp name="ThreadGroup.ramp_time">1stringProp>
        <boolProp name="ThreadGroup.scheduler">falseboolProp>
        <stringProp name="ThreadGroup.duration">stringProp>
        <stringProp name="ThreadGroup.delay">stringProp>
        <boolProp name="ThreadGroup.same_user_on_next_iteration">trueboolProp>
      ThreadGroup>
      <hashTree>
        <LoopController guiclass="LoopControlPanel" testclass="LoopController" testname="循环控制器" enabled="true">
          <boolProp name="LoopController.continue_forever">trueboolProp>
          <stringProp name="LoopController.loops">10stringProp>
        LoopController>
        <hashTree>
          <HTTPSamplerProxy guiclass="HttpTestSampleGui" testclass="HTTPSamplerProxy" testname="127.0.0.1:8020/order/add" enabled="false">
            <elementProp name="HTTPsampler.Arguments" elementType="Arguments" guiclass="HTTPArgumentsPanel" testclass="Arguments" testname="用户定义的变量" enabled="true">
              <collectionProp name="Arguments.arguments"/>
            elementProp>
            <stringProp name="HTTPSampler.domain">127.0.0.1stringProp>
            <stringProp name="HTTPSampler.port">8020stringProp>
            <stringProp name="HTTPSampler.protocol">httpstringProp>
            <stringProp name="HTTPSampler.contentEncoding">stringProp>
            <stringProp name="HTTPSampler.path">/order/addstringProp>
            <stringProp name="HTTPSampler.method">GETstringProp>
            <boolProp name="HTTPSampler.follow_redirects">trueboolProp>
            <boolProp name="HTTPSampler.auto_redirects">falseboolProp>
            <boolProp name="HTTPSampler.use_keepalive">trueboolProp>
            <boolProp name="HTTPSampler.DO_MULTIPART_POST">falseboolProp>
            <stringProp name="HTTPSampler.embedded_url_re">stringProp>
            <stringProp name="HTTPSampler.connect_timeout">stringProp>
            <stringProp name="HTTPSampler.response_timeout">stringProp>
          HTTPSamplerProxy>
          <hashTree/>
          <HTTPSamplerProxy guiclass="HttpTestSampleGui" testclass="HTTPSamplerProxy" testname="127.0.0.1:8060/order/add" enabled="false">
            <elementProp name="HTTPsampler.Arguments" elementType="Arguments" guiclass="HTTPArgumentsPanel" testclass="Arguments" testname="用户定义的变量" enabled="true">
              <collectionProp name="Arguments.arguments"/>
            elementProp>
            <stringProp name="HTTPSampler.domain">127.0.0.1stringProp>
            <stringProp name="HTTPSampler.port">8060stringProp>
            <stringProp name="HTTPSampler.protocol">httpstringProp>
            <stringProp name="HTTPSampler.contentEncoding">stringProp>
            <stringProp name="HTTPSampler.path">/order/addstringProp>
            <stringProp name="HTTPSampler.method">GETstringProp>
            <boolProp name="HTTPSampler.follow_redirects">trueboolProp>
            <boolProp name="HTTPSampler.auto_redirects">falseboolProp>
            <boolProp name="HTTPSampler.use_keepalive">trueboolProp>
            <boolProp name="HTTPSampler.DO_MULTIPART_POST">falseboolProp>
            <stringProp name="HTTPSampler.embedded_url_re">stringProp>
            <stringProp name="HTTPSampler.connect_timeout">stringProp>
            <stringProp name="HTTPSampler.response_timeout">stringProp>
          HTTPSamplerProxy>
          <hashTree/>
          <ConstantTimer guiclass="ConstantTimerGui" testclass="ConstantTimer" testname="固定定时器" enabled="false">
            <stringProp name="ConstantTimer.delay">5000stringProp>
          ConstantTimer>
          <hashTree/>
          <HTTPSamplerProxy guiclass="HttpTestSampleGui" testclass="HTTPSamplerProxy" testname="127.0.0.1:8060/order/find" enabled="false">
            <elementProp name="HTTPsampler.Arguments" elementType="Arguments" guiclass="HTTPArgumentsPanel" testclass="Arguments" testname="用户定义的变量" enabled="true">
              <collectionProp name="Arguments.arguments"/>
            elementProp>
            <stringProp name="HTTPSampler.domain">127.0.0.1stringProp>
            <stringProp name="HTTPSampler.port">8060stringProp>
            <stringProp name="HTTPSampler.protocol">httpstringProp>
            <stringProp name="HTTPSampler.contentEncoding">stringProp>
            <stringProp name="HTTPSampler.path">/order/findstringProp>
            <stringProp name="HTTPSampler.method">GETstringProp>
            <boolProp name="HTTPSampler.follow_redirects">trueboolProp>
            <boolProp name="HTTPSampler.auto_redirects">falseboolProp>
            <boolProp name="HTTPSampler.use_keepalive">trueboolProp>
            <boolProp name="HTTPSampler.DO_MULTIPART_POST">falseboolProp>
            <stringProp name="HTTPSampler.embedded_url_re">stringProp>
            <stringProp name="HTTPSampler.connect_timeout">stringProp>
            <stringProp name="HTTPSampler.response_timeout">stringProp>
          HTTPSamplerProxy>
          <hashTree/>
          <HTTPSamplerProxy guiclass="HttpTestSampleGui" testclass="HTTPSamplerProxy" testname="127.0.0.1:8060/order/test1" enabled="false">
            <elementProp name="HTTPsampler.Arguments" elementType="Arguments" guiclass="HTTPArgumentsPanel" testclass="Arguments" testname="用户定义的变量" enabled="true">
              <collectionProp name="Arguments.arguments"/>
            elementProp>
            <stringProp name="HTTPSampler.domain">127.0.0.1stringProp>
            <stringProp name="HTTPSampler.port">8060stringProp>
            <stringProp name="HTTPSampler.protocol">httpstringProp>
            <stringProp name="HTTPSampler.contentEncoding">stringProp>
            <stringProp name="HTTPSampler.path">/order/test1stringProp>
            <stringProp name="HTTPSampler.method">GETstringProp>
            <boolProp name="HTTPSampler.follow_redirects">trueboolProp>
            <boolProp name="HTTPSampler.auto_redirects">falseboolProp>
            <boolProp name="HTTPSampler.use_keepalive">trueboolProp>
            <boolProp name="HTTPSampler.DO_MULTIPART_POST">falseboolProp>
            <stringProp name="HTTPSampler.embedded_url_re">stringProp>
            <stringProp name="HTTPSampler.connect_timeout">stringProp>
            <stringProp name="HTTPSampler.response_timeout">stringProp>
          HTTPSamplerProxy>
          <hashTree/>
          <HTTPSamplerProxy guiclass="HttpTestSampleGui" testclass="HTTPSamplerProxy" testname="127.0.0.1:8060/order/test2" enabled="false">
            <elementProp name="HTTPsampler.Arguments" elementType="Arguments" guiclass="HTTPArgumentsPanel" testclass="Arguments" testname="用户定义的变量" enabled="true">
              <collectionProp name="Arguments.arguments"/>
            elementProp>
            <stringProp name="HTTPSampler.domain">127.0.0.1stringProp>
            <stringProp name="HTTPSampler.port">8060stringProp>
            <stringProp name="HTTPSampler.protocol">httpstringProp>
            <stringProp name="HTTPSampler.contentEncoding">stringProp>
            <stringProp name="HTTPSampler.path">/order/test2stringProp>
            <stringProp name="HTTPSampler.method">GETstringProp>
            <boolProp name="HTTPSampler.follow_redirects">trueboolProp>
            <boolProp name="HTTPSampler.auto_redirects">falseboolProp>
            <boolProp name="HTTPSampler.use_keepalive">trueboolProp>
            <boolProp name="HTTPSampler.DO_MULTIPART_POST">falseboolProp>
            <stringProp name="HTTPSampler.embedded_url_re">stringProp>
            <stringProp name="HTTPSampler.connect_timeout">stringProp>
            <stringProp name="HTTPSampler.response_timeout">stringProp>
          HTTPSamplerProxy>
          <hashTree/>
          <HTTPSamplerProxy guiclass="HttpTestSampleGui" testclass="HTTPSamplerProxy" testname="127.0.0.1:8060/order/Fusing" enabled="false">
            <elementProp name="HTTPsampler.Arguments" elementType="Arguments" guiclass="HTTPArgumentsPanel" testclass="Arguments" testname="用户定义的变量" enabled="true">
              <collectionProp name="Arguments.arguments"/>
            elementProp>
            <stringProp name="HTTPSampler.domain">127.0.0.1stringProp>
            <stringProp name="HTTPSampler.port">8060stringProp>
            <stringProp name="HTTPSampler.protocol">httpstringProp>
            <stringProp name="HTTPSampler.contentEncoding">stringProp>
            <stringProp name="HTTPSampler.path">/order/FusingstringProp>
            <stringProp name="HTTPSampler.method">GETstringProp>
            <boolProp name="HTTPSampler.follow_redirects">trueboolProp>
            <boolProp name="HTTPSampler.auto_redirects">falseboolProp>
            <boolProp name="HTTPSampler.use_keepalive">trueboolProp>
            <boolProp name="HTTPSampler.DO_MULTIPART_POST">falseboolProp>
            <stringProp name="HTTPSampler.embedded_url_re">stringProp>
            <stringProp name="HTTPSampler.connect_timeout">stringProp>
            <stringProp name="HTTPSampler.response_timeout">stringProp>
          HTTPSamplerProxy>
          <hashTree/>
          <HTTPSamplerProxy guiclass="HttpTestSampleGui" testclass="HTTPSamplerProxy" testname="127.0.0.1:8060/order/FusingErr" enabled="false">
            <elementProp name="HTTPsampler.Arguments" elementType="Arguments" guiclass="HTTPArgumentsPanel" testclass="Arguments" testname="用户定义的变量" enabled="true">
              <collectionProp name="Arguments.arguments"/>
            elementProp>
            <stringProp name="HTTPSampler.domain">127.0.0.1stringProp>
            <stringProp name="HTTPSampler.port">8060stringProp>
            <stringProp name="HTTPSampler.protocol">httpstringProp>
            <stringProp name="HTTPSampler.contentEncoding">stringProp>
            <stringProp name="HTTPSampler.path">/order/FusingErrstringProp>
            <stringProp name="HTTPSampler.method">GETstringProp>
            <boolProp name="HTTPSampler.follow_redirects">trueboolProp>
            <boolProp name="HTTPSampler.auto_redirects">falseboolProp>
            <boolProp name="HTTPSampler.use_keepalive">trueboolProp>
            <boolProp name="HTTPSampler.DO_MULTIPART_POST">falseboolProp>
            <stringProp name="HTTPSampler.embedded_url_re">stringProp>
            <stringProp name="HTTPSampler.connect_timeout">stringProp>
            <stringProp name="HTTPSampler.response_timeout">stringProp>
          HTTPSamplerProxy>
          <hashTree/>
          <HTTPSamplerProxy guiclass="HttpTestSampleGui" testclass="HTTPSamplerProxy" testname="127.0.0.1:8060/order/hotDist/1" enabled="false">
            <elementProp name="HTTPsampler.Arguments" elementType="Arguments" guiclass="HTTPArgumentsPanel" testclass="Arguments" testname="用户定义的变量" enabled="true">
              <collectionProp name="Arguments.arguments"/>
            elementProp>
            <stringProp name="HTTPSampler.domain">127.0.0.1stringProp>
            <stringProp name="HTTPSampler.port">8060stringProp>
            <stringProp name="HTTPSampler.protocol">httpstringProp>
            <stringProp name="HTTPSampler.contentEncoding">stringProp>
            <stringProp name="HTTPSampler.path">/order//hotDist/1stringProp>
            <stringProp name="HTTPSampler.method">GETstringProp>
            <boolProp name="HTTPSampler.follow_redirects">trueboolProp>
            <boolProp name="HTTPSampler.auto_redirects">falseboolProp>
            <boolProp name="HTTPSampler.use_keepalive">trueboolProp>
            <boolProp name="HTTPSampler.DO_MULTIPART_POST">falseboolProp>
            <stringProp name="HTTPSampler.embedded_url_re">stringProp>
            <stringProp name="HTTPSampler.connect_timeout">stringProp>
            <stringProp name="HTTPSampler.response_timeout">stringProp>
          HTTPSamplerProxy>
          <hashTree/>
          <HTTPSamplerProxy guiclass="HttpTestSampleGui" testclass="HTTPSamplerProxy" testname="127.0.0.1:8060/order/hotDist/2" enabled="false">
            <elementProp name="HTTPsampler.Arguments" elementType="Arguments" guiclass="HTTPArgumentsPanel" testclass="Arguments" testname="用户定义的变量" enabled="true">
              <collectionProp name="Arguments.arguments"/>
            elementProp>
            <stringProp name="HTTPSampler.domain">127.0.0.1stringProp>
            <stringProp name="HTTPSampler.port">8060stringProp>
            <stringProp name="HTTPSampler.protocol">httpstringProp>
            <stringProp name="HTTPSampler.contentEncoding">stringProp>
            <stringProp name="HTTPSampler.path">/order//hotDist/2stringProp>
            <stringProp name="HTTPSampler.method">GETstringProp>
            <boolProp name="HTTPSampler.follow_redirects">trueboolProp>
            <boolProp name="HTTPSampler.auto_redirects">falseboolProp>
            <boolProp name="HTTPSampler.use_keepalive">trueboolProp>
            <boolProp name="HTTPSampler.DO_MULTIPART_POST">falseboolProp>
            <stringProp name="HTTPSampler.embedded_url_re">stringProp>
            <stringProp name="HTTPSampler.connect_timeout">stringProp>
            <stringProp name="HTTPSampler.response_timeout">stringProp>
          HTTPSamplerProxy>
          <hashTree/>
          <HTTPSamplerProxy guiclass="HttpTestSampleGui" testclass="HTTPSamplerProxy" testname="127.0.0.1:8071/order-serv/order/add" enabled="true">
            <elementProp name="HTTPsampler.Arguments" elementType="Arguments" guiclass="HTTPArgumentsPanel" testclass="Arguments" testname="用户定义的变量" enabled="true">
              <collectionProp name="Arguments.arguments"/>
            elementProp>
            <stringProp name="HTTPSampler.domain">127.0.0.1stringProp>
            <stringProp name="HTTPSampler.port">8071stringProp>
            <stringProp name="HTTPSampler.protocol">httpstringProp>
            <stringProp name="HTTPSampler.contentEncoding">stringProp>
            <stringProp name="HTTPSampler.path">/order-serv/order/addstringProp>
            <stringProp name="HTTPSampler.method">GETstringProp>
            <boolProp name="HTTPSampler.follow_redirects">trueboolProp>
            <boolProp name="HTTPSampler.auto_redirects">falseboolProp>
            <boolProp name="HTTPSampler.use_keepalive">trueboolProp>
            <boolProp name="HTTPSampler.DO_MULTIPART_POST">falseboolProp>
            <stringProp name="HTTPSampler.embedded_url_re">stringProp>
            <stringProp name="HTTPSampler.connect_timeout">stringProp>
            <stringProp name="HTTPSampler.response_timeout">stringProp>
          HTTPSamplerProxy>
          <hashTree/>
        hashTree>
        <ResultCollector guiclass="ViewResultsFullVisualizer" testclass="ResultCollector" testname="查看结果树" enabled="true">
          <boolProp name="ResultCollector.error_logging">falseboolProp>
          <objProp>
            <name>saveConfigname>
            <value class="SampleSaveConfiguration">
              <time>truetime>
              <latency>truelatency>
              <timestamp>truetimestamp>
              <success>truesuccess>
              <label>truelabel>
              <code>truecode>
              <message>truemessage>
              <threadName>truethreadName>
              <dataType>truedataType>
              <encoding>falseencoding>
              <assertions>trueassertions>
              <subresults>truesubresults>
              <responseData>falseresponseData>
              <samplerData>falsesamplerData>
              <xml>falsexml>
              <fieldNames>truefieldNames>
              <responseHeaders>falseresponseHeaders>
              <requestHeaders>falserequestHeaders>
              <responseDataOnError>falseresponseDataOnError>
              <saveAssertionResultsFailureMessage>truesaveAssertionResultsFailureMessage>
              <assertionsResultsToSave>0assertionsResultsToSave>
              <bytes>truebytes>
              <sentBytes>truesentBytes>
              <url>trueurl>
              <threadCounts>truethreadCounts>
              <idleTime>trueidleTime>
              <connectTime>trueconnectTime>
            value>
          objProp>
          <stringProp name="filename">stringProp>
          <stringProp name="TestPlan.comments">locked by Sentinel (flow limiting)stringProp>
        ResultCollector>
        <hashTree/>
      hashTree>
    hashTree>
  hashTree>
jmeterTestPlan>
九、 尚医通
gitee 后端地址:https://gitee.com/StarSea007/yyds-parent
gitee 后台前端地址:https://gitee.com/StarSea007/yyds-vue-font
