vue国际化教程
需求背景
项目需求要做国际化,结果网上找了好几篇文章,没有一个可以一次性搞定,现在这里总结一下。首先,我们分为两部分处理,一个是前端页面的静态文字,这个由前端vue.json自行处理。第二部分就是后端的错误消息和日志部分,我们由springboot的拦截器来处理。
i18n介绍
i18n(其来源是英文单词 internationalization的首末字符i和n,18为中间的字符数)是“国际化”的简称。
vue前端国际化部分
1、安装i18n插件
安装插件时候,注意必须指定版本号,不然安装会报错。
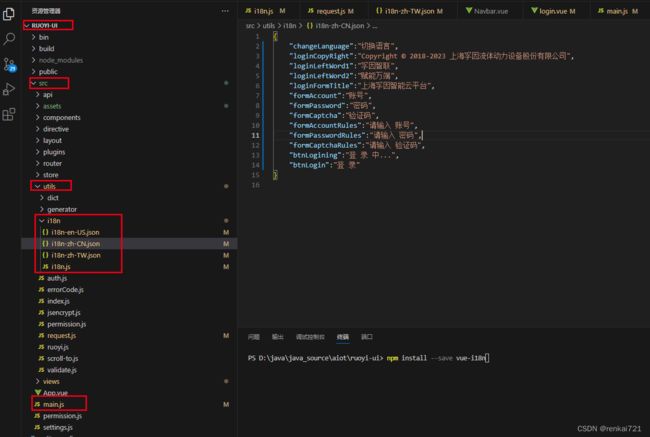
npm i [email protected]2、新建文件夹i18n
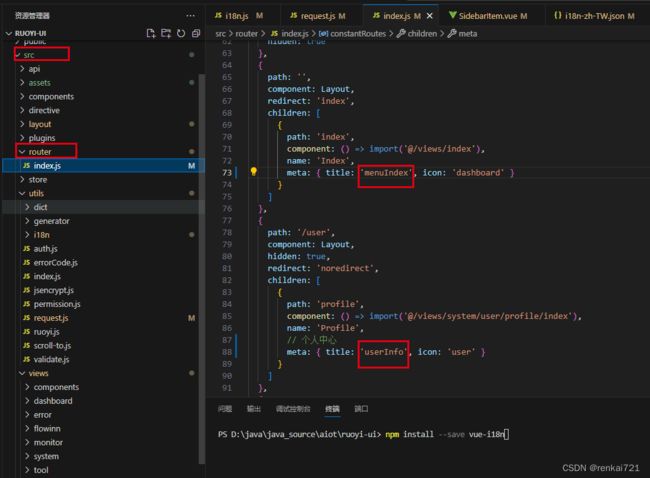
文件路径依次是RUOYI-UI/src/utils/i18n。具体的文件结构看图
3、新建i18n.js文件
文件的位置请看上图。
// I18n
import VueI18n from 'vue-i18n'
import Vue from 'vue'
import locale from 'element-ui/lib/locale'

// 引入 elementui 的多语言
import enLocale from 'element-ui/lib/locale/lang/en'
import zhCnLocale from 'element-ui/lib/locale/lang/zh-CN'
import zhTwLocale from 'element-ui/lib/locale/lang/zh-TW'
// 如果还有新的语言在下面继续添加

// 引入自己定义的 I18n 文件
import myI18nEn from './i18n-en-US.json'
import myI18nZh from './i18n-zh-CN.json'
import myI18nTw from './i18n-zh-TW.json'
// 如果还有新的语言在下面继续添加

// 注册 vue-i18n
Vue.use(VueI18n)

// 默认中文
const lang = 'zh-CN'
const i18n = new VueI18n({
  locale: lang,
  messages: {
    // 会把myI18nZh的所有内容拷贝到zhCnLocale文件中
    'zh-CN': Object.assign(zhCnLocale, myI18nZh),
    'en-US': Object.assign(enLocale, myI18nEn),
    'zh-TW': Object.assign(zhTwLocale, myI18nTw),
    // 如果还有新的语言在下面继续添加
  }
})

locale.i18n((key, value) => i18n.t(key, value))
export default i18n
4、修改main.js文件
import Vue from 'vue'

import Cookies from 'js-cookie'

import Element from 'element-ui'

// i18n js
import i18n from './utils/i18n/i18n.js'
// 其余的信息不用修改,就增加上面的i18n js,然后在new Vue中把i18n添加进去

new Vue({
  el: '#app',
  router,
  store,
  i18n,
  render: h => h(App)
})
5、 页面显示的语法
// title
:title="$t('btnBulkOperations')"

// js
this.$i18n.t('username')

// 标签,注意冒号
:label="$t('username')"

// 输入框中的占位符,注意冒号
:placeholder="this.$t('username')"

// 表格标题
:label="$t('username')"

// div语法
{{$t("username")}}

// 多个key拼接
:placeholder="`${this.$t('userInput')}${this.$t('userPhone')}`"
:label="`${this.$t('indexTablePrimaryKey')} • ${this.$t('wordName')}`"
6、vue登录页面源码
大家可以参照一下这个登录页面的实现方法
{{$t("loginLeftWord1")}}
{{$t("loginLeftWord2")}}
 {{$t("loginFormTitle")}}
![]()
 {{$t("changeLanguage")}}
{{item.value}}
{{$t("btnLogin")}}
{{$t("btnLogining")}}
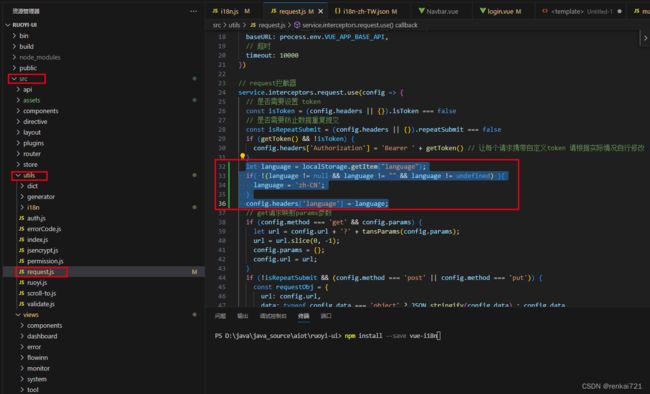
7、修改request.js
这样就可以保证,每一次请求都从cookies中读取出来用户设置的语言,然后传递到后台
let language = localStorage.getItem("language");
if(!(language != null && language != "" && language != undefined) ){
  language = 'zh-CN';
}
config.headers['language'] = language;
8、 前端国际化结束
到此前端的国际化就结束了,大家可以试试看。
springboot2后端国际化
1、保存messages.properties
大家先把messages.properties文件中的内容保存到别的地方。
2、删除messages.properties
然后我们需要删除这个文件,重新生成。
3、新建messages.properties
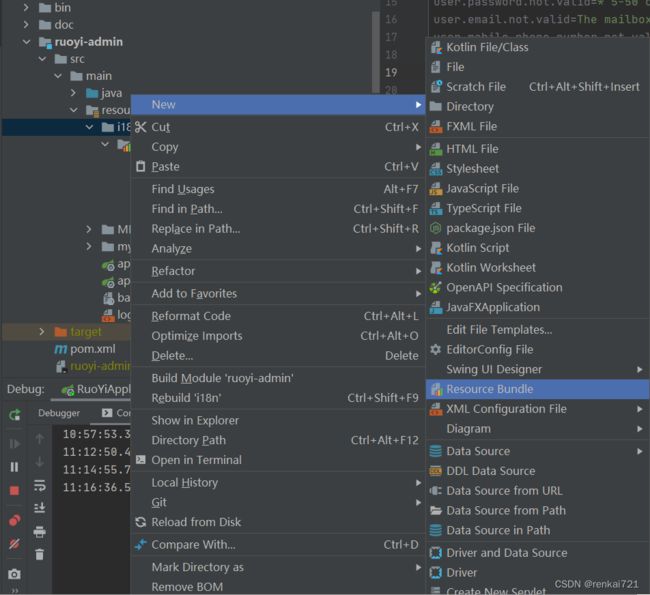
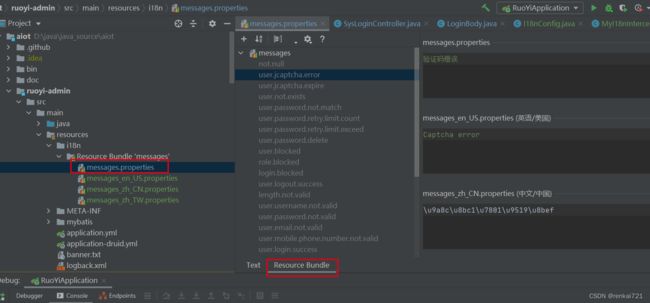
在ruoyi-admin/src/main/resources/i18n这个文件夹上右键New-Resource Bundle
然后输入messages,个人建议就使用这个固定的messages名字,不然后面的配置中要多一个配置,然后点击右边的加号,添加自己需要的国际化语言,如果要添加中文就输入zh_CN,英文就输入en_US。因为我这里已经存在文件了,所以会有错误提示。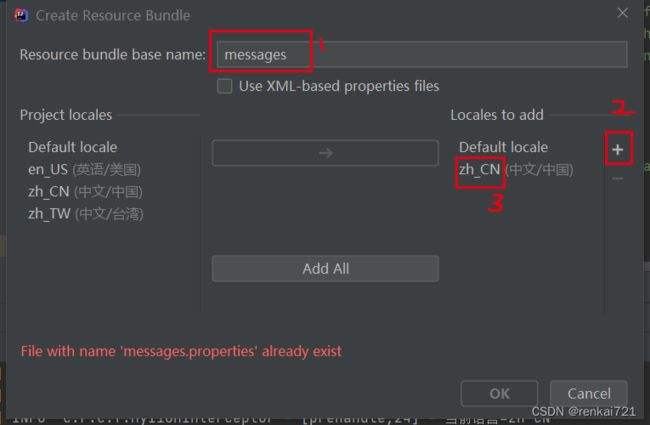
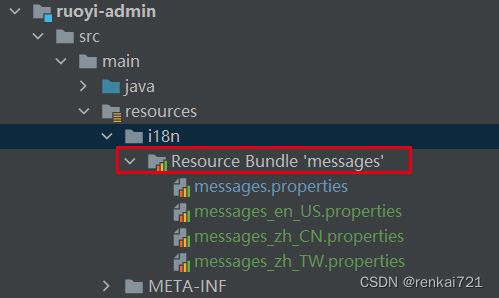
新建好了之后,显示就会变成下面这个样子,如果大家不是这种结构,那就要删除重新搞,必须是这样的结构才可以。经过上面的操作之后,就会自动把对应的文件都生成。
4、编辑messages.properties
大家双击messages.properties文件,然后在右边点击Resource Bundle,然后在右边就可以一个一个编辑了。
5、国际化地区语言码对照表
在线国际化地区语言码对照表 - UU在线工具在线国际化地区语言码对照表,提供完整的DNN3支持的多语言地区语言码对照表速查,列出了每个国家对应的语言Locale和国家代码对照表。![]() https://uutool.cn/info-lang/
https://uutool.cn/info-lang/
6、I18nConfig.java
package com.ruoyi.common.config;

import com.ruoyi.common.filter.MyI18nInterceptor;
import lombok.extern.slf4j.Slf4j;
import org.springframework.context.annotation.Configuration;
import org.springframework.web.servlet.config.annotation.InterceptorRegistration;
import org.springframework.web.servlet.config.annotation.InterceptorRegistry;
import org.springframework.web.servlet.config.annotation.WebMvcConfigurer;


@Configuration
@Slf4j
public class I18nConfig implements WebMvcConfigurer {


    @Override
    public void addInterceptors(InterceptorRegistry registry) {
        // 注册拦截器
        MyI18nInterceptor myHandlerInterceptor = new MyI18nInterceptor();
        InterceptorRegistration loginRegistry = registry.addInterceptor(myHandlerInterceptor);
        // 拦截路径
        loginRegistry.addPathPatterns("/**");
    }

}
7、MyI18nInterceptor.java
package com.ruoyi.common.filter;

import lombok.extern.slf4j.Slf4j;
import org.springframework.context.i18n.LocaleContextHolder;
import org.springframework.web.servlet.HandlerInterceptor;
import org.springframework.web.servlet.ModelAndView;

import javax.servlet.http.HttpServletRequest;
import javax.servlet.http.HttpServletResponse;
import java.util.Locale;

@Slf4j
public class MyI18nInterceptor implements HandlerInterceptor {

    @Override
    public boolean preHandle(HttpServletRequest request, HttpServletResponse response, Object handler) throws Exception {
		final String key = "language";
		String language = request.getHeader(key);
		// 前端传递的language必须是zh-CN格式的,中间的-必须要完整,不能只传递zh或en
		log.info("当前语言={}",language);
		Locale locale = new Locale(language.split("-")[0],language.split("-")[1]);
		// 这样赋值以后,MessageUtils.message方法就不用修改了
		LocaleContextHolder.setLocale(locale);
        return true;
    }

    /**
     * 请求处理之后进行调用,但是在视图被渲染之前(Controller方法调用之后)
     */
    @Override
    public void postHandle(HttpServletRequest request, HttpServletResponse response, Object handler, ModelAndView modelAndView) {
    }

    /**
     * 在整个请求结束之后被调用,也就是在DispatcherServlet 渲染了对应的视图之后执行(主要是用于进行资源清理工作)
     */
    @Override
    public void afterCompletion(HttpServletRequest request, HttpServletResponse response, Object handler, Exception ex) {
    }

}
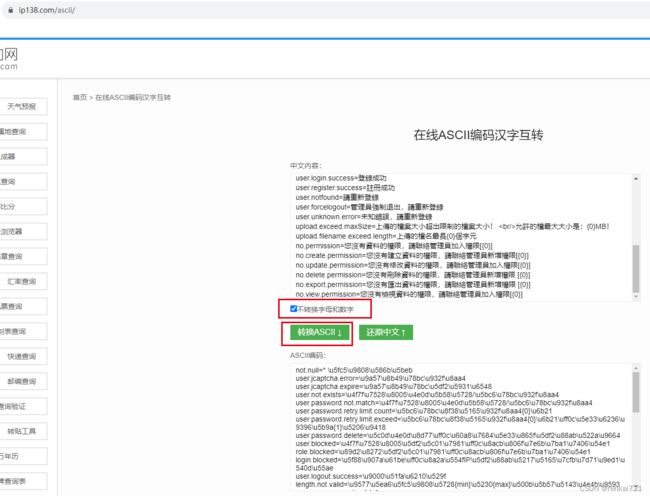
8、解决乱码
在线ASCII编码汉字互转![]() https://www.ip138.com/ascii/打开网站后,把文件中的文字全部复制粘贴,然后勾选不转换字母和数字,点击转换ASCII就行,然后在复制粘贴回去。
https://www.ip138.com/ascii/打开网站后,把文件中的文字全部复制粘贴,然后勾选不转换字母和数字,点击转换ASCII就行,然后在复制粘贴回去。
9、自定义properties文件名
如果你的名字不叫messages.properties,而是i18nMessage.properties或者其余的名字,那么配置文件中需要修改。注意以下的配置没有经过验证。
@Configuration
public class I18nConfig implements WebMvcConfigurer {


    /**
     * 配置 MessageSource 其实这个可以不配置如果不配置请注意 message 多语言文件的位置
     *
     * @return
     */
    @Bean
    public ResourceBundleMessageSource messageSource() {
        Locale.setDefault(Locale.CHINESE);
        ResourceBundleMessageSource source = new ResourceBundleMessageSource();
        // 这里设置自己的文件名
        source.setBasenames("i18nMessage");
        source.setUseCodeAsDefaultMessage(true);
        source.setDefaultEncoding("UTF-8");
        return source;
    }
}
10、后端国际化结束
数据库菜单国际化
1、菜单国际化翻译
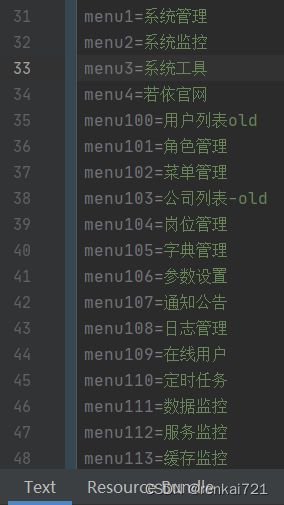
把数据库菜单的id和名字都翻译一遍,然后messages.properties文件中的key可以自定义,我这里的规则是menu+id。
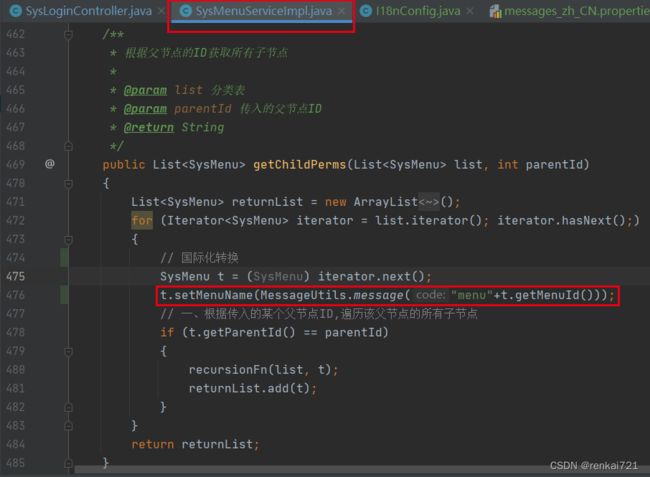
2、菜单国际化转换
/**
     * 根据父节点的ID获取所有子节点
     *
     * @param list 分类表
     * @param parentId 传入的父节点ID
     * @return String
     */
    public List getChildPerms(List list, int parentId)
    {
        List returnList = new ArrayList();
        for (Iterator iterator = list.iterator(); iterator.hasNext();)
        {
            // 国际化转换
            SysMenu t = (SysMenu) iterator.next();
            t.setMenuName(MessageUtils.message("menu"+t.getMenuId()));
            // 一、根据传入的某个父节点ID,遍历该父节点的所有子节点
            if (t.getParentId() == parentId)
            {
                recursionFn(list, t);
                returnList.add(t);
            }
        }
        return returnList;
    }
前端页面自定义菜单国际化
1、前端菜单title处理
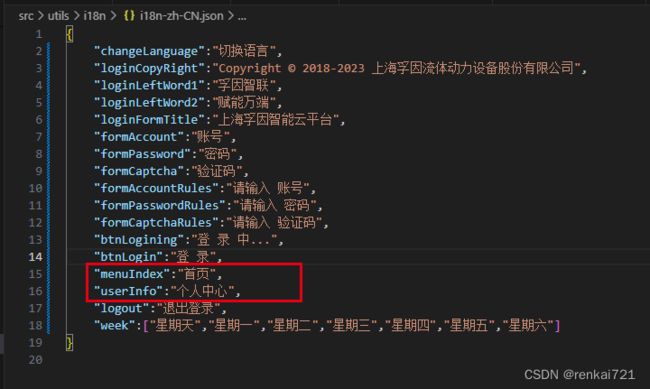
把自定义菜单中的内容替换为国际化定义的key。
2、菜单国际化代码处理
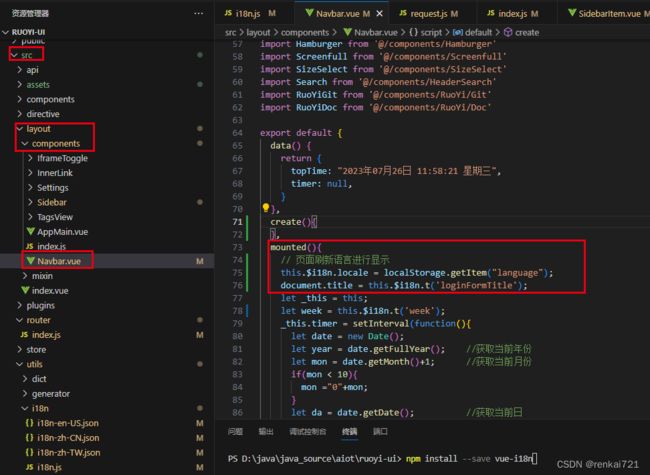
然后找到src/layout/components/Navbar.vue,在mounted方法中添加下面的代码,直接设置国际化即可。这样也解决了页面刷新后国际化失效和菜单国际化失效的问题。
