面试官不要再问我 axios 了?我能手写简易版的 axios
点击上方 前端Q,关注公众号
回复加群,加入前端Q技术交流群
作为我们工作中的常用的ajax请求库,作为前端工程师的我们当然是想一探究竟,axios究竟是如何去架构整个框架,中间的拦截器、适配器、 取消请求这些都是我们经常使用的。
前言
由于axios源码中有很多不是很重要的方法,而且很多方法为了考虑兼容性,并没有考虑到用es6 的语法去写。本篇主要是带你去梳理axios的主要流程,并用es6重写简易版axios
拦截器
适配器
取消请求
拦截器
一个axios实例上有两个拦截器,一个是请求拦截器, 然后响应拦截器。我们下看下官网的用法:添加拦截器
// 添加请求拦截器
axios.interceptors.request.use(function (config) {
    // 在发送请求之前做些什么
    return config;
  }, function (error) {
    // 对请求错误做些什么
    return Promise.reject(error);
  });
移除拦截器
const myInterceptor = axios.interceptors.request.use(function () {/*...*/});
axios.interceptors.request.eject(myInterceptor);
其实源码中就是,所有拦截器的执行 所以说肯定有一个forEach方法。
思路理清楚了,现在我们就开始去写吧。代码我就直接发出来,然后我在下面注解。
export class InterceptorManager {
  constructor() {
    // 存放所有拦截器的栈
    this.handlers = []
  }

  use(fulfilled, rejected) {
    this.handlers.push({
      fulfilled,
      rejected,
    })
    //返回id 便于取消
    return this.handlers.length - 1
  }
  // 取消一个拦截器
  eject(id) {
    if (this.handlers[id]) {
      this.handlers[id] = null
    }
  }

  // 执行栈中所有的hanlder
  forEach(fn) {
    this.handlers.forEach((item) => {
      // 这里为了过滤已经被取消的拦截器,因为已经取消的拦截器被置null
      if (item) {
        fn(item)
      }
    })
  }
}
拦截器这个类我们已经初步实现了,现在我们去实现axios 这个类,还是先看下官方文档,先看用法,再去分析。
axios(config)
// 发送 POST 请求
axios({
  method: 'post',
  url: '/user/12345',
  data: {
    firstName: 'Fred',
    lastName: 'Flintstone'
  }
});
axios(url[, config])
// 发送 GET 请求(默认的方法)
axios('/user/12345');
Axios 这个类最核心的方法其实还是 request 这个方法。我们先看下实现吧
class Axios {
  constructor(config) {
    this.defaults = config
    this.interceptors = {
      request: new InterceptorManager(),
      response: new InterceptorManager(),
    }
  }
  // 发送一个请求
  request(config) {
    // 这里呢其实就是去处理了 axios(url[,config])
    if (typeof config == 'string') {
      config = arguments[1] || {}
      config.url = arguments[0]
    } else {
      config = config || {}
    }

    // 默认get请求,并且都转成小写
    if (config.method) {
      config.method = config.method.toLowerCase()
    } else {
      config.method = 'get'
    }

    // dispatchRequest 就是发送ajax请求
    const chain = [dispatchRequest, undefined]
    //  发生请求之前加入拦截的 fulfille 和reject 函数
    this.interceptors.request.forEach((item) => {
      chain.unshift(item.fulfilled, item.rejected)
    })
    // 在请求之后增加 fulfilled 和reject 函数
    this.interceptors.response.forEach((item) => {
      chain.push(item.fulfilled, item.rejected)
    })

    // 利用promise的链式调用,将参数一层一层传下去
    let promise = Promise.resolve(config)

    //然后我去遍历 chain
    while (chain.length) {
      // 这里不断出栈 直到结束为止
      promise = promise.then(chain.shift(), chain.shift())
    }
    return promise
  }
}
这里其实就是体现了axios设计的巧妙, 维护一个栈结构 + promise 的链式调用 实现了 拦截器的功能, 可能有的小伙伴到这里还是不是很能理解,我还是给大家画一个草图去模拟下这个过程。
假设我有1个请求拦截器handler和1个响应拦截器handler
这个没什么问题,由于有拦截器的存在,如果存在的话,那么我们就要往这个栈中加数据,请求拦截器顾名思义要在请求之前所以是unshift。加完请求拦截器我们的栈变成了这样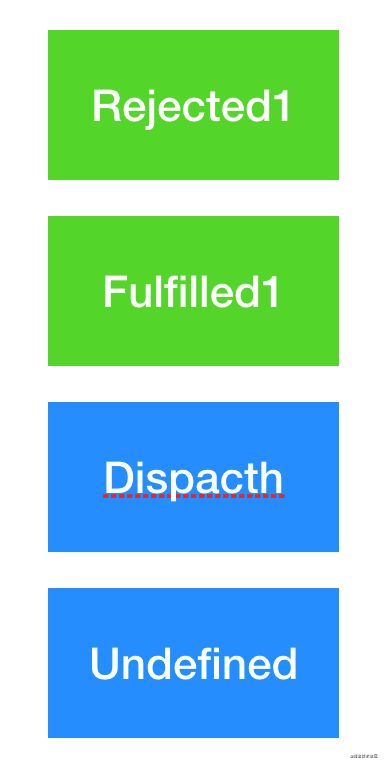
没什么问题,然后请求结束后,我们又想对请求之后的数据做处理,所以响应拦截的数据自然是push了。这时候栈结构变成了这样: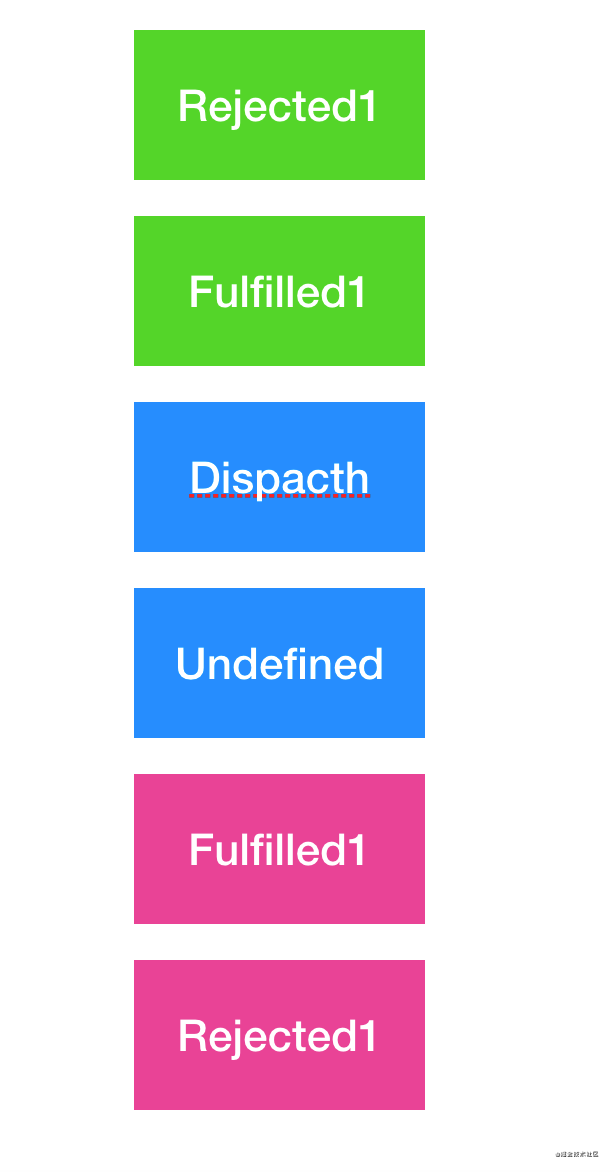
然后遍历整个栈结构,每次出栈都是一对出栈, 因为promise 的then 就是 一个成功,一个失败嘛。遍历结束后,返回经过所有处理的promise,然后你就可以拿到最终的值了。
adapter
Adapter: 英文解释是适配器的意思。这里我就不实现了,我带大家看一下源码。adapter 做了一件事非常简单,就是根据不同的环境 使用不同的请求。如果用户自定义了adapter,就用config.adapter。否则就是默认是default.adpter.
var adapter = config.adapter || defaults.adapter;

 return adapter(config).then() ...
继续往下看deafults.adapter做了什么事情:
function getDefaultAdapter() {
  var adapter;
  if (typeof XMLHttpRequest !== 'undefined') {
    // For browsers use XHR adapter
    adapter = require('./adapters/xhr');
  } else if (typeof process !== 'undefined' && Object.prototype.toString.call(process) === '[object process]') {
    // For node use HTTP adapter
    adapter = require('./adapters/http');
  }
  return adapter;
}
其实就是做个选择:如果是浏览器环境:就是用xhr 否则就是node 环境。判断process是否存在。从写代码的角度来说,axios源码的这里的设计可扩展性非常好。有点像设计模式中的适配器模式, 因为浏览器端和node 端 发送请求其实并不一样, 但是我们不重要,我们不去管他的内部实现,用promise包一层做到对外统一。所以 我们用axios 自定义adapter 器的时候, 一定是返回一个promise。ok请求的方法我在下面模拟写出。
cancleToken
我首先问大家一个问题,取消请求原生浏览器是怎么做到的?有一个abort 方法。可以取消请求。那么axios源码肯定也是运用了这一点去取消请求。现在浏览器其实也支持fetch请求, fetch可以取消请求?很多同学说是不可以的,其实不是?fetch 结合 abortController 可以实现取消fetch请求。我们看下例子:
const controller = new AbortController();
const { signal } = controller;

fetch("http://localhost:8000", { signal }).then(response => {
    console.log(`Request 1 is complete!`);
}).catch(e => {
    console.warn(`Fetch 1 error: ${e.message}`);
});
// Wait 2 seconds to abort both requests
setTimeout(() => controller.abort(), 2000);
但是这是个实验性功能,可恶的ie。所以我们这次还是用原生的浏览器xhr基于promise简单的封装一下。代码如下:
export function dispatchRequest(config) {
  return new Promise((resolve, reject) => {
    const xhr = new XMLHttpRequest()
    xhr.open(config.method, config.url)
    xhr.onreadystatechange = function () {
      if (xhr.status >= 200 && xhr.status <= 300 && xhr.readyState === 4) {
        resolve(xhr.responseText)
      } else {
        reject('失败了')
      }
    }

    if (config.cancelToken) {
      // Handle cancellation
      config.cancelToken.promise.then(function onCanceled(cancel) {
        if (!xhr) {
          return
        }
        xhr.abort()
        reject(cancel)
        // Clean up request
        xhr = null
      })
    }
    xhr.send()
  })
}
Axios 源码里面做了很多处理, 这里我只做了get处理,我主要的目的就是为了axios是如何取消请求的。先看下官方用法:
主要是两种用法:
使用 cancel token 取消请求
const CancelToken = axios.CancelToken;
const source = CancelToken.source();

axios.get('/user/12345', {
  cancelToken: source.token
}).catch(function(thrown) {
  if (axios.isCancel(thrown)) {
    console.log('Request canceled', thrown.message);
  } else {
     // 处理错误
  }
});

axios.post('/user/12345', {
  name: 'new name'
}, {
  cancelToken: source.token
})

// 取消请求(message 参数是可选的)
source.cancel('Operation canceled by the user.');
还可以通过传递一个 executor 函数到 CancelToken 的构造函数来创建 cancel token:
const CancelToken = axios.CancelToken;
let cancel;

axios.get('/user/12345', {
  cancelToken: new CancelToken(function executor(c) {
    // executor 函数接收一个 cancel 函数作为参数
    cancel = c;
  })
});

// cancel the request
cancel();
看了官方用法 和结合axios源码:我给出以下实现:
export class cancelToken {
    constructor(exactor) {
        if (typeof executor !== 'function') {
        throw new TypeError('executor must be a function.')
        }
        // 这里其实将promise的控制权 交给 cancel 函数
        // 同时做了防止多次重复cancel 之前 Redux 还有React 源码中也有类似的案列
        const resolvePromise;
        this.promise =  new Promise(resolve => {
            resolvePromise = resolve;
        })
        this.reason = undefined;

        const cancel  = (message) => {
            if(this.reason) {
                return;
            }
            this.reason = 'cancel' + message;
            resolvePromise(this.reason);
        }
        exactor(cancel)
    }

    throwIfRequested() {
        if(this.reason) {
            throw this.reason
        }
    }

    // source 其实本质上是一个语法糖 里面做了封装
    static source() {
        const cancel;
        const token = new cancelToken(function executor(c) {
            cancel = c;
        });
        return {
            token: token,
            cancel: cancel
        };
    }

}
截止到这里大体axios 大体功能已经给出。
接下来我就测试下我的手写axios 有没有什么问题?
    import Axios from './axios.js';
    const config = { url:'http://101.132.113.6:3030/api/mock' }
    const axios =  new Axios();
    axios.request(config).then(res => {
        console.log(res,'0000')
    }).catch(err => {
        console.log(err)
    })
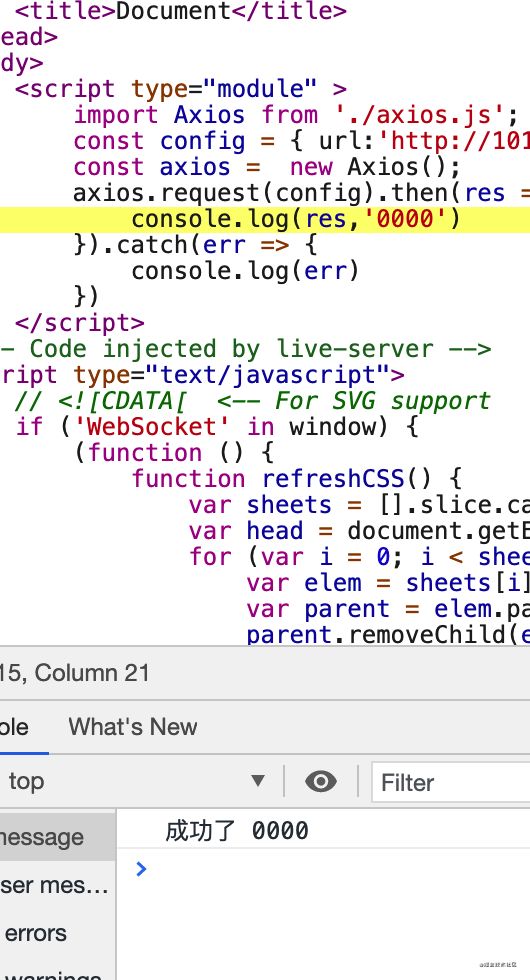
成功了ok, 然后我来测试一下拦截器的功能:代码更新成下面这样:
import Axios from './axios.js';
const config = { url:'http://101.132.113.6:3030/api/mock' }
const axios =  new Axios();
// 在axios 实例上挂载属性
const err = () => {}
axios.interceptors.request.use((config)=> {
    console.log('我是请求拦截器1')
    config.id = 1;
    return  config
},err )
axios.interceptors.request.use((config)=> {
    config.id = 2
    console.log('我是请求拦截器2')
    return config
},err)
axios.interceptors.response.use((data)=> {
    console.log('我是响应拦截器1',data )
    data += 1;
    return data;
},err)
axios.interceptors.response.use((data)=> {
    console.log('我是响应拦截器2',data )
    return  data
},err)
axios.request(config).then(res => {
    // console.log(res,'0000')
    // return res;
}).catch(err => {
    console.log(err)
})  console.log(err)})
ajax 请求的结果 我是resolve(1) ,所以我们看下输出路径: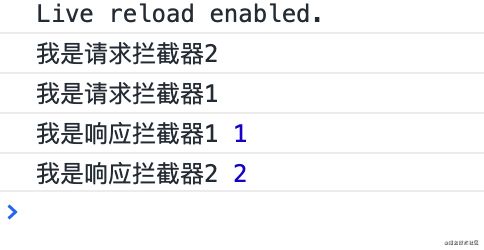
没什么问题, 响应后的数据我加了1。
接下来我来是取消请求的两种方式
// 第一种方式
let  cancelFun = undefined;
const cancelInstance = new cancelToken((c)=>{
    cancelFun = c;
});
config.cancelToken = cancelInstance;
// 50 ms 就取消请求
setTimeout(()=>{
    cancelFun('取消成功')
},50)

第二种方式:
const { token, cancel }  = cancelToken.source();
config.cancelToken = token;
setTimeout(()=>{
    cancel()
},50)
结果都是OK的,至此axios简单源码终于搞定了。
反思
本篇文章只是把axios源码的大体流程走了一遍, axios源码内部还是做了很多兼容比如:配置优先级:他有一个mergeConfig 方法, 还有数据转换器。不过这些不影响我们对axios源码的整体梳理, 源码中其实有一个createInstance,至于为什么有?我觉得就是为了可扩展性更好, 将来有啥新功能,直接在原有axios的实例的原型链上去增加,代码可维护性强, axios.all spread 都是实例new出来再去挂的,不过都很简单,没啥的。有兴趣大家自行阅读。
作者:FE_FLY
juejin.cn/post/6973257605367988260
往期推荐
基于WebAssembly的图片渲染/视频处理/云原生的场景应用有哪些?
用oclif,码得更快了,30秒创建脚手架
专心工作只想搞钱的前端女程序员的2020
最后
欢迎加我微信,拉你进技术群,长期交流学习...
欢迎关注「前端Q」,认真学前端,做个专业的技术人...
![]()
点个在看支持我吧

