实现 3D 倒计时器
构建单个倒计时器卡片
实现思路
从上述的总体效果图来看,单个倒计时器的卡片主要是分为头部为尾部两个部分,所以我们可以采用flex布局来实现整体的布局,并且利用flex布局实现文字内容的布局。具体实现步骤如下:
编写 HTML 结构
<div class="flip_card flip">
  <div class="top">4div>
  <div class="bottom">4div>
div>
编写样式
.flip_card {
  position: relative;
  display: inline-flex;
  flex-direction: column;
  box-shadow: 0px 3px 8px #b7b7b7;
  border-radius: var(--border-radius);
}
.top,
.bottom {
  height: 0.75em;
  line-height: 1;
  padding: 0.25em;
  overflow: hidden;
}

.flip_card .top {
  border-top-left-radius: var(--border-radius);
  border-top-right-radius: var(--border-radius);
  background-color: var(--flip-card-top);
  border-bottom: 1px solid rgba(0, 0, 0, 0.1);
}

.flip_card .bottom {
  display: flex;
  align-items: flex-end;
  border-bottom-left-radius: var(--border-radius);
  border-bottom-right-radius: var(--border-radius);
  background-color: var(--flip-card-bottom);
}
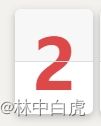
完成上述代码后,单个卡片的效果如下:
编写单个倒计时器卡片动画
实现思路
单个倒计时器卡片的动画,我们可以 JS 动态添加新的一个倒计时器卡片,并且新的一个倒计时器卡片悬浮在卡片上方,这样在执行动画效果的时候,切换效果会比较好。而动画的执行动作选用rotateX来执行。具体的实现过程如下。
编写样式(只展示核心动画样式,布局样式跟上述步骤一致)
.flip_card .top_flip {
  position: absolute;
  width: 100%;
  animation: flip-top 250ms ease-in;
  transform-origin: bottom;
}

@keyframes flip-top {
  100% {
    transform: rotateX(90deg);
  }
}

.flip_card .bottom_flip {
  position: absolute;
  bottom: 0;
  width: 100%;
  animation: flip-bottom 250ms ease-out 250ms;
  transform-origin: top;
  transform: rotateX(90deg);
}

@keyframes flip-bottom {
  100% {
    transform: rotateX(0deg);
  }
}
结合 JS 完成倒计时器的数据切换动画测试
实现了上述的样式布局和动画后,我们的页面是看不到动画执行过程的,因为我们添加的倒计时器的动画元素是需要 JS 动态添加的,所以我们需要添加如下代码进行测试。
function test() {
  const flipCard = document.querySelector(".flip_card");
  const topHalf = flipCard.querySelector(".top");
  const bottomHalf = flipCard.querySelector(".bottom");
  const startNumber = parseInt(topHalf.textContent);

  const topFlip = document.createElement("div");
  topFlip.classList.add("top_flip");
  const bottomFlip = document.createElement("div");
  bottomFlip.classList.add("bottom_flip");

  top.textContent = startNumber;
  bottomHalf.textContent = startNumber;
  topFlip.textContent = startNumber;
  bottomFlip.textContent = 4;

  topFlip.addEventListener("animationstart", (e) => {
    topHalf.textContent = 4;
  });

  topFlip.addEventListener("animationend", (e) => {
    topFlip.remove();
  });

  bottomFlip.addEventListener("animationend", (e) => {
    bottomHalf.textContent = 4;
    bottomFlip.remove();
  });

  flipCard.append(topFlip, bottomFlip);
}
执行上述 JS 代码后,可以看到动画已经可以正常运行,我们接下来就可以实现整体布局。
在单个倒计时器卡片的基础上实现整体的布局
我们现在已经把核心的功能完成了 80%左右,现在我们就是需要把整体的倒计时器整体布局完成。具体的核心代码如下:
<div class="container">

  <div class="container_segment">
    <div class="segment-title">小时div>
    <div class="segment">
      <div class="flip_card">
        <div class="top">2div>
        <div class="bottom">2div>
      div>
      <div class="flip_card" data-hours-ones>
        <div class="top">4div>
        <div class="bottom">4div>
      div>
    div>
  div>
div>
.container {
  display: flex;
  gap: 0.5em;
  justify-content: center;
}

.container_segment {
  display: flex;
  flex-direction: column;
  gap: 0.1em;
  align-items: center;
}

.container_segment .segment_title {
  font-size: 0.5em;
  text-align: center;
}

.segment {
  display: flex;
  gap: 0.1em;
}

.segment-title {
  font-size: 1rem;
}
实现上述代码后的效果如下:
实现倒计时功能
封装单个倒计时器翻牌动画函数
在上述的步骤中,我们已经编写了一个用于测试单个倒计时器卡片翻牌的 JS 函数,我们可以在这个基础上重新梳理逻辑来封装对应的动画函数。
通过分析上述测试代码,我们可以得知单个倒计时器卡片翻牌的执行最关键的有如下两个部分:
-
单个倒计时器卡片容器
因为此容器主要是可以获取当前倒计时的数值,并且需要动态添加对应的卡片动画 DIV 元素和初始化对应数值,元素添加完成后自动执行动画。最为重要的就是此容器中的元素需要监听动画的开始和结束时间,从而为下一次动画的数值进行赋值。
-
下一次翻牌的新数值
下一次翻牌的新数值不应该在此函数中来进行计算,要不然代码的耦合度会比较高,所以这里的新数值是作为参数传入的。
具体代码如下:
function flip(flipCard, newNumber) {
  const topHalf = flipCard.querySelector(".top");
  const bottomHalf = flipCard.querySelector(".bottom");
  const startNumber = parseInt(topHalf.textContent);

  if (newNumber === startNumber) return;

  const topFlip = document.createElement("div");
  topFlip.classList.add("top_flip");
  const bottomFlip = document.createElement("div");
  bottomFlip.classList.add("bottom_flip");

  top.textContent = startNumber;
  bottomHalf.textContent = startNumber;
  topFlip.textContent = startNumber;
  bottomFlip.textContent = newNumber;

  topFlip.addEventListener("animationstart", (e) => {
    topHalf.textContent = newNumber;
  });

  topFlip.addEventListener("animationend", (e) => {
    topFlip.remove();
  });

  bottomFlip.addEventListener("animationend", (e) => {
    bottomHalf.textContent = newNumber;
    bottomFlip.remove();
  });

  flipCard.append(topFlip, bottomFlip);
}
封装所有倒计时器翻牌动画
上述步骤我们已经封装了单个倒计时器翻牌,但是整个倒计时器是由很多单个翻牌卡片组成的,为了能够方便维护代码,所以我们可以把所有倒计时翻牌动画封装到一个函数中进行控制,然后调用上一个步骤我们编写的flip函数。
为了方便能够获取到时分秒的卡片容器和对齐进行操作,我们可以在卡片容器中添加data-[hours | minutes | seconds]-tens和data-[hours | minutes | seconds]-ones属性来方便获取元素,具体的实例代码如下:
<div class="segment">
  <div class="flip_card" data-hours-tens>
    <div class="top">2div>
    <div class="bottom">2div>
  div>
  <div class="flip_card" data-hours-ones>
    <div class="top">4div>
    <div class="bottom">4div>
  div>
div>
/**
 * 对所有单个倒计时器卡片进行数值设置
 * @param {Number} time 当前倒计时的时间(毫秒值)
 */
function flipAllCards(time) {
  const seconds = time % 60;
  const minutes = Math.floor(time / 60) % 60;
  const hours = Math.floor(time / 3600);

  flip(document.querySelector("[data-hours-tens]"), Math.floor(hours / 10));
  flip(document.querySelector("[data-hours-ones]"), hours % 10);
  flip(document.querySelector("[data-minutes-tens]"), Math.floor(minutes / 10));
  flip(document.querySelector("[data-minutes-ones]"), minutes % 10);
  flip(document.querySelector("[data-seconds-tens]"), Math.floor(seconds / 10));
  flip(document.querySelector("[data-seconds-ones]"), seconds % 10);
}
编写定时函数定时执行动画
通过上述两个步骤的铺垫,我们现在就只差编写一个定时器来调用flipAllCards函数。具体实例代码如下:
const countToDate = new Date().setHours(new Date().getHours() + 24); // 程序执行时的时间点

setInterval(() => {
  const currentDate = new Date();
  const timeBetweenDates = Math.ceil((countToDate - currentDate) / 1000); // 计算时间差
  flipAllCards(timeBetweenDates);
}, 250);
实例代码下载
实例代码下载

