Google资深工程师深度讲解Go语言-测试与性能调优(八)
一.传统测试 vs 表格驱动测试
传统测试
- 测试数据与测试逻辑混在一起
- 出错信息不明确
- 一旦一个数据出错测试全部结束
表格驱动测试
- 分离的测试数据与测试逻辑
- 明确的出错信息
- 可以部分失败
- go语言的语法使得我们更易实践表格驱动测试
nonerepeating_test.go
package main

import "testing"

func TestSubstr(t *testing.T) {
	tests := []struct {
		s   string
		ans int
	}{
		//normal case
		{"abcabcbb", 3},
		{"pwwkew", 3},

		//edge case
		{"", 0},
		{"bbbb", 1},
		{"abcabcabcd", 4},

		//chainese case
		{"这里是中国", 5},
		{"黑化肥发灰会挥发灰化肥发挥会发黑", 7},
	}
	for _, tt := range tests {
		actual := lenthOfNonRepeatingSubstr(tt.s)
		if actual != tt.ans {
			t.Errorf("got %d for input %s ,expexted %d", actual, tt.s, tt.ans)
		}
	}
}
nonrepeating.go
package main

import "fmt"
//最长不含有重复字符的子串
func lenthOfNonRepeatingSubstr(s string) int {
	lastOccurred := make(map[rune]int)
	start := 0
	maxLength := 0
	for i, ch := range []rune(s) {
		if lastI, ok := lastOccurred[ch]; ok && lastI >= start {
			start = lastI + 1
		}
		if i-start+1 > maxLength {
			maxLength = i - start + 1
		}
		lastOccurred[ch] = i
	}
	return maxLength
}

func main() {
	fmt.Println(lenthOfNonRepeatingSubstr("abcabcbb")) //3
	fmt.Println(lenthOfNonRepeatingSubstr("bbbbb"))    //1
	fmt.Println(lenthOfNonRepeatingSubstr("pwwkew"))   //3
	fmt.Println(lenthOfNonRepeatingSubstr(""))//0
	fmt.Println(lenthOfNonRepeatingSubstr("b"))//1
	fmt.Println(lenthOfNonRepeatingSubstr("abcdef"))//6
	fmt.Println(lenthOfNonRepeatingSubstr("这里是中国"))//5
	fmt.Println(lenthOfNonRepeatingSubstr("一二三二一"))//3
	fmt.Println(lenthOfNonRepeatingSubstr("黑化肥发灰会挥发灰化肥发挥会发黑"))//7
}
运行
TestSubstr报错,??
但是,在命令行可以执行
cd 进入nonrepeating.go和nonerepeating_test.go 所在目录下,输入命令,可以正常执行
go test .
二.代码覆盖率
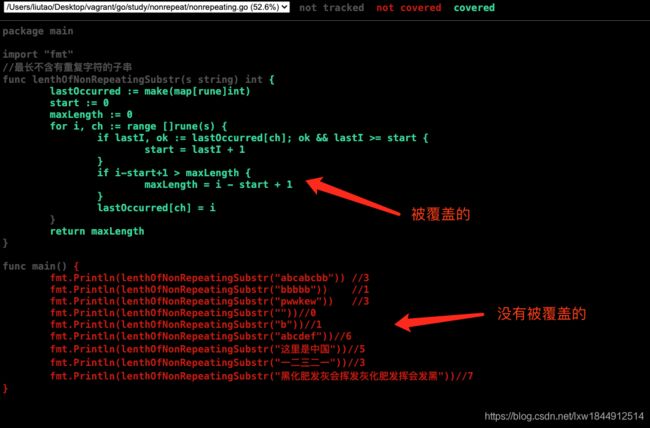
执行命令行,52.6%覆盖率
go test -coverprofile=c.outOpen a web browser displaying annotated source code:打开显示带注释源代码的web浏览器:
go tool cover -html=c.out
性能测试,执行命令行,每个操作725纳秒
go test -bench .
参考: 关于golang性能调试及pprof可视化
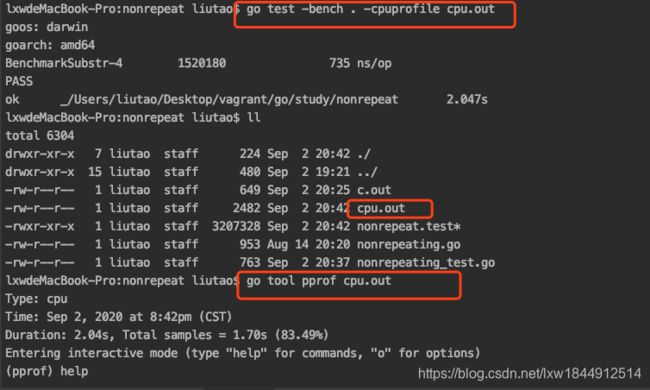
 go test -bench . -cpuprofile cpu.out  //输出生成out后缀的文件
 go tool pprof cpu.out //查看文件内容,多种方式,
 输入"web"报错:failed to execute dot. Is Graphviz installed? Error: exec: "dot": executable file not found in $PATH
解决方法:
mac环境:
-
$ sudo port install graphviz -
Homebrew* has a Graphviz port.
$ brew install graphviz
此时可用如下命令安装Graphviz
sudo apt install graphviz
其中
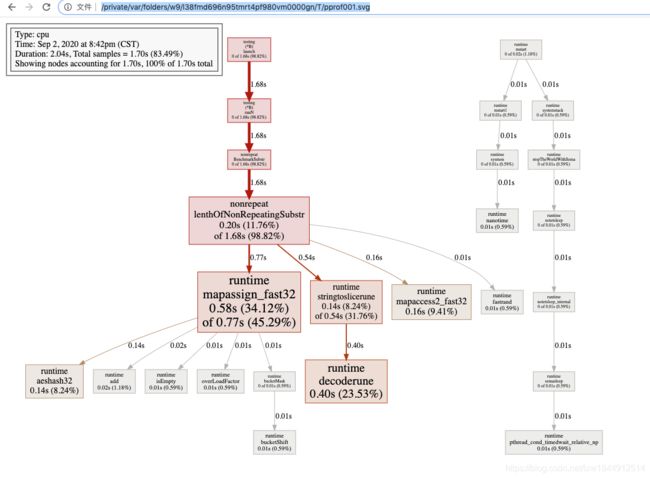
web命令用以图形展示接口之间的调用关系以及性能情况,但是需要安装Graphviz图形化工具,以我目前的系统为Ubuntu为例,直接执行sudo apt-get install graphviz命令即可安装完成图形化工具,随后再次使用web命令,最终生成以下图表:
file:///private/var/folders/w9/l38fmd696n95tmrt4pf980vm0000gn/T/pprof001.svg
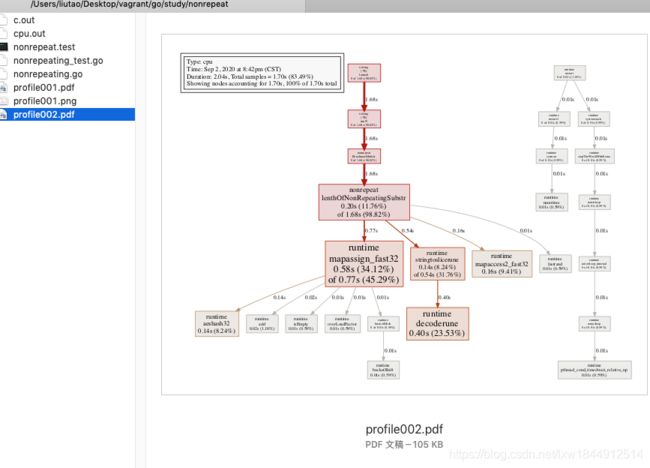
同样输入:pdf,png,也会生成对应的文件
总结:
- testing.T的使用
- 运行测试
- 使用ide查看代码覆盖
- 使用go test获取代码覆盖报告
- 使用go tool cover查看代码覆盖报告
- 使用test.B的使用
- 使用pprof优化性能
三.测试HTTP服务器
go test -coverprofile=c.out 生成覆盖文件
package main

import (
	"errors"
	"fmt"
	"io/ioutil"
	"net/http"
	"net/http/httptest"
	"os"
	"strings"
	"testing"
)

func errPanic(writer http.ResponseWriter, request *http.Request) error {
	panic(123)
}

type testingUserError string

func (e testingUserError) Error() string {
	return e.Message()
}
func (e testingUserError) Message() string {
	return string(e)
}

func errUserErrot(writer http.ResponseWriter, request *http.Request) error {
	return testingUserError("user error")
}

func errNotFound(writer http.ResponseWriter, request *http.Request) error {
	return os.ErrNotExist
}

func errNoPermission(writer http.ResponseWriter, request *http.Request) error {
	return os.ErrPermission
}

func errUnknown(writer http.ResponseWriter, request *http.Request) error {
	return errors.New("unknown error")
}

func noError(writer http.ResponseWriter, request *http.Request) error {
	fmt.Println(writer, "no error")
	return nil
}
var tests = []struct {
	h       appHandler
	code    int
	message string
}{
	{errPanic, 500, "Internal server Error"},
	{errUserErrot, 400, "user Error"},
	{errNotFound, 404, "Not found"},
	{errNoPermission, 403, "Forbidden"},
	{errUnknown, 500, "Internal server Error"},
	{noError, 200, "NO Error"},
}

func TestErrWrapper(t *testing.T) {
	for _, tt := range tests {
		f := errWrapper(tt.h)
		response := httptest.NewRecorder()
		request := httptest.NewRequest(http.MethodGet, "http://www.imooc.com", nil)
		f(response, request)

		verfyResponse(response.Result(),tt.code,tt.message,t)

	}
}

func TestErrWrapperInServer(t *testing.T){
	for _, tt:=range tests {
		f:=errWrapper(tt.h)
		server:=httptest.NewServer(http.HandlerFunc(f))
		resp,_:=http.Get(server.URL)

		verfyResponse(resp,tt.code,tt.message,t)

	}
}

func verfyResponse(resp *http.Response,expectedCode int,expectedMsg string,t *testing.T)  {
	b, _ := ioutil.ReadAll(resp.Body)
	body := strings.Trim(string(b), "\n")
	if resp.StatusCode != expectedCode || body != expectedMsg {
		t.Errorf("expect (%d,%s);got(%d,%s)", expectedCode, expectedMsg, resp.StatusCode, body)
	}
}
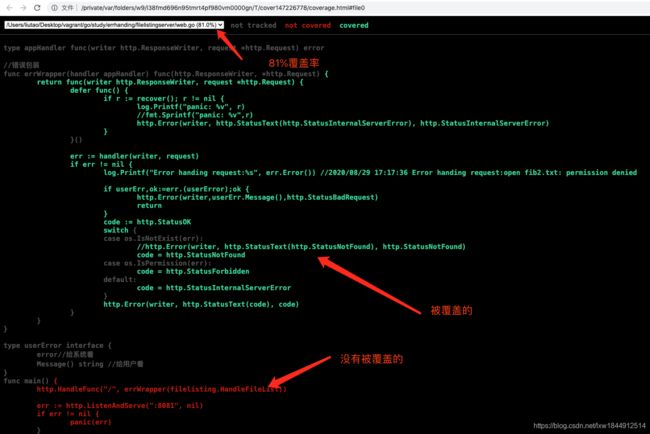
go tool cover -html=c.out 在web浏览器显示具体的覆盖率和具体覆盖部分
http测试
- 通过使用假的request/response(在httptest库中,速度快,密度细,像单元测试)
- 通过起服务器(集成度高,代码覆盖量大)
四.查看文档
go doc
go help doc //帮助文档
连起来的godoc,比较有用
输入godoc 报错,bash: godoc: command not found,
原因:没有安装godoc
解决方法:
关于godoc 不是内部命令问题解决
首先,该命令无效的原因是go 1.13 版本后 移除了godoc相关的一些命令,因此需手动安装
下面是安装使用该命令的方法:
第一步
进入命令行
输入下面两行代码
go env -w GO111MODULE=on
go env -w GOPROXY="https://goproxy.io,direct"
Go Modules
简介
Go 在 1.11 版本引入了新的依赖管理模式 Go Modules,旨在解决一直广为诟病的依赖管理问题。

使用下列命令启用 Go Modules

go env -w GO111MODULE=on # 不建议设为 auto ;on 打开 off 关闭 auto自动
这是持久性设定,环境变量 GOENV 指示配置文件位置。

Go Modules 采用语义化版本,详见 https://semver.org/lang/zh-CN/ 。
第二步
命令行输入,安装godoc
go get golang.org/x/tools/cmd/godoc
- 安装完成后即可使用godoc命令,生成文档
sudo apt-get install golang-doc //方法一
sudo apt-get install golang-go.tools //方法二
go get -v  golang.org/x/tools/cmd/godoc //方法三

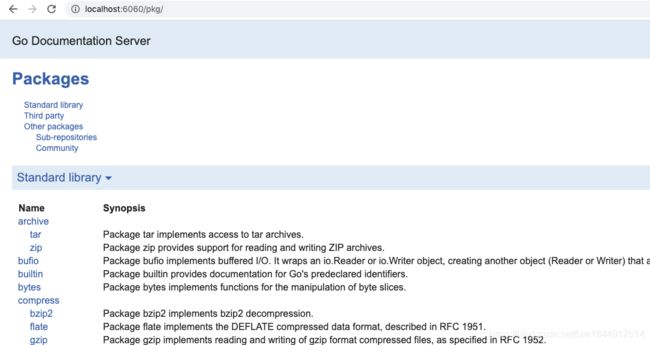
godoc -http= :6060   //在浏览器 访问 http://localhost:6060
sudo vi ~/.profile //编辑用户的配置文件
source ~/.profile //加载配置信息,使生效在命令行执行godoc -http=localhost:6060后, 直接在浏览器,访问 http://localhost:6060/pkg/
- 用注释写文档
- 在测试中加入example
- 使用go doc/godoc 来查看/生成文档
自己文件文档: http://localhost:6060/pkg/study/queue/
示例函数,以Example开头,没有参数也没有结果。
1.作为文档
2.可以通过go test运行的可执行测试
3.提供手动实验代码
参考:testing - 运行并验证示例
示例,一方面是文档的效果,是关于某个功能的使用例子;另一方面,可以被当做测试运行。
package queue

import "fmt"

func ExampleQueues_Pop() {
	q := Queue{1}
	q.Push(2)
	q.Push(3)
	fmt.Println(q.Pop())
	fmt.Println(q.Pop())
	fmt.Println(q.IsEmpty())

	fmt.Println(q.Pop())
	fmt.Println(q.IsEmpty())

	//Output:
	//1
	//2
	//false
	//3
	//true

}
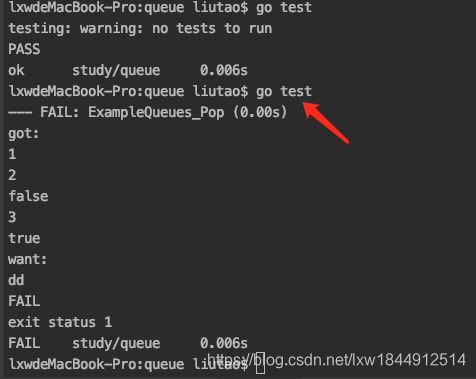
通过: go test 执行该示例, 注意 Output 首字母大写
输出:与结果不一致
输出:与结果一致
五.测试总结
- 表格驱动测试:
- 代码覆盖:go test -coverprofile=c.out go tool cover -html=c.out
- 性能优化工具: go test -bench .
- http测试
- 文档以及示例代码


