使用ZoeDepth生成深度估计图
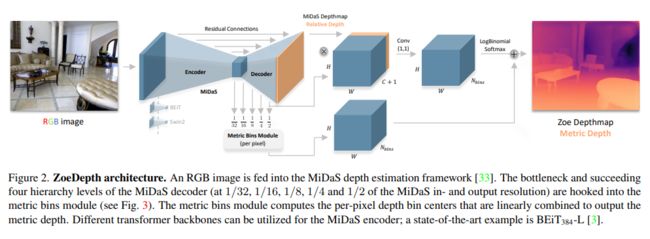
目前单目深度估计分为两个派系,metric depth estimation(度量深度估计,也称绝对深度估计)和relative depth estimation(相对深度估计)。 ZoeDepth是 第一个结合相对和绝对深度的多模态单目深度估计网络。本博文仅记录使用ZoeDepth生成深度估计图的过程(因为直接按项目说明中进行使用会报错误)
项目地址: https://github.com/isl-org/ZoeDepth
论文地址: https://arxiv.org/pdf/2302.12288.pdf

1、基本概念
绝对深度估计: 估计物体绝对物理单位的深度,即米。预测绝对深度的优点是在计算机视觉和机器人技术的许多下游应用中具有实用价值,如建图、规划、导航、物体识别、三维重建和图像编辑。然而,绝对深度股即泛化能力(室外、室内)极差。因此,目前的绝对深度估计模型通常在特定的数据集上过拟合,而不能很好地推广到其他数据集。
相对深度估计: 估计每个像素与其它像素的相对深度差异,深度无尺度信息,可以各种类型环境中的估计深度。应用场景有限。
2、使用准备
在https://github.com/isl-org/ZoeDepth中介绍了基于torch hub初始化ZoeDepth模型的方法(不推荐,该操作经常导致报错),需要修改相关部分源码才可以正常加载模型。
2.1 下载项目
使用git下载项目,或者直接到github上下载项目源码并解压。
git clone https://github.com/isl-org/ZoeDepth.git && cd ZoeDepth
2.2 下载依赖
ZoeDepth项目在运行时仍然会调用torch.hub下载其他依赖性,使用python默认下载或许网速较慢。这里列出需要下载的数据,若自己电脑网络环境良好可以不同下载。
Downloading: "https://github.com/intel-isl/MiDaS/zipball/master" to C:\Users\Administrator/.cache\torch\hub\master.zip
Downloading: "https://github.com/isl-org/ZoeDepth/releases/download/v1.0/ZoeD_M12_N.pt" to C:\Users\Administrator/.cache\torch\hub\checkpoints\ZoeD_M12_N.pt
还有k、nk模型,有用到的可以下载,下载页为:https://github.com/isl-org/ZoeDepth/releases
2.3 修改代码
使用默认代码在加载使用模型时,会存在2个报错,需要进行修改。
1、zoedepth/models/model_io.py 第49行,修改为一下代码。这里加载权重时会存在部分key不匹配
model.load_state_dict(state, strict=False)
2、C:/Users/Administrator/.cache/torch/hub/intel-isl_MiDaS_master/midas/backbones/beit.py第94行的函数,替换为以下代码。这里是forward时不存在self.drop_path所引发的保存
def block_forward(self, x, resolution, shared_rel_pos_bias: Optional[torch.Tensor] = None):
    """
    Modification of timm.models.beit.py: Block.forward to support arbitrary window sizes.
    """ #HPG change
    if hasattr(self, 'drop_path'):
        if self.gamma_1 is None:
            x = x + self.drop_path(self.attn(self.norm1(x), resolution, shared_rel_pos_bias=shared_rel_pos_bias))
            x = x + self.drop_path(self.mlp(self.norm2(x)))
        else:
            x = x + self.drop_path(self.gamma_1 * self.attn(self.norm1(x), resolution,
                                                            shared_rel_pos_bias=shared_rel_pos_bias))
            x = x + self.drop_path(self.gamma_2 * self.mlp(self.norm2(x)))
    else:
        if self.gamma_1 is None:
            x = x + (self.attn(self.norm1(x), resolution, shared_rel_pos_bias=shared_rel_pos_bias))
            x = x + (self.mlp(self.norm2(x)))
        else:
            x = x + (self.gamma_1 * self.attn(self.norm1(x), resolution,
                                                            shared_rel_pos_bias=shared_rel_pos_bias))
            x = x + (self.gamma_2 * self.mlp(self.norm2(x)))
    return x
3、基本使用
3.1 加载模型
这里只推荐采用以下方式加载模型。注,若遇到模型下载缓慢需要可以按照2.2的步骤下载文件到指定位置
from zoedepth.models.builder import build_model
from zoedepth.utils.config import get_config
import torch
from zoedepth.utils.misc import colorize

# ZoeD_N
conf = get_config("zoedepth", "infer")
model_zoe_n = build_model(conf)

##### sample prediction
DEVICE = "cuda" if torch.cuda.is_available() else "cpu"
zoe = model_zoe_n.to(DEVICE)
k模型和nk模型的初始化代码如下
# ZoeD_K
conf = get_config("zoedepth", "infer", config_version="kitti")
model_zoe_k = build_model(conf)

# ZoeD_NK
conf = get_config("zoedepth_nk", "infer")
model_zoe_nk = build_model(conf)
3.2 进行预测
zoe预测图像所返回数据直接进行可视化是一片全黑,使用colorize函数可以将其值域进行拉伸并展示(扩展到0~25)。 其中myimshows函数源自https://hpg123.blog.csdn.net/article/details/124824892 ,将博文中的代码保存为imgutils.py即可。
import numpy as np
from PIL import Image
from imgutils import myimshows
image = Image.open(r"a14.jpg").convert("RGB")  # load
#image = Image.open(r"D:\AI_toolV.13\TouKui_jc/part2_000509.jpg").convert("RGB")  # load
#depth_pil = zoe.infer_pil(image, output_type="pil")  # as 16-bit PIL Image
depth = zoe.infer_pil(image)
colored = colorize(depth)
# save colored output
fpath_colored = "output_colored.png"
colored_img=Image.fromarray(colored)
colored_img.save(fpath_colored)

myimshows([np.array(image),colored],["ori","depth"])
