nightwatch + selenium 基于浏览器的web自动化测试 教程(一)
目录
什么是nightwatch
nightwatch的实现原理
安装与配置
安装nodejs
安装nightwatch
Selenium Server Setup
Selenium Server
下载 Selenium
启动Selenium
配置nightwatch + selenium
什么是nightwatch
Nightwatch.js 是一个用于web网站或应用的自动化测试框架,使用node.js和W3C WebDriver API (熟知的selenium)
它是一个完整的浏览器自动化测试解决方案,能够简化持续集成及自动化测试编写工作。当然它也可以用于nodejs的单元测试过程中。
webdriver 简介
webdriver是一个浏览器自动化的标准库, 它是selenium(最开始是为java设计,现在基本上已经支持大部分语言了)解决方案中的一部分。
Nightwatch使用webdriver作为浏览器任务相关的task,例如打开浏览器实例,保持连接。
webdriver现在已经成为W3C标准, 用于标准化浏览器自动化的实现。
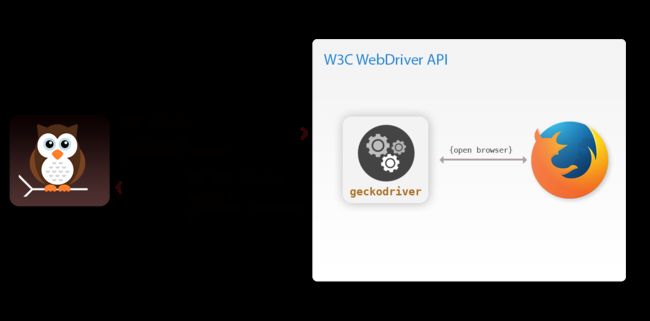
nightwatch的实现原理
nightwatch 通过restful http api与 selenium server通信,从而操作浏览器
安装与配置
安装nodejs
首先当然需要安装node.js,安装教程请参考,这里就不详述了
安装nightwatch
npm install -g nightwatch其中-g参数表示全局安装
Selenium Server Setup
selenium server是webdriver的一个标准化实现,也是最常用的,它允许你通过配置在一个地方同时操作多个不同类型的浏览器,而且可以跟浏览器保持分离,在不同服务器或者电脑上,使用rest http进行通信操作。
Selenium Server
selenium server是一个java应用,nightwatch使用它和多浏览器进行通信。所以你首先需要安装jdk, 不能低于1.7
下载 Selenium
现在最新版本的 selenium-server-standalone-{VERSION}.jar, 下载地址 Selenium downloads
启动Selenium
$ java -jar selenium-server-standalone-{VERSION}.jar配置nightwatch + selenium
首先创建一个node.js工程, 创建一个目录名为myproject, 然后进入目录,在终端上运行npm init -y, 生成一个配置文件package.json。
nigthwatch test runner 需要配置一个名为nigthwatch.json的配置文件, 或者nightwatch.conf.js(优先会加载nightwatch.conf.js,没有的话就加载nightwatch.json), 配置文件示例如下
{
  "src_folders" : ["tests"],
  "output_folder" : "reports",
  "custom_commands_path" : "",
  "custom_assertions_path" : "",
  "page_objects_path" : "",
  "globals_path" : "",

  "selenium" : {
    "start_process" : false,
    "server_path" : "",
    "log_path" : "",
    "port" : 4444,
    "cli_args" : {
      "webdriver.chrome.driver" : "",
      "webdriver.gecko.driver" : "",
      "webdriver.edge.driver" : ""
    }
  },

  "test_settings" : {
    "default" : {
      "launch_url" : "http://localhost",
      "selenium_port"  : 4444,
      "selenium_host"  : "localhost",
      "silent": true,
      "screenshots" : {
        "enabled" : false,
        "path" : ""
      },
      "desiredCapabilities": {
        "browserName": "firefox",
        "marionette": true
      }
    },

    "chrome" : {
      "desiredCapabilities": {
        "browserName": "chrome"
      }
    },

    "edge" : {
      "desiredCapabilities": {
        "browserName": "MicrosoftEdge"
      }
    }
  }
}
基础配置解析
| Name | type |
default |
description |
|---|---|---|---|
| src_folders | string|array | none | 测试脚本代码放置的目录 |
| output_folder Optional |
string | tests_output | JUnit XML report files 保存的位置 |
| custom_commands_path Optional | string|array | none | commands 模块的位置目录 |
| custom_assertions_path Optional | string|array | none | assertions 模块的位置目录 |
| page_objects_path Optional |
string|array | none | page object files 的位置目录 |
| globals_path Optional |
string | none | Location of an external globals module which will be loaded and made available to the test as a property globals on the main client instance. Globals can also be defined/overwritten inside a test_settings environment. |
| selenium Optional |
object | Selenium Server 相关的配置文件 | |
| test_settings | object | test 配置模块文件 | |
| live_output Optional |
boolean | false | 并发运行情况下是否缓存测试结果 |
| disable_colors Optional |
boolean | false | 控制台输出颜色开关 |
| parallel_process_delay Optional |
integer | 10 | Specifies the delay(in milliseconds) between starting the child processes when running in parallel mode.
|
| test_workers Optional |
boolean|object | false | Whether or not to run individual test files in parallel. If set to true, runs the tests in parallel and determines the number of workers automatically. If set to an object, can specify specify the number of workers as "auto" or a number. Example: "test_workers" : {"enabled" : true, "workers" : "auto"} |
| test_runner Optionalsince v0.8.0 |
string|object | "default" | Specifies which test runner to use when running the tests. Values can be either default (built in nightwatch runner) or mocha.Example: "test_runner" : {"type" : "mocha", "options" : {"ui" : "tdd"}} |
测试配置
{
  ...
  "test_settings" : {
    "default" : {
      "launch_url" : "http://localhost",
      "globals" : {
        "myGlobalVar" : "some value",
        "otherGlobal" : "some other value"
      }
    },

    "integration" : {
      "launch_url" : "http://staging.host",
      "globals" : {
        "myGlobalVar" : "other value"
      }
    }
  }
}
如上即为测试配置,测试配置为nightwatch实例运行过程中的配置,配置可以区分环境,例如上述配置中含default配置和integration配置,运行时通过--env来区分:
nightwatch --env integration通常用这个来区分环境,在不同运行环境下加载不同的配置
安装浏览器驱动
这里以chrome为例
chrome driver
从 ChromeDriver Downloads 下载合适版本的chrome driver,然后配置项可设置如下
{
  "selenium" : {
    "start_process" : true,
    "server_path" : "./bin/selenium-server-standalone-3.{VERSION}.jar",
    "log_path" : "",
    "port" : 4444,
    "cli_args" : {
      "webdriver.chrome.driver" : "./bin/chromedriver"
    }
  }
}
至此配置结束,执行命令nightwatch 即可。
完整的工程配置请参考https://www.cnblogs.com/saryli/p/6861864.html 这位大神有非常详尽的描述!
课程目录
nightwatch + selenium 基于浏览器的web自动化测试 教程(二)
