Electron学习(前端)
文章目录
-
- 一. 下载和安装
- 二. 入门案例
- 三. 内容
-
- 1. Remote 模块讲解
- 2. 菜单的创建和绑定事件
- 3. 右键菜单的制作
- 4. 通过链接打开浏览器
- 5. 嵌入网页和打开子窗口
- 6. 子窗口向父窗口传递信息
- 7. 对话框使用
- 8. 断网提醒功能制作
- 9. 底部通知消息制作
- 10. 注册全局快捷键
- 11. 剪切板功能的使用
一. 下载和安装
- 初始化npm,在根目录下生成一个package.json文件,用来记载项目相关文件的信息。

- 安装electron,时间有点长,需要保证网络通畅的情况下下载

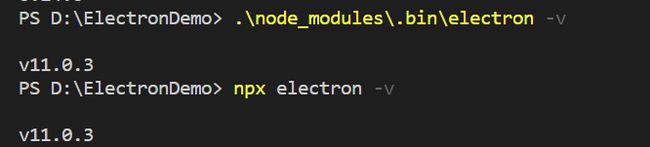
- 查看electron版本
- 开启electron,出现一个可视化界面,安装成功。


二. 入门案例
- 自定义一个入口函数main.js,在里面我们需要引入一些electron相关的配置与设置参数:
var electron = require('electron')

var app = electron.app  //引用app
var BrowserWindow = electron.BrowserWindow //窗口引用

var mainWindow = null //声明要打开的主窗口

app.on('ready',()=>{
    mainWindow = new BrowserWindow({
        width:800,
        height:800,
        webPreferences:{nodeIntegration:true} //设置此项以使用nodejs
    })
    mainWindow.loadFile('index.html')  //加载html页面
    mainWindow.on('close',()=>{
        mainWindow = null  //监听窗口关闭,把mainWindow设置为null,防止占用内存
    })
})
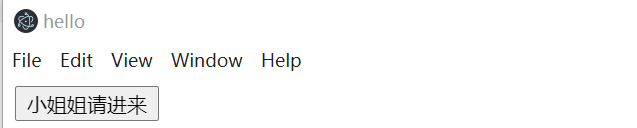
- 设置了启动后我们会加载一个index.html页面,我们可以在页面中添加想看见的元素,这里以按钮示例,点击按钮在div中加载文件中的内容。
index.html --- 渲染进程
<body>
    <button id="btn">小姐姐请进来button>
    <div id="mybaby">div>
    <script src="render/index.js">script>
body>
//--- render/index.js
var fs = require('fs')
window.onload = function(){
    var btn = this.document.querySelector('#btn')
    var mybaby = this.document.querySelector('#mybaby')
    btn.onclick = function(){
        fs.readFile('xiaojiejie,txt',(err,data)=>{
            mybaby.innerHTML = data
        })
    }
}
- 启动electroll
这里我在package.json中配置了命令,可以使用npm start打开,它会去找项目依赖中的electron,如果直接使用electron .运行会报错,因为没有全局安装electron,或者我们自己指定运行electroll:.\node_modules.bin\electron .

它会去执行main.js文件,然后替我们渲染index.html
三. 内容
1. Remote 模块讲解
- remote 模块提供了一种在渲染进程(网页)和主进程之间进行进程间通讯(IPC)的简便途径。
- 有时,我们需要在渲染进程中使用主进程中的方法或对象,这时我们是没办法直接使用的,使用remote我们就可以间接地调用它们了。
- 步骤:
- 改变main.js中要加载的html页面(渲染进程)
- 在原有窗口上加载一个新的窗口:BrowserWindow
const btn = this.document.querySelector('#btn')
const BrowserWindow = require('electron').remote.BrowserWindow

window.onload = function(){
    btn.onclick = ()=>{
        newWin = new BrowserWindow({
            width:500,
            height:500,

        })
        newWin.loadFile('yellow.html')
        newWin.on('close',()=>{
            newWin = null
        })
    }
}
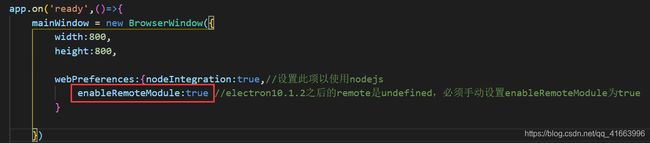
- 踩坑:主进程中设置enableRemoteModule:true
2. 菜单的创建和绑定事件
- main — menu.js
//1. 通过模板创建菜单
const {Menu, BrowserWindow} = require('electron')
var template = [
    {
        label:'莲花坞',
        submenu:[
            {
                label:'师姐',
                accelerator:'ctrl+n',  //3. 设置快捷键
                //2. 给菜单中的子项绑定点击事件
                click:()=>{
                    var win = new BrowserWindow({
                        width:500,
                        height:500,
                        webPreferences:{nodeIntegration:true}
                    })
                    win.loadFile('yellow.html')
                    win.on('closed',()=>{
                        win = null;
                    })
                }
            },
            {label:'师娘'}
        ]
    },
    {
        label:'夷陵老祖',
        submenu:[
            {label:'魏无羡'},
            {label:'小苹果'}
        ]
    }
]

var m = Menu.buildFromTemplate(template)

Menu.setApplicationMenu(m)
- 在主入口函数中引入:

这个时候我们运行electron,点击绑定了点击事件的子菜单就弹出新窗口了。
3. 右键菜单的制作
- 在渲染进程的js文件中设置:
const {remote}  = require('electron')
//因为在渲染进程中使用主进程的变量,所以需要remote
var rightTemplate = [
    {label:'复制',accelerator:'ctrl+c'},  //设置快捷键
    {label:'黏贴',accelerator:'ctrl+v'}
]

var m = remote.Menu.buildFromTemplate(rightTemplate)  //建立菜单
//绑定右击事件
window.addEventListener('contextmenu',function(e){
    e.preventDefault();
    m.popup({window:remote.getCurrentWindow()}) //调出菜单
})
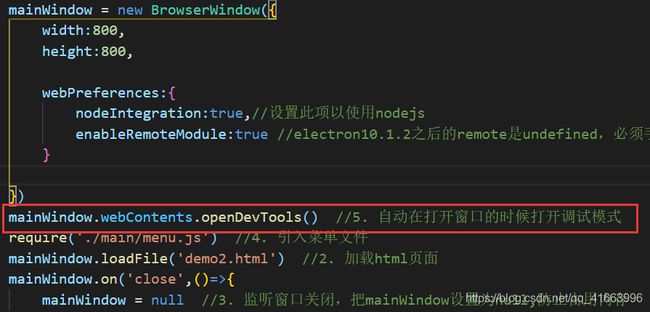
- 自己设置了菜单之后,要调试比较麻烦,如果要调出调试的菜单,可以在主进程的js文件中配置:
4. 通过链接打开浏览器
- 默认会在electron的窗口中打开
   <h1>
        <a id="aHref" href="http://www.baidu.com">打开百度a>
        <script src="render/demo3.js">script>
    h1>
- 设置在浏览器中打开:shell
var { shell } = require('electron')

var aHref = document.querySelector('#aHref')

aHref.onclick = function(e){
    e.preventDefault();  //阻止默认行为 --- 不要在当前窗口打开
    var href = this.getAttribute('href')  //获取属性的值
    shell.openExternal(href) //浏览器中打开
}
5. 嵌入网页和打开子窗口
 <button id="mybtn">打开子窗口button>
    <script src="render/demo3.js">script>
- 在窗口中嵌入网页: BrowserView
-----main.js------
    //6. BrowserView 嵌入网页 (在主线程中设置)
    var BrowserView = electron.BrowserView
    var view = new BrowserView()
    mainWindow.setBrowserView(view)  //在窗口中嵌入
    view.setBounds({x:0,y:120,width:1000,height:680})  //设置位置和大小
    view.webContents.loadURL('https://www.jianshu.com/u/02cd0bc8c45e')

    //7. 打开子窗口 window.open子窗口   BrowserWindow打开一个窗口
    //(在渲染进程的js中设置)
- 打开子窗口,使用window.open,BrowserWindow是之前用过的,指打开一个窗口。
------demo3.js--------
//点击打开子窗口
var mybtn = document.querySelector('#mybtn')
mybtn.onclick = function(){
    window.open('https://mp.csdn.net/console/article')  //可以直接使用,不需要引入什么
}
- 效果:

6. 子窗口向父窗口传递信息
- 渲染进程 — 父窗口:打开一个子窗口
	<h1>
        <a id="aHref" href="http://www.baidu.com">打开百度a>
    h1>
    <button id="mybtn">打开子窗口button>

    <div id="mytext">div>
    <script src="render/demo3.js">script>
--------- render/demo3.js -------------
//点击打开子窗口
var mybtn = document.querySelector('#mybtn')
mybtn.onclick = function(){
    window.open('./popup_page.html')  //可以直接使用,不需要引入什么
}
- 点击后弹出的子窗口,在js代码中我们使用window.opener.postMessage向父窗口传递信息。
<body>
    <h2>我是弹出子窗口h2>
    <button id="popbtn">向父窗口传递信息button>
body>
<script>
    var popbtn = this.document.querySelector('#popbtn')
    popbtn.onclick = function(e){
        alert(111)
        window.opener.postMessage('我是子窗口传递过来的信息')  //默认传递所有父窗口,可以指定具体父窗口
    }
script>
- 父窗口接收子窗口传递的信息
--------- render/demo3.js -------------

window.addEventListener('message',(msg)=>{  //msg是子窗口传递过来的对象
    let mytext = document.querySelector('#mytext')
    console.log(msg);
    mytext.innerHTML = JSON.stringify(msg.data) //msg是一个对象,需要转换成字符串
})
7. 对话框使用
<body>
	<button id="openBtn">打开图片button>
	<button id="saveBtn">保存文件button>
	<button id="messageBtn">弹出对话框button>
	<img id="images" style="width: 100%;">
body>
- 文件选择对话框使用
点击按钮打开文件对话框,因为设置了过滤器filters的原因,只显示图片格式结尾的文件,设置默认选中文件路径defaultPath,还可以自己设置打开窗口的标题,选择打开按钮显示的文字等属性,
//1 文件选择对话框
   const {dialog} = require('electron').remote  //因为在渲染进程中引入dialog,需要remote
   var openBtn = document.querySelector('#openBtn')
   openBtn.onclick = function(){
       dialog.showOpenDialog({
           title:'请选择你喜欢的图片',  //窗口标题
           defaultPath:'1.jpg', //指定默认路径
           filters:[{name:'img',extensions:['jpg','png']}], //文件选择过滤器
           buttonLabel:'请选择图片~'  //设置打开按钮
       }).then(result => {
           console.log(result);
           let image = document.getElementById('images')
           image.setAttribute('src',result.filePaths[0]) //选择的第一个
       }).catch(error => {
           console.log(error);
       })
   }
- 保存文件对话框使用
点击按钮弹出保存文件的对话框,输入文件名点击保存即可。
 //2 文件保存对话框
 	var saveBtn = document.querySelector('#saveBtn')
       saveBtn.onclick = function(){
           dialog.showSaveDialog({
               title:'保存文件'
           }).then(result => {
               console.log(result)
               fs.writeFileSync(result.filePath,'你好啊,singxiao')  //保存文件,并在文件中写入
           }).catch(err => {
               console.log(err);
           })
       }
- 消息对话框
	//3 消息对话框
	var messageBtn = document.querySelector('#messageBtn')
        messageBtn.onclick = function(){
            dialog.showMessageBox({
                type:'warning',
                title:'去不去由你',
                message:'胖大星我们去抓水母吧',
                buttons:['一起去','不去了']  //返回下标来判断选择
            }).then(res => {
                console.log(res);
            })
        }
8. 断网提醒功能制作
<body>
    <h2>Singxiao 断网提醒测试h2>
body>
<script>
    //1 online  offline监听两个事件
    window.addEventListener('online',function(){
        alert('网络修复啦,我们继续!')
    })
    window.addEventListener('offline',function(){
        alert('网络情况不佳,我要躺躺~')
    })
script>
9. 底部通知消息制作
点击按钮在屏幕底部弹出消息框,包含标题和内容。
<body>
    <button id="notifyBtn">通知消息button>
body>
<script>
    var notifyBtn = document.querySelector('#notifyBtn')
    var option = {
        title:'小二,来订单了,出来接客',
        body:'把你的心我的心串一串,串一株幸运草'
    }
    notifyBtn.onclick = function(){
        new window.Notification(option.title,option)
    }
script>
10. 注册全局快捷键
app.on('ready',()=>{
   ...
    // 8. 注册全局快捷键
    globalShotcut.register('ctrl+e',()=>{
        //快捷键触发的事情 --- eg:载入远程url
        mainWindow.loadURL('http://www.baidu.com')
    })
    //globalShotcut.isRegistered(快捷键)  判断快捷键是否注册成功,返回一个boolean值
    let isRegister = globalShotcut.isRegistered('ctrl+e')?'Refister Success':'Refister fail'
    console.log('------------>'+isRegister);
	...
})

//将要退出应用前,注销快捷键,否则可能影响其他页面
app.on('will-quit',function(){
    //注销全局快捷键
    globalShotcut.unregister('ctrl+e')  //取消指定快捷键
    globalShotcut.unregisterAll()   //取消所有快捷键
})
11. 剪切板功能的使用
- 使用electron中的clipboard,这个是主进程和渲染进程都可以使用的,不需要加remote,
<body>
    <div>
        激活码:<span id="code">Singxiao1005span>
        <button id="btn">复制激活码button>
    div>
body>
<script>
    const {clipboard} = require('electron')  //渲染进程可直接使用
    const code = document.querySelector('#code')
    const btn = document.querySelector('#btn')
    btn.onclick = function(){
        //clipboard 不仅有复制文字的方法,还有其他可以在api中学习
        clipboard.writeText(code.innerHTML)  //复制到剪贴板
        alert('复制成功')
    }
script>