精通Python——Office编程
1 Excel编程
1.1 读Excel
1)Pandas
读取
df=pd.read_excel('lemon.xlsx')#这个会直接默认读取到这个Excel的第一个表单df=pd.read_excel('lemon.xlsx',sheet_name='sheet1')#可以通过sheet_name来指定读取的表单df=pd.read_excel('lemon.xlsx',sheet_name=['sheet0','sheet1'])
df=pd.read_excel('lemon.xlsx',sheet_name=[1,2])
操作
data=df.ix[0].values      #0表示第一行 这里读取数据并不包含表头
data=df.ix[[1,2]].values  #读取指定多行的话
data=df.ix[1,2]           #读取第一行第二列的值
data=df.ix[[1,2],['title','data']].values    #读取第一行第二行的title以及data列的值
data=df.ix[:,['title','data']].values        #读所有行的title以及data列的值
df.columns.values         #获取列名
df['data'].values         #获取指定列的值
2)xlrd
安装Xlrd模块
打开excel文档
- workbook = xlrd.open_ workbook('ttt.xIs')
获取所有sheet
- sheet_ name = workbook.sheet_names()[0] (返回类型为sheet名字组成list )
获取指定sheet
- 根据sheet的sheet_ by_ index属性索引获取
- 根据sheet的sheet_ by_ name属性名字获取
获取指定sheet的名字,行数,列数
- 调用指定sheet的name, nrows, ncols属性
获取sheet的内容
- 将sheet按照二维数组,根据行列的方式访问指定内容
- 第0行第1列数据sheet.row(0)[1].value
- 第1列第0行数据sheet.col(1)[0].value
- 第0行第1列数据sheet.cell(0,1).value
- rows = sheet.row_values(1) # 获取第2行内容
- cols = sheet.col_values(2) # 获取第3列内容
1.2 写Excel
1)openpyxl
官方文档:https://openpyxl.readthedocs.io/en/stable/#usage-examples
import openpyxl


wb = openpyxl.Workbook()  # 创建一个Workbook对象

mySheet = wb.create_sheet(index=0, title="Mysheet")   # 创建一个Sheet对象

activeSheet = wb.get_active_sheet()    # 获取活动的sheet

activeSheet.sheet_properties.tabColor = "205EB2"   # 设置活动表颜色

mySheet .title = "test"    # 设置mySheet的标题

directionCell = activeSheet.cell(row=4, column=2)   # 选择Cell对象(B4单元格并赋值)

directionCell.value = "找到这个单元格"

mySheet ['A1'].value = "activesheet最大行:" + str(activeSheet.max_row)

mySheet ['A2'].value = "activesheet最大列:" + str(activeSheet.max_column)

wb.save("test.xlsx")   # 最后保存workbook
2)xlsxwriter
官方文档:https://xlsxwriter.readthedocs.io/contents.html
import xlsxwriter

f = xlsxwriter.Workbook()                 # 创建excel文件

worksheet1 = f.add_worksheet('操作日志')   # 括号内为工作表表名

bold = f.add_format({
        'bold':  True,  # 字体加粗
        'border': 1,  # 单元格边框宽度
        'align': 'left',  # 水平对齐方式
        'valign': 'vcenter',  # 垂直对齐方式
        'fg_color': '#F4B084',  # 单元格背景颜色
        'text_wrap': True,  # 是否自动换行
    })

//row:行, col:列, data:要写入的数据, bold:单元格的样式
worksheet1.write(row, col, data, bold)

// A1:从A1单元格开始插入数据,按行插入, data:要写入的数据(格式为一个列表), bold:单元格的样式
worksheet1.write_row(“A1”,data,bold)

// A1:从A1单元格开始插入数据,按列插入, data:要写入的数据(格式为一个列表), bold:单元格的样式
worksheet1.write_column(“A1”,data,bold)

// 第一个参数是插入的起始单元格,第二个参数是图片你文件的绝对路径
worksheet1.insert_image('A1','f:\\1.jpg')

worksheet1.write_url(row, col, "internal:%s!A1" % ("要关联的工作表表名"), string="超链接显示的名字")

workbook.add_chartsheet(type="")

参数中的type指的是图表类型,图表类型示例如下:
[area:面积图,bar:条形图,column:直方图,doughnut:环状图,line:折线图,
pie:饼状图,scatter:散点图,radar:雷达图,stock:箱线图]

workbook.close()

摘抄于:https://www.jianshu.com/p/187e6b86e1d9
2 Word编程
安装python-dock
官方文档:http://python-docx.readthedocs.io/en/latest/
新建文档: document = Document();document.save( 'filename.docx' )
添加文本: text = document.add paragraph( 'contentof the paragraph' )
更改项目符号: text.style ='' stylename'
添加标题: document.add heading( 'head-name' )
添加图片: document.add picture( 'path-of-the-picture' )
字体设置
设置加粗: text.run.font.bold = True
设置字号: text.run.font.size= pt(sizeNumber)
设置字体颜色: text.run.font.color =
创建表格: table = document.add table(rows = ,cols = )
遍历某单元格 : cell = table.cell(row_ num,col num)
添加文本: cell.add paragraph( "content" ,style =None)
添加另一表格: cell.add table(rows,cols)
返回该单元格内文本: String content = cell.text (只读)
返回该单元格内表格list : table[] = cell.tables (只读)
from docx import *
from docx.shared import Inches

# 创建一个已存在的 word 文档的对象
file = Document()

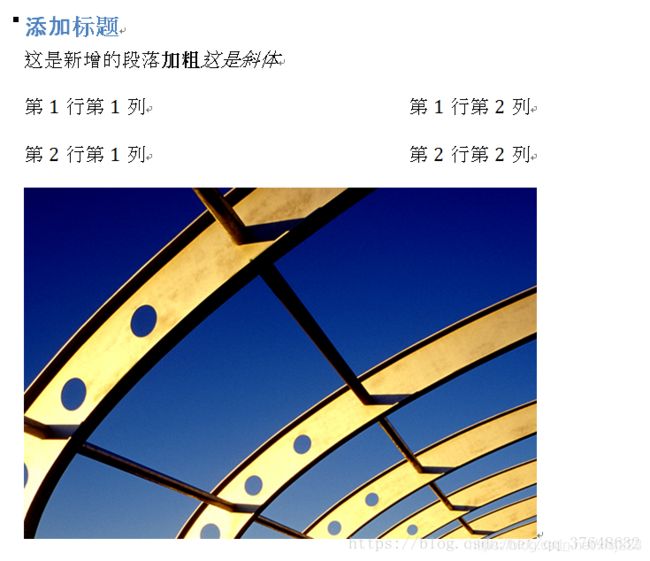
# 添加标题,标题级别设置为2级
file.add_heading('添加标题',level=2)

# 添加段落
paragraph = file.add_paragraph('这是新增的段落')
paragraph.add_run('加粗').bold = True
paragraph.add_run('这是斜体').italic = True

# 添加表格
table = file.add_table(rows=2, cols=2)

for i in range(2):
    for j in range(2):
        cell = table.cell(i, j)
        cell.text = "第"+str(i+1) +"行第"+str(j+1) +"列"

# 添加图片,图片是当前文件夹下的 img.png 图片
file.add_picture('img.png',width=Inches(4.0))

# 保存新创建的 word 文档
file.save('testDoc.docx')
注意:一个run对象是相同样式文本的延续(只要文本的格式没有改变,那么就是一个run,一旦改变了就是列外一个run了)
摘自于:https://blog.csdn.net/qq_37648632/article/details/81661007
