cocoscreator3.X 强更 游戏内下载APK和安装APK
本文环境3.6.0,目测3.7, 3.8都可以用
强制更新是强制用户下载整包并覆盖安装,因为android部分代码不方便热更,所以游戏内采用服务器推送下载通知,游戏执行下载后再安装的形式.
下载完全可在ts层完成,可采用cocoscreator的native.Downloader类,此类功能非常强大,只要给出apk的服务器地址就可以执行下载操作,还返回onProgress(进度反馈)和onError和onSuccess回调,你可以方便的用一个进度条展示出下载进度,并获得下载失败的原因和成功回调,代码如下:
//下载Apk
    downloadApk() {
        if(!native || !native.AssetsManager ) {
            return;
        }
        let filePath = this._storagePath + "/bigwinner.apk"; //下载成功后的存放地址,为本地可写路径下的XX.apk

        if(!this._downloader)
            this._downloader = new native.Downloader();
        //下载失败回调
        this._downloader.onError = (task:native.DownloaderTask, errorCode: number, errorCodeInternal: number, errorStr: string)=> {
            console.log(errorStr);
        };

        //进度回调
        this._downloader.onProgress = (task, bytesReceived, totalBytesReceived, totalBytesExpected)=> {
            let progress:number = totalBytesReceived / totalBytesExpected; //已经下载的字节数 / 需要下载的总字节数
            this.getProgress(progress);
            let bKReceived:string = (totalBytesReceived / 1024).toFixed(1);
            let totalReceived:string = (totalBytesExpected / 1024).toFixed(1);
            var strProgress:string = "Download APK:" + bKReceived + "kb / " + totalReceived + "kb";
            this.updateLabel.string = strProgress;
        };
        //下载成功回调
        this._downloader.onSuccess = (task) => {
            this.updateLabel.string = "Download success!";
            this.installApk(filePath); //下载成功,执行安装apk操作
        };

        //开始执行下载操作,参数1:服务器的下载地址 如:http://192.168.0.101/game.apk  参数2:下载完成后的apk文件本地存放地址
        this._downloader.createDownloadTask(this.apkUrl, filePath);
    }
安装APK需要用到android底层,所以应该在android层写代码
ts层代码:
//安装APK
    installApk(apkPath:string) {
        if (native.reflection) {
            native.reflection.callStaticMethod("com/cocos/game/AppActivity", "installAPK", "(Ljava/lang/String;)V", apkPath);
        }
    }
此处调用com.cocos.game.AppActivity下的installApk静态方法
安卓代码:
//安装APK
    public static void installAPK(String path) {
        try {
            File apk = new File(path);
            if(!apk.exists()) {
                Log.e(TAG, "apk:" + path + " not found!");
                return;
            }
            Intent intent = new Intent(Intent.ACTION_VIEW);
            intent.addFlags(Intent.FLAG_ACTIVITY_NEW_TASK);
            intent.addFlags(Intent.FLAG_GRANT_READ_URI_PERMISSION | Intent.FLAG_GRANT_WRITE_URI_PERMISSION);
            Uri uri;
            if(Build.VERSION.SDK_INT>=Build.VERSION_CODES.N) { //新版本android 24以后执行下面方法
                String packageName = myContext.getApplicationContext().getPackageName();//pkgName;
                String authority =  new StringBuilder(packageName).append(".fileprovider").toString();
                uri = FileProvider.getUriForFile(myContext, authority, apk);
                intent.setDataAndType(uri, "application/vnd.android.package-archive");
            }
            else { //老版本执行下面方法
                uri = Uri.fromFile(apk);
                intent.setDataAndType(uri, "application/vnd.android.package-archive");
            }
            myContext.startActivity(intent);
        }
        catch (Exception ex) {
            ex.printStackTrace();
        }
    }
注意现在的android版本一般是大于android24的,即代码里的Build.VERSION_CODES.N,所以需要像代码里所写,在AndroidManfeist.xml里配置一个fileprovider,否则程序无法执行,具体是:
首先在AndroidManfiest文件里加入可安装的权限,以及读写内部存储的权限:
在
注意这里有两个要点,andrioid:authorities是"你的包名"+"fileprovider"写法,这是刚才installApk代码里写的,你可以再回头看一眼那个代码,还有那个meta-data里要配置可读写的路径,即 android:resource = "@xml/file_paths"里的配置,如果配置不对程序还是会报错的。
所以在res目录下新建个xml文件夹,在里面新建个file_paths.xml文件,如图所示: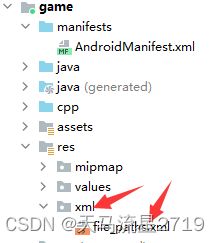
file_paths.xml内容如下:
其实也就第一条有用,我下载apk存放的路径是游戏可写路径下/bigwinner-remote-asset/内,这样配置游戏就能正常安装了
网上说需要动态申请安装和读取存储权限,我代码里面没有动态申请也能执行成功,安装时自动会问用户是否要安装,不知道那个动态申请代码有何用?