vue3基础
141.用vite创建vue3项目
142.项目目录
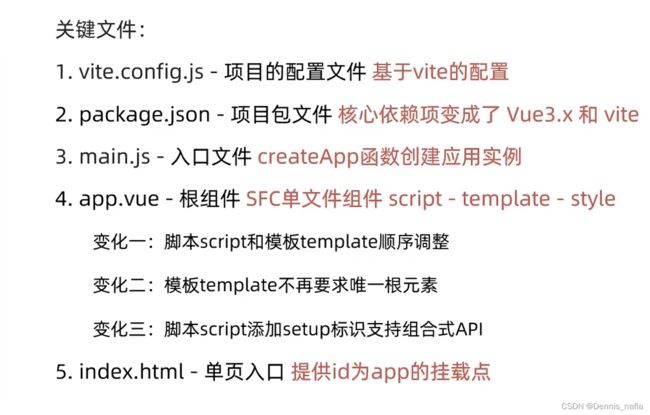
vue3中,直接导入组件就能用
不再要求唯一根元素
//createApp(App)是创建实例,.mount('#app')是在将实例往id为app的盒子上挂载
createApp(App).mount('#app')

//挂载就是让实例接管一片区域
assets是存放图片或样式的目录
143.组合式API--setup选项
执行时机在beforeCreate之前
测试代码:
控制台输出:![]()
可以看出setup函数的执行时机在beforeCreate之前
vue3基本不用this
2.setup函数里面定义的数据或者函数要想在界面中使用,需要return
setup(){
    //数据
    const message ='hello'

    //函数
    const logMessage =()=>{
      console.log(message)
    }
    return{
      message,
      logMessage
    }


  },
只要return了就能直接在界面中使用
{{message}}
语法糖:这样就简化了代码,不再需要return,只要在
3.reactive:接收一个对象类型的数据,返回一个响应式的对象
响应式的对象指的是当数据改变时,前端界面上显示的数据也随之改变
{{user.count}}
4.ref,接收简单类型或者复杂类型,返回一个响应式的对象
{{count}}
推荐以后都使用ref,因为他既能接受简单类型又能接受复杂类型
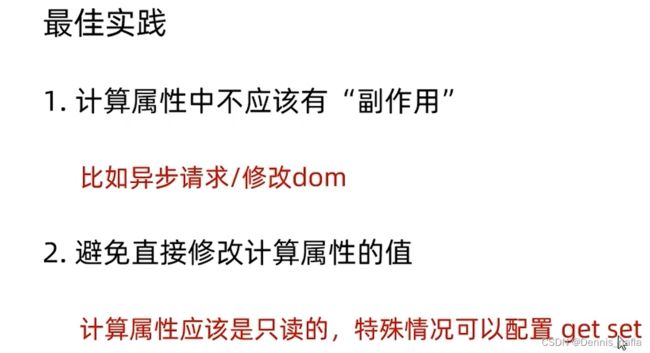
144.computed
{{list}}
{{computedList}}
计算属性的优点是它们可以缓存计算结果,并且只在依赖数据发生变化时才重新计算。这有助于提高性能,并避免不必要的重复计算。
在使用computedList时,你可以像使用普通属性一样访问它,在模板中进行绑定或在JavaScript代码中读取它。每当list的值发生变化时,computedList会自动更新并提供最新的计算结果。
146.watch侦听器
语法:
// 1.监听单个数据的变化
// watch(ref对象,newValue,oldValue)=>{
//})
//2.监听多个数据的变化
//watch([ref对象1,ref对象2],(newArr,oldArr)=>{
// })
//3.immediate 立即执行
// watch(count,(newValue,oldValue)=>{
//   console.log(newValue,oldValue);
// },{
//immediate:true,
//})

//4.deep深度监视
//默认watch进行的是浅层监视
//const ref = ref(简单类型) 可以直接监视

//但是如果是复杂类型,就要使用deep属性进行升读监视
// watch(count,(newValue,oldValue)=>{
//   console.log(newValue,oldValue);
// },{
//immediate:true,
//deep:true
//})
5.不开启deep,直接监视复杂类型的某个属性,语法:
watch(()=>user.value.age,(newValue,oldValue)=>{
  console.log(newValue,oldValue)
})
代码示例
数量:{{count}}
姓名:{{name}}
148.父子组件通信
父组件数据传到子组件:
1.在父组件中给子组件自定义属性并赋值
2.在子组件中使用defineProps来接受
3.此时就能使用父组件传过来的数据了,不过要注意:
//对于props得到的数据,在script里面要用props.car获取数据
//而模块中直接用car即可
子组件:
const  props = defineProps({
  car:String,
  money:Number
})
console.log(props.car)
console.log(props.money)
子组件改变父组件数据
1.父组件给子组件绑定事件,如果触发此事件就执行某方法
2.在子组件中用defineEmits注册事件
const emit = defineEmits('changeMoney')
注册完事件后就能在方法里面使用emit通知父组件更新数据了
const  buy=()=>{
  //需要emit触发事件
emit('changeMoney',5)
}
事件名是changeMoney,参数是5
父子通信完整代码演示
父组件:
父组件
子组件:
我是子组件-{{car}}--{{money}}
149.模板引用和defineExpose
引用dom元素:
1.使用ref生成一个ref对象
const inp = ref(null);2.在模板中给元素添加属性
此时就绑定成功了
通过inp.value.focus()能让输入框聚焦
代码示例
父组件:
子组件:
150.跨级传递数据,用procide传递,用inject接收
注意:孙子或者更低的组件得到高级组件传递的数据后,不能直接更改它的值
要想更改它的值,可以让高级组件将修改它的值的方法也传递过来
顶级组件:
我是底层组件-{{themeColor}}--{{count}}
中级组件:
我是中间组件
底层组件:
我是底层组件-{{themeColor}}--{{count}}
151.defineOptions

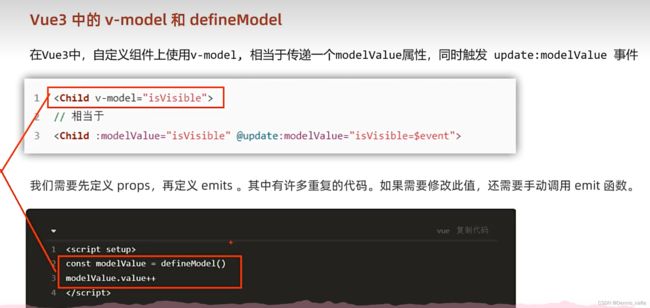
152.defineModel
 155.Pinia-最新的状态管理工具
使用Pinia
1.npm install pinia
2.在自己创建的js文件(如counter.js)里面导入Pinia
import {defineStore} from "pinia";3.创建并导出一个状态管理函数(函数名以use开头),这个函数里面就是仓库内容,(可以声明数据,声明操作数据的方法,声明基于数据派生的计算属性)
记得一定要return
export const useCounterStore=defineStore('counter',()=>{
    //声明数据
    //第一个数据
    const count = ref(0)

    //声明操作数据的方法
    const addCount=()=>count.value++
    const subCount=()=>count.value--
    //声明基于数据派生的计算属性
    const getDoubleCount = computed(()=>count.value*2)


    //第二个数据
    const msg = ref('hello')


    //只有return出去后,才能被页面使用
    return{
        count,
        msg,
        addCount,
        subCount,
        getDoubleCount
    }
})
export导出后就能在其他组件中使用了
4.其他组件中使用:
import {useCounterStore}from'@/store/counter'
const counterStore = useCounterStore()
将这个状态管理函数导入即可,使用就直接用' . '来调用变量或者方法
如:
子组件1 {{counterStore.count}} - {{counterStore.getDoubleCount}}
counterStore.count 和counterStore.getDoubleCount都是从状态管理函数的返回值得到的
156.Pinia的异步方法
export const useChannelStore =defineStore('channel',()=>{
    //声明数据
    const channelList = ref([])
    const getList = async ()=>{
        const {data:{data}} =await axios.get('https://geek.itheima.net/v1_0/channels')
        channelList.value = data.channels
    }
    return{
        channelList,
        getList

    }
})
res默认会包装一层
158.Pinia-持久化
1.安装pinia-plugin-persistedstate
npm i pinia-plugin-persistedstate
2.在main.js里面导入
import persist from 'pinia-plugin-persistedstate'
app.use(createPinia().use(persist))
3.在store仓库中(就是一个用来保存数据的js文件)加一条属性
persist : true

import {defineStore} from "pinia";
import {computed, ref} from "vue";
import persist from "pinia-plugin-persistedstate";

//定义store
//defineStore(仓库的唯一标识(填名字就行),()=>{...})

export const useCounterStore=defineStore('counter',()=>{
    //声明数据
    //第一个数据
    const count = ref(0)

    //声明操作数据的方法
    const addCount=()=>count.value++
    const subCount=()=>count.value--
    //声明基于数据派生的计算属性
    const getDoubleCount = computed(()=>count.value*2)

    //第二个数据
    const msg = ref('hello')
    //只有return出去后,才能被页面使用
    return{
        count,
        msg,
        addCount,
        subCount,
        getDoubleCount
    }
},{
    persist:true
})
这样,该counter里面的数据就会被自动存入本地存储
其中,这一句
export const useCounterStore=defineStore('counter',()=>{
里面的counter就是存本地存储的键名
拓展:
1.修改key
persist:{
    key:'nsy-counter'
}
2.更改storage
persist:{
    key:'nsy-counter',
    storage:sessionStorage
}
3.指定需要进行持久化的数据
(默认是stage里面的所有数据都持久化)
persist:{
    key:'nsy-counter',
    storage:sessionStorage,
    paths:['count']
}