Ubuntu下pwn环境搭建
文章目录
- 安装Ubuntu虚拟机
-
- 镜像下载
- 安装VMware
- 创建新的虚拟机
- 配置基本pwn环境
-
- 更换软件源
- python和pip安装
- pwntools安装
- git安装
- pwndbg安装
- 配置pwn做题辅助工具
-
- LibcSearcher安装
- one_gadget安装
- seccomp-tools安装
- ROPgadget安装
- glibc-all-in-one安装
安装Ubuntu虚拟机
镜像下载
首先去阿里镜像站或者其它的镜像站将ubuntu的安装镜像下载到本地
阿里ubuntu镜像地址
版本推荐16.0以上,我这里使用的是22.04
安装VMware
去VMware的官网,下载workstation 16 pro,选择“for windows”。
[官网地址](Download VMware Workstation Pro)
安装步骤没什么好说的,保持默认总不会错,不会的可以百度亿下。
创建新的虚拟机
安装好后打开“VMware Workstation Pro”,点击创建新的虚拟机。
具体方法不多赘述,这里我随便找了一篇可以参考一下。
创建新的虚拟机
配置基本pwn环境
更换软件源
为了使我们后续安装软件的时候会顺一些,先换一下软件源,可以选择清华的源。
ubuntu | 清华大学开源软件镜像站
先将/etc/apt/source.list 文件备份一下,然后将里面清空,将下面的地址复制进去。最后执行指令sudo apt update更新一下。
# 默认注释了源码镜像以提高 apt update 速度,如有需要可自行取消注释
deb https://mirrors.tuna.tsinghua.edu.cn/ubuntu/ jammy main restricted universe multiverse
# deb-src https://mirrors.tuna.tsinghua.edu.cn/ubuntu/ jammy main restricted universe multiverse
deb https://mirrors.tuna.tsinghua.edu.cn/ubuntu/ jammy-updates main restricted universe multiverse
# deb-src https://mirrors.tuna.tsinghua.edu.cn/ubuntu/ jammy-updates main restricted universe multiverse
deb https://mirrors.tuna.tsinghua.edu.cn/ubuntu/ jammy-backports main restricted universe multiverse
# deb-src https://mirrors.tuna.tsinghua.edu.cn/ubuntu/ jammy-backports main restricted universe multiverse
deb https://mirrors.tuna.tsinghua.edu.cn/ubuntu/ jammy-security main restricted universe multiverse
# deb-src https://mirrors.tuna.tsinghua.edu.cn/ubuntu/ jammy-security main restricted universe multiverse

# 预发布软件源,不建议启用
# deb https://mirrors.tuna.tsinghua.edu.cn/ubuntu/ jammy-proposed main restricted universe multiverse
# deb-src https://mirrors.tuna.tsinghua.edu.cn/ubuntu/ jammy-proposed main restricted universe multiverse
python和pip安装
因为我们写攻击脚本要用到python,所以我们要把python和pip工具装一下。首先使用一下指令查看下自己虚拟机上有没有安装系统的时候就装好的。
python
python3
我这里表示已经有了python3,下面就只演示python2的安装方式。
使用指令sudo apt install python2安装,安装好后使用指令python2检查一下,如下图所示则表示成功。
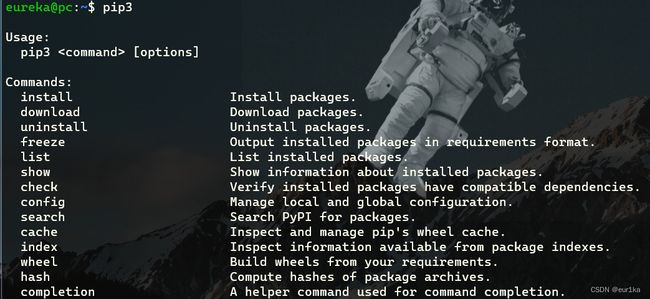
使用指令sudo apt install python3-pip安装pip3,如下图所示则表示安装成功。
然后更换pip源,这里我使用的还是清华的源。pypi |清华大学开源软件镜像站
使用指令pip config set global.index-url https://pypi.tuna.tsinghua.edu.cn/simple
pwntools安装
使用指令sudo pip3 install --upgrade pwntools,因为python2下的pwntools已经不更新了,所以这里用的是python3版本。
输入指令python3进入python指令环境,输入以下指令
>>> import pwn
>>> pwn.asm('xor eax,eax')
如下图所示,则安装成功。
git安装
git是用来帮我们从github来拉取资源的工具,使用指令sudo apt install git安装,如下图所示表示成功。
pwndbg安装
先在Public目录下使用指令mkdir tools新建个文件夹,然后cd tools进入该目录,在tools目录下使用如下指令
git clone https://github.com/pwndbg/pwndbg	#从github上克隆
cd pwndbg	#进入克隆下来的包
./setup.sh	#执行安装脚本
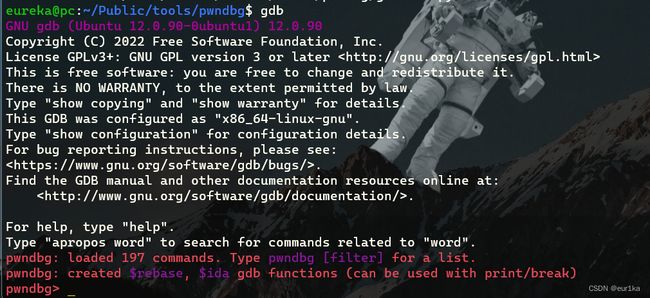
gdb	#启动pwndbg测试
效果如下则表示成功,到目前为止该环境已经可以拿来做基本的栈溢出题目了。
配置pwn做题辅助工具
LibcSearcher安装
这是一个师傅自己写的libc查找脚本,我们安装一下,方便以后找libc偏移,在tools目录下使用如下指令安装。
git clone https://github.com/lieanu/LibcSearcher.git
cd LibcSearcher
sudo python3 setup.py develop
效果如下所示则表示成功。
one_gadget安装
使用指令sudo gem install one_gadget安装,如果提示找不到命令gem,则先使用指令sudo apt install ruby-rubygems,如下图所示表示成功。
20.04及以下版本的ubuntu可能找不到
ruby-rubygems软件包,就下载rubygems这个软件包
seccomp-tools安装
使用如下指令
sudo apt install gcc ruby-dev
sudo gem install seccomp-tools
如下图所示则表示成功
ROPgadget安装
在tools目录下使用以下指令
git clone https://github.com/JonathanSalwan/ROPgadget.git
cd ROPgadget
sudo python3 setup.py install
效果如下则表示成功
如果出现如下错误,则使用指令
sudo cp -r scripts /home/eureka/.local/lib/python3.6/site-packages/ROPGadget-7.1.dist-info将ROPgadget下的script复制到它所说的目录下去
glibc-all-in-one安装
在tools目录下使用如下指令
sudo apt install patchelf
git clone https://github.com/matrix1001/glibc-all-in-one.git
cd glibc-all-in-one
python3 update_list
效果如下则表示成功
![[外链图片转存失败,源站可能有防盗链机制,建议将图片保存下来直接上传(img-usRvx6hv-1683120712628)(Ubuntu下pwn环境搭建/image-20220614131818990.png)]](http://img.e-com-net.com/image/info8/e09cc1748ff04611beb38906a8651fd3.jpg)


![[外链图片转存失败,源站可能有防盗链机制,建议将图片保存下来直接上传(img-OhnH7vJ4-1683120712630)(Ubuntu下pwn环境搭建/image-20220614151356542.png)]](http://img.e-com-net.com/image/info8/35f6ce6854a94e24aa173696682b9088.jpg)

![[外链图片转存失败,源站可能有防盗链机制,建议将图片保存下来直接上传(img-S1SrS9s3-1683120712631)(Ubuntu下pwn环境搭建/image-20220614153531126.png)]](http://img.e-com-net.com/image/info8/bf2e7150746244d5ae8e49f808ebe019.jpg)


![[外链图片转存失败,源站可能有防盗链机制,建议将图片保存下来直接上传(img-osHLWmA6-1683120712632)(Ubuntu下pwn环境搭建/image-20220915145531048.png)]](http://img.e-com-net.com/image/info8/0e5ed80ae46740e0ab5696602382624e.jpg)
