Spring Cloud 微服务架构 Eureka RIbbon Feign Hystrix Gateway config Bus Stream Sleuth+Zipkin
Spring Cloud
- Spring Cloud
-
- 一、Spring Cloud介绍
- 二、创建微服务工程
-
- 2.1 搭建配置eureka-provider工程
- 2.2 搭建配置eureka-consumer工程
- 三、Eureka注册中心说明
-
- 3.1 Eureka和Zookeeper区别
- 3.2 搭建eureka-server工程
- 3.3 yml核心配置
- 3.4 服务注册与发现
- 3.5 心跳
- 3.6 Eureka 高可用配置
- 3.7 适用配置
-
- 1.使用ip地址访问注册 Eureka客户端配置
- 2.服务续约相关配置 Eureka客户端配置
- 3.获取服务列表间隔 Eureka客户端配置
- 4.失效剔除和自我保护 相关配置 Eureka服务端配置
- 3.8 Eureka常用配置
- 四、Ribbon
-
- 4.1 负载均衡
- 4.2 Ribbon来拼接URL
- 4.3修改负载均衡策略
-
- 1.注解方式
- 2.配置方式(推荐)
- Ribbon负载均衡配置
- 五、Feign
-
- 5.1 使用Feign访问其他服务
- 5.2Feign配置
-
- 2.Hystrix熔断配置
- 5.3 Feign日志
- 5.4Feign拦截器
- 六、Hystrix熔断器
-
- 6.1 Hystrix降级
-
- 一、 服务提供方
- 二、 服务消费方
- 6.4 服务熔断流程
- 6.5Hystrix 相关配置
- 请求超时时间配置
- 熔断相关配置
- 配置隔离策略
- 配置参考
-
-
- Turbine聚合监控
-
- 一、搭建监控模块
- 二、修改被监控模块
- 三、启动测试
-
- 七、Gateway网关
-
- 7.1 Spring Cloud Gateway
- 7.2 过滤器
-
- 7.2.1自定义局部过滤器
- 八 、Config分布式配置中心
-
- 8.1 概述
- 8.2 入门
- 8.3 Config 客户端刷新
- 8.4 Config集成Eureka
- 九、Bus消息总线
-
- 修改配置中心
- 改造拉取配置的服务
- 9.1 Stream消息驱动
- 9.2 stream组件
- 9.3 Stream消息生产者
- 9.4 Stram消息消费者
- 十、 Sleuth+Zipkin链路追踪
-
- 10.1 入门
- 2.配置
- Zipkin
-
- 最简单方式
-
- zipkin服务端
- 使用RabbitMQ发送跟踪日志
-
- 启动服务端
- 客户端
- 使用Mysql存储日志
-
- 数据库准备
- 启动服务端
- 总图
Spring Cloud
一、Spring Cloud介绍
Springboot 用于快速构建Spring项目
微服务架构:是一套使用小服务或者单一业务来开发单个应用的方式或途径。
微服务架构特点:
- 单一职责
- 服务粒度小
- 面向服务(对外暴露REST api)
- 服务之间相互独立
与使用ESB的SOA架构的区别:微服务架构没有使用ESB,有服务治理注册中心;业务粒度小。
那怎么把多个小项目关联起来?
我们使用HTTP协议的方式来进行调用
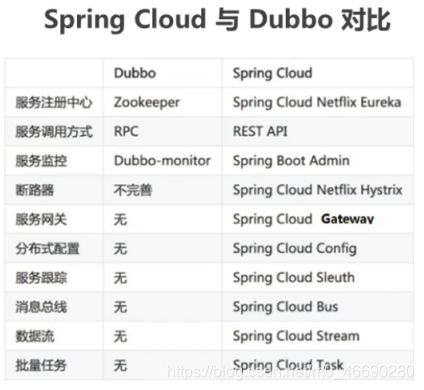
SpringCloud是一堆其他框架的集合(包含了很多其他框架),同时也做了整合,自动配置的起步依赖
- 整合的组件可以有很多组件;常见的组件有:eureka注册中心,Gateway网关,Ribbon负载均衡,Feign服务调用,Hystrix熔断器。在有需要的时候项目添加对于的启动器依赖即可。
- 版本特征:以英文单词命名(伦敦地铁站名)
使用SpringCloud的时候注意版本对应。
二、创建微服务工程
创建微服务父工程sping-cloud-parent、服务提供工程eureka-provider、服务消费工程eureka-consumer
    <parent>
        <groupId>org.springframework.bootgroupId>
        <artifactId>spring-boot-starter-parentartifactId>
        <version>2.1.8.RELEASEversion>
        <relativePath/>
    parent>


    <properties>
        <project.build.sourceEncoding>UTF-8project.build.sourceEncoding>
        <project.reporting.outputEncoding>UTF-8project.reporting.outputEncoding>
        <java.version>1.8java.version>

        <spring-cloud.version>Greenwich.RELEASEspring-cloud.version>
    properties>


    <dependencyManagement>
        <dependencies>
            <dependency>
                <groupId>org.springframework.cloudgroupId>
                <artifactId>spring-cloud-dependenciesartifactId>
                <version>${spring-cloud.version}version>
                <type>pomtype>
                <scope>importscope>
            dependency>
        dependencies>
    dependencyManagement>
通过 scope 的import可以继承 spring-cloud-dependencies 工程中的依赖
2.1 搭建配置eureka-provider工程
- 添加启动器依赖
   <dependencies>


        <dependency>
            <groupId>org.springframework.bootgroupId>
            <artifactId>spring-boot-starter-webartifactId>
        dependency>


        <dependency>
            <groupId>org.springframework.cloudgroupId>
            <artifactId>spring-cloud-starter-netflix-eureka-clientartifactId>
        dependency>
    dependencies>
- 编写配置文件
server:
  port: 8002
启动类
@EnableEurekaClient //该注解 在新版本中可以省略
@SpringBootApplication
public class ProviderApp {
    public static void main(String[] args) {
        SpringApplication.run(ProviderApp.class,args);
    }
}
2.2 搭建配置eureka-consumer工程
编写测试类使用restTemplate访问user-service的路径根据id查询用户
server:
  port: 9000
启动类
@EnableEurekaClient
@SpringBootApplication
public class ConsumerApp {


    public static void main(String[] args) {
        SpringApplication.run(ConsumerApp.class,args);
    }
}
依赖
    <dependencies>

        <dependency>
            <groupId>org.springframework.bootgroupId>
            <artifactId>spring-boot-starter-webartifactId>
        dependency>


        <dependency>
            <groupId>org.springframework.cloudgroupId>
            <artifactId>spring-cloud-starter-netflix-eureka-clientartifactId>
        dependency>
    dependencies>
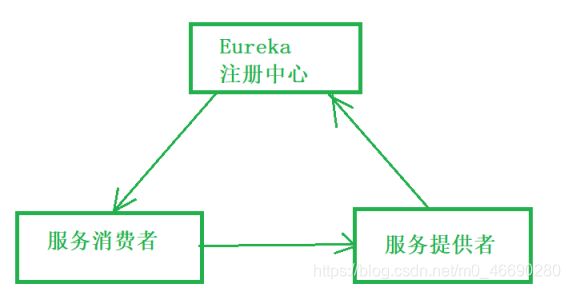
三、Eureka注册中心说明
Eureka的主要功能是进行服务管理,定期检查服务状态,返回服务地址列表。
它其实和之前用的zookeeper功能类似,做个(服务治理中心|服务注册中心)
知识点:
因为涉及到http请求,之前前端用的超链接,表单,location.href,Ajax等等,那java代码怎么实现呢?
java原生API也可以实现
- HttpURLConnection
- OKHTTP
- HTTPClient
- RestTemplate(Springboot已经自动配置了)
这里使用最后一种,通过@Autowired注入调用使用

3.1 Eureka和Zookeeper区别

Zookeeper是一个服务器软件,双击使用就完事了。
Eureka是需要我们自己搭建的服务器
一个分布式系统不可能同时满足C(一致性)、A(可用性)和P(分区容错性)。由于分区容错性在分布式系统中是必须要保证的,因此我们只能在A和C之间权衡。故在此Zookeeper保证的是CP,而Eureka则保证的是AP。
Zookeeper:
当向注册中心查询服务列表时,我们可以容忍注册中心返回的是几分钟以前的注册信息,单不能接受服务直接down掉不可用。也就是说,服务注册功能对可用性的要求要高于一致性。但是Zookeeper会出现这样一种情况,当master节点因为网络故障与其他节点失去联系时,剩余节点会重新进行leader选举。问题在于,选举leader的时间太长,30s~120s,并且选举期间整个Zookeeper集群都是不可用的,这就导致在选举期间注册服务瘫痪。在云部署的环境下,因网络问题是得Zookeeper集群失去master节点是较大概率会发生的事,虽然服务能够最终恢复,但是漫长的选举时间导致的注册长期不可用是不能容忍的。
Eureka:
Eureka看明白了这点,因此在设计师就有限保证可用性,Eureka各个节点都是平等的,几个节点挂掉不会影响正常节点的工作,剩余的节点依然可以提供注册和查询服务。而Eureka的客户端在向某个Eureka注册时如果发现连接失败,会自动切换至其他节点,只要有一台Eureka还在,就能保证注册服务可用(保证可用性),只不过查到的信息可能不是最新的(不保证强一致性)。除此之外,Eureka还有一种自我保护机制,如果在15分钟内超过85%的节点都没有正常的心跳,那么Eureka就认为客户端与注册中心出现了网络故障,此时会出现以下几种情况:
1、Eureka不再从注册列表中溢出因为长时间没有收到心跳而应该过期的服务。
2、Eureka仍然能够接受新服务的注册和查询请求,但是不会被同步到其他节点上(即保证当前节点依然可用)。
3、当网络稳定是,当前实例新的注册信息会被同步到其他节点中。
因此,Eureka可以很好的应对网络故障导致部分节点失去联系的情况,而不会像zookeeper那样使整个注册服务瘫痪。
3.2 搭建eureka-server工程
Eureka是服务注册中心,只做服务注册;自身并不提供服务也不消费服务。可以搭建web工程使用Eureka,可以使用Spring Boot方式搭建。
搭建步骤:
- 创建工程;
- 添加启动器依赖;
- 编写启动引导类(添加Eureka的服务注解)和配置文件;
- 修改配置文件(端口,应用名称…);
- 启动测试
         <dependency>
            <groupId>org.springframework.bootgroupId>
            <artifactId>spring-boot-starter-webartifactId>
        dependency>
		<dependency>
            <groupId>org.springframework.cloudgroupId>
            <artifactId>spring-cloud-starter-netflix-eureka-serverartifactId>
        dependency>
3.3 yml核心配置
# eureka 一共有4部分 配置
# 1. dashboard:eureka的web控制台配置
# 2. server:eureka的服务端配置
# 3. client:eureka的客户端配置
# 4. instance:eureka的实例配置
server:
  port: 8761
eureka:
  instance:
    hostname: localhost # 主机名
    prefer-ip-address: true # 将当前实例的ip注册到eureka server 中。默认是false 注册主机名
    ip-address: 127.0.0.1 # 设置当前实例的ip
    instance-id: ${eureka.instance.ip-address}:${spring.application.name}:${server.port}
  client:
    service-url:
      defaultZone: http://${eureka.instance.hostname}:${server.port}/eureka
    register-with-eureka: false # 是否将自己的路径 注册到eureka上。eureka server 不需要的,eureka provider client 需要
    fetch-registry: false # 是否需要从eureka中抓取路径。eureka server 不需要的,eureka consumer client 需要
  server:
    renewal-percent-threshold: 0.5 #0.85 掉包百分比
    renewal-threshold-update-interval-ms: 30000
    enable-self-preservation: false # 关闭自我保护机制
    eviction-interval-timer-in-ms: 3000 # 清理无效服务时间间隔
spring:
  application:
    name: eurke-server
启动类
@SpringBootApplication
// 启用EurekaServer
@EnableEurekaServer
public class EurekaApp {
    public static void main(String[] args) {
        SpringApplication.run(EurekaApp.class,args);
    }
}
- 上面的prefer-ip-address和ip-address配合使用
- defaultZone这个配置,如果当前项目本身是一个Eureka服务器项目,这个地址写它自己 相当于自己连接上自己(必须写) ,如果是Eureka集群项目,这个地址要写其他Eureka服务器的链接地址(逗号分隔),如果是消费者/提供者 这个地址是要链接Eureka服务器的地址
3.4 服务注册与发现
- 添加Eureka客户端依赖;
        <dependency>
            <groupId>org.springframework.cloudgroupId>
            <artifactId>spring-cloud-starter-netflix-eureka-clientartifactId>
        dependency>
配置
server:
  port: 8083
spring:
  application:
    name: user-consumer
eureka:
  client:
    service-url:
      # eureka 服务地址,如果是集群的话;需要指定其它集群eureka地址
      defaultZone: http://127.0.0.1:10086/eureka
    # 是否注册到服务端
    register-with-eureka: true
    # 是否拉取服务列表
    fetch-registry: true
  instance:
    ip-address: 127.0.0.1 # 服务的ip地址
    prefer-ip-address: true # 启用ip地址注册
添加启动引导类注解;
@EnableDiscoveryClient(重要)
@SpringBootApplication
@EnableDiscoveryClient
public class UserConsumerApplication {


    public static void main(String[] args) {
        SpringApplication.run(UserConsumerApplication.class,args);
    }
}
注意:@EnableDiscoveryClient可以使用@EnableEurekaClient来代替,但是一般都使用@EnableDiscoveryClient。因为前者支持更多的注册中心,而后者只支持Eureka做为注册中心
3.5 心跳

3.6 Eureka 高可用配置
高可用配置:将Eureka Server作为一个服务注册到其它Eureka Server,这样多个Eureka Server之间就能够互相发现对方,同步服务,实现Eureka Server集群。
这里以配置两台为例,如果还有多台,用逗号分隔即可
- 服务提供者和消费者需要向多个Eureka(注册中心)同时注册,这里配置两台服务提供者,一个消费者
consumer
server:
  port: 9000


eureka:
  instance:
    hostname: localhost # 主机名
  client:
    service-url:
      defaultZone: http://localhost:8761/eureka,http://localhost:8762/eureka # eureka服务端地址,将来客户端使用该地址和eureka进行通信
spring:
  application:
    name: eureka-consumer # 设置当前应用的名称。将来会在eureka中Application显示。将来需要使用该名称来获取路径
如果想看具体端口的话,需要在服务提供者这里写,这样消费者在拿到数据后可以很直观的展示出来
provider
server:
  port: 8002


eureka:
  instance:
    hostname: localhost # 主机名
    prefer-ip-address: true # 将当前实例的ip注册到eureka server 中。默认是false 注册主机名
    ip-address: 127.0.0.1 # 设置当前实例的ip
    instance-id: ${eureka.instance.ip-address}:${spring.application.name}:${server.port} # 设置web控制台显示的 实例id
    lease-renewal-interval-in-seconds: 3 # 每隔3 秒发一次心跳包
    lease-expiration-duration-in-seconds: 9 # 如果9秒没有发心跳包,服务器呀,你把我干掉吧~
  client:
    service-url:
      defaultZone: http://localhost:8761/eureka,http://localhost:8762/eureka # eureka服务端地址,将来客户端使用该地址和eureka进行通信
spring:
  application:
    name: eureka-provider # 设置当前应用的名称。将来会在eureka中Application显示。将来需要使用该名称来获取路径
- Eureka(注册中心)多台也需要向配置,知道对方注册中心的存在
server:
  port: 8761


eureka:
  client:
    service-url:
      defaultZone: http://127.0.0.1:8762/eureka
    register-with-eureka: true # 是否将自己的路径 注册到eureka上。eureka server 不需要的,eureka provider client 需要
    fetch-registry: true # 是否需要从eureka中抓取路径。eureka server 不需要的,eureka consumer client 需要


spring:
  application:
    name: eureka-server-ha
server:
  port: 8762


eureka:
  client:
    service-url:
      defaultZone: http://127.0.0.1:8761/eureka
    register-with-eureka: true # 是否将自己的路径 注册到eureka上。eureka server 不需要的,eureka provider client 需要
    fetch-registry: true # 是否需要从eureka中抓取路径。eureka server 不需要的,eureka consumer client 需要
spring:
  application:
    name: eureka-server-ha


3.7 适用配置
1.使用ip地址访问注册 Eureka客户端配置
默认注册时使用的是主机名或者localhost,如果想用ip进行注册,添加配置如下:
eureka:
  instance:
    ip-address: 127.0.0.1 # 服务的ip地址
    prefer-ip-address: true # 启用ip地址访问
2.服务续约相关配置 Eureka客户端配置
在注册服务完成以后,服务提供者会维持一个心跳(定时向EurekaServer发起Rest请求),告诉EurekaServer:“我 还活着”。这个我们称为服务的续约(renew); 有两个重要参数可以修改服务续约的行为;可以在 user-service 中添加如下配置项:
eureka:
  instance:
    lease-expiration-duration-in-seconds: 90
    lease-renewal-interval-in-seconds: 30
lease-renewal-interval-in-seconds:服务续约(renew)的间隔,默认为30秒
lease-expiration-duration-in-seconds:服务失效时间,默认值90秒
也就是说,默认情况下每隔30秒服务会向注册中心发送一次心跳,证明自己还活着。如果超过90秒没有发送心跳, EurekaServer就会认为该服务宕机,会定时(eureka.server.eviction-interval-timer-in-ms设定的时间)从服务列表 中移除,这两个值在生产环境不要修改,默认即可。
3.获取服务列表间隔 Eureka客户端配置
当服务消费者启动时,会检测 eureka.client.fetch-registry=true 参数的值,如果为true,则会从Eureka Server服务的列表拉取只读备份,然后缓存在本地。并且 每隔30秒 会重新拉取并更新数据。可以在 服务调用者 项目中通过下面的参数来修改:
eureka:
  client:
  registry-fetch-interval-seconds: 30
4.失效剔除和自我保护 相关配置 Eureka服务端配置
相关概念:
服务下线:
当服务进行正常关闭操作时,它会触发一个服务下线的REST请求给Eureka Server,告诉服务注册中心:“我要下线 了”。服务中心接受到请求之后,将该服务置为下线状态。
失效剔除 :
有时我们的服务可能由于内存溢出或网络故障等原因使得服务不能正常的工作,而服务注册中心并未收到“服务下 线”的请求。相对于服务提供者的“服务续约”操作,服务注册中心在启动时会创建一个定时任务,默认每隔一段时间 (默认为60秒)将当前清单中超时(默认为90秒)没有续约的服务剔除,这个操作被称为失效剔除。 可以通过 eureka.server.eviction-interval-timer-in-ms 参数对其进行修改,单位是毫秒。
自我保护 :
我们关停一个服务,很可能会在Eureka面板看到一条警告:

这是触发了Eureka的自我保护机制。当服务未按时进行心跳续约时,Eureka会统计服务实例最近15分钟心跳续约的 比例是否低于了85%。在生产环境下,因为网络延迟等原因,心跳失败实例的比例很有可能超标,但是此时就把服务 剔除列表并不妥当,因为服务可能没有宕机。Eureka在这段时间内不会剔除任何服务实例,直到网络恢复正常。生 产环境下这很有效,保证了大多数服务依然可用,不过也有可能获取到失败的服务实例,因此服务调用者必须做好服 务的失败容错。 可以通过下面的配置来关停自我保护:
eureka:
  server:
    enable-self-preservation: false # 关闭自我保护模式(缺省为打开)
3.8 Eureka常用配置
通用配置

# 应用名称,将会显示在Eureka界面的应用名称列
spring.application.name=config-service

# 应用端口,Eureka服务端默认为:8761
server.port=3333

---

eureka.server前缀的配置项

# 是否允许开启自我保护模式,缺省:true
# 当Eureka服务器在短时间内丢失过多客户端时,自我保护模式可使服务端不再删除失去连接的客户端
eureka.server.enable-self-preservation = false

# Peer节点更新间隔,单位:毫秒 默认10分钟
eureka.server.peer-eureka-nodes-update-interval-ms = 600000

# Eureka服务器清理无效节点的时间间隔,单位:毫秒,缺省:60000,即60秒
eureka.server.eviction-interval-timer-in-ms = 60000

---

eureka.instance前缀的配置项

# 服务名,默认取 spring.application.name 配置值,如果没有则为 unknown
eureka.instance.appname = eureka-client

# 实例ID
eureka.instance.instance-id = eureka-client-instance1

# 应用实例主机名
eureka.instance.hostname = localhost

# 客户端在注册时使用自己的IP而不是主机名,缺省:false
eureka.instance.prefer-ip-address = false

# 应用实例IP
eureka.instance.ip-address = 127.0.0.1

# 服务失效时间,失效的服务将被剔除。单位:秒,默认:90
eureka.instance.lease-expiration-duration-in-seconds = 90

# 服务续约(心跳)频率,单位:秒,缺省30
eureka.instance.lease-renewal-interval-in-seconds = 30

# 状态页面的URL,相对路径,默认使用 HTTP 访问,如需使用 HTTPS则要使用绝对路径配置,缺省:/info
eureka.instance.status-page-url-path = /info

# 健康检查页面的URL,相对路径,默认使用 HTTP 访问,如需使用 HTTPS则要使用绝对路径配置,缺省:/health
eureka.instance.health-check-url-path = /health

---

eureka.client前缀

# Eureka服务器的地址,类型为HashMap,缺省的Key为 defaultZone;缺省的Value为 http://localhost:8761/eureka
# 如果服务注册中心为高可用集群时,多个注册中心地址以逗号分隔。
eureka.client.service-url.defaultZone=http://${eureka.instance.hostname}:${server.port}/eureka

# 是否向注册中心注册自己,缺省:true
# 一般情况下,Eureka服务端是不需要再注册自己的
eureka.client.register-with-eureka = true

# 是否从Eureka获取注册信息,缺省:true
# 一般情况下,Eureka服务端是不需要的
eureka.client.fetch-registry = true

# 客户端拉取服务注册信息间隔,单位:秒,缺省:30
eureka.client.registry-fetch-interval-seconds = 30

# 是否启用客户端健康检查
eureka.client.health-check.enabled = true

# 询问Eureka服务url信息变化的频率(s),默认为300秒
eureka.client.eureka-service-url-poll-interval-seconds = 60

# 连接Eureka服务器的超时时间,单位:秒,缺省:5
eureka.client.eureka-server-connect-timeout-seconds = 5

# 从Eureka服务器读取信息的超时时间,单位:秒,缺省:8
eureka.client.eureka-server-read-timeout-seconds = 8

# 获取实例时是否只保留状态为 UP 的实例,缺省:true
eureka.client.filter-only-up-instances = true

# Eureka服务端连接空闲时的关闭时间,单位:秒,缺省:30
eureka.client.eureka-connection-idle-timeout-seconds = 30

# 从Eureka客户端到所有Eureka服务端的连接总数,缺省:200
eureka.client.eureka-server-total-connections = 200

# 从Eureka客户端到每个Eureka服务主机的连接总数,缺省:50
eureka.client.eureka-server-total-connections-per-host = 50
四、Ribbon
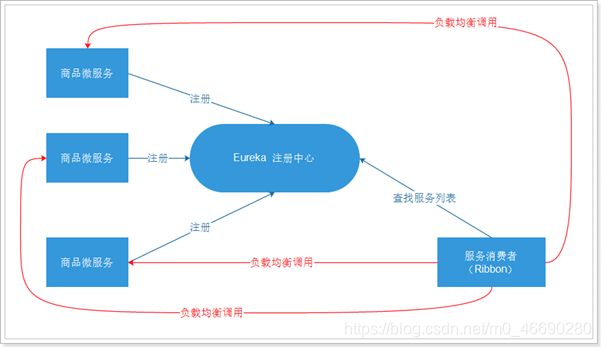
4.1 负载均衡
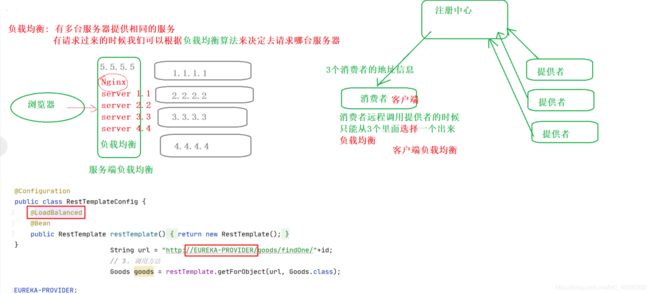
Ribbon时Netflix发布的负载均衡器,它有助于控制HTTP和TCP客户端的行为。为Ribbon配置服务提供者地址列表后,Ribbon就可基于某种负载均衡算法,自动地帮助服务消费者去请求。Ribbon默认为我们提供了很多的负载均衡算法,例如轮询、随机等。我们也可以自定负载均衡算法。
ribbon不需要引入依赖,因为eureka依赖中已经包含了
在RestTemplateConfig的bean中加入@LoadBalanced
@Configuration
public class RestTemplateConfig {

    @LoadBalanced
    @Bean
    public RestTemplate restTemplate(){
        return new RestTemplate();
    }
}
简单运用
使用RestTemplate发送请求(设置请求方式,请求头,请求体)
    @Autowired
    RestTemplate restTemplate;

    public void test1(){
        //请求地址
        String authUrl ="http://localhost:9200/oauth2/token";
        //1、定义MultiValueMap 来存放请求头信息
        MultiValueMap<String, String> headers = new LinkedMultiValueMap<String, String>();
        //添加请求头到headers中
        headers.add("Authorization", "abcssda");
        //1、定义MultiValueMap 来存放请求体信息
        MultiValueMap<String, String> body = new LinkedMultiValueMap<String, String>();
        body.add("username","password");
        body.add("username","itheima");
        HttpEntity<MultiValueMap<String, String>> multiValueMapHttpEntity = new HttpEntity<MultiValueMap<String, String>>(body, headers);
        //设置请求路径,请求方式,请求实体(包含请求头和请求体),返回值类型
        ResponseEntity<Map> exchange = restTemplate.exchange(authUrl, HttpMethod.POST, multiValueMapHttpEntity, Map.class);
        Map result = exchange.getBody();
        System.out.println(result);
    }
只需要按照上面模板修改请求路径,请求头,请求体即可,请求方式
| 策略类 | 命名 | 描述 |
|---|---|---|
| RandomRule | 随机策略 | 随机选择可用的服务 |
| RoundRobinRule | 轮询策略 | 轮询【不管服务是否能用】 |
| RetryRule | 重试策略 | 轮询选择server,当选择server不成功,则一直尝试选择一个可用的server |
| BestAvailableRule | 最低并发策略 | 选择可用服务列表中并发数最少的服务 |
| AvailabilityFilteringRule | 可用过滤策略 | 忽略多次连接失败和并发数过高的服务 |
| ResponseTimeWeightedRule | 响应时间加权重策略 | 通过权重与响应时间来分配,响应时间占主导 |
| ZoneAvoidanceRule | 区域权重策略 | 轮询【只从可用服务列表中选择】 |
4.2 Ribbon来拼接URL
@RestController
@RequestMapping("/order")
public class OrderController {

    @Autowired
    private RestTemplate restTemplate;

    @Autowired
    private DiscoveryClient discoveryClient;

    @GetMapping("/goods/{id}")
    public Goods findGoodsById(@PathVariable("id") int id){
        System.out.println("findGoodsById..."+id);
        /*
            //远程调用Goods服务中的findOne接口
            使用RestTemplate
            1. 定义Bean  restTemplate
            2. 注入Bean
            3. 调用方法
         */

        /*
            动态从Eureka Server 中获取 provider 的 ip 和端口
             1. 注入 DiscoveryClient 对象.激活
             2. 调用方法
         */
        //演示discoveryClient 使用
        List<ServiceInstance> instances = discoveryClient.getInstances("EUREKA-PROVIDER");

        //判断集合是否有数据
        if(instances == null || instances.size() == 0){
            //集合没有数据
            return null;
        }
        String url="http://EUREKA-PROVIDER/goods/findOne/"+id;

     // 3. 调用方法
        Goods goods = restTemplate.getForObject(url, Goods.class);
        return goods;
    }
}
这样就实现了解耦,不需要把地址写死了,这里把URL几种写法展示下

4.3修改负载均衡策略
1.注解方式
注意:要求这种方式的Ribbon配置类不能被启动类给扫描到。
定义一个注解
public @interface AvoidScan {

}
定义Ribbon配置类
@Configuration
@AvoidScan //主要做一个标记作用。被标记的类可以在启动类中配置不扫描
public class RibbonConfiguration {


    @Bean
    public IRule ribbonRule() {
        return new RandomRule();
    }
}
启动类中进行配置
@SpringBootApplication
@EnableDiscoveryClient
@RibbonClient(name = "user-server", configuration = RibbonConfiguration.class) //访问user-server服务的时候使用RibbonConfiguration配置中的规则来进行负载均衡
@ComponentScan(excludeFilters = {@ComponentScan.Filter(type = FilterType.ANNOTATION,classes = AvoidScan.class)})//扫描的时候不扫描具有AvoidScan注解的类
public class ConsumerApplication {

    public static void main(String[] args) {
        SpringApplication.run(ConsumerApplication.class,args);
    }

    @LoadBalanced
    @Bean
    RestTemplate restTemplate(){
        return new RestTemplate();
    }
}
2.配置方式(推荐)
user-server:  #这里写的是服务名称
  ribbon:
    NFLoadBalancerRuleClassName: com.netflix.loadbalancer.RandomRule #针对user-server服务使用随机策略
Ribbon负载均衡配置
Fegin内置的ribbon默认设置了请求超时时长,默认是1000,我们可以通过手动配置来修改这个超时时长:
ribbon:
  ReadTimeout: 2000 # 读取超时时长
  ConnectTimeout: 1000 # 建立链接的超时时长
因为ribbon内部有重试机制,一旦超时,会自动重新发起请求。如果不希望重试,可以添加配置:
ribbon:
  ConnectTimeout: 1000 # 连接超时时长
  ReadTimeout: 2000 # 数据通信超时时长
  MaxAutoRetries: 0 # 当前服务器的重试次数
  MaxAutoRetriesNextServer: 0 # 重试多少次服务
  OkToRetryOnAllOperations: false # 是否对所有的请求方式都重试
五、Feign
Feign是spring cloud中服务消费端的调用框架,通常与ribbon,hystrix等组合使用。Feign其实底层是依赖于Ribbon
但是在某些项目中,由于遗留原因,整个系统并不是spring cloud项目,甚至不是spring项目,而使用者关注的重点仅仅是简化http调用代码的编写。
5.1 使用Feign访问其他服务
依赖
        <dependency>
            <groupId>org.springframework.cloudgroupId>
            <artifactId>spring-cloud-starter-openfeignartifactId>
        dependency>
在服务调用模块启动类上加上@EnableFeignClients注解
@SpringBootApplication
@EnableDiscoveryClient
@EnableCircuitBreaker
@EnableFeignClients(basePackages = "com.itheima.feign")//指定feign接口所在的包。如果 feign结构和启动类在同一个模块下可以不加,不过如果feign接口在另外一个依赖进来的模块中的话必须加上。建议都加上
public class UserConsumerApplication {

    public static void main(String[] args) {
        SpringApplication.run(UserConsumerApplication.class,args);
    }
}
定义Feign接口
加上要访问服务提供方的接口如下:
http://user-server/user/findList?id=3 //其中的user-server代表提供方的服务名
则需要定义如下接口和方法 。注意在接口上加FeignClient 并且指定服务名
//声明当前类是一个Feign客户端,指定服务名为user-server
@FeignClient("user-server")
public interface UserFeign {
    //要访问这样的接口  http://user-server/user/findList?id=3
    @RequestMapping("/user/findList")
    public List<User> findList(@RequestParam("id") Integer id);

        @RequestMapping("/user/findById")  //http://user-server/user/findById?id=3
    public List<User> findById(@RequestParam("id") Integer id);
}
注意如果是 http://user-server/user/3 一定要记得在方法参数上加上@PathVariable注解
    @GetMapping("/user/{id}")
    public User findById(@PathVariable(name = "id") Integer id);   //注意PathVariable的name属性必须写上
注意不要再接口上加@RequestMapping 加了会导致后期日志输出问题甚至甚至fallback启动不了
使用Feign访问接口
@RestController
public class UserController {
    @Autowired
    private UserFeign userFeign;

    @RequestMapping("/findList")
    public List<User> findList(Integer id){
        List<User> list = userFeign.findList(id);
        System.out.println(list);
        log.error("hhh");
        return list;
    }

}
5.2Feign配置
1.负载均衡配置
Feign中本身已经集成了Ribbon依赖和自动配置所以不需要在额外引入Ribbon
Fegin内置的ribbon默认设置了请求超时时长,默认是1000,我们可以通过手动配置来修改这个超时时长:
ribbon:
  ReadTimeout: 2000 # 读取超时时长
  ConnectTimeout: 1000 # 建立链接的超时时长
因为ribbon内部有重试机制,一旦超时,会自动重新发起请求。如果不希望重试,可以添加配置:
ribbon:
  ConnectTimeout: 1000 # 连接超时时长
  ReadTimeout: 2000 # 数据通信超时时长
  MaxAutoRetries: 0 # 当前服务器的重试次数
  MaxAutoRetriesNextServer: 0 # 重试多少次服务
  OkToRetryOnAllOperations: false # 是否对所有的请求方式都重试
2.Hystrix熔断配置
0.开启熔断
        <dependency>
            <groupId>org.springframework.cloudgroupId>
            <artifactId>spring-cloud-starter-netflix-hystrixartifactId>
        dependency>
启动类开启Hystrix 加@EnableCircuitBreaker
@EnableCircuitBreaker
public class ConsumerApplication {
1.开启熔断
feign:
  hystrix:
    enabled: true # 开启Feign的熔断功能
2.创建一个失败处理类实现要进行降级处理的Feign接口
注意在类上加@Component注解
@Component
public class UserFeignFallback implements UserFeign {
    @Override
    public List<User> findList(@RequestParam("id") Integer id) {
        return Arrays.asList(new User(500,"服务降级了"));
    }
}
在FeignClient注解的fallback属性上指定feign接口使用的降级处理类
@FeignClient(name = "user-server",fallback = UserFeignFallback.class)
public interface UserFeign {

    //User user = restTemplate.getForObject("http://user-server/user/"+id, User.class);

    @GetMapping("/user/{id}")   //http://user-server/user/1
    public User findById(@PathVariable(name = "id") Integer id);


    @GetMapping("/user/findAll")//   http://user-server/user/findAll
    public List<User> findAll();
}
3.请求压缩
Spring Cloud Feign 支持对请求和响应进行GZIP压缩,以减少通信过程中的性能损耗。通过下面的参数即可开启请求 与响应的压缩功能:
feign:
  compression:
    request:
      enabled: true # 开启请求压缩
    response:
      enabled: true # 开启响应压缩
同时,我们也可以对请求的数据类型,以及触发压缩的大小下限进行设置:
feign:
  compression:
    request:
      enabled: true # 开启请求压缩
      mime-types: text/html,application/xml,application/json # 设置压缩的数据类型
      min-request-size: 2048 # 设置触发压缩的大小下限
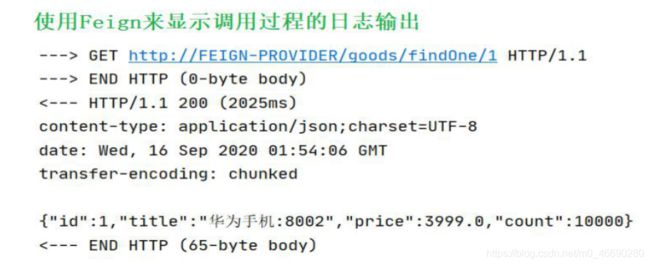
5.3 Feign日志
日志级别
只能记录debug级别的日志信息,记录Fegin调用过程的日志
1.开启日志配置
logging:
  level:
    com.itheima: debug
2.编写Feign配置类,定义日志级别
@Configuration
public class FeignConfig {

    @Bean
    Logger.Level feignLoggerLever(){
        return Logger.Level.FULL;
    }
}
这里指定的Level级别是
- FULL,Feign支持4种级别:
- NONE:不记录任何日志信息,这是默认值。
- BASIC:仅记录请求的方法,URL以及响应状态码和执行时间
- HEADERS:在BASIC的基础上,额外记录了请求和响应的头信息
- FULL:记录所有请求和响应的明细,包括头信息、请求体、元数据。
3.在Feign客户端中配置Feign配置类
@FeignClient(name = "user-server",fallback = UserFeignFallback.class,configuration = FeignConfig.class)
public interface UserFeign {
    @RequestMapping("/user/findList")
    public List<User> findList(@RequestParam("id") Integer id);
}
5.4Feign拦截器
可以对通过Feign发生的请求进行拦截,常用于微服务间调用时的认证。
定义拦截器
定义一个类实现RequestInterceptor
@Component
public class FeignInterceptor implements RequestInterceptor {
    @Override
    public void apply(RequestTemplate requestTemplate) {
        //获取当前线程中的请求对象
        ServletRequestAttributes servletRequestAttributes=
                (ServletRequestAttributes) RequestContextHolder.getRequestAttributes();
        HttpServletRequest request = servletRequestAttributes.getRequest();
        System.out.println(request);
        //判断是否有token这个头,如果有,就把这个头添加到feign发起的请求头上
        String token = request.getHeader("token");
        if(!StringUtils.isEmpty(token)){
            requestTemplate.header("token",token);
        }
    }
}
如果该类和使用Feign发生请求的代码在同一个模块中上面代码就可以进行拦截。如果不是在同一个模块需要在
调用Feign去访问的模块中增加下面的代码
@Bean
public FeignInterceptor feignInterceptor(){
    return new FeignInterceptor();
}
3.2配置隔离策略为信号量
#hystrix 配置
hystrix:
  command:
    default:
      execution:
        isolation:
          strategy: SEMAPHORE  #隔离策略,默认是Thread, 可选Thread|SEMAPHORE
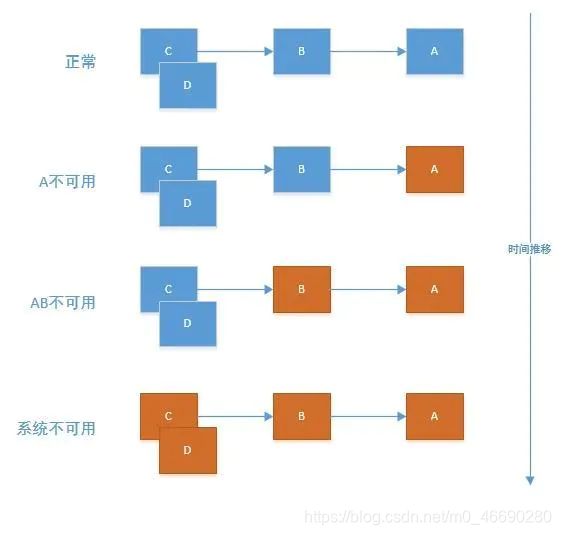
六、Hystrix熔断器
Hystrix是一个延迟和容错库,用于隔离访问远程服务,防止出现级联失败(雪崩)
雪崩:一个服务失败,导致整条链路的服务都失败的情形
1.隔离
1.线程池隔离 各个线程相互独立,比如一个服务挂了,只会影响自己的线程池
把整个服务器想成一池子水,分割成多个池子,一个池子对应一个其他服务器链接,判断请求去哪个服务器,去对应服务线程池拿线程然后再去请求

2.信号量隔离 类似于计数器,比如设置只允许40个线程访问,发一个+1,响应回来了-1

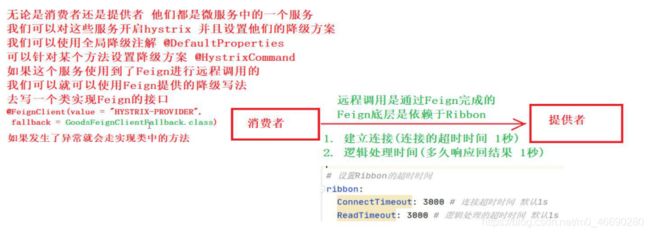
2.降级
降级(服务降级)
消费者调用提供者,如果提供者给消费者的是正常的数据回应 正常消费服务 如果提供者给消费者的是非正常的数据回应 降级服务(备胎) 重点在回应
(异常,超时) 服务的调用方和提供方都需要写,如果C挂了,做个降级方案,友好提示别人,比如服务器正忙,正在维护 ,A访问C访问不了,也需要有个降级方案

3.熔断 多次调用没反应,启用熔断,拒绝访问请求。
4.限流 只允许多少线程访问
6.1 Hystrix降级
Hystrix解决雪崩效应:
- 线程隔离:用户请求不直接访问服务,而是使用线程池中空闲的线程访问服务,加速失败判断时间。
- 服务降级:及时返回服务调用失败的结果,让线程不因为等待服务而阻塞。
一、 服务提供方
- 在服务提供方,引入hystrix依赖
- 定义降级方法
- 使用@HystrixCommand注解配置降级方法
- 在启动类上开启Hystrix功能:@EnableCircuitBreaker
        <dependency>
            <groupId>org.springframework.cloudgroupId>
            <artifactId>spring-cloud-starter-netflix-hystrixartifactId>
        dependency>
开启熔断

上面的配置可以用@SpringCloudApplicationz注解来代替,所有请求先经过熔断器
在服务消费端controller上
在controller上增加@DefaultProperties注解配置全局的失败回调方法,并定义该方法。在需要进行降级处理的方法上增加 @HystrixCommand注解。
注意该方法的参数列表必须为空,该类中所有加了@HystrixCommand注解的方法 返回类型要与处理失败的方法的返回类型一致。
@RestController
@Slf4j
@DefaultProperties(defaultFallback = "fallback")
public class UserController {

    @Autowired
    private DiscoveryClient discoveryClient;
    @Autowired
    private RestTemplate restTemplate;

    @RequestMapping("/findList")
    @HystrixCommand
    public List<User> findList(Integer id){
        String url = "http://user-server/findList?id="+id;
        List<User> forObject = restTemplate.getForObject(url, List.class);
        System.out.println(forObject);
        log.error("hhh");
        return forObject;
    }


    public List<User> fallback(){
        return Arrays.asList(new User(500,"降级"));
    }
}
注意:这种方式没法做每个方法失败回调的定制化处理,所以我们更常用的是采用Feign来配置降级熔断。
这里注意回调的返回值类型要和正常方法类型的匹配
- 修改超时配置
1.yaml配置
hystrix:
  command:
    default:
      execution:
        isolation:
          thread:
            timeoutInMilliseconds: 2000
2.注解配置

二、 服务消费方

全局回调
@Component
public class GoodsFeignClientFallback implements GoodsFeignClient {
    @Override
    public Goods findGoodsById(int id) {
        Goods goods = new Goods();
        goods.setTitle("又被降级了~~~");
        return goods;
    }
}
配置回调
@FeignClient(value = "HYSTRIX-PROVIDER",fallback = GoodsFeignClientFallback.class)
public interface GoodsFeignClient {


    @GetMapping("/goods/findOne/{id}")
    public Goods findGoodsById(@PathVariable("id") int id);
}
6.4 服务熔断流程

当一台服务器 请求在5秒内20次失败达到指定的阈值 然后断路器会自动打开,拒绝所有请求(走降级方案) 过指定的时间5s后断路器会自动打开(半开) 然后请求过来后如果能正常访问 断路器就会自动关闭
通过yaml配置服务熔断参数修改默认
hystrix:
  command:
    default:
      execution:
        isolation:
          thread:
            timeoutInMilliseconds: 2000
      circuitBreaker:
        errorThresholdPercentage: 50 # 触发熔断错误比例阈值,默认值50%
        sleepWindowInMilliseconds: 10000 # 熔断后休眠时长,默认值5秒
        requestVolumeThreshold: 10 # 熔断触发最小请求次数,默认值是20
注解修改

6.5Hystrix 相关配置
请求超时时间配置
hystrix:
  command:
    default:
      execution:
        isolation:
          thread:
            timeoutInMilliseconds: 2000
熔断相关配置
# 配置熔断策略:
hystrix:
  command:
    default:
      circuitBreaker:
        errorThresholdPercentage: 50 # 触发熔断错误比例阈值,默认值50%
        sleepWindowInMilliseconds: 10000 # 熔断后休眠时长,默认值5秒
        requestVolumeThreshold: 10 # 熔断触发最小请求次数,默认值是20
      execution:
        isolation:
          thread:
            timeoutInMilliseconds: 2000 # 熔断超时设置,默认为1秒
配置隔离策略
#hystrix 配置
hystrix:
  command:
    default:
      execution:
        timeout:
          #如果enabled设置为false,则请求超时交给ribbon控制
          enabled: false
        isolation:
          strategy: SEMAPHORE  #隔离策略,默认是Thread, 可选Thread|SEMAPHORE
配置参考
hystrix.command.default和hystrix.threadpool.default中的default为默认CommandKey

Command Properties
Execution相关的属性的配置:
hystrix.command.default.execution.isolation.strategy 隔离策略,默认是Thread, 可选Thread|Semaphore

hystrix.command.default.execution.isolation.thread.timeoutInMilliseconds 命令执行超时时间,默认1000ms

hystrix.command.default.execution.timeout.enabled 执行是否启用超时,默认启用true
hystrix.command.default.execution.isolation.thread.interruptOnTimeout 发生超时是是否中断,默认true
hystrix.command.default.execution.isolation.semaphore.maxConcurrentRequests 最大并发请求数,默认10,该参数当使用ExecutionIsolationStrategy.SEMAPHORE策略时才有效。如果达到最大并发请求数,请求会被拒绝。理论上选择semaphore size的原则和选择thread size一致,但选用semaphore时每次执行的单元要比较小且执行速度快(ms级别),否则的话应该用thread。
semaphore应该占整个容器(tomcat)的线程池的一小部分。
Fallback相关的属性
这些参数可以应用于Hystrix的THREAD和SEMAPHORE策略

hystrix.command.default.fallback.isolation.semaphore.maxConcurrentRequests 如果并发数达到该设置值,请求会被拒绝和抛出异常并且fallback不会被调用。默认10
hystrix.command.default.fallback.enabled 当执行失败或者请求被拒绝,是否会尝试调用hystrixCommand.getFallback() 。默认true
Circuit Breaker相关的属性
hystrix.command.default.circuitBreaker.enabled 用来跟踪circuit的健康性,如果未达标则让request短路。默认true
hystrix.command.default.circuitBreaker.requestVolumeThreshold 一个rolling window内最小的请求数。如果设为20,那么当一个rolling window的时间内(比如说1个rolling window是10秒)收到19个请求,即使19个请求都失败,也不会触发circuit break。默认20
hystrix.command.default.circuitBreaker.sleepWindowInMilliseconds 触发短路的时间值,当该值设为5000时,则当触发circuit break后的5000毫秒内都会拒绝request,也就是5000毫秒后才会关闭circuit。默认5000
hystrix.command.default.circuitBreaker.errorThresholdPercentage错误比率阀值,如果错误率>=该值,circuit会被打开,并短路所有请求触发fallback。默认50
hystrix.command.default.circuitBreaker.forceOpen 强制打开熔断器,如果打开这个开关,那么拒绝所有request,默认false
hystrix.command.default.circuitBreaker.forceClosed 强制关闭熔断器 如果这个开关打开,circuit将一直关闭且忽略circuitBreaker.errorThresholdPercentage
Metrics相关参数
hystrix.command.default.metrics.rollingStats.timeInMilliseconds 设置统计的时间窗口值的,毫秒值,circuit break 的打开会根据1个rolling window的统计来计算。若rolling window被设为10000毫秒,则rolling window会被分成n个buckets,每个bucket包含success,failure,timeout,rejection的次数的统计信息。默认10000
hystrix.command.default.metrics.rollingStats.numBuckets 设置一个rolling window被划分的数量,若numBuckets=10,rolling window=10000,那么一个bucket的时间即1秒。必须符合rolling window % numberBuckets == 0。默认10
hystrix.command.default.metrics.rollingPercentile.enabled 执行时是否enable指标的计算和跟踪,默认true
hystrix.command.default.metrics.rollingPercentile.timeInMilliseconds 设置rolling percentile window的时间,默认60000
hystrix.command.default.metrics.rollingPercentile.numBuckets 设置rolling percentile window的numberBuckets。逻辑同上。默认6
hystrix.command.default.metrics.rollingPercentile.bucketSize 如果bucket size=100,window=10s,若这10s里有500次执行,只有最后100次执行会被统计到bucket里去。增加该值会增加内存开销以及排序的开销。默认100
hystrix.command.default.metrics.healthSnapshot.intervalInMilliseconds 记录health 快照(用来统计成功和错误绿)的间隔,默认500ms
Request Context 相关参数
hystrix.command.default.requestCache.enabled 默认true,需要重载getCacheKey(),返回null时不缓存
hystrix.command.default.requestLog.enabled 记录日志到HystrixRequestLog,默认true

Collapser Properties 相关参数
hystrix.collapser.default.maxRequestsInBatch 单次批处理的最大请求数,达到该数量触发批处理,默认Integer.MAX_VALUE
hystrix.collapser.default.timerDelayInMilliseconds 触发批处理的延迟,也可以为创建批处理的时间+该值,默认10
hystrix.collapser.default.requestCache.enabled 是否对HystrixCollapser.execute() and HystrixCollapser.queue()的cache,默认true

ThreadPool 相关参数
线程数默认值10适用于大部分情况(有时可以设置得更小),如果需要设置得更大,那有个基本得公式可以follow:
requests per second at peak when healthy × 99th percentile latency in seconds + some breathing room
每秒最大支撑的请求数 (99%平均响应时间 + 缓存值)
比如:每秒能处理1000个请求,99%的请求响应时间是60ms,那么公式是:
(0.060+0.012)

基本得原则时保持线程池尽可能小,他主要是为了释放压力,防止资源被阻塞。
当一切都是正常的时候,线程池一般仅会有1到2个线程激活来提供服务

hystrix.threadpool.default.coreSize 并发执行的最大线程数,默认10
hystrix.threadpool.default.maxQueueSize BlockingQueue的最大队列数,当设为-1,会使用SynchronousQueue,值为正时使用LinkedBlcokingQueue。该设置只会在初始化时有效,之后不能修改threadpool的queue size,除非reinitialising thread executor。默认-1。
hystrix.threadpool.default.queueSizeRejectionThreshold 即使maxQueueSize没有达到,达到queueSizeRejectionThreshold该值后,请求也会被拒绝。因为maxQueueSize不能被动态修改,这个参数将允许我们动态设置该值。if maxQueueSize == -1,该字段将不起作用
hystrix.threadpool.default.keepAliveTimeMinutes 如果corePoolSize和maxPoolSize设成一样(默认实现)该设置无效。如果通过plugin(https://github.com/Netflix/Hystrix/wiki/Plugins)使用自定义实现,该设置才有用,默认1.
hystrix.threadpool.default.metrics.rollingStats.timeInMilliseconds 线程池统计指标的时间,默认10000
hystrix.threadpool.default.metrics.rollingStats.numBuckets 将rolling window划分为n个buckets,默认10
Turbine聚合监控
一、搭建监控模块
1. 创建监控模块
创建hystrix-monitor模块,使用Turbine聚合监控多个Hystrix dashboard功能,
2. 引入Turbine聚合监控起步依赖
<project xmlns="http://maven.apache.org/POM/4.0.0"
         xmlns:xsi="http://www.w3.org/2001/XMLSchema-instance"
         xsi:schemaLocation="http://maven.apache.org/POM/4.0.0 http://maven.apache.org/xsd/maven-4.0.0.xsd">
    <parent>
        <artifactId>hystrix-parentartifactId>
        <groupId>com.itheimagroupId>
        <version>1.0-SNAPSHOTversion>
    parent>
    <modelVersion>4.0.0modelVersion>

    <artifactId>hystrix-monitorartifactId>
    <properties>
        <project.build.sourceEncoding>UTF-8project.build.sourceEncoding>
        <project.reporting.outputEncoding>UTF-8project.reporting.outputEncoding>
        <java.version>1.8java.version>
    properties>

    <dependencies>
        <dependency>
            <groupId>org.springframework.cloudgroupId>
            <artifactId>spring-cloud-starter-netflix-hystrix-dashboardartifactId>
        dependency>

        <dependency>
            <groupId>org.springframework.cloudgroupId>
            <artifactId>spring-cloud-starter-netflix-turbineartifactId>
        dependency>

        <dependency>
            <groupId>org.springframework.bootgroupId>
            <artifactId>spring-boot-starter-actuatorartifactId>
        dependency>

        <dependency>
            <groupId>org.springframework.cloudgroupId>
            <artifactId>spring-cloud-starter-netflix-eureka-clientartifactId>
        dependency>


        <dependency>
            <groupId>org.springframework.bootgroupId>
            <artifactId>spring-boot-starter-testartifactId>
            <scope>testscope>
        dependency>
    dependencies>

    <build>
        <plugins>
            <plugin>
                <groupId>org.springframework.bootgroupId>
                <artifactId>spring-boot-maven-pluginartifactId>
            plugin>
        plugins>
    build>

project>
3. 修改application.yml
spring:
  application.name: hystrix-monitor
server:
  port: 8769
turbine:
  combine-host-port: true
  # 配置需要监控的服务名称列表
  app-config: hystrix-provider,hystrix-consumer
  cluster-name-expression: "'default'"
  aggregator:
    cluster-config: default
  #instanceUrlSuffix: /actuator/hystrix.stream
eureka:
  client:
    serviceUrl:
      defaultZone: http://localhost:8761/eureka/
4. 创建启动类
@SpringBootApplication
@EnableEurekaClient

@EnableTurbine //开启Turbine 很聚合监控功能
@EnableHystrixDashboard //开启Hystrix仪表盘监控功能
public class HystrixMonitorApp {

    public static void main(String[] args) {
        SpringApplication.run(HystrixMonitorApp.class, args);
    }

}
二、修改被监控模块
需要分别修改 hystrix-provider 和 hystrix-consumer 模块:
1、导入依赖:
		<dependency>
            <groupId>org.springframework.bootgroupId>
            <artifactId>spring-boot-starter-actuatorartifactId>
        dependency>

        <dependency>
            <groupId>org.springframework.cloudgroupId>
            <artifactId>spring-cloud-starter-netflix-hystrixartifactId>
        dependency>

        <dependency>
            <groupId>org.springframework.cloudgroupId>
            <artifactId>spring-cloud-starter-netflix-hystrix-dashboardartifactId>
        dependency>
2、配置Bean
此处为了方便,将其配置在启动类中。
@Bean
    public ServletRegistrationBean getServlet() {
        HystrixMetricsStreamServlet streamServlet = new HystrixMetricsStreamServlet();
        ServletRegistrationBean registrationBean = new ServletRegistrationBean(streamServlet);
        registrationBean.setLoadOnStartup(1);
        registrationBean.addUrlMappings("/actuator/hystrix.stream");
        registrationBean.setName("HystrixMetricsStreamServlet");
        return registrationBean;
    }
3、启动类上添加注解@EnableHystrixDashboard
@EnableDiscoveryClient
@EnableEurekaClient
@SpringBootApplication
@EnableFeignClients
@EnableHystrixDashboard // 开启Hystrix仪表盘监控功能
public class ConsumerApp {


    public static void main(String[] args) {
        SpringApplication.run(ConsumerApp.class,args);
    }
    @Bean
    public ServletRegistrationBean getServlet() {
        HystrixMetricsStreamServlet streamServlet = new HystrixMetricsStreamServlet();
        ServletRegistrationBean registrationBean = new ServletRegistrationBean(streamServlet);
        registrationBean.setLoadOnStartup(1);
        registrationBean.addUrlMappings("/actuator/hystrix.stream");
        registrationBean.setName("HystrixMetricsStreamServlet");
        return registrationBean;
    }
}
三、启动测试
1、启动服务:
-
eureka-server
-
hystrix-provider
-
hystrix-consumer
-
hystrix-monitor
2、访问:
在浏览器访问http://localhost:8769/hystrix/ 进入Hystrix Dashboard界面

界面中输入监控的Url地址 http://localhost:8769/turbine.stream,监控时间间隔2000毫秒和title,如下图
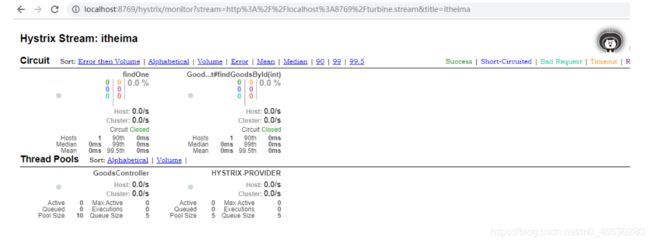
- 实心圆:它有颜色和大小之分,分别代表实例的监控程度和流量大小。如上图所示,它的健康度从绿色、黄色、橙色、红色递减。通过该实心圆的展示,我们就可以在大量的实例中快速的发现故障实例和高压力实例。
- 曲线:用来记录 2 分钟内流量的相对变化,我们可以通过它来观察到流量的上升和下降趋势。

七、Gateway网关
微服务是相互调用的,可能登录这也有个集群,不好找入口
网关:给用户提供一个访问微服务的入口 对请求做一个过滤增强的工作
可以打成jar包,方便使用
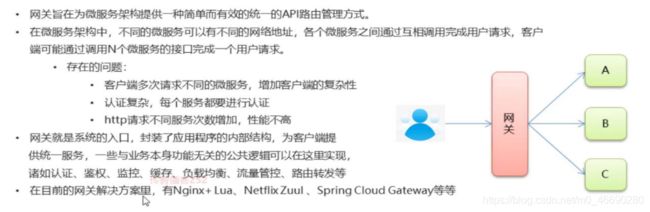
Spring Cloud Gateway的核心就是一系列的过滤器,可以将客户端的请求转发到不同的微服务。主要作用:过滤和路由。
7.1 Spring Cloud Gateway
网关中要配置的是根据用户的请求路径去匹配某一台为服务器 (路由)
三部分组成
- id:给路由起个名 一个网关中可以配置N多个路由
- uri:要链接的为服务器地址 IP:port
- predicates:匹配用户的请求路径表达式
server:
port: 80
spring:
application:
name: api-gateway-server
cloud:
# 网关配置
gateway:
# 路由配置:转发规则
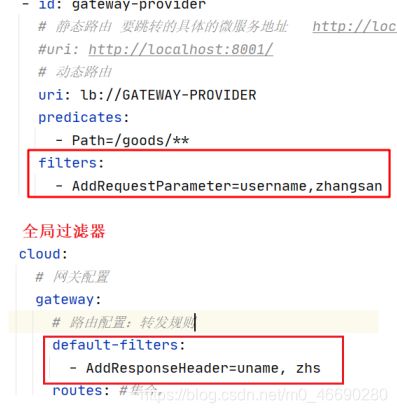
default-filters:
- AddResponseHeader=uname, zhs
routes: #集合。
# id: 唯一标识。默认是一个UUID
# uri: 转发路径
# predicates: 条件,用于请求网关路径的匹配规则
# filters:配置局部过滤器的
- id: gateway-provider
# 静态路由 要跳转的具体的微服务地址 http://localhost/userprovider/index.html http://localhost:8001/
#uri: http://localhost:8001/
# 动态路由
uri: lb://GATEWAY-PROVIDER
predicates:
- Path=/goods/**
filters:
- AddRequestParameter=username,zhangsan
- id: gateway-consumer
# uri: http://localhost:9000/order/goods/2
uri: lb://GATEWAY-CONSUMER
predicates:
- Path=/order/**
# 微服务名称配置
discovery:
locator:
enabled: true # 设置为true 请求路径前可以添加微服务名称
lower-case-service-id: true # 允许为小写
eureka:
client:
service-url:
defaultZone: http://localhost:8761/eureka
#需要连接注册中心
hystrix:
command:
default:
execution:
isolation:
thread:
timeoutInMilliseconds: 6000
ribbon:
ConnectTimeout: 1000
ReadTimeout: 2000
MaxAutoRetries: 0
MaxAutoRetriesNextServer: 0
pom依赖
  <dependencies>
        <dependency>
            <groupId>org.springframework.cloudgroupId>
            <artifactId>spring-cloud-starter-gatewayartifactId>
        dependency>
        <dependency>
            <groupId>org.springframework.cloudgroupId>
            <artifactId>spring-cloud-starter-netflix-eureka-clientartifactId>
        dependency>
    dependencies>
7.2 过滤器
- 用法:在配置文件中指定要使用的过滤器名称;
- 类型:局部、全局;
- 使用场景:请求鉴权、异常处理、记录调用时长等。

7.2.1自定义局部过滤器
MyFilter
@Component
public class MyFilter implements GlobalFilter, Ordered {
    @Override
    public Mono<Void> filter(ServerWebExchange exchange, GatewayFilterChain chain) {
        System.out.println("自定义全局过滤器执行了~~~");
        return chain.filter(exchange);//放行
    }

    /**
     * 过滤器排序
     * @return 数值越小 越先执行
     */
    @Override
    public int getOrder() {
        return 0;
    }
}
@SpringBootApplication
@EnableEurekaClient
public class ApiGatewayApp {
    public static void main(String[] args) {
        SpringApplication.run(ApiGatewayApp.class,args);
    }
}
yml
server:
  port: 80

spring:
  application:
    name: api-gateway-server

  cloud:
    # 网关配置
    gateway:
      # 路由配置:转发规则
      default-filters:
        - AddResponseHeader=uname, zhs
      routes: #集合。
        # id: 唯一标识。默认是一个UUID
        # uri: 转发路径
        # predicates: 条件,用于请求网关路径的匹配规则
        # filters:配置局部过滤器的

        - id: gateway-provider
          # 静态路由 要跳转的具体的微服务地址   http://localhost/userprovider/index.html  http://localhost:8001/
          #uri: http://localhost:8001/
          # 动态路由
          uri: lb://GATEWAY-PROVIDER
          predicates:
            - Path=/goods/**
          filters:
            - AddRequestParameter=username,zhangsan

        - id: gateway-consumer
          # uri: http://localhost:9000/order/goods/2
          uri: lb://GATEWAY-CONSUMER
          predicates:
            - Path=/order/**
          # 微服务名称配置
      discovery:
        locator:
          enabled: true # 设置为true 请求路径前可以添加微服务名称
          lower-case-service-id: true # 允许为小写


eureka:
  client:
    service-url:
      defaultZone: http://localhost:8761/eureka

hystrix:
  command:
    default:
      execution:
        isolation:
          thread:
            timeoutInMilliseconds: 6000

ribbon:
  ConnectTimeout: 1000
  ReadTimeout: 2000
  MaxAutoRetries: 0
  MaxAutoRetriesNextServer: 0
- 加载网关上可以对所有的为服务器中的请求进行过滤
八 、Config分布式配置中心
8.1 概述
SpringCloud Config Server 是一台服务器
可以连接到外部仓库中的配置文件,获取配置文件中的内容,再更新到其他的微服务(服务器)里面
不需要重启,就可以更改
解决了再分布式环境下多环境配置文件的管理和维护
• 集中管理配置文件
• 不同环境不同配置,动态化的配置更新
• 配置信息改变时,不需要重启即可更新配置信息到服务

8.2 入门
config server:
-
使用gitee创建远程仓库,上传配置文件
-
搭建 config server 模块
-
导入 config-server 依赖
-
编写配置,设置 gitee 远程仓库地址
-
测试访问远程配置文件
     <dependency>
            <groupId>org.springframework.cloudgroupId>
            <artifactId>spring-cloud-starter-netflix-eureka-clientartifactId>
        dependency>

        <dependency>
            <groupId>org.springframework.cloudgroupId>
            <artifactId>spring-cloud-config-serverartifactId>
        dependency>
启动类
@EnableConfigServer // 启用config server功能
@SpringBootApplication
@EnableConfigServer
public class ConfigServerApplication {

    public static void main(String[] args) {
        SpringApplication.run(ConfigServerApplication.class,args);
    }
}
server:
  port: 9527

spring:
  application:
    name: config-server
  # spring cloud config
  cloud:
    config:
      server:
        # git 的 远程仓库地址
        git:
          uri: https://gitee.com/ithei/itheima-configs.git
      label: master # 分支配置
访问localhost:9527/master/文件名
config client:
-
导入 starter-config 依赖
<dependency> <groupId>org.springframework.cloudgroupId> <artifactId>spring-cloud-starter-configartifactId> <version>2.1.8.RELEASEversion> dependency> -
配置config server 地址,读取配置文件名称等信息
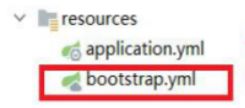
如果有重复application.yml会覆盖bootstarp.yml的键值对# 配置config-server地址 # 配置获得配置文件的名称等信息 spring: cloud: config: # 配置config-server地址 uri: http://localhost:9527 # 配置获得配置文件的名称等信息 name: config # 文件名 profile: dev # profile指定, config-dev.yml label: master # 分支 eureka: client: service-url: defaultZone: http://127.0.0.1:10086/eureka
注意:name属性的设置一定要设置为服务的服务名,不然的话拉取不到对应的配置文件
③启动服务测试
8.3 Config 客户端刷新
- 在 config 客户端引入 actuator 依赖
   <dependency>
            <groupId>org.springframework.bootgroupId>
            <artifactId>spring-boot-starter-actuatorartifactId>
        dependency>
- 获取配置信息类上,添加 @RefreshScope 注解
(谁获取,写在哪)
- 添加配置
management.endpoints.web.exposure.include: refresh
management:
  endpoints:
    web:
      exposure:
        include: '*'
- 使用curl工具发送post请求
curl -X POST http://localhost:8001/actuator/refresh
8.4 Config集成Eureka
把ip改成动态

config-server注册到eureka中
eureka:
  client:
    service-url:
      defaultZone: http://localhost:8761/eureka
其他消费者去拿,去发现
# 配置config-server地址
# 配置获得配置文件的名称等信息
spring:
  cloud:
    config:
      # 配置config-server地址
      #uri: http://localhost:9527
      # 配置获得配置文件的名称等信息
      name: config # 文件名
      profile: dev # profile指定,  config-dev.yml
      label: master # 分支
      discovery:
        enabled: true
        service-id: config-server
九、Bus消息总线
• Spring Cloud Bus 是用轻量的消息中间件将分布式的节点连接起来,可以用于广播配置文件的更改或者服务的监控管理。关
键的思想就是,消息总线可以为微服务做监控,也可以实现应用程序之间相通信。
• Spring Cloud Bus 可选的消息中间件包括 RabbitMQ 和 Kafka

修改配置中心
①添加依赖
       <dependency>
            <groupId>org.springframework.cloudgroupId>
            <artifactId>spring-cloud-busartifactId>
        dependency>
        <dependency>
            <groupId>org.springframework.cloudgroupId>
            <artifactId>spring-cloud-stream-binder-rabbitartifactId>
        dependency>
②修改配置
增加rabbitmq的配置和触发消息总线的地址 注意rabbitmq相关配置应该写自己的。
server:
  port: 12000
spring:
  application:
    name: config-server
  cloud:
    config:
      server:
        git:
          uri: https://gitee.com/chen_junitheima/SpringCloudConfigDemo.git # 配置仓库的http地址
  rabbitmq:
    host: 47.103.2.1
    username: guest
    password: guest
    port: 5672
eureka:
  client:
    service-url:
      defaultZone: http://127.0.0.1:10086/eureka
management:
  endpoints:
    web:
      exposure:
      # 暴露触发消息总线的地址
        include: bus-refresh
改造拉取配置的服务
①添加依赖
<dependency>
            <groupId>org.springframework.cloudgroupId>
            <artifactId>spring-cloud-busartifactId>
        dependency>
        <dependency>
            <groupId>org.springframework.cloudgroupId>
            <artifactId>spring-cloud-stream-binder-rabbitartifactId>
        dependency>
        <dependency>
            <groupId>org.springframework.bootgroupId>
            <artifactId>spring-boot-starter-actuatorartifactId>
        dependency>
②修改 bootstrap.yml
增加rabbitmq的配置
spring:
  rabbitmq:
    host: 47.103.2.1
    username: guest
    password: guest
    port: 5672
  cloud:
    config:
      # 与远程仓库中的配置文件的application保持一致
      name: user-server
      # 远程仓库中的配置文件的profile保持一致
      profile: pro
      # 远程仓库中的版本保持一致

      label: master
      discovery:
        # 使用配置中心
        enabled: true
        # 配置中心服务id
        service-id: config-server
eureka:
  client:
    service-url:
      defaultZone: http://127.0.0.1:10086/eureka
③在需要自动刷新最新配置的Controller上增加@RefreshScope
@RestController
@RequestMapping("/user")
@RefreshScope
public class UserController {
    @Value("${server.port}")
    String port;
    @Value("${test}")
    String name;
    @RequestMapping("/findList")
    public List<User> findList(Integer id) throws InterruptedException {
        List<User> users = new ArrayList<>();
        users.add(new User(Integer.valueOf(port),name));

        return users;
    }
}
④测试
修改配置后可以使用Post请求访问 http://127.0.0.1:12000/actuator/bus-refresh 注意是POST请求。就可以在不重启服务的情况下获取最新配置。
9.1 Stream消息驱动
• Spring Cloud Stream 是一个构建消息驱动微服务应用的框架。
• Stream 解决了开发人员无感知的使用消息中间件的问题,因为Stream对消息中间件的进一步封装,可以做
到代码层面对中间件的无感知,甚至于动态的切换中间件,使得微服务开发的高度解耦,服务可以关注更多
自己的业务流程。
• Spring Cloud Stream目前支持两种消息中间件RabbitMQ和Kafka
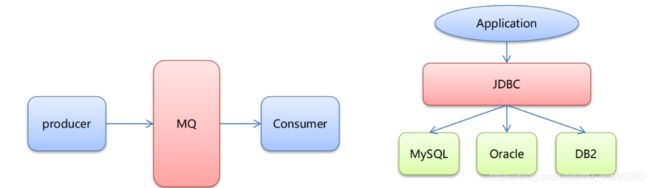
9.2 stream组件
Spring Cloud Stream 构建的应用程序与消息中间件之间是通过绑定器 Binder
相关联的。绑定器对于应用程序而言起到了隔离作用, 它使得不同消息中间件
的实现细节对应用程序来说是透明的。
• binding 是我们通过配置把应用和spring cloud stream 的 binder 绑定在一起
• output:发送消息 Channel,内置 Source接口
• input:接收消息 Channel,内置 Sink接口
9.3 Stream消息生产者
- 创建消息生产者模块,引入依赖 starter-stream-rabbit
        <dependency>
            <groupId>org.springframework.bootgroupId>
            <artifactId>spring-boot-starter-webartifactId>
        dependency>


        <dependency>
            <groupId>org.springframework.cloudgroupId>
            <artifactId>spring-cloud-starter-stream-rabbitartifactId>
        dependency>
- 编写配置,定义 binder,和 bingings
server:
  port: 8000


spring:
  cloud:
    stream:
      # 定义绑定器,绑定到哪个消息中间件上
      binders:
        itheima_binder: # 自定义的绑定器名称
          type: rabbit # 绑定器类型
          environment: # 指定mq的环境
            spring:
              rabbitmq:
                host: localhost
                port: 5672
                username: guest
                password: guest
                virtual-host: /
      bindings:
        output: # channel名称
          binder: itheima_binder #指定使用哪一个binder
          destination: itheima_exchange # 消息目的地
- 定义消息发送业务类。添加 @EnableBinding(Source.class),注入
MessageChannel output ,完成消息发送
@Component
@EnableBinding(Source.class)
public class MessageProducer {

    @Autowired
    private MessageChannel output;

    public void send(){
        String msessage = "hello stream~~~";

        //发送消息
        output.send(MessageBuilder.withPayload(msessage).build());

        System.out.println("消息发送成功~~~");

    }
}
Producer
@RestController
public class ProducerController {

    @Autowired
    private MessageProducer producer;


    @RequestMapping("/send")
        public String sendMsg(){
        producer.send();
        return "success";
    }
}
9.4 Stram消息消费者
-
创建消息消费者模块,引入依赖 starter-stream-rabbit
-
编写配置,定义 binder,和 bingings
server:
  port: 9000

spring:
  cloud:
    stream:
      # 定义绑定器,绑定到哪个消息中间件上
      binders:
        itheima_binder: # 自定义的绑定器名称
          type: rabbit # 绑定器类型
          environment: # 指定mq的环境
            spring:
              rabbitmq:
                host: localhost
                port: 5672
                username: guest
                password: guest
                virtual-host: /
      bindings:
        input: # channel名称
          binder: itheima_binder #指定使用哪一个binder
          destination: itheima_exchange # 消息目的地
改input和端口
- 定义消息接收业务类。添加 @EnableBinding(Sink.class),使用
@StreamListener(Sink.INPUT),完成消息接收。
/**
 * 消息接收类
 */
@EnableBinding({Sink.class})
@Component
public class MessageListener {

    @StreamListener(Sink.INPUT)
    public void receive(Message message){

        System.out.println(message);
        System.out.println(message.getPayload());
    }
}
十、 Sleuth+Zipkin链路追踪
• Spring Cloud Sleuth 其实是一个工具,它在整个分布式系统中能跟踪一个用户请求的过程,捕获这些跟踪数
据,就能构建微服务的整个调用链的视图,这是调试和监控微服务的关键工具。
• 耗时分析
• 可视化错误
• 链路优化
• Zipkin 是 Twitter 的一个开源项目,它致力于收集服务的定时数据,以解决微服务架构中的延迟问题,包
括数据的收集、存储、查找和展现。

10.1 入门
-
安装启动zipkin。 java –jar zipkin.jar
-
访问zipkin web界面。 http://localhost:9411/
-
在服务提供方和消费方分别引入 sleuth 和 zipkin 依赖
        <dependency>
            <groupId>org.springframework.cloudgroupId>
            <artifactId>spring-cloud-starter-zipkinartifactId>
        dependency>
zipkin里已经有依赖sleuth了
4.分别配置服务提供方和消费方。
  zipkin:
    base-url: http://localhost:9411/  # 设置zipkin的服务端路径

  sleuth:
    sampler:
      probability: 1 # 采集率 默认 0.1 百分之十。
2.配置
logging:
  level:
    root: INFO
    org.springframework.web.servlet.DispatcherServlet: DEBUG
    org.springframework.cloud.sleuth: DEBUG
Zipkin
最简单方式
zipkin服务端
使用资料中的zipkin-server-2.12.9-exec.jar,在命令行输入 java -jar zipkin-server-2.12.9-exec.jar 启动 Zipkin Server
默认Zipkin Server的请求端口为 9411
####zipkin客户端
依赖
        <dependency>
            <groupId>org.springframework.cloudgroupId>
            <artifactId>spring-cloud-starter-zipkinartifactId>
        dependency>
配置
spring:
  zipkin:
    base-url: http://127.0.0.1:9411/ #zipkin server的请求地址
    sender:
      type: web #请求方式,默认以http的方式向zipkin server发送追踪数据
  sleuth:
    sampler:
      probability: 1.0 #采样的百分比 生产环境中不用1.0
使用RabbitMQ发送跟踪日志
启动服务端
java -jar zipkin-server-2.12.9-exec.jar --RABBIT_ADDRESSES=127.0.0.1:5672 --RABBIT_USER=guest --RABBIT_PASSWORD=guest
客户端
增加依赖
<dependency>
<groupId>org.springframework.cloudgroupId>
  <artifactId>spring-cloud-starter-sleuthartifactId>
dependency>
<dependency>
<groupId>org.springframework.cloudgroupId>
<artifactId>spring-cloud-starter-zipkinartifactId>
dependency>
<dependency>
<groupId>org.springframework.cloudgroupId>
  <artifactId>spring-cloud-sleuth-zipkinartifactId>
dependency>
<dependency>
<groupId>org.springframework.amqpgroupId>
<artifactId>spring-rabbitartifactId>
dependency>
配置
  application:
    name: userConmuer
  zipkin:
    base-url: http://127.0.0.1:9411/ #zipkin server的请求地址
    sender:
      type: rabbit #请求方式,默认以http的方式向zipkin server发送追踪数据
  rabbitmq:
    host: 4.114.115.122 #自己rabbitmq的ip地址
    port: 5672
    username: guest
    password: guest
    listener:
      direct:
        retry:
          enabled: true
      simple:
        retry:
          enabled: true
使用Mysql存储日志
数据库准备
创建数据库zipkin 然后执行下面的sql


CREATE TABLE IF NOT EXISTS zipkin_spans (
`trace_id_high` BIGINT NOT NULL DEFAULT 0 COMMENT 'If non zero, this means
the trace uses 128 bit traceIds instead of 64 bit',
`trace_id` BIGINT NOT NULL,
`id` BIGINT NOT NULL,
`name` VARCHAR(255) NOT NULL,
`parent_id` BIGINT,
`debug` BIT(1),
`start_ts` BIGINT COMMENT 'Span.timestamp(): epoch micros used for endTs
query and to implement TTL',
`duration` BIGINT COMMENT 'Span.duration(): micros used for minDuration
and maxDuration query'
) ENGINE=InnoDB ROW_FORMAT=COMPRESSED CHARACTER SET=utf8 COLLATE
utf8_general_ci;
ALTER TABLE zipkin_spans ADD UNIQUE KEY(`trace_id_high`, `trace_id`, `id`)
COMMENT 'ignore insert on duplicate';

  ALTER TABLE zipkin_spans ADD INDEX(`trace_id_high`, `trace_id`, `id`)
COMMENT 'for joining with zipkin_annotations';
  ALTER TABLE zipkin_spans ADD INDEX(`trace_id_high`, `trace_id`) COMMENT 'for
getTracesByIds';
  ALTER TABLE zipkin_spans ADD INDEX(`name`) COMMENT 'for getTraces and
getSpanNames';
  ALTER TABLE zipkin_spans ADD INDEX(`start_ts`) COMMENT 'for getTraces
ordering and range';
CREATE TABLE IF NOT EXISTS zipkin_annotations (
 `trace_id_high` BIGINT NOT NULL DEFAULT 0 COMMENT 'If non zero, this means
the trace uses 128 bit traceIds instead of 64 bit',
 `trace_id` BIGINT NOT NULL COMMENT 'coincides with zipkin_spans.trace_id',
 `span_id` BIGINT NOT NULL COMMENT 'coincides with zipkin_spans.id',
 `a_key` VARCHAR(255) NOT NULL COMMENT 'BinaryAnnotation.key or
Annotation.value if type == -1',
 `a_value` BLOB COMMENT 'BinaryAnnotation.value(), which must be smaller
than 64KB',
 `a_type` INT NOT NULL COMMENT 'BinaryAnnotation.type() or -1 if
Annotation',
 `a_timestamp` BIGINT COMMENT 'Used to implement TTL; Annotation.timestamp
or zipkin_spans.timestamp',
 `endpoint_ipv4` INT COMMENT 'Null when Binary/Annotation.endpoint is
null',
 `endpoint_ipv6` BINARY(16) COMMENT 'Null when Binary/Annotation.endpoint
is null, or no IPv6 address',
 `endpoint_port` SMALLINT COMMENT 'Null when Binary/Annotation.endpoint is
null',
 `endpoint_service_name` VARCHAR(255) COMMENT 'Null when
Binary/Annotation.endpoint is null'
 ) ENGINE=InnoDB ROW_FORMAT=COMPRESSED CHARACTER SET=utf8 COLLATE
utf8_general_ci;
  ALTER TABLE zipkin_annotations ADD UNIQUE KEY(`trace_id_high`, `trace_id`,
`span_id`, `a_key`, `a_timestamp`) COMMENT 'Ignore insert on duplicate';
  ALTER TABLE zipkin_annotations ADD INDEX(`trace_id_high`, `trace_id`,
`span_id`) COMMENT 'for joining with zipkin_spans';
  ALTER TABLE zipkin_annotations ADD INDEX(`trace_id_high`, `trace_id`)
COMMENT 'for getTraces/ByIds';
  ALTER TABLE zipkin_annotations ADD INDEX(`endpoint_service_name`) COMMENT
'for getTraces and getServiceNames';
ALTER TABLE zipkin_annotations ADD INDEX(`a_type`) COMMENT 'for getTraces';
ALTER TABLE zipkin_annotations ADD INDEX(`a_key`) COMMENT 'for getTraces';
  ALTER TABLE zipkin_annotations ADD INDEX(`trace_id`, `span_id`, `a_key`)
COMMENT 'for dependencies job';
CREATE TABLE IF NOT EXISTS zipkin_dependencies (
 `day` DATE NOT NULL,
 `parent` VARCHAR(255) NOT NULL,
 `child` VARCHAR(255) NOT NULL,
 `call_count` BIGINT
 ) ENGINE=InnoDB ROW_FORMAT=COMPRESSED CHARACTER SET=utf8 COLLATE
utf8_general_ci;
ALTER TABLE zipkin_dependencies ADD UNIQUE KEY(`day`, `parent`, `child`);
启动服务端
STORAGE_TYPE : 存储类型
MYSQL_HOST: mysql主机地址
MYSQL_TCP_PORT:mysql端口
MYSQL_DB: mysql数据库名称
MYSQL_USER:mysql用户名
MYSQL_PASS :mysql密码
以下是使用rbbitMq和mysql的启动命令

java -jar zipkin-server-2.12.9-exec.jar --STORAGE_TYPE=mysql --MYSQL_HOST=127.0.0.1 --MYSQL_TCP_PORT=3306 --MYSQL_DB=zipkin --MYSQL_USER=root --MYSQL_PASS=root --RABBIT_ADDRESSES=192.168.200.128:5672 --RABBIT_USER=guest --RABBIT_PASSWORD=guest