k8s教程01(k8s环境配置及私有仓库搭建)
Infrastructure as a Service(laas,基础架构作为服务) 阿里云
platform as a service(Paas,平台作为服务) 新浪云
Software as a Service(Saas,软件作为服务) Office 365
Apache MESOS资源管理器
docker Swarm
高可用集群副本数据最好是>= 3奇数个
资料地址:
https://gitee.com/WeiboGe2012/kubernetes-kubeadm-install
https://gitee.com/llqhz/ingress-nginx根据版本找资料
k8s架构

APISERVER:所有服务访问统一入 口
CrontrollerManager:维持副本期望数目
Scheduler:负责介绍任务,选择合适的节点进行分配任务
ETCD:键值对数据库储存K8S集群所有 重要信息(持久化)
Kubelet:直接跟容器引擎交互实现容器的生命周期管理
Kube-prox:负责写入规则至IPTABLES、 IPVS 实现服务映射访问的
其他插件说明
COREDNS:可以为集群中的SVC创建一一个域名IP的对应关系解析
DASHBOARD:给K8S 集群提供个B/S结构访间体系
INGRESS CONTROLLER:官方只能实现四层代理,INGRESS 可以实现七层代理
FEDERATION:提供一个可以跨集群中心多K8S统一管 理功能
PROMETHEUS:提供K8S集群的监控能力
ELK:提供K8S集群日志统一分析介入平台
Pod概念
pod控制器类型
Repl icationController & ReplicaSet & Deployment
ReplicationController用来确保容器应用的副本数始终保持在用户定义的副本数,即如果有容器异常退出,会自动创建新的Pod来替代;而如果异常多出来的容器也会自动回收。在新版本的Kubernetes 中建议使用ReplicaSet 来取代Replicat ionControlle
ReplicaSet跟Repl icat ionController没有本质的不同,只是名字不一样,并且Repl icaSet支持集合式的selector
虽然ReplicaSet可以独立使用,但一般般还是建议使用Deployment 来自动管理ReplicaSet,这样就无需担心跟其他机制的不兼容问题(比如ReplicaSet 不支持rolling-update但Deployment 支持)
HPA (Hor izontalPodAutoScale)
Horizontal Pod Autoscaling 仅适用于Deployment和ReplicaSet ,在V1版本中仅支持根据Pod的CPU利用率扩所容,在vlalpha 版本中,支持根据内存和用户自定义的metric 扩缩容
StatefullSet
StatefulSet是为了解决有状态服务的问题(对应Deployments 和Repl icaSets是为无状态服务而设计),其应用场景包括:
*稳定的持久化存储,即Pod重新调度后还是能访问到相同的持久化数据,基于PVC来实现
*稳定的网络标志,即Pod重新调度后其PodName 和HostName 不变,基于Headless Service(即没有Cluster IP的Service )来实现
*有序部署,有序扩展,即Pod是有顺序的,在部署或者扩展的时候要依据定义的顺序依次依次进行(即从0到N-1,在下一个Pod运行之前所有之前的Pod必须都是Running 和Ready状态),基于init containers 来实现
*有序收缩,有序删除(即从N-1到0)
DaemonSet
DaemonSet确保全部(或者-些) Node上运行一个Pod的副本。当有Node加入集群时,也会为他们新增一个Pod。当有Node从集群移除时,这些Pod也会被回收。删除DaemonSet 将会删除它创建的所有Pod
使用DaemonSet 的一些 典型用法:
*运行集群存储daemon, 例如在每个Node上运行 glusterd、 ceph。
*在每个Node上运行日志收集daemon,例如fluentd、 logstash。
*在每个Node上运行监控daemon, 例如Prometheus Node Exporter
Job,Cronjob
Job负责批处理任务,即仅执行一次的任务, 它保证批处理任务的-一个或多个Pod成功结束
Cron Job管理基于时间的Job,即:
*在给定时间点只运行一次
*周期性地在给定时间点运行
服务发现
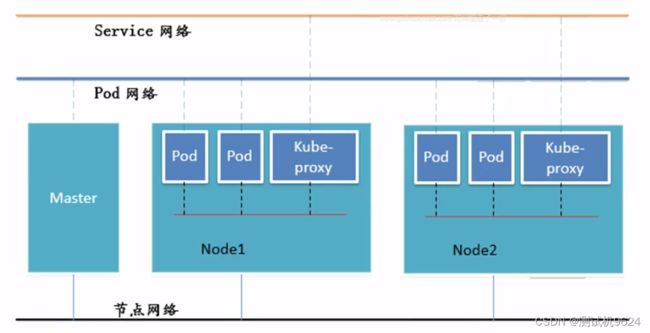
网络通信模式
Kubernetes的网络模型假定了所有Pod都在一-个可以直接连通的扁平的网络空间中,这在GCE (Google Compute Engine) 里面是现成的网络模型,Kubernetes 假定这个网络已经存在。而在私有云里搭建Kubernetes 集群,就不能假定这个网络已经存在了。我们需要自己实现这个网络假设,将不同节点上的Docker 容器之间的互相访问先打通,然后运行Kubernetes
同一个Pod内的多个容器之间:lo
各Pod之间的通讯: Overlay Network
Pod与Service 之间的通讯:各节点的Iptables 规则
网络解决方案kubernetes + flannel
Flannel是CoreOS 团队针对Kubernetes 设计的一个网络规划服务,简单来说,它的功能是让集群中的不同节点主机创建的Docker容器都具有全集群唯—的虚拟IP地址。而且它还能在这些IP地址之间建立-一个覆盖网络(Overlay Network) ,通过这个覆盖网络,将数据包原封不动地传递到目标容器内

ETCD之Flannel 提供说明:
存储管理Flannel 可分配的IP地址段资源
监控ETCD中每个Pod的实际地址,并在内存中建立维护Pod节点路由表
不同情况下网络通讯方式
1、同一个Pod内部通讯:同一个 Pod共享同一个网络命名空间,共享同一个Linux协议栈Pod1至Pod2
2、Pod1至Pod2
- 不在同一 台主机,Pod的地址是与docker0在同一个网段的,但docker0网段与宿主机网卡是两个完全不同的IP网段,并且不同Node之间的通信能通过宿主机的物理网卡进行。将Pod的IP和所在Node的IP关联起来,通过这个关联让Pod可以互相访问!
- Pod1与Pod2在同一.台机器,由Docker0 网桥直接转发请求至Pod2, 不需要经过Flannel演示

3、Pod至Service 的网络:目前基于性能考虑,全部为iptables 维护和转发
4、Pod到外网: Pod向外网发送请求,查找路由表,转发数据包到宿主机的网卡,宿主网卡完成路由选择后,iptables执行Masquerade,把源IP更改为宿主网卡的IP, 然后向外网服务器发送请求
5、外网访问Pod: Service
组件通讯示意图
k8s集群安装
前期准备

1、安装k8s的节点必须是大于1核心的CPU
2、安装节点的网络信息192.168.192.0/24 master:131 node1:130 node2:129
四台CentOS7:一个master主服务器和两个node节点和一个harbor,都是:仅主机模式

一台Windows10:并安装koolshare
KoolCenter固件下载服务器:http://fw.koolcenter.com/
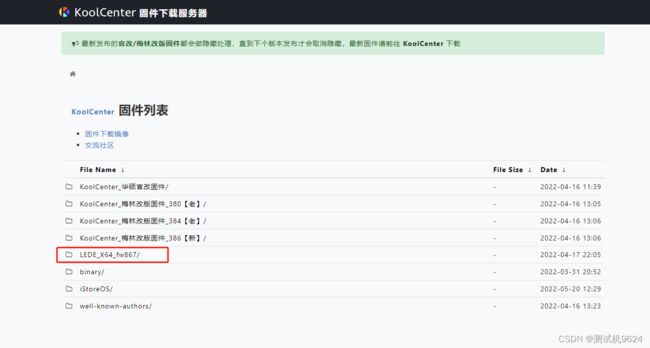


下载IMG写盘工具


创建虚拟机

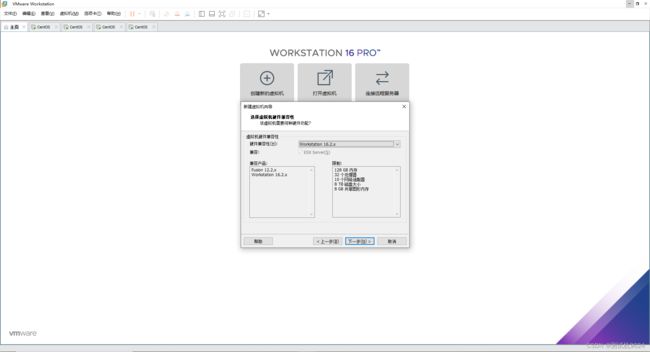
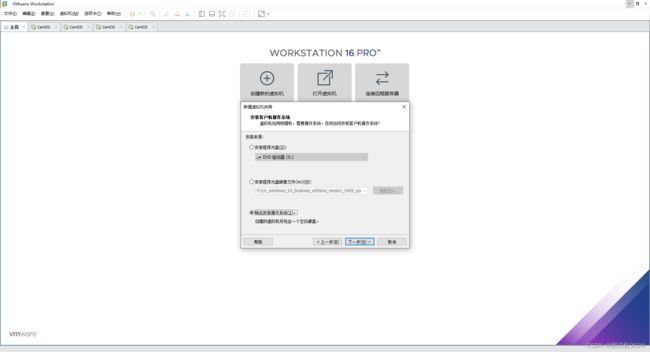
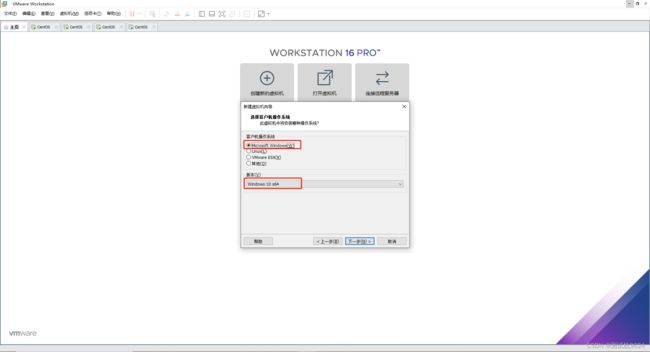

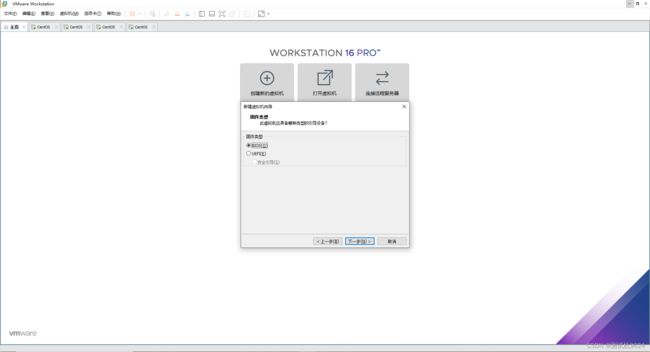
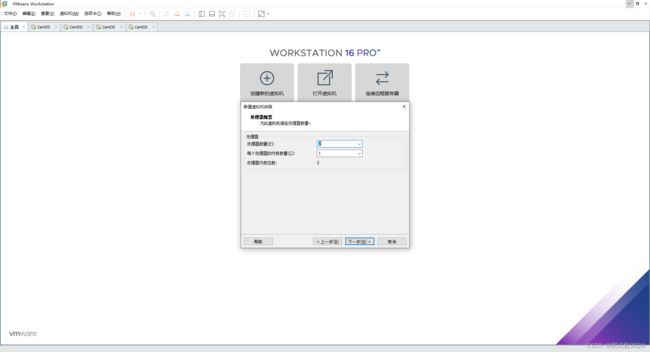


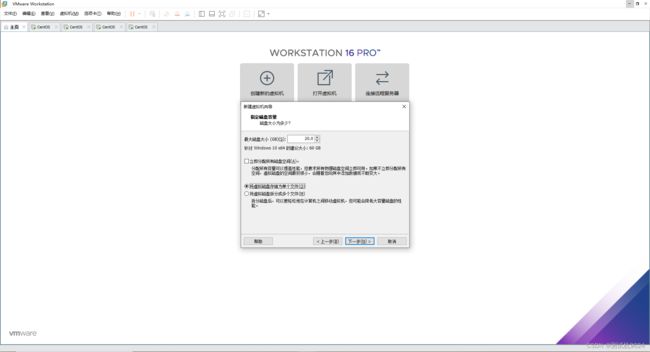

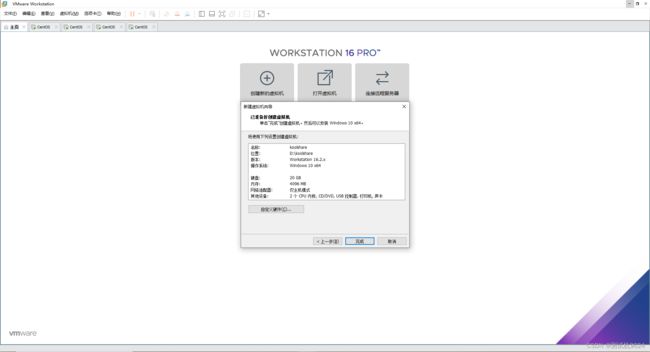

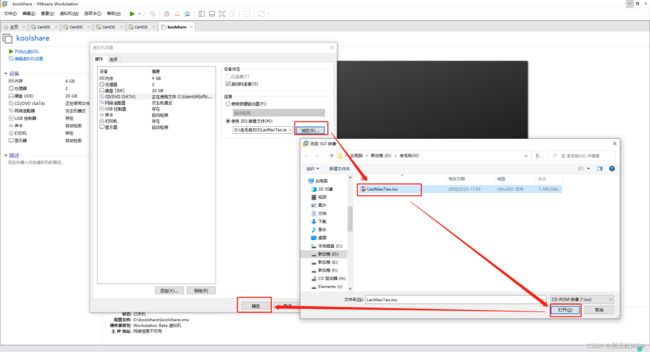


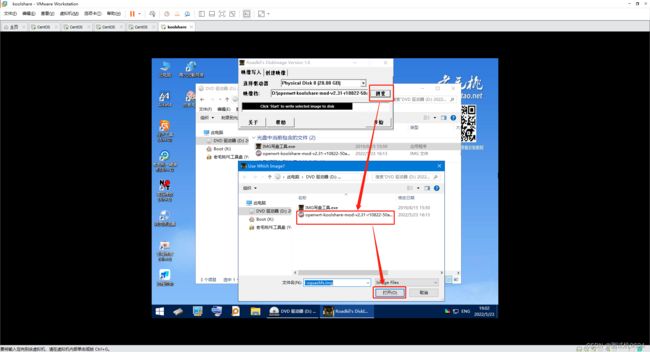


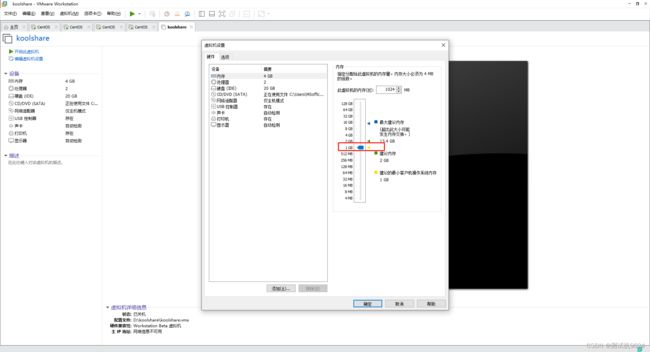

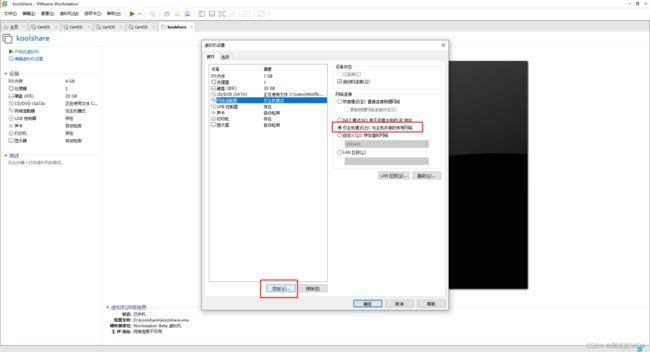


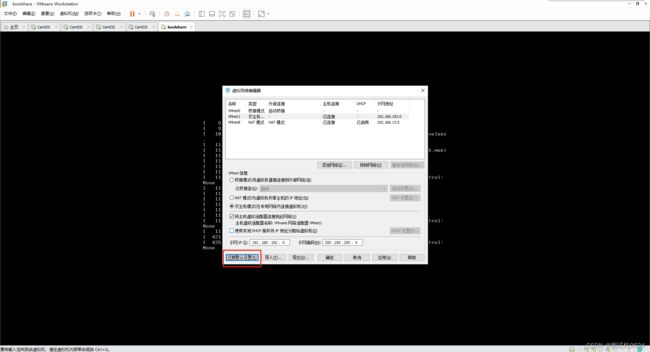
看一下是哪一个网卡是仅主机运行


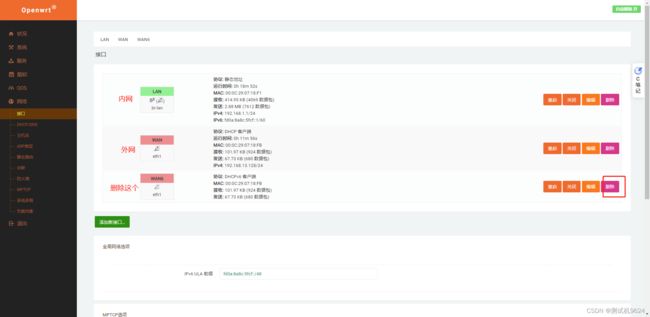
设置完成后,浏览器访问koolshare路由ip:192.168.1.1密码:koolshare

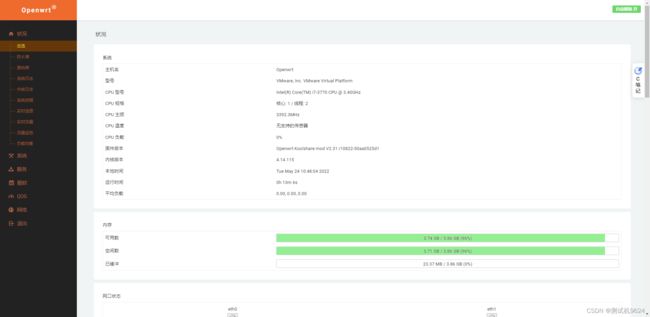


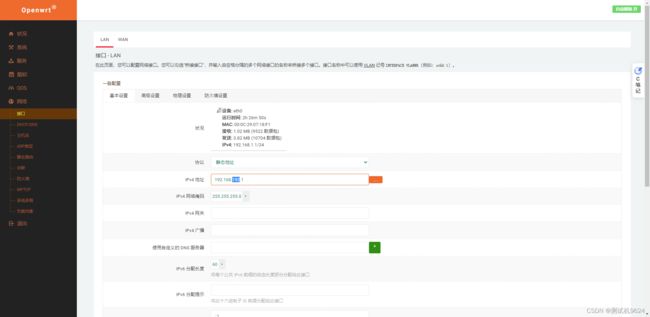
修改成与k8s集群一样的网段
再次登录使用的是新的路由ip:192.168.192.1
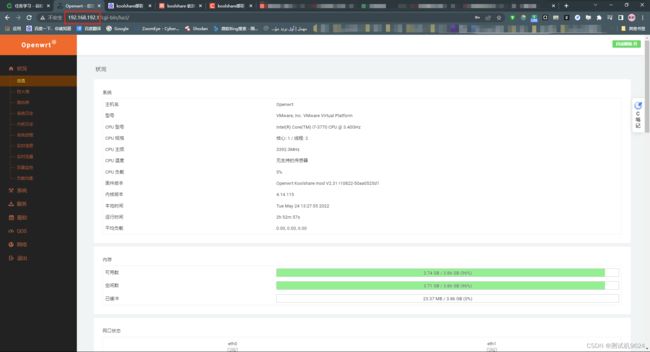
诊断访问国内网站正常

访问国外网站,点击【酷软】

下载koolss
![]()

直接搜索SSR节点或有SSR服务器直接填写上去
k8s集群安装
设置系统主机名以及hosts文件
hostnamectl set-hostname k8s-master01

hostnamectl set-hostname k8s-node01

hostnamectl set-hostname k8s-node02
设置ip地址
vi /etc/sysconfig/network-scripts/ifcfg-ens33
master主机
TYPE="Ethernet"
PROXY_METHOD="none"
BROWSER_ONLY="no"
BOOTPROTO="static"
DEFROUTE="yes"
IPV4_FAILURE_FATAL="no"
IPV6INIT="yes"
IPV6_AUTOCONF="yes"
IPV6_DEFROUTE="yes"
IPV6_FAILURE_FATAL="no"
IPV6_ADDR_GEN_MODE="stable-privacy"
NAME="ens33"
UUID="ea3b61ed-9232-4b69-b6c0-2f863969e750"
DEVICE="ens33"
ONBOOT="yes"
IPADDR=192.168.192.131
NETMASK=255.255.255.0
GATEWAY=192.168.192.1
DNS1=192.168.192.1
DNS2=114.114.114.114
node01主机
TYPE="Ethernet"
PROXY_METHOD="none"
BROWSER_ONLY="no"
BOOTPROTO="static"
DEFROUTE="yes"
IPV4_FAILURE_FATAL="no"
IPV6INIT="yes"
IPV6_AUTOCONF="yes"
IPV6_DEFROUTE="yes"
IPV6_FAILURE_FATAL="no"
IPV6_ADDR_GEN_MODE="stable-privacy"
NAME="ens33"
UUID="ea3b61ed-9232-4b69-b6c0-2f863969e750"
DEVICE="ens33"
ONBOOT="yes"
IPADDR=192.168.192.130
NETMASK=255.255.255.0
GATEWAY=192.168.192.1
DNS1=192.168.192.1
DNS2=114.114.114.114
node02主机
TYPE="Ethernet"
PROXY_METHOD="none"
BROWSER_ONLY="no"
BOOTPROTO="static"
DEFROUTE="yes"
IPV4_FAILURE_FATAL="no"
IPV6INIT="yes"
IPV6_AUTOCONF="yes"
IPV6_DEFROUTE="yes"
IPV6_FAILURE_FATAL="no"
IPV6_ADDR_GEN_MODE="stable-privacy"
NAME="ens33"
UUID="ea3b61ed-9232-4b69-b6c0-2f863969e750"
DEVICE="ens33"
ONBOOT="yes"
IPADDR=192.168.192.129
NETMASK=255.255.255.0
GATEWAY=192.168.192.1
DNS1=192.168.192.1
DNS2=114.114.114.114
三台主机重启网络
service network restart
设置master主机的hosts文件,加入以下主机名
vi /etc/hosts
192.168.192.131 k8s-master01
192.168.192.130 k8s-node01
192.168.192.129 k8s-node02
将master主机的hosts文件拷贝到node01、node02主机上
[root@localhost ~]# scp /etc/hosts root@k8s-node01:/etc/hosts
The authenticity of host 'k8s-node01 (192.168.192.130)' can't be established.
ECDSA key fingerprint is SHA256:M5BalHyNXU5W49c5/9iZgC4Hl370O0Wr/c5S/FYFIvw.
ECDSA key fingerprint is MD5:28:23:b8:eb:af:d1:bd:bb:8c:77:e0:01:3c:62:7a:cb.
Are you sure you want to continue connecting (yes/no)? yes
Warning: Permanently added 'k8s-node01,192.168.192.130' (ECDSA) to the list of known hosts.
root@k8s-node01's password:
hosts                                         100%  241   217.8KB/s   00:00
[root@localhost ~]# scp /etc/hosts root@k8s-node02:/etc/hosts
The authenticity of host 'k8s-node02 (192.168.192.129)' can't be established.
ECDSA key fingerprint is SHA256:M5BalHyNXU5W49c5/9iZgC4Hl370O0Wr/c5S/FYFIvw.
ECDSA key fingerprint is MD5:28:23:b8:eb:af:d1:bd:bb:8c:77:e0:01:3c:62:7a:cb.
Are you sure you want to continue connecting (yes/no)? yes
Warning: Permanently added 'k8s-node02,192.168.192.129' (ECDSA) to the list of known hosts.
root@k8s-node02's password:
hosts                                         100%  241   143.1KB/s   00:00
三台主机都安装依赖包
yum install -y conntrack ntpdate ntp ipvsadm ipset jq iptables curl sysstat libseccomp wget vim net-tools git
三台主机:设置防火墙为iptables并设置空规则
systemctl stop firewalld && systemctl disable firewalld

yum -y install iptables-services && systemctl start iptables && systemctl enable iptables && iptables -F && service iptables save
三台主机:关闭selinux
swapoff -a && sed -i '/ swap / s/^\(.*\)$/#\1/g' /etc/fstab

setenforce 0 && sed -i 's/^SELINUX=.*/SELINUX=disabled/' /etc/selinux/config
三台主机:调整内核参数,对于K8S
cat > kubernetes.conf <<EOF
net.bridge.bridge-nf-call-iptables=1
net.bridge.bridge-nf-call-ip6tables=1
net.ipv4.ip_forward=1
net.ipv4.tcp_tw_recycle=0
vm.swappiness=0 # 禁止使用 swap 空间,只有当系统 OOM 时才允许使用它
vm.overcommit_memory=1 # 不检查物理内存是否够用
vm.panic_on_oom=0 # 开启 OOM
fs.inotify.max_user_instances=8192
fs.inotify.max_user_watches=1048576
fs.file-max=52706963
fs.nr_open=52706963
net.ipv6.conf.all.disable_ipv6=1
net.netfilter.nf_conntrack_max=2310720
EOF

cp kubernetes.conf /etc/sysctl.d/kubernetes.conf
sysctl -p /etc/sysctl.d/kubernetes.conf
三台主机:调整系统时区
# 设置系统时区为中国/上海
timedatectl set-timezone Asia/Shanghai
# 将当前的UTC时间写入硬件时钟
timedatectl set-local-rtc 0
# 重启依赖于系统时间的服务
systemctl restart rsyslog
systemctl restart crond
三台主机:关闭系统不需要的服务
systemctl stop postfix && systemctl disable postfix
三台主机:设置rsyslogd和systemd journald
mkdir /var/log/journal  # 持久化保存日志的目录

mkdir /etc/systemd/journald.conf.d

cat > /etc/systemd/journald.conf.d/99-prophet.conf <<EOF
[Journal]
# 持久化保存到磁盘
Storage=persistent

# 压缩历史日志
Compress=yes

SyncIntervalSec=5m
RateLimitInterval=30s
RateLimitBurst=1000

# 最大占用空间10G
SystemMaxUse=10G

# 但日志文件最大 200M
SystemMaxFileSeize=200M

# 日志保存时间2周
MaxRetentionSec=2week

# 不将日志转发到syslog
ForwardToSyslog=no
EOF

systemctl restart systemd-journald
三台主机:升级系统内核为5.4
CentOS 7.x系统自带的3.10.x内核存在一些Bugs,导致运行的Docker、Kubernetes 不稳定,例如: rpm -Uvh http://www.elrepo.org/elrepo-release-7.0-3.el7.elrepo.noarch.rpm
uname -r 命令查看内核信息
rpm -Uvh http://www.elrepo.org/elrepo-release-7.0-3.el7.elrepo.noarch.rpm
# 安装完成后检查/boot/grub2/grub.cfg 中对应内核menuentry 中是否包含initrd16 配置,如果没有,再安装一次!
yum --enablerepo=elrepo-kernel install -y kernel-lt

# 上面查询出内核版本后,设置开机从新内核启动
grub2-set-default "CentOS Linux (4.4.182-1.el7.elrepo.x86_64) 7 (Core)"
grub2-set-default "CentOS Linux (5.4.195-1.el7.elrepo.x86_64) 7 (Core)"
三台主机:kube-proxy开启ipvs的前置条件
# ==============================================================内核4.44版本
modprobe br_netfilter

cat > /etc/sysconfig/modules/ipvs.modules <<EOF
#!/bin/bash
modprobe -- ip_vs
modprobe -- ip_vs_rr
modprobe -- ip_vs_wrr
modprobe -- ip_vs_sh
modprobe -- nf_conntrack_ipv4
EOF

chmod 755 /etc/sysconfig/modules/ipvs.modules && bash /etc/sysconfig/modules/ipvs.modules && lsmod | grep -e ip_Vs -e nf_conntrack_ipv4


# ==============================================================内核5.4版本
# 1.安装ipset和ipvsadm
yum install ipset ipvsadmin -y

# 2.添加需要加载的模块写入脚本文件
cat > /etc/sysconfig/modules/ipvs.modules <<EOF
#!/bin/bash
modprobe -- ip_vs
modprobe -- ip_vs_rr
modprobe -- ip_vs_wrr
modprobe -- ip_vs_sh
modprobe -- nf_conntrack
EOF

# 3.为脚本添加执行权限
chmod +x /etc/sysconfig/modules/ipvs.modules
# 4.执行脚本文件
cd /etc/sysconfig/modules/
./ipvs.modules
# 5.查看对应的模块是否加载成功
lsmod | grep -e -ip_vs -e nf_conntrack
三台主机:安装Docker软件
参考安装docker:https://blog.csdn.net/DDJ_TEST/article/details/114983746
# 设置存储库
# 安装yum-utils包(提供yum-config-manager 实用程序)并设置稳定存储库。
$ sudo yum install -y yum-utils
$ sudo yum-config-manager \
    --add-repo \
    https://download.docker.com/linux/centos/docker-ce.repo

# 安装指定版本的 Docker Engine 和 containerd
$ sudo yum install -y docker-ce-18.09.9 docker-ce-cli-18.09.9 containerd.io
启动docker
$ sudo systemctl start docker
通过运行hello-world 映像验证 Docker Engine 是否已正确安装。
$ sudo docker run hello-world
设置开机定时启动docker
$ sudo systemctl enable docker
关闭docker服务
$ sudo systemctl stop docker
重启docker服务
$ sudo systemctl restart docker
验证
[root@k8s-master01 ~]# docker version
Client:
 Version:           18.09.9
 API version:       1.39
 Go version:        go1.11.13
 Git commit:        039a7df9ba
 Built:             Wed Sep  4 16:51:21 2019
 OS/Arch:           linux/amd64
 Experimental:      false

Server: Docker Engine - Community
 Engine:
  Version:          18.09.9
  API version:      1.39 (minimum version 1.12)
  Go version:       go1.11.13
  Git commit:       039a7df
  Built:            Wed Sep  4 16:22:32 2019
  OS/Arch:          linux/amd64
  Experimental:     false
# 创建/etc/docker目录
mkdir /etc/docker

# 配置daemon
cat > /etc/docker/daemon.json <<EOF
{
	"exec-opts": ["native.cgroupdriver=systemd"],
	"log-driver": "json-file",
	"log-opts": {
		"max-size": "100m"
	},
	"insecure-registries": ["https://hub.atguigu.com"]
}
EOF

mkdir -p /etc/systemd/system/docker.service.d

# 重启docker服务
systemctl daemon-reload && systemctl restart docker && systemctl enable docker
三台主机:安装kubeadm(主从配置)
cat <<EOF > /etc/yum.repos.d/kubernetes.repo
[kubernetes]
name=Kubernetes
baseurl=http://mirrors.aliyun.com/kubernetes/yum/repos/kubernetes-el7-x86_64
enabled=1
gpgcheck=0
repo_gpgcheck=0
gpgkey=http://mirrors.aliyun.com/kubernetes/yum/doc/yum-key.gpg
http://mirrors.aliyun.com/kubernetes/yum/doc/rpm-package-key.gpg
EOF

yum -y install kubeadm-1.15.1 kubectl-1.15.1 kubelet-1.15.1
systemctl enable kubelet.service
kubeadm-basic.images.tar.gz和harbor-offline-installer-v2.3.2.tgz 下载
上传到master节点上
tar -zxvf kubeadm-basic.images.tar.gz
vim load-images.sh将镜像文件上传到docker
#!/bin/bash

ls /root/kubeadm-basic.images > /tmp/image-list.txt

cd /root/kubeadm-basic.images

for i in $( cat /tmp/image-list.txt )
do
    docker load -i $i
done


rm -rf /tmp/image-list.txt
chmod a+x load-images.sh

./load-images.sh
将解压的文件复制到node01、node02
scp -r kubeadm-basic.images load-images.sh root@k8s-node01:/root

scp -r kubeadm-basic.images load-images.sh root@k8s-node02:/root
在node01、node02上执行load-images.sh文件
./load-images.sh
初始化主节点
# 生成模板文件
kubeadm config print init-defaults > kubeadm-config.yaml
vim kubeadm-config.yaml
apiVersion: kubeadm.k8s.io/v1beta2
bootstrapTokens:
- groups:
  - system:bootstrappers:kubeadm:default-node-token
  token: abcdef.0123456789abcdef
  ttl: 24h0m0s
  usages:
  - signing
  - authentication
kind: InitConfiguration
localAPIEndpoint:
  advertiseAddress: 192.168.192.131      # 改成master主机的ip
  bindPort: 6443
nodeRegistration:
  criSocket: /var/run/dockershim.sock
  name: k8s-master01
  taints:
  - effect: NoSchedule
    key: node-role.kubernetes.io/master
---
apiServer:
  timeoutForControlPlane: 4m0s
apiVersion: kubeadm.k8s.io/v1beta2
certificatesDir: /etc/kubernetes/pki
clusterName: kubernetes
controllerManager: {}
dns:
  type: CoreDNS
etcd:
  local:
    dataDir: /var/lib/etcd
imageRepository: k8s.gcr.io
kind: ClusterConfiguration
kubernetesVersion: v1.15.1		# 改成安装的版本号
networking:
  dnsDomain: cluster.local
  podSubnet: "10.244.0.0/16"	# 添加默认podSubnet网段
  serviceSubnet: 10.96.0.0/12
scheduler: {}
---
apiVersion: kubeproxy.config.k8s.io/v1alpha1
kind: KubeProxyConfiguration
featureGates:
    SupportIPVSProxyMode: true
mode: ipvs
kubeadm init --config=kubeadm-config.yaml --experimental-upload-certs | tee kubeadm-init.log
遇到报错,找问题3、4
查看日志文件
[root@k8s-master01 ~]# vim kubeadm-init.log

[init] Using Kubernetes version: v1.15.1
[preflight] Running pre-flight checks
[preflight] Pulling images required for setting up a Kubernetes cluster
[preflight] This might take a minute or two, depending on the speed of your internet connection
[preflight] You can also perform this action in beforehand using 'kubeadm config images pull'
[kubelet-start] Writing kubelet environment file with flags to file "/var/lib/kubelet/kubeadm-flags.env"
[kubelet-start] Writing kubelet configuration to file "/var/lib/kubelet/config.yaml"
[kubelet-start] Activating the kubelet service
[certs] Using certificateDir folder "/etc/kubernetes/pki"
[certs] Generating "etcd/ca" certificate and key
[certs] Generating "etcd/server" certificate and key
[certs] etcd/server serving cert is signed for DNS names [k8s-master01 localhost] and IPs [192.168.192.131 127.0.0.1 ::1]
[certs] Generating "etcd/peer" certificate and key
[certs] etcd/peer serving cert is signed for DNS names [k8s-master01 localhost] and IPs [192.168.192.131 127.0.0.1 ::1]
[certs] Generating "etcd/healthcheck-client" certificate and key
[certs] Generating "apiserver-etcd-client" certificate and key
[certs] Generating "ca" certificate and key
[certs] Generating "apiserver" certificate and key
[certs] apiserver serving cert is signed for DNS names [k8s-master01 kubernetes kubernetes.default kubernetes.default.svc kubernetes.default.svc.cluster.local] and IPs [10.96.0.1 192.168.192.131]
[certs] Generating "apiserver-kubelet-client" certificate and key
[certs] Generating "front-proxy-ca" certificate and key
[certs] Generating "front-proxy-client" certificate and key
[certs] Generating "sa" key and public key
[kubeconfig] Using kubeconfig folder "/etc/kubernetes"
[kubeconfig] Writing "admin.conf" kubeconfig file
[kubeconfig] Writing "kubelet.conf" kubeconfig file
[kubeconfig] Writing "controller-manager.conf" kubeconfig file
[kubeconfig] Writing "scheduler.conf" kubeconfig file
[control-plane] Using manifest folder "/etc/kubernetes/manifests"
[control-plane] Creating static Pod manifest for "kube-apiserver"
[control-plane] Creating static Pod manifest for "kube-controller-manager"
[control-plane] Creating static Pod manifest for "kube-scheduler"
[etcd] Creating static Pod manifest for local etcd in "/etc/kubernetes/manifests"
[wait-control-plane] Waiting for the kubelet to boot up the control plane as static Pods from directory "/etc/kubernetes/manifests". This can take up to 4m0s
[apiclient] All control plane components are healthy after 23.004030 seconds
[upload-config] Storing the configuration used in ConfigMap "kubeadm-config" in the "kube-system" Namespace
[kubelet] Creating a ConfigMap "kubelet-config-1.15" in namespace kube-system with the configuration for the kubelets in the cluster
[upload-certs] Storing the certificates in Secret "kubeadm-certs" in the "kube-system" Namespace
[upload-certs] Using certificate key:
ecaa903ab475ec8d361a7a844feb3973b437a6e36981be7d949dccda63c15d00
[mark-control-plane] Marking the node k8s-master01 as control-plane by adding the label "node-role.kubernetes.io/master=''"
[mark-control-plane] Marking the node k8s-master01 as control-plane by adding the taints [node-role.kubernetes.io/master:NoSchedule]
[bootstrap-token] Using token: abcdef.0123456789abcdef
[bootstrap-token] Configuring bootstrap tokens, cluster-info ConfigMap, RBAC Roles
[bootstrap-token] configured RBAC rules to allow Node Bootstrap tokens to post CSRs in order for nodes to get long term certificate credentials
[bootstrap-token] configured RBAC rules to allow the csrapprover controller automatically approve CSRs from a Node Bootstrap Token
[bootstrap-token] configured RBAC rules to allow certificate rotation for all node client certificates in the cluster
[bootstrap-token] Creating the "cluster-info" ConfigMap in the "kube-public" namespace
[addons] Applied essential addon: CoreDNS
[addons] Applied essential addon: kube-proxy

Your Kubernetes control-plane has initialized successfully!

To start using your cluster, you need to run the following as a regular user:

  mkdir -p $HOME/.kube
  sudo cp -i /etc/kubernetes/admin.conf $HOME/.kube/config
  sudo chown $(id -u):$(id -g) $HOME/.kube/config

You should now deploy a pod network to the cluster.
Run "kubectl apply -f [podnetwork].yaml" with one of the options listed at:
  https://kubernetes.io/docs/concepts/cluster-administration/addons/

Then you can join any number of worker nodes by running the following on each as root:

kubeadm join 192.168.192.131:6443 --token abcdef.0123456789abcdef \
    --discovery-token-ca-cert-hash sha256:3236bf910c84de4e1f5ad24b1b627771602d5bad03e7819aad18805c440fd8aa
~
执行上面的命令
mkdir -p $HOME/.kube
sudo cp -i /etc/kubernetes/admin.conf $HOME/.kube/config
sudo chown $(id -u):$(id -g) $HOME/.kube/config
查看k8s节点
[root@k8s-master01 ~]# kubectl get node
NAME           STATUS     ROLES    AGE   VERSION
k8s-master01   NotReady   master   19m   v1.15.1
加入主节点以及其余工作节点
执行安装日志中的加入命令即可
部署网络
下面这条不用
kubectl apply -f https://github.com/WeiboGe2012/kube-flannel.yml/blob/master/kube-flannel.yml
执行下面的命令
[root@k8s-master01 ~]# mkdir -p install-k8s/core
[root@k8s-master01 ~]# mv kubeadm-init.log kubeadm-config.yaml install-k8s/core
[root@k8s-master01 ~]# cd install-k8s/
[root@k8s-master01 install-k8s]# mkdir -p plugin/flannel
[root@k8s-master01 install-k8s]# cd plugin/flannel
[root@k8s-master01 flannel]# wget https://github.com/WeiboGe2012/kube-flannel.yml/blob/master/kube-flannel.yml

[root@k8s-master01 flannel]# kubectl create -f kube-flannel.yml

[root@k8s-master01 flannel]# kubectl get pod -n kube-system
NAME                                   READY   STATUS    RESTARTS   AGE
coredns-5c98db65d4-4kj2t               1/1     Running   0          92m
coredns-5c98db65d4-7zsr7               1/1     Running   0          92m
etcd-k8s-master01                      1/1     Running   0          91m
kube-apiserver-k8s-master01            1/1     Running   0          91m
kube-controller-manager-k8s-master01   1/1     Running   0          91m
kube-flannel-ds-amd64-g4gh9            1/1     Running   0          18m
kube-proxy-t7v46                       1/1     Running   0          92m
kube-scheduler-k8s-master01            1/1     Running   0          91m

[root@k8s-master01 flannel]# kubectl get node
NAME           STATUS   ROLES    AGE   VERSION
k8s-master01   Ready    master   93m   v1.15.1

[root@k8s-master01 flannel]# ifconfig
cni0: flags=4163<UP,BROADCAST,RUNNING,MULTICAST>  mtu 1450
        inet 10.244.0.1  netmask 255.255.255.0  broadcast 10.244.0.255
        ether c6:13:60:e7:e8:21  txqueuelen 1000  (Ethernet)
        RX packets 4809  bytes 329578 (321.8 KiB)
        RX errors 0  dropped 0  overruns 0  frame 0
        TX packets 4854  bytes 1485513 (1.4 MiB)
        TX errors 0  dropped 0 overruns 0  carrier 0  collisions 0

docker0: flags=4099<UP,BROADCAST,MULTICAST>  mtu 1500
        inet 172.17.0.1  netmask 255.255.0.0  broadcast 0.0.0.0
        ether 02:42:71:d8:f1:e2  txqueuelen 0  (Ethernet)
        RX packets 0  bytes 0 (0.0 B)
        RX errors 0  dropped 0  overruns 0  frame 0
        TX packets 0  bytes 0 (0.0 B)
        TX errors 0  dropped 0 overruns 0  carrier 0  collisions 0

ens33: flags=4163<UP,BROADCAST,RUNNING,MULTICAST>  mtu 1500
        inet 192.168.192.131  netmask 255.255.255.0  broadcast 192.168.192.255
        ether 00:0c:29:8c:51:ba  txqueuelen 1000  (Ethernet)
        RX packets 536379  bytes 581462942 (554.5 MiB)
        RX errors 0  dropped 0  overruns 0  frame 0
        TX packets 1359677  bytes 1764989232 (1.6 GiB)
        TX errors 0  dropped 0 overruns 0  carrier 0  collisions 0

flannel.1: flags=4163<UP,BROADCAST,RUNNING,MULTICAST>  mtu 1450
        inet 10.244.0.0  netmask 255.255.255.255  broadcast 0.0.0.0
        ether 16:0c:14:08:a6:51  txqueuelen 0  (Ethernet)
        RX packets 0  bytes 0 (0.0 B)
        RX errors 0  dropped 0  overruns 0  frame 0
        TX packets 0  bytes 0 (0.0 B)
        TX errors 0  dropped 0 overruns 0  carrier 0  collisions 0

lo: flags=73<UP,LOOPBACK,RUNNING>  mtu 65536
        inet 127.0.0.1  netmask 255.0.0.0
        loop  txqueuelen 1000  (Local Loopback)
        RX packets 625548  bytes 102038881 (97.3 MiB)
        RX errors 0  dropped 0  overruns 0  frame 0
        TX packets 625548  bytes 102038881 (97.3 MiB)
        TX errors 0  dropped 0 overruns 0  carrier 0  collisions 0

veth350261c9: flags=4163<UP,BROADCAST,RUNNING,MULTICAST>  mtu 1450
        ether f2:95:97:91:06:00  txqueuelen 0  (Ethernet)
        RX packets 2400  bytes 198077 (193.4 KiB)
        RX errors 0  dropped 0  overruns 0  frame 0
        TX packets 2424  bytes 741548 (724.1 KiB)
        TX errors 0  dropped 0 overruns 0  carrier 0  collisions 0

vethd9ac2bc1: flags=4163<UP,BROADCAST,RUNNING,MULTICAST>  mtu 1450
        ether 16:5c:e0:81:25:ba  txqueuelen 0  (Ethernet)
        RX packets 2409  bytes 198827 (194.1 KiB)
        RX errors 0  dropped 0  overruns 0  frame 0
        TX packets 2435  bytes 744163 (726.7 KiB)
        TX errors 0  dropped 0 overruns 0  carrier 0  collisions 0
node01、node01主机加入节点
kubeadm-init.log日志文件最后一行复制到node01、node02执行
kubeadm join 192.168.192.131:6443 --token abcdef.0123456789abcdef \
    --discovery-token-ca-cert-hash sha256:3236bf910c84de4e1f5ad24b1b627771602d5bad03e7819aad18805c440fd8aa
再到master上查看两个节点还没完全运行
[root@k8s-master01 flannel]# kubectl get node
NAME           STATUS     ROLES    AGE   VERSION
k8s-master01   Ready      master   99m   v1.15.1
k8s-node01     NotReady   <none>   23s   v1.15.1
k8s-node02     NotReady   <none>   20s   v1.15.1

# 等一会node01、node02运行完成后再次看看
[root@k8s-master01 flannel]# kubectl get pod -n kube-system
NAME                                   READY   STATUS    RESTARTS   AGE
coredns-5c98db65d4-4kj2t               1/1     Running   0          100m
coredns-5c98db65d4-7zsr7               1/1     Running   0          100m
etcd-k8s-master01                      1/1     Running   0          100m
kube-apiserver-k8s-master01            1/1     Running   0          100m
kube-controller-manager-k8s-master01   1/1     Running   0          100m
kube-flannel-ds-amd64-5chsx            1/1     Running   0          109s
kube-flannel-ds-amd64-8bxpj            1/1     Running   0          112s
kube-flannel-ds-amd64-g4gh9            1/1     Running   0          26m
kube-proxy-cznqr                       1/1     Running   0          112s
kube-proxy-mcsdl                       1/1     Running   0          109s
kube-proxy-t7v46                       1/1     Running   0          100m
kube-scheduler-k8s-master01            1/1     Running   0          100m
[root@k8s-master01 flannel]# kubectl get pod -n kube-system -o wide
NAME                                   READY   STATUS    RESTARTS   AGE     IP                NODE           NOMINATED NODE   READINESS GATES
coredns-5c98db65d4-4kj2t               1/1     Running   0          101m    10.244.0.3        k8s-master01   <none>           <none>
coredns-5c98db65d4-7zsr7               1/1     Running   0          101m    10.244.0.2        k8s-master01   <none>           <none>
etcd-k8s-master01                      1/1     Running   0          100m    192.168.192.131   k8s-master01   <none>           <none>
kube-apiserver-k8s-master01            1/1     Running   0          100m    192.168.192.131   k8s-master01   <none>           <none>
kube-controller-manager-k8s-master01   1/1     Running   0          100m    192.168.192.131   k8s-master01   <none>           <none>
kube-flannel-ds-amd64-5chsx            1/1     Running   0          2m20s   192.168.192.129   k8s-node02     <none>           <none>
kube-flannel-ds-amd64-8bxpj            1/1     Running   0          2m23s   192.168.192.130   k8s-node01     <none>           <none>
kube-flannel-ds-amd64-g4gh9            1/1     Running   0          26m     192.168.192.131   k8s-master01   <none>           <none>
kube-proxy-cznqr                       1/1     Running   0          2m23s   192.168.192.130   k8s-node01     <none>           <none>
kube-proxy-mcsdl                       1/1     Running   0          2m20s   192.168.192.129   k8s-node02     <none>           <none>
kube-proxy-t7v46                       1/1     Running   0          101m    192.168.192.131   k8s-master01   <none>           <none>
kube-scheduler-k8s-master01            1/1     Running   0          100m    192.168.192.131   k8s-master01   <none>           <none>

[root@k8s-master01 flannel]# kubectl get node
NAME           STATUS   ROLES    AGE     VERSION
k8s-master01   Ready    master   104m    v1.15.1
k8s-node01     Ready    <none>   5m34s   v1.15.1
k8s-node02     Ready    <none>   5m31s   v1.15.1
到此k8s的1.15.1版本部署成功了,现在还不是高可用的
最后将重要文件保存到/usr/local/下,防止别删除
mv install-k8s/ /usr/local/
harbor主机配置
参考文档:https://github.com/WeiboGe2012/Data/tree/master/Linux/k8s/colony
设置ip地址
vi /etc/sysconfig/network-scripts/ifcfg-ens33
master主机
TYPE="Ethernet"
PROXY_METHOD="none"
BROWSER_ONLY="no"
BOOTPROTO="static"
DEFROUTE="yes"
IPV4_FAILURE_FATAL="no"
IPV6INIT="yes"
IPV6_AUTOCONF="yes"
IPV6_DEFROUTE="yes"
IPV6_FAILURE_FATAL="no"
IPV6_ADDR_GEN_MODE="stable-privacy"
NAME="ens33"
UUID="ea3b61ed-9232-4b69-b6c0-2f863969e750"
DEVICE="ens33"
ONBOOT="yes"
IPADDR=192.168.192.128
NETMASK=255.255.255.0
GATEWAY=192.168.192.1
DNS1=192.168.192.1
DNS2=114.114.114.114
安装docker
- 卸载旧版本
$ sudo yum remove docker \
                  docker-client \
                  docker-client-latest \
                  docker-common \
                  docker-latest \
                  docker-latest-logrotate \
                  docker-logrotate \
                  docker-engine
# 设置存储库
# 安装yum-utils包(提供yum-config-manager 实用程序)并设置稳定存储库。
$ sudo yum install -y yum-utils
$ sudo yum-config-manager \
    --add-repo \
    https://download.docker.com/linux/centos/docker-ce.repo

# 安装指定版本的 Docker Engine 和 containerd
$ sudo yum install -y docker-ce-18.09.9 docker-ce-cli-18.09.9 containerd.io
启动docker
$ sudo systemctl start docker
通过运行hello-world 映像验证 Docker Engine 是否已正确安装。
$ sudo docker run hello-world
设置开机定时启动docker
$ sudo systemctl enable docker
关闭docker服务
$ sudo systemctl stop docker
重启docker服务
$ sudo systemctl restart docker
验证
[root@k8s-master01 ~]# docker version
Client:
 Version:           18.09.9
 API version:       1.39
 Go version:        go1.11.13
 Git commit:        039a7df9ba
 Built:             Wed Sep  4 16:51:21 2019
 OS/Arch:           linux/amd64
 Experimental:      false

Server: Docker Engine - Community
 Engine:
  Version:          18.09.9
  API version:      1.39 (minimum version 1.12)
  Go version:       go1.11.13
  Git commit:       039a7df
  Built:            Wed Sep  4 16:22:32 2019
  OS/Arch:          linux/amd64
  Experimental:     false
# 创建/etc/docker目录
mkdir /etc/docker

# 配置daemon
cat > /etc/docker/daemon.json <<EOF
{
	"exec-opts": ["native.cgroupdriver=systemd"],
	"log-driver": "json-file",
	"log-opts": {
		"max-size": "100m"
	},
	"insecure-registries": ["https://hub.atguigu.com"]
}
EOF

mkdir -p /etc/systemd/system/docker.service.d

# 重启docker服务
systemctl daemon-reload && systemctl restart docker && systemctl enable docker
安装docker-compose
下载
sudo curl -L "https://get.daocloud.io/docker/compose/releases/download/1.29.2/docker-compose-$(uname -s)-$(uname -m)" -o /usr/local/bin/docker-compose
设置权限
sudo chmod +x /usr/local/bin/docker-compose
验证
docker-compose --version
下载harborhttps://github.com/goharbor/harbor/releases
wget https://github.91chi.fun//https://github.com//goharbor/harbor/releases/download/v1.10.11/harbor-offline-installer-v1.10.11.tgz

tar -zxvf harbor-offline-installer-v1.10.11.tgz

mv harbor /usr/local/

cd /usr/local/harbor/

vi harbor.yml
harbor.yml
# Configuration file of Harbor

# The IP address or hostname to access admin UI and registry service.
# DO NOT use localhost or 127.0.0.1, because Harbor needs to be accessed by external clients.
hostname: hub.atguigu.com  # 修改点1,通讯地址

# http related config
http:
  # port for http, default is 80. If https enabled, this port will redirect to https port
  port: 80

# https related config
https:
  # https port for harbor, default is 443
  port: 443
  # The path of cert and key files for nginx
  certificate: /data/cert/server.crt    # 修改并创建/data/cert路径
  private_key: /data/cert/server.key    # 修改并创建/data/cert路径

# Uncomment external_url if you want to enable external proxy
# And when it enabled the hostname will no longer used
# external_url: https://reg.mydomain.com:8433

# The initial password of Harbor admin
# It only works in first time to install harbor
# Remember Change the admin password from UI after launching Harbor.
harbor_admin_password: Harbor12345     # harbor登录admin账户密码

# Harbor DB configuration
database:
  # The password for the root user of Harbor DB. Change this before any production use.
  password: root123
  # The maximum number of connections in the idle connection pool. If it <=0, no idle connections are retained.
  max_idle_conns: 50
  # The maximum number of open connections to the database. If it <= 0, then there is no limit on the number of open connections.
  # Note: the default number of connections is 100 for postgres.
  max_open_conns: 100

# The default data volume
data_volume: /data      # 数据存储地址,没有需要创建目录

# Harbor Storage settings by default is using /data dir on local filesystem
# Uncomment storage_service setting If you want to using external storage
# storage_service:
#   # ca_bundle is the path to the custom root ca certificate, which will be injected into the truststore
#   # of registry's and chart repository's containers.  This is usually needed when the user hosts a internal storage with self signed certificate.
#   ca_bundle:

#   # storage backend, default is filesystem, options include filesystem, azure, gcs, s3, swift and oss
#   # for more info about this configuration please refer https://docs.docker.com/registry/configuration/
#   filesystem:
#     maxthreads: 100
#   # set disable to true when you want to disable registry redirect
#   redirect:
#     disabled: false

# Clair configuration
clair:
  # The interval of clair updaters, the unit is hour, set to 0 to disable the updaters.
  updaters_interval: 12

jobservice:
  # Maximum number of job workers in job service
  max_job_workers: 10

notification:
  # Maximum retry count for webhook job
  webhook_job_max_retry: 10

chart:
  # Change the value of absolute_url to enabled can enable absolute url in chart
  absolute_url: disabled

# Log configurations
log:
  # options are debug, info, warning, error, fatal
  level: info
  # configs for logs in local storage
  local:
    # Log files are rotated log_rotate_count times before being removed. If count is 0, old versions are removed rather than rotated.
    rotate_count: 50
    # Log files are rotated only if they grow bigger than log_rotate_size bytes. If size is followed by k, the size is assumed to be in kilobytes.
    # If the M is used, the size is in megabytes, and if G is used, the size is in gigabytes. So size 100, size 100k, size 100M and size 100G
    # are all valid.
    rotate_size: 200M
    # The directory on your host that store log
    location: /var/log/harbor

  # Uncomment following lines to enable external syslog endpoint.
  # external_endpoint:
  #   # protocol used to transmit log to external endpoint, options is tcp or udp
  #   protocol: tcp
  #   # The host of external endpoint
  #   host: localhost
  #   # Port of external endpoint
  #   port: 5140

#This attribute is for migrator to detect the version of the .cfg file, DO NOT MODIFY!
_version: 1.10.0

# Uncomment external_database if using external database.
# external_database:
#   harbor:
#     host: harbor_db_host
#     port: harbor_db_port
#     db_name: harbor_db_name
#     username: harbor_db_username
#     password: harbor_db_password
#     ssl_mode: disable
#     max_idle_conns: 2
#     max_open_conns: 0
#   clair:
#     host: clair_db_host
#     port: clair_db_port
#     db_name: clair_db_name
#     username: clair_db_username
#     password: clair_db_password
#     ssl_mode: disable
#   notary_signer:
#     host: notary_signer_db_host
#     port: notary_signer_db_port
#     db_name: notary_signer_db_name
#     username: notary_signer_db_username
#     password: notary_signer_db_password
#     ssl_mode: disable
#   notary_server:
#     host: notary_server_db_host
#     port: notary_server_db_port
#     db_name: notary_server_db_name
#     username: notary_server_db_username
#     password: notary_server_db_password
#     ssl_mode: disable

# Uncomment external_redis if using external Redis server
# external_redis:
#   host: redis
#   port: 6379
#   password:
#   # db_index 0 is for core, it's unchangeable
#   registry_db_index: 1
#   jobservice_db_index: 2
#   chartmuseum_db_index: 3
#   clair_db_index: 4

# Uncomment uaa for trusting the certificate of uaa instance that is hosted via self-signed cert.
# uaa:
#   ca_file: /path/to/ca

# Global proxy
# Config http proxy for components, e.g. http://my.proxy.com:3128
# Components doesn't need to connect to each others via http proxy.
# Remove component from `components` array if want disable proxy
# for it. If you want use proxy for replication, MUST enable proxy
# for core and jobservice, and set `http_proxy` and `https_proxy`.
# Add domain to the `no_proxy` field, when you want disable proxy
# for some special registry.
proxy:
  http_proxy:
  https_proxy:
  # no_proxy endpoints will appended to 127.0.0.1,localhost,.local,.internal,log,db,redis,nginx,core,portal,postgresql,jobservice,registry,registryctl,clair,chartmuseum,notary-server
  no_proxy:
  components:
    - core
    - jobservice
    - clair
根据上面的创建目录
[root@localhost harbor]# mkdir -p /data/cert
[root@localhost harbor]# cd !$
cd /data/cert
[root@localhost cert]#
创建证书
# 生成私钥
[root@localhost cert]# openssl genrsa -des3 -out server.key 2048
Generating RSA private key, 2048 bit long modulus
....................................................................................+++
...........+++
e is 65537 (0x10001)
Enter pass phrase for server.key:					# 输入两次一样的密码
Verifying - Enter pass phrase for server.key:

[root@localhost cert]# openssl req -new -key server.key -out server.csr
Enter pass phrase for server.key:
You are about to be asked to enter information that will be incorporated
into your certificate request.
What you are about to enter is what is called a Distinguished Name or a DN.
There are quite a few fields but you can leave some blank
For some fields there will be a default value,
If you enter '.', the field will be left blank.
-----
Country Name (2 letter code) [XX]:CN										# 国家
State or Province Name (full name) []:BJ									# 省份
Locality Name (eg, city) [Default City]:BJ									# 城市
Organization Name (eg, company) [Default Company Ltd]:atguigu				# 组织
Organizational Unit Name (eg, section) []:atguigu							# 机构
Common Name (eg, your name or your server's hostname) []:hub.atguigu.com	# 域名
Email Address []:[email protected]											# 管理员邮箱

Please enter the following 'extra' attributes
to be sent with your certificate request
A challenge password []:													# 是否改密码,直接回车
An optional company name []:												# 是否改密码,直接回车


# 备份私钥
[root@localhost cert]# cp server.key server.key.org

# 转换成证书,把密码退掉
[root@localhost cert]# openssl rsa -in server.key.org -out server.key
Enter pass phrase for server.key.org:
writing RSA key

# 拿证书请求去签名
[root@localhost cert]# openssl x509 -req -days 365 -in server.csr -signkey server.key -out server.crt
Signature ok
subject=/C=CN/ST=BJ/L=BJ/O=atguigu/OU=atguigu/CN=hub.atguigu.com/emailAddress=[email protected]
Getting Private key

# 把证书赋予权限
[root@localhost cert]# chmod a+x *

# 运行脚本安装
[root@localhost cert]# cd /usr/local/harbor/
[root@localhost harbor]# ls
common.sh  harbor.v1.10.11.tar.gz  harbor.yml  install.sh  LICENSE  prepare
# 下面这部遇到问题5
[root@localhost harbor]# ./install.sh
到master、node01、node02三台主机,添加harbor主机域名
[root@k8s-master01 ~]# cat /etc/hosts
127.0.0.1   localhost localhost.localdomain localhost4 localhost4.localdomain4
::1         localhost localhost.localdomain localhost6 localhost6.localdomain6
192.168.192.131 k8s-master01
192.168.192.130 k8s-node01
192.168.192.129 k8s-node02
[root@k8s-master01 ~]# echo "192.168.192.128 hub.atguigu.com" >> /etc/hosts
[root@k8s-master01 ~]# cat /etc/hosts
127.0.0.1   localhost localhost.localdomain localhost4 localhost4.localdomain4
::1         localhost localhost.localdomain localhost6 localhost6.localdomain6
192.168.192.131 k8s-master01
192.168.192.130 k8s-node01
192.168.192.129 k8s-node02
192.168.192.128 hub.atguigu.com
harbor主机也添加上域名
[root@k8s-master01 ~]# cat /etc/hosts
127.0.0.1   localhost localhost.localdomain localhost4 localhost4.localdomain4
::1         localhost localhost.localdomain localhost6 localhost6.localdomain6
192.168.192.131 k8s-master01
192.168.192.130 k8s-node01
192.168.192.129 k8s-node02
192.168.192.128 hub.atguigu.com
修改Windows本地hosts文件,添加域名
C:\Windows\System32\drivers\etc\hosts
192.168.192.128 hub.atguigu.com
harbor主机,查看运行的容器
[root@localhost harbor]# docker ps -a
CONTAINER ID        IMAGE                                  COMMAND                  CREATED             STATUS                      PORTS                                         NAMES
cf5d0df2935f        goharbor/nginx-photon:v1.10.11         "nginx -g 'daemon of…"   48 seconds ago      Up 46 seconds (healthy)     0.0.0.0:80->8080/tcp, 0.0.0.0:443->8443/tcp   nginx
5f373c689525        goharbor/harbor-jobservice:v1.10.11    "/harbor/harbor_jobs…"   48 seconds ago      Up 46 seconds (healthy)                                                   harbor-jobservice
242b4f35f322        goharbor/harbor-core:v1.10.11          "/harbor/harbor_core"    48 seconds ago      Up 47 seconds (healthy)                                                   harbor-core
6fc46205eccb        goharbor/harbor-registryctl:v1.10.11   "/home/harbor/start.…"   50 seconds ago      Up 48 seconds (healthy)                                                   registryctl
8ca6e340e8b5        goharbor/harbor-db:v1.10.11            "/docker-entrypoint.…"   50 seconds ago      Up 48 seconds (healthy)     5432/tcp                                      harbor-db
bed1ed36df00        goharbor/redis-photon:v1.10.11         "redis-server /etc/r…"   50 seconds ago      Up 48 seconds (healthy)     6379/tcp                                      redis
42f03bcc4fb8        goharbor/harbor-portal:v1.10.11        "nginx -g 'daemon of…"   51 seconds ago      Up 48 seconds (healthy)     8080/tcp                                      harbor-portal
0647d52988cf        goharbor/registry-photon:v1.10.11      "/home/harbor/entryp…"   51 seconds ago      Up 48 seconds (healthy)     5000/tcp                                      registry
229aa32bbc70        goharbor/harbor-log:v1.10.11           "/bin/sh -c /usr/loc…"   51 seconds ago      Up 50 seconds (healthy)     127.0.0.1:1514->10514/tcp                     harbor-log
f349984bf935        91d0ab894aff                           "stf local --public-…"   6 months ago        Exited (1) 6 months ago                                                   stf
3b7be288d1ff        7123ee61b746                           "/sbin/tini -- adb -…"   6 months ago        Exited (143) 6 months ago                                                 adbd
a4bfb45049e4        2a54dcb95502                           "rethinkdb --bind al…"   6 months ago        Exited (0) 6 months ago                                                   rethinkdb
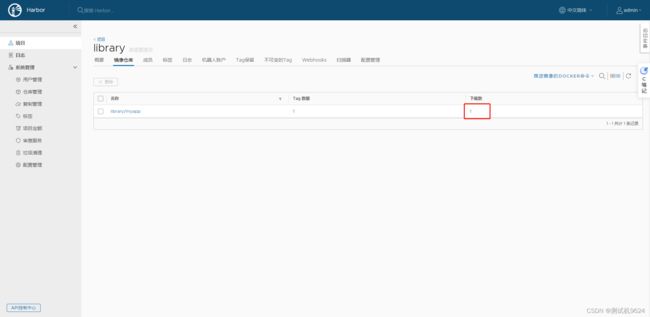
打开浏览器访问:hub.atguigu.com

输入账户:admin 密码:Harbor12345

验证node01登录harbor
[root@k8s-node01 ~]# docker login https://hub.atguigu.com
Username: admin
Password:
WARNING! Your password will be stored unencrypted in /root/.docker/config.json.
Configure a credential helper to remove this warning. See
https://docs.docker.com/engine/reference/commandline/login/#credentials-store

Login Succeeded

[root@k8s-node01 ~]# docker pull wangyanglinux/myapp:v1
v1: Pulling from wangyanglinux/myapp
550fe1bea624: Pull complete
af3988949040: Pull complete
d6642feac728: Pull complete
c20f0a205eaa: Pull complete
fe78b5db7c4e: Pull complete
6565e38e67fe: Pull complete
Digest: sha256:9c3dc30b5219788b2b8a4b065f548b922a34479577befb54b03330999d30d513
Status: Downloaded newer image for wangyanglinux/myapp:v1

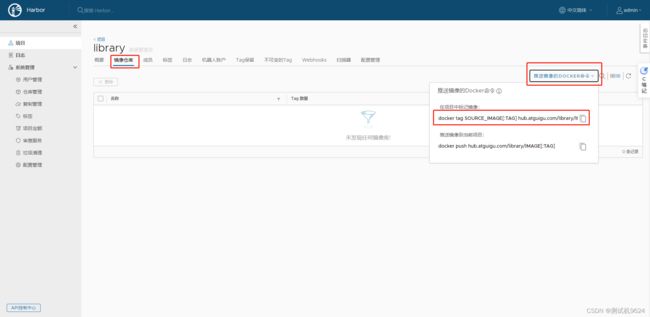
格式:docker tag SOURCE_IMAGE[:TAG] hub.atguigu.com/library/IMAGE[:TAG]
修改镜像标签,并推送
[root@k8s-node01 ~]# docker tag wangyanglinux/myapp:v1 hub.atguigu.com/library/myapp:v1
[root@k8s-node01 ~]# docker push hub.atguigu.com/library/myapp:v1
The push refers to repository [hub.atguigu.com/library/myapp]
a0d2c4392b06: Pushed
05a9e65e2d53: Pushed
68695a6cfd7d: Pushed
c1dc81a64903: Pushed
8460a579ab63: Pushed
d39d92664027: Pushed
v1: digest: sha256:9eeca44ba2d410e54fccc54cbe9c021802aa8b9836a0bcf3d3229354e4c8870e size: 1569
[root@k8s-node01 ~]# docker rmi -f hub.atguigu.com/library/myapp:v1
Untagged: hub.atguigu.com/library/myapp:v1
Untagged: hub.atguigu.com/library/myapp@sha256:9eeca44ba2d410e54fccc54cbe9c021802aa8b9836a0bcf3d3229354e4c8870e
[root@k8s-node01 ~]# docker rmi -f wangyanglinux/myapp:v1
Untagged: wangyanglinux/myapp:v1
Untagged: wangyanglinux/myapp@sha256:9c3dc30b5219788b2b8a4b065f548b922a34479577befb54b03330999d30d513
Deleted: sha256:d4a5e0eaa84f28550cb9dd1bde4bfe63a93e3cf88886aa5dad52c9a75dd0e6a9
Deleted: sha256:bf5594a16c1ff32ffe64a68a92ebade1080641f608d299170a2ae403f08764e7
Deleted: sha256:b74f3c20dd90bf6ead520265073c4946461baaa168176424ea7aea1bc7f08c1f
Deleted: sha256:8943f94f7db615e453fa88694440f76d65927fa18c6bf69f32ebc9419bfcc04a
Deleted: sha256:2020231862738f8ad677bb75020d1dfa34159ad95eef10e790839174bb908908
Deleted: sha256:49757da6049113b08246e77f770f49b1d50bb97c93f19d2eeae62b485b46e489
Deleted: sha256:d39d92664027be502c35cf1bf464c726d15b8ead0e3084be6e252a161730bc82

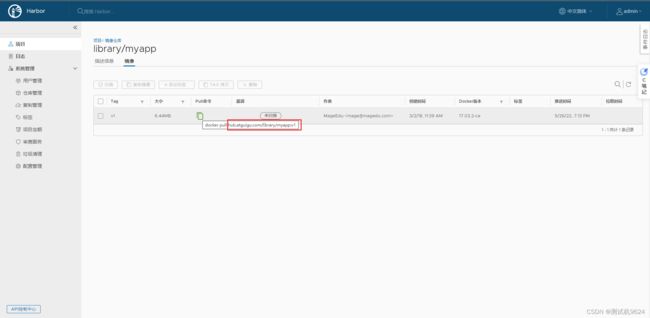
docker pull hub.atguigu.com/library/myapp:v1
在master主机上
[root@k8s-master01 ~]# kubectl run nginx-deployment --image=hub.atguigu.com/library/myapp:v1 --prot=80 --replicas=1
kubectl run --generator=deployment/apps.v1 is DEPRECATED and will be removed in a future version. Use kubectl run --generator=run-pod/v1 or kubectl create instead.
deployment.apps/nginx-deployment created

[root@k8s-master01 ~]# kubectl get deployment
NAME               READY   UP-TO-DATE   AVAILABLE   AGE
nginx-deployment   1/1     1            1           3m32s
[root@k8s-master01 ~]# kubectl get rs
NAME                          DESIRED   CURRENT   READY   AGE
nginx-deployment-78b46578cd   1         1         1       4m39s
[root@k8s-master01 ~]# kubectl get pod
NAME                                READY   STATUS    RESTARTS   AGE
nginx-deployment-78b46578cd-ttnkc   1/1     Running   0          4m48s

# 可以看到是在node01接点上运行
[root@k8s-master01 ~]# kubectl get pod -o wide
NAME                                READY   STATUS    RESTARTS   AGE     IP           NODE         NOMINATED NODE   READINESS GATES
nginx-deployment-78b46578cd-ttnkc   1/1     Running   0          5m19s   10.244.1.2   k8s-node01   <none>           <none>

# 直接访问是通的
[root@k8s-master01 ~]# curl 10.244.1.2
Hello MyApp | Version: v1 | <a href="hostname.html">Pod Name</a>
[root@k8s-master01 ~]# curl 10.244.1.2/hostname.html
nginx-deployment-78b46578cd-ttnkc
我们就到node01查看到hub.atguigu.com/library/myapp 在运行
[root@k8s-node01 ~]# docker ps
CONTAINER ID        IMAGE                           COMMAND                  CREATED             STATUS              PORTS               NAMES
ead8b7b658d0        hub.atguigu.com/library/myapp   "nginx -g 'daemon of…"   6 minutes ago       Up 6 minutes                            k8s_nginx-deployment_nginx-deployment-78b46578cd-ttnkc_default_aba645b2-b0bc-40df-bd3f-74e872c5eb3e_0
2e9604fe6814        k8s.gcr.io/pause:3.1            "/pause"                 6 minutes ago       Up 6 minutes                            k8s_POD_nginx-deployment-78b46578cd-ttnkc_default_aba645b2-b0bc-40df-bd3f-74e872c5eb3e_0
14144597ee6c        4e9f801d2217                    "/opt/bin/flanneld -…"   6 hours ago         Up 6 hours                              k8s_kube-flannel_kube-flannel-ds-amd64-8bxpj_kube-system_cf50e169-2798-496b-ac94-901ae02fc836_3
da5aa7976f63        89a062da739d                    "/usr/local/bin/kube…"   6 hours ago         Up 6 hours                              k8s_kube-proxy_kube-proxy-cznqr_kube-system_4146aaa5-e985-45bb-9f42-871c7671eea2_2
db9c540c9d69        k8s.gcr.io/pause:3.1            "/pause"                 6 hours ago         Up 6 hours                              k8s_POD_kube-proxy-cznqr_kube-system_4146aaa5-e985-45bb-9f42-871c7671eea2_3
b0c135210d4f        k8s.gcr.io/pause:3.1            "/pause"                 6 hours ago         Up 6 hours                              k8s_POD_kube-flannel-ds-amd64-8bxpj_kube-system_cf50e169-2798-496b-ac94-901ae02fc836_2
[root@k8s-master01 ~]# kubectl delete pod nginx-deployment-78b46578cd-ttnkc
pod "nginx-deployment-78b46578cd-ttnkc" deleted
[root@k8s-master01 ~]# kubectl get pod
NAME                                READY   STATUS    RESTARTS   AGE
nginx-deployment-78b46578cd-vvkd6   1/1     Running   0          29s
进行扩容
[root@k8s-master01 ~]# kubectl scale --replicas=3 deployment/nginx-deployment
deployment.extensions/nginx-deployment scaled
[root@k8s-master01 ~]# kubectl get pod
NAME                                READY   STATUS    RESTARTS   AGE
nginx-deployment-78b46578cd-45ndq   1/1     Running   0          11s
nginx-deployment-78b46578cd-r627l   1/1     Running   0          11s
nginx-deployment-78b46578cd-vvkd6   1/1     Running   0          3m17s
[root@k8s-master01 ~]# kubectl get pod -o wide
NAME                                READY   STATUS    RESTARTS   AGE     IP           NODE         NOMINATED NODE   READINESS GATES
nginx-deployment-78b46578cd-45ndq   1/1     Running   0          50s     10.244.2.2   k8s-node02   <none>           <none>
nginx-deployment-78b46578cd-r627l   1/1     Running   0          50s     10.244.1.4   k8s-node01   <none>           <none>
nginx-deployment-78b46578cd-vvkd6   1/1     Running   0          3m56s   10.244.1.3   k8s-node01   <none>           <none>
删除一个后再查看依然还是三个
[root@k8s-master01 ~]# kubectl delete pod nginx-deployment-78b46578cd-45ndq
pod "nginx-deployment-78b46578cd-45ndq" deleted
[root@k8s-master01 ~]# kubectl get pod -o wide
NAME                                READY   STATUS    RESTARTS   AGE     IP           NODE         NOMINATED NODE   READINESS GATES
nginx-deployment-78b46578cd-4g4cb   1/1     Running   0          34s     10.244.2.3   k8s-node02   <none>           <none>
nginx-deployment-78b46578cd-r627l   1/1     Running   0          2m30s   10.244.1.4   k8s-node01   <none>           <none>
nginx-deployment-78b46578cd-vvkd6   1/1     Running   0          5m36s   10.244.1.3   k8s-node01   <none>           <none>
[root@k8s-master01 ~]# kubectl get svc
NAME         TYPE        CLUSTER-IP   EXTERNAL-IP   PORT(S)   AGE
kubernetes   ClusterIP   10.96.0.1    <none>        443/TCP   23h
[root@k8s-master01 ~]# kubectl get deployment
NAME               READY   UP-TO-DATE   AVAILABLE   AGE
nginx-deployment   3/3     3            3           22m
[root@k8s-master01 ~]# kubectl expose deployment nginx-deployment --port=30000 --target-port=80
service/nginx-deployment exposed
[root@k8s-master01 ~]# kubectl get svc
NAME               TYPE        CLUSTER-IP     EXTERNAL-IP   PORT(S)     AGE
kubernetes         ClusterIP   10.96.0.1      <none>        443/TCP     23h
nginx-deployment   ClusterIP   10.97.63.227   <none>        30000/TCP   39s
[root@k8s-master01 ~]# curl 10.97.63.227:30000
Hello MyApp | Version: v1 | <a href="hostname.html">Pod Name</a>

# 轮询的访问
[root@k8s-master01 ~]# curl 10.97.63.227:30000/hostname.html
nginx-deployment-78b46578cd-r627l
[root@k8s-master01 ~]# curl 10.97.63.227:30000/hostname.html
nginx-deployment-78b46578cd-vvkd6
[root@k8s-master01 ~]# curl 10.97.63.227:30000/hostname.html
nginx-deployment-78b46578cd-4g4cb
[root@k8s-master01 ~]# curl 10.97.63.227:30000/hostname.html
nginx-deployment-78b46578cd-r627l
[root@k8s-master01 ~]# ipvsadm -Ln | grep 10.97.63.227
TCP  10.97.63.227:30000 rr
[root@k8s-master01 ~]# ipvsadm -Ln
IP Virtual Server version 1.2.1 (size=4096)
Prot LocalAddress:Port Scheduler Flags
  -> RemoteAddress:Port           Forward Weight ActiveConn InActConn
TCP  10.96.0.1:443 rr
  -> 192.168.192.131:6443         Masq    1      3          0
TCP  10.96.0.10:53 rr
  -> 10.244.0.6:53                Masq    1      0          0
  -> 10.244.0.7:53                Masq    1      0          0
TCP  10.96.0.10:9153 rr
  -> 10.244.0.6:9153              Masq    1      0          0
  -> 10.244.0.7:9153              Masq    1      0          0
TCP  10.97.63.227:30000 rr
  -> 10.244.1.3:80                Masq    1      0          2
  -> 10.244.1.4:80                Masq    1      0          2
  -> 10.244.2.3:80                Masq    1      0          2
UDP  10.96.0.10:53 rr
  -> 10.244.0.6:53                Masq    1      0          0
  -> 10.244.0.7:53                Masq    1      0          0

# IP和上面的一样
[root@k8s-master01 ~]# kubectl get pod -o wide
NAME                                READY   STATUS    RESTARTS   AGE   IP           NODE         NOMINATED NODE   READINESS GATES
nginx-deployment-78b46578cd-4g4cb   1/1     Running   0          13m   10.244.2.3   k8s-node02   <none>           <none>
nginx-deployment-78b46578cd-r627l   1/1     Running   0          15m   10.244.1.4   k8s-node01   <none>           <none>
nginx-deployment-78b46578cd-vvkd6   1/1     Running   0          18m   10.244.1.3   k8s-node01   <none>           <none>
外网不能访问问题
[root@k8s-master01 ~]# kubectl get svc
NAME               TYPE        CLUSTER-IP     EXTERNAL-IP   PORT(S)     AGE
kubernetes         ClusterIP   10.96.0.1      <none>        443/TCP     24h
nginx-deployment   ClusterIP   10.97.63.227   <none>        30000/TCP   10m
[root@k8s-master01 ~]# kubectl edit svc nginx-deployment
# Please edit the object below. Lines beginning with a '#' will be ignored,
# and an empty file will abort the edit. If an error occurs while saving this file will be
# reopened with the relevant failures.
#
apiVersion: v1
kind: Service
metadata:
  creationTimestamp: "2022-05-26T11:48:32Z"
  labels:
    run: nginx-deployment
  name: nginx-deployment
  namespace: default
  resourceVersion: "72884"
  selfLink: /api/v1/namespaces/default/services/nginx-deployment
  uid: 22af8fb4-9580-4918-9040-ac1de01e39d3
spec:
  clusterIP: 10.97.63.227
  ports:
  - port: 30000
    protocol: TCP
    targetPort: 80
  selector:
    run: nginx-deployment
  sessionAffinity: None
  type: NodePort     # 修改成NodePort
status:
  loadBalancer: {}
[root@k8s-master01 ~]# kubectl get svc
NAME               TYPE        CLUSTER-IP     EXTERNAL-IP   PORT(S)           AGE
kubernetes         ClusterIP   10.96.0.1      <none>        443/TCP           24h
nginx-deployment   NodePort    10.97.63.227   <none>        30000:30607/TCP   14m
[root@k8s-master01 ~]# netstat -anpt | grep :30607
tcp6       0      0 :::30607                :::*                    LISTEN      112386/kube-proxy
[root@k8s-master01 ~]# netstat -anpt | grep :30607
tcp6       0      0 :::30607                :::*                    LISTEN      112386/kube-proxy
外网访问master主机地址加端口

node01的访问

node02的访问

这样k8s的测试,和仓库的私有连接就完成了
遇到问题1:浏览器192.168.1.1访问不了
遇到问题2:
Cannot connect to the Docker daemon at unix:///var/run/docker.sock. Is the docker daemon running?
解决办法:docker少创建了一个目录,环境部署仔细捋一遍
遇到问题3:
[root@k8s-master01 ~]# kubeadm init --config=kubeadm-config.yaml --experimental-upload-certs | tee kubeadm-init.log
Flag --experimental-upload-certs has been deprecated, use --upload-certs instead
[init] Using Kubernetes version: v1.15.1
[preflight] Running pre-flight checks
        [WARNING SystemVerification]: this Docker version is not on the list of validated versions: 20.10.16. Latest validated version: 18.09
error execution phase preflight: [preflight] Some fatal errors occurred:
        [ERROR NumCPU]: the number of available CPUs 1 is less than the required 2
解决办法:安装指定版本的docker,参考1:https://blog.csdn.net/mayi_xiaochaun/article/details/123421532
卸载docker,参考2:https://blog.csdn.net/wujian_csdn_csdn/article/details/122421103
遇到问题4:
[root@k8s-master01 ~]# kubeadm init --config=kubeadm-config.yaml --experimental-upload-certs | tee kubeadm-init.log
Flag --experimental-upload-certs has been deprecated, use --upload-certs instead
[init] Using Kubernetes version: v1.15.1
[preflight] Running pre-flight checks
        [WARNING Service-Docker]: docker service is not enabled, please run 'systemctl enable docker.service'
error execution phase preflight: [preflight] Some fatal errors occurred:
        [ERROR NumCPU]: the number of available CPUs 1 is less than the required 2
[preflight] If you know what you are doing, you can make a check non-fatal with `--ignore-preflight-errors=...`
解决办法:虚拟机添加cpu,必须最低保证两个cpu
遇到问题5:
[root@localhost harbor]# ./install.sh
...
...
...
Creating network "harbor_harbor" with the default driver
Creating harbor-log ... done
Creating harbor-portal ...
Creating registryctl   ...
Creating registry      ... error
Creating harbor-portal ... done
Creating registryctl   ... done
ERROR: for registry  Cannot create container for service registry: Conflict. The container name "/registry" is already in use by container "3f42e1c7dd80b96b59848ac10698ef3f5537afeedb718a424dd91d13bb55440b". You have to remove (or renCreating redis         ... done
Creating harbor-db     ... done

ERROR: for registry  Cannot create container for service registry: Conflict. The container name "/registry" is already in use by container "3f42e1c7dd80b96b59848ac10698ef3f5537afeedb718a424dd91d13bb55440b". You have to remove (or rename) that container to be able to reuse that name.
ERROR: Encountered errors while bringing up the project.
解决办法:删除registry容器和镜像
[root@localhost harbor]# docker images
REPOSITORY                      TAG                 IMAGE ID            CREATED             SIZE
goharbor/chartmuseum-photon     v1.10.11            d00df92a5e3e        3 weeks ago         164MB
goharbor/redis-photon           v1.10.11            aa57c8e9fa46        3 weeks ago         151MB
goharbor/clair-adapter-photon   v1.10.11            e87900ea4eb9        3 weeks ago         66.1MB
goharbor/clair-photon           v1.10.11            03cd37f2ca5d        3 weeks ago         178MB
goharbor/notary-server-photon   v1.10.11            801719b38205        3 weeks ago         105MB
goharbor/notary-signer-photon   v1.10.11            005e711802d6        3 weeks ago         102MB
goharbor/harbor-registryctl     v1.10.11            fd34fcc88f68        3 weeks ago         93.4MB
goharbor/registry-photon        v1.10.11            c7076a9bc40b        3 weeks ago         78.6MB
goharbor/nginx-photon           v1.10.11            68e6d0e1c018        3 weeks ago         45MB
goharbor/harbor-log             v1.10.11            06df11c5e8f3        3 weeks ago         108MB
goharbor/harbor-jobservice      v1.10.11            f7d878b39e41        3 weeks ago         84.7MB
goharbor/harbor-core            v1.10.11            69d4874721a3        3 weeks ago         79.6MB
goharbor/harbor-portal          v1.10.11            83b24472c7c8        3 weeks ago         53.1MB
goharbor/harbor-db              v1.10.11            11278dbcadf4        3 weeks ago         188MB
goharbor/prepare                v1.10.11            66d60732b8ff        3 weeks ago         206MB
nginx                           latest              04661cdce581        6 months ago        141MB
rethinkdb                       latest              2a54dcb95502        7 months ago        131MB
192.168.111.129:5000/demo       latest              40fc65df2cf9        14 months ago       660MB
demo                            1.0-SNAPSHOT        40fc65df2cf9        14 months ago       660MB
registry                        latest              678dfa38fcfa        17 months ago       26.2MB
openstf/ambassador              latest              938a816f078a        21 months ago       8.63MB
openstf/stf                     latest              91d0ab894aff        21 months ago       958MB
sorccu/adb                      latest              7123ee61b746        4 years ago         30.5MB
java                            8                   d23bdf5b1b1b        5 years ago         643MB
[root@localhost harbor]# docker rmi -f registry:latest
或者
[root@localhost harbor]# docker rmi 678dfa38fcfa
Error response from daemon: conflict: unable to delete 678dfa38fcfa (must be forced) - image is being used by stopped container 3f42e1c7dd80
[root@localhost harbor]# docker rm 3f42e1c7dd80
3f42e1c7dd80
[root@localhost harbor]# docker rmi 678dfa38fcfa
Error: No such image: 678dfa38fcfa

[root@localhost harbor]# cd /var/lib/docker/image/overlay2/imagedb/content/sha256/
[root@localhost sha256]# ll
总用量 188
-rw-------. 1 root root 4265 5月  26 17:48 005e711802d665903b9216e8c46b46676ad9c2e43ef48911a33f0bf9dbd30a06
-rw-------. 1 root root 4791 5月  26 17:48 03cd37f2ca5d16745270fef771c60cd502ec9559d332d6601f5ab5e9f41e841a
-rw-------. 1 root root 7738 11月 11 2021 04661cdce5812210bac48a8af672915d0719e745414b4c322719ff48c7da5b83
-rw-------. 1 root root 4789 5月  26 17:48 06df11c5e8f3cf1963c236327434cbfe2f5f3d9a9798c487d4e6c8ba1742e5fe
-rw-------. 1 root root 5725 5月  26 17:48 11278dbcadf4651433c7432427bd4877b6840c5d21454c3bf266c12c1d1dd559
-rw-------. 1 root root 5640 3月  18 2021 27fdf005f8f0ddc7837fcb7c1dd61cffdb37f14d964fb4edccfa4e6b60f6e339
-rw-------. 1 root root 3364 11月 11 2021 2a54dcb95502386ca01cdec479bea40b3eacfefe7019e6bb4883eff04d35b883
-rw-------. 1 root root 5771 3月  18 2021 40fc65df2cf909b24416714b4640fa783869481a4eebf37f7da8cbf1f299b2ab
-rw-------. 1 root root 5062 3月  18 2021 4e1d920c1cd61aeaf44f7e17b2dfc3dcb24414770a3955bbed61e53c39b90232
-rw-------. 1 root root 3526 5月  26 17:48 66d60732b8ff10d2f2d237a68044f11fc87497606cf8c5feae2adf6433f3d946
-rw-------. 1 root root 3114 3月  18 2021 678dfa38fcfa349ccbdb1b6d52ac113ace67d5746794b36dfbad9dd96a9d1c43
-rw-------. 1 root root 3501 5月  26 17:48 68e6d0e1c018d66a4cab78d6c2c46c23794e8a06b37e195e8c8bcded2ecc82d2
-rw-------. 1 root root 4058 5月  26 17:48 69d4874721a38f06228c4a2e407e4c82a8847b61b51c2d50a6e3fc645635c233
-rw-------. 1 root root 4284 11月 11 2021 7123ee61b7468b74c8de67a6dfb40c61840f5b910fee4105e38737271741582f
-rw-------. 1 root root 4263 5月  26 17:48 801719b38205038d5a145380a1954481ed4e8a340e914ef7819f0f7bed395df6
-rw-------. 1 root root 4814 5月  26 17:48 83b24472c7c8cc71effc362949d4fa04e3e0a6e4a8f2a248f5706513cbcdfa0a
-rw-------. 1 root root 5316 3月  18 2021 8f36ad1be230ab68cc8337931358734ffedd968a076a9522cd88359fbf4af98d
-rw-------. 1 root root 6501 11月 11 2021 91d0ab894affa1430efb6bd130edb360d9600132bb4187a6cabe403d8ef98bdd
-rw-------. 1 root root 2070 11月 11 2021 938a816f078a0b27753a0f690518754bfbb47e0bb57e61275600757845d7e4b1
-rw-------. 1 root root 3751 5月  26 17:48 aa57c8e9fa464f8124a753facda552af0a79f5aa169901f357a9003c8a65d9c5
-rw-------. 1 root root 5204 3月  18 2021 bb56dc5d8cbd1f41b9e9bc7de1df15354a204cf17527790e13ac7d0147916dd6
-rw-------. 1 root root 4347 5月  26 17:48 c7076a9bc40b43db80afb4699e124c0dd1c777825bd36d504a2233028421a178
-rw-------. 1 root root 4858 3月  18 2021 c70a4b1ffafa08a73e469ed0caa6693111aad55d34df8df7eea6bae0fb542547
-rw-------. 1 root root 4592 5月  26 17:48 d00df92a5e3e330c2231d9f54a0a0c320c420946e04afcfe02ad596d778a8370
-rw-------. 1 root root 4733 3月  18 2021 d23bdf5b1b1b1afce5f1d0fd33e7ed8afbc084b594b9ccf742a5b27080d8a4a8
-rw-------. 1 root root 3715 5月  26 17:48 e87900ea4eb9beafd8264e874f71fcb72ce1df827e999d6bb7b2e47ebb0ca5e4
-rw-------. 1 root root 3677 5月  26 17:48 f7d878b39e411b345d4eb263205cde950ad59ba3102d4ac1079238ef1b3de903
-rw-------. 1 root root 4632 5月  26 17:48 fd34fcc88f68fe44a06c34d3a754f70fd36ee6174e64e65cb1072f0d4a9826d0
[root@localhost sha256]# rm -rf 678dfa38fcfa349ccbdb1b6d52ac113ace67d5746794b36dfbad9dd96a9d1c43
[root@localhost sha256]# docker images
REPOSITORY                      TAG                 IMAGE ID            CREATED             SIZE
goharbor/chartmuseum-photon     v1.10.11            d00df92a5e3e        3 weeks ago         164MB
goharbor/redis-photon           v1.10.11            aa57c8e9fa46        3 weeks ago         151MB
goharbor/clair-adapter-photon   v1.10.11            e87900ea4eb9        3 weeks ago         66.1MB
goharbor/clair-photon           v1.10.11            03cd37f2ca5d        3 weeks ago         178MB
goharbor/notary-server-photon   v1.10.11            801719b38205        3 weeks ago         105MB
goharbor/notary-signer-photon   v1.10.11            005e711802d6        3 weeks ago         102MB
goharbor/harbor-registryctl     v1.10.11            fd34fcc88f68        3 weeks ago         93.4MB
goharbor/registry-photon        v1.10.11            c7076a9bc40b        3 weeks ago         78.6MB
goharbor/nginx-photon           v1.10.11            68e6d0e1c018        3 weeks ago         45MB
goharbor/harbor-log             v1.10.11            06df11c5e8f3        3 weeks ago         108MB
goharbor/harbor-jobservice      v1.10.11            f7d878b39e41        3 weeks ago         84.7MB
goharbor/harbor-core            v1.10.11            69d4874721a3        3 weeks ago         79.6MB
goharbor/harbor-portal          v1.10.11            83b24472c7c8        3 weeks ago         53.1MB
goharbor/harbor-db              v1.10.11            11278dbcadf4        3 weeks ago         188MB
goharbor/prepare                v1.10.11            66d60732b8ff        3 weeks ago         206MB
nginx                           latest              04661cdce581        6 months ago        141MB
rethinkdb                       latest              2a54dcb95502        7 months ago        131MB
192.168.111.129:5000/demo       latest              40fc65df2cf9        14 months ago       660MB
demo                            1.0-SNAPSHOT        40fc65df2cf9        14 months ago       660MB
openstf/ambassador              latest              938a816f078a        21 months ago       8.63MB
openstf/stf                     latest              91d0ab894aff        21 months ago       958MB
sorccu/adb                      latest              7123ee61b746        4 years ago         30.5MB
java                            8                   d23bdf5b1b1b        5 years ago         643MB

