Linux离线安装elasticsearch|header|kibna插件最详细
1.准备软件安装包
[hadoop@host152 elasticsearch]$ ll
-rw-r--r--. 1 hadoop hadoop 515807354 9月 23 23:40 elasticsearch-8.1.1-linux-x86_64.tar.gz
-rw-r--r--. 1 hadoop hadoop 1295593 9月 23 23:48 elasticsearch-head-master.tar.gz
-rw-r--r--. 1 hadoop hadoop 269733374 9月 23 23:46 kibana-8.1.1-linux-x86_64.tar.gz
-rw-r--r--. 1 hadoop hadoop 22290256 9月 21 17:47 node-v16.3.0-linux-x64.tar.xz
百度云链接:https://pan.baidu.com/s/1BN80_GIw4k9Vd9u-x_RSxg
提取码:ujph
2.安装elasticsearch-8.1.1
2.1解压安装包
[hadoop@host152 elasticsearch]$ tar -xvf elasticsearch-8.1.1-linux-x86_64.tar.gz
2.2修改配置文件
[hadoop@host152 elasticsearch]$ cd elasticsearch-8.1.1/
[hadoop@host152 elasticsearch-8.1.1]$ cd config/
[hadoop@host152 config]$ vim elasticsearch.yml
cluster.name: my-es8.1.1
node.name: node-1
network.host: 192.168.72.152
http.port: 9200
2.3启动elasticsearch-8.1.1
[hadoop@host152 bin]$ ./elasticsearch -d
2.4启动报错常见问题
ERROR: [2] bootstrap checks failed. You must address the points described in the following [2] lines before starting Elasticsearch.
bootstrap check failure [1] of [2]: max file descriptors [4096] for elasticsearch process is too low, increase to at least [65535]
bootstrap check failure [2] of [2]: max virtual memory areas vm.max_map_count [65530] is too low, increase to at least [262144]
ERROR: Elasticsearch did not exit normally - check the logs at /home/hadoop/opensource/elasticsearch/elasticsearch-8.1.1/logs/elasticsearch.log
说上述有两个错误,第一个是说elasticsearch进程为4096太小,请调整为至少65535,解决办法切换root用户在limits.conf末尾添加文件如下(此配置修改后需要退出重新登陆才生效):
[root@host152 ~]# vi /etc/security/limits.conf
* soft nofile 65536
* hard nofile 131072
* soft nproc 65535
* hard nproc 65535
另一个错误是说elasticsearch用户拥有的内存权限太小,至少需要262144,解决办法也是切换root用户修改sysctl.conf,添加内容如下:
[root@host152 ~]# vim /etc/sysctl.conf
vm.max_map_count=262144
刷新系统配置即可
[root@host152 ~]# sysctl -p
vm.max_map_count = 262144
2.5再次启动elasticsearch
[hadoop@host152 bin]$ ./elasticsearch >elasticsearch.log &
启动没报错,但是访问不能成功,把安全关闭,es8默认开启了此开关
xpack.security.enabled: false
xpack.security.enrollment.enabled: false
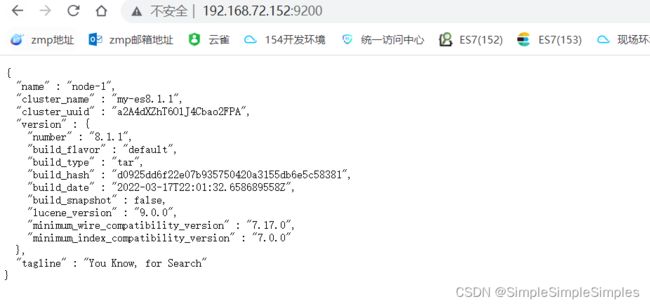
修改上述配置再重启,即可访问成功
[hadoop@host152 elasticsearch-8.1.1]$ curl 192.168.72.152:9200
{
"name" : "node-1",
"cluster_name" : "my-es8.1.1",
"cluster_uuid" : "a2A4dXZhT6OlJ4Cbao2FPA",
"version" : {
"number" : "8.1.1",
"build_flavor" : "default",
"build_type" : "tar",
"build_hash" : "d0925dd6f22e07b935750420a3155db6e5c58381",
"build_date" : "2022-03-17T22:01:32.658689558Z",
"build_snapshot" : false,
"lucene_version" : "9.0.0",
"minimum_wire_compatibility_version" : "7.17.0",
"minimum_index_compatibility_version" : "7.0.0"
},
"tagline" : "You Know, for Search"
}
2.6本地浏览器访问
输入访问地址http://192.168.72.152:9200/
若果不能访问,请检查防火墙
查看状态
[root@host152 ~]# firewall-cmd --state
running
关闭防火墙
[root@host152 ~]# systemctl stop firewalld.service
禁止开机启动
[root@host152 ~]# systemctl disable firewalld.service
3.安装node
3.1检查服务是否已经安装node
[root@host152 ~]# node -v
bash: node: 未找到命令...
[root@host152 ~]# npm -v
bash: npm: 未找到命令...
3.2安装node
解压node
[hadoop@host152 elasticsearch]$ tar -xvf node-v16.3.0-linux-x64.tar.xz
切换到用户的根目录
[hadoop@host152 node-v16.3.0-linux-x64]$ cd
[hadoop@host152 ~]$ ll -a
[hadoop@host152 ~]$ more .bashrc
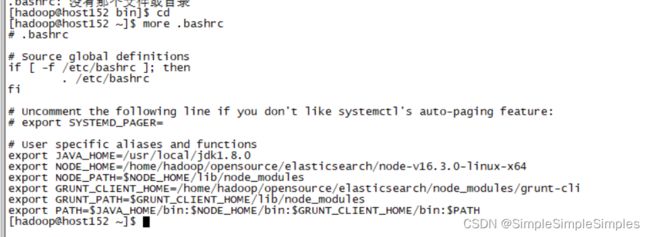
修改用户.bashrc,添加node环境变量只给当前用户
[hadoop@host152 ~]$ cd
[hadoop@host152 ~]$ echo 'export JAVA_HOME=/usr/local/jdk1.8.0' >> .bashrc
[hadoop@host152 ~]$ echo 'export NODE_HOME=/home/hadoop/opensource/elasticsearch/node-v16.3.0-linux-x64' >> .bashrc
[hadoop@host152 ~]$ echo 'export NODE_PATH=$NODE_HOME/lib/node_modules' >> .bashrc
[hadoop@host152 ~]$ echo 'export PATH=$JAVA_HOME/bin:$NODE_HOME/bin:$PATH' >> .bashrc
[hadoop@host152 ~]$ source .bashrc
[hadoop@host152 ~]$ npm -v
7.15.1
[hadoop@host152 ~]$ node -v
v16.3.0
4.离线安装grunt
安装grunt之前必须安装node,即grunt依赖node环境,在线安装node如下
[root@host151 ~]#curl -sL https://rpm.nodesource.com/setup_8.x | bash -
[root@host151 ~]#yum install -y nodejs
4.1安装grunt
先找一台联网的机器,全局安装grunt-cli客户端
[root@host151 lib]# npm install -g grunt-cli
[root@host151 lib]# grunt -version
grunt-cli v1.4.3
此时只能执行grunt --version和grunt --completion两个命令,如果执行grunt --help,则会报错如下:
grunt-cli: The grunt command line interface (v1.3.2)
If you're seeing this message, grunt hasn't been installed locally to
your project. For more information about installing and configuring grunt,
please see the Getting Started guide:
https://gruntjs.com/getting-started
再安装局部grunt
[root@host151 lib]#npm install grunt
[root@host151 elasticsearch-head-master]$ grunt --version
grunt-cli v1.4.3
grunt v1.6.1
为了防止后面运行es-heaer报下出错误:
>> Local Npm module "grunt-contrib-concat" not found. Is it installed?
>> Local Npm module "grunt-contrib-watch" not found. Is it installed?
>> Local Npm module "grunt-contrib-connect" not found. Is it installed?
>> Local Npm module "grunt-contrib-copy" not found. Is it installed?
>> Local Npm module "grunt-contrib-jasmine" not found. Is it installed?
还应该提前安装的模块如下:
[root@host151 lib]#npm install grunt-contrib-clean --registry=https://registry.npm.taobao.org
[root@host151 lib]#npm install grunt-contrib-concat --registry=https://registry.npm.taobao.org
[root@host151 lib]#npm install grunt-contrib-watch --registry=https://registry.npm.taobao.org
[root@host151 lib]#npm install grunt-contrib-connect --registry=https://registry.npm.taobao.org
[root@host151 lib]#npm install grunt-contrib-copy --registry=https://registry.npm.taobao.org
[root@host151 lib]#npm install grunt-contrib-jasmine --registry=https://registry.npm.taobao.org
找到grunt-cli安装目录node_modules目录
[root@host151 lib]# which grunt
/bin/grunt
[root@host151 lib]# ll /bin/grunt
lrwxrwxrwx. 1 root root 35 9月 24 12:21 /bin/grunt -> ../lib/node_modules/grunt/bin/grunt
[root@host151 lib]#
打包ftp上传或者scp到对应内网机器,这里是152作为内网机器为例
[root@host151 node_modules]# scp -r node_modules [email protected]:/home/hadoop/opensource/elasticsearch
登陆152机器,找到bin目录,测试grunt是否移植成功,若出现版本号即可
[hadoop@host152 elasticsearch]$ cd grunt-cli
[hadoop@host152 grunt-cli]$ ll
总用量 16
drwxr-xr-x. 2 hadoop hadoop 19 9月 24 11:10 bin
-rw-r--r--. 1 hadoop hadoop 1267 9月 24 11:10 CHANGELOG.md
drwxr-xr-x. 2 hadoop hadoop 29 9月 24 11:10 completion
drwxr-xr-x. 2 hadoop hadoop 42 9月 24 11:10 lib
drwxr-xr-x. 61 hadoop hadoop 4096 9月 24 11:10 node_modules
-rw-r--r--. 1 hadoop hadoop 1662 9月 24 11:10 package.json
-rw-r--r--. 1 hadoop hadoop 1731 9月 24 11:10 README.md
[hadoop@host152 grunt-cli]$ cd bin
[hadoop@host152 bin]$ ./grunt --version
grunt-cli v1.4.3
grunt v1.6.1
4.2配置grunt的全局环境变量,配置grunt-cli的即可
切换到用户目录,修改用户环境变量.bashrc,注释原来的PATH,复制后保存
[hadoop@host152 ~]$ vim .bashrc
export GRUNT_CLIENT_HOME=/home/hadoop/opensource/elasticsearch/node_modules/grunt-cli
export GRUNT_PATH=$GRUNT_CLIENT_HOME/lib/node_modules
export PATH=$JAVA_HOME/bin:$NODE_HOME/bin:$GRUNT_CLIENT_HOME/bin:$PATH
[hadoop@host152 ~]$ source .bashrc
[hadoop@host152 ~]# grunt --version
grunt-cli v1.4.3
grunt v1.6.1
5.安装header插件
5.1解压安装elasticsearch-head安装包
[hadoop@host152 elasticsearch]$ tar -xvf elasticsearch-head-master.tar.gz
修改Gruntfile.js配置文件,增加hostname: '*' 属性
[hadoop@host152 elasticsearch]$ cd elasticsearch-head-master
[hadoop@host152 elasticsearch-head-master]$ vim Gruntfile.js
修改app.js,设置访问elastic-header地址,搜索关键字localhost,修改为访问ES的http地址
[hadoop@host152 elasticsearch-head-master]$ cd _site/
[hadoop@host152 _site]$ vim app.js 
编写启动header的脚本
[hadoop@host152 elasticsearch-head-master]$ touch start.sh
[hadoop@host152 elasticsearch-head-master]$ vim start.sh
[hadoop@host152 elasticsearch-head-master]$ more start.sh
grunt server &
[hadoop@host152 elasticsearch-head-master]$ sh start.sh
Running "connect:server" (connect) task
Waiting forever...
Started connect web server on http://localhost:9100
5.2停止grunt任务
[hadoop@host152 elasticsearch-head-master]$ lsof -i:9100
COMMAND PID USER FD TYPE DEVICE SIZE/OFF NODE NAME
grunt 18727 hadoop 21u IPv6 76547 0t0 TCP *:jetdirect (LISTEN)
[hadoop@host152 elasticsearch-head-master]$ kill -9 18727
5.3修改ES的配置文件并重启访问header
上述发现还是不能访问,请修改elasticsearch.yml添加配置如下
[hadoop@host152 config]$ vim elasticsearch.yml
http.cors.enabled: true
http.cors.allow-origin: "*"
6.kibana安装
6.1解压安装kibana
解压,并修改配置文件
[hadoop@host152 elasticsearch]$ tar -xvf kibana-8.1.1-linux-x86_64.tar.gz
[hadoop@host152 config]$ vim kibana.yml
server.port: 5601
server.host: 192.168.72.152
elasticsearch.hosts: ["http://192.168.72.152:9200"]
编写启动脚本
[hadoop@host152 kibana-8.1.1]$ touch start.sh
[hadoop@host152 kibana-8.1.1]$ vim start.sh
./bin/kibana > start.log &
[hadoop@host152 kibana-8.1.1]$ chmod 755 start.sh
[hadoop@host152 kibana-8.1.1]$ sh start.sh
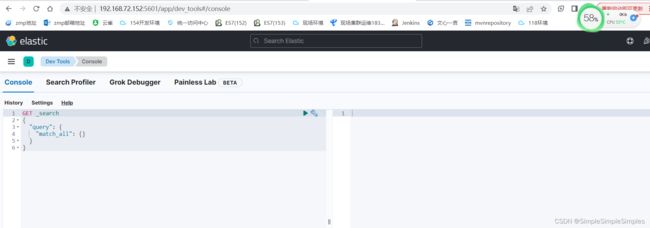
安装启动成功,访问默认端口http://192.168.72.152:5601/


