Flutter —— 通讯录页面&索引条
Flutter —— 通讯录页面&索引条
-
- 1. 通讯录页面
- 2. 索引条
1. 通讯录页面
做完了发现页面和我的页面,接下来做通讯录页面。将_currentIndex 改成1方便开发。
发现通讯录页面还是要用到之前的_themColor,那么就将_themColor抽取出来以便公用。
创建一个文件来存放这些需要公用的常量。然后放入主题色之后,在别的地方import这个文件就能使用了。
//主题色
const Color weChatThemColor = Color.fromRGBO(220, 220, 220, 1.0);
然后就可以将通讯录页面的Appbar的背景色改为weChatThemColor了,接下来要添加右上角的按钮,这里就可以用AppBar里面的actions。在actions里面添加一个图片,这里可以放多个,多个的话会从左到右排列。
 actions: [
          Container(
            margin: EdgeInsets.only(right: 10),
            child: Image(
              image: AssetImage("images/icon_friends_add.png"),
              height: 20,
              width: 20,
            ),
          ),
        ],
接着在Container外面包一层GestureDetector来添加手势响应。

接下来要做通讯录页的cell,那么如果只有通讯录页里面用,则可以放在一个文件里面,因为在一个文件里面,所以可以使用_令其私有,私有后本文件里面依然可以使用。
class _FriendCell extends StatelessWidget {
  _FriendCell({this.imageUrl, this.name, this.groupTitle, this.imageAssets});

  final String? imageUrl;
  final String? name;
  final String? groupTitle;
  final String? imageAssets;
  @override
  Widget build(BuildContext context) {
    return Container();
  }
}
根据需要的内容创建模型
class Friends {
  Friends({this.imageUrl, this.name, this.indexLetter,this.ImageAssets});
  final String? imageUrl;
  final String? name;
  final String? indexLetter;
  final String? ImageAssets;
}
创建完之后,可以将通讯录页面scaffold里面的body设为:
	Container(
        child: ListView.builder(
          itemBuilder: _itemForRow,
          itemCount: datas.length + _headerData.length,
        ),
        color: weChatThemColor,
      ),`
接下来添加头部四个的数据,这里是asset图片所以传ImageAssets。
  final List _headerData = [
    Friends(ImageAssets: 'images/新的朋友.png', name: '新的朋友'),
    Friends(ImageAssets: 'images/群聊.png', name: '群聊'),
    Friends(ImageAssets: 'images/标签.png', name: '标签'),
    Friends(ImageAssets: 'images/公众号.png', name: '公众号'),
  ];
然后构建_itemForRow方法,就是在_itemForRow里面判断如果小于_headerData的长度,则传入imageAssets,否则就是imageUrl。注意这里datas的index需要减去_headerData的长度,否则会缺少前面几个数据。
 Widget _itemForRow(BuildContext context, int index) {
    if (index < _headerData.length) {
      return _FriendCell(
          imageAssets: _headerData[index].ImageAssets,
          name: _headerData[index].name);
    } else {
      return _FriendCell(
          imageUrl: datas[index - _headerData.length].imageUrl, name: datas[index -  _headerData.length ].name);
    }
  }
然后开始写界面,这里简单的使用一个Row来包含图片和昵称,然后使用ClipRRect将图片剪裁为圆角矩形,并且判断imageUrl是否为空,不为空则使用NetworkImage加载网络图片,否则就使用AssetImage加载本地图片。
Widget build(BuildContext context) {
    return Container(
      color: Colors.white,
      child: Row(
        children: [
          Container(
            margin: EdgeInsets.all(10),
            width: 34,
            height: 34,
            child: ClipRRect(
              //剪裁为圆角矩形
              borderRadius: BorderRadius.circular(5.0),
              child:
                   Image(
                      image:  imageUrl != null ? NetworkImage(imageUrl!) : AssetImage(imageAssets ?? "") as ImageProvider,
                      height: 20,
                      width: 20,
                    )
            ),
          ), //图片
          Container(
            child: Text(name ?? "",style: const TextStyle(fontSize: 18),),
          ), //昵称
        ],
      ),
    );
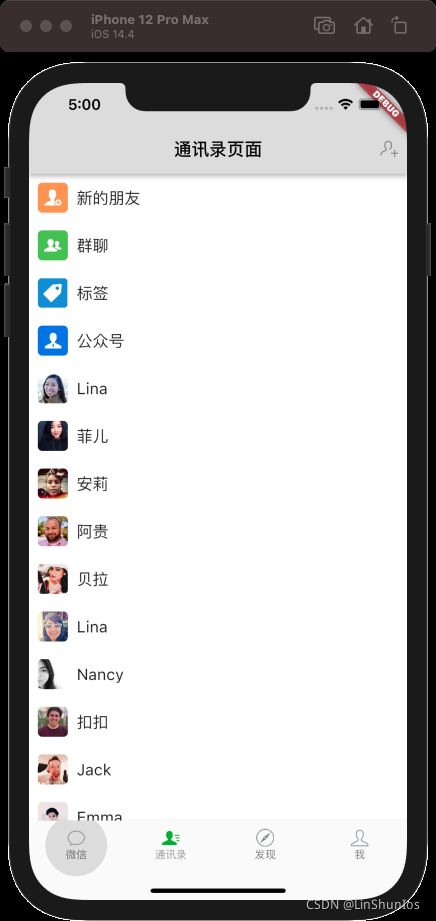
运行后得到:

发现少了下划线,那么这里看到下划线是从昵称开始的,这里就可以选择将昵称和下划线做成一个整体。
 Container(
            width: screenWidth(context) - 54,
            child: Column(
              children: [
                Container(
                  child: Text(name ?? "", style: const TextStyle(fontSize: 18)),
                  alignment: Alignment.centerLeft,
                  height: 54,
                ),
                Container(
                  color: weChatThemColor,
                  height: 0.5,
                )
              ],
            ),
          ), //昵称
接下来要实现分组显示,在_itemForRow中多传一个groupTitle,这里在else添加因为上面的没有title。
 Widget _itemForRow(BuildContext context, int index) {
    if (index < _headerData.length) {
      return _FriendCell(
          imageAssets: _headerData[index].ImageAssets,
          name: _headerData[index].name);
    } else {
      return _FriendCell(
        imageUrl: datas[index - _headerData.length].imageUrl,
        name: datas[index - _headerData.length].name,
        groupTitle: datas[index - _headerData.length].indexLetter,
      );
    }
然后到_FriendCell里面将刚才的内容用Column包起来,然后在cell内容上面添加头部。

在头部里面设置alignment为Alignment.centerLeft,为了避免文字太左边给个10的内边距,然后根据是否有groupTitle判断是否显示这个控件。
  Container(
          alignment: Alignment.centerLeft,
          padding: EdgeInsets.only(left: 10),
          height: groupTitle != null ? 30 : 0,
          color: weChatThemColor,
          child: groupTitle != null ? Text(groupTitle!,style: TextStyle(color: Colors.grey),) : null,
        ),
这里还需要对数据进行排序,那么这里先声明一个_listDatas,然后在initState的时候进行添加数据,然后根据数据的indexLetter进行排序。
  void initState() {
    // TODO: implement initState
    super.initState();
    //_listDatas = [];
    _listDatas.addAll(datas);
       _listDatas.sort((Friends a,Friends b)
        {
         return (a.indexLetter ?? "").compareTo(b.indexLetter ?? "");
        });
  }
然后在_itemForRow里面根据判断当前indexLetter和前面一个indexLetter是否相等来判断是否传groupTitle。
Widget _itemForRow(BuildContext context, int index) {
    if (index < _headerData.length) {
      return _FriendCell(
          imageAssets: _headerData[index].ImageAssets,
          name: _headerData[index].name);
    }
    bool _hiddenIndexLetter =  index - 4 > 0 &&
        _listDatas[index - _headerData.length].indexLetter ==
            _listDatas[index - _headerData.length - 1].indexLetter;

    return _FriendCell(
      imageUrl: _listDatas[index - _headerData.length].imageUrl,
      name: _listDatas[index - _headerData.length].name,
      groupTitle: _hiddenIndexLetter ? null : _listDatas[index - _headerData.length].indexLetter,
    );

  }
2. 索引条
这里功能太多所以重新创建一个文件来写索引条。
索引条是叠在Listview上面的,那么朋友圈页面里面的body就应该使用stack。然后添加索引条。
 body: Stack(
       children: [
         Container(
           child: ListView.builder(
             itemBuilder: _itemForRow,
             itemCount: datas.length + _headerData.length,
           ),
           color: weChatThemColor,
         ), //列表
       IndexBar(), // 索引条
       ],
     ),
添加索引条数据
const INDEX_WORDS = [ '', '☆', 'A', 'B', 'C', 'D', 'E', 'F', 'G', 'H', 'I', 'J', 'K', 'L', 'M', 'N', 'O', 'P', 'Q', 'R', 'S', 'T', 'U', 'V', 'W', 'X', 'Y', 'Z' ];
创建一个保存Widget的list
final List words = [];
在initState中添加Widget
  for (int i = 0; i < INDEX_WORDS.length;i++) {
      words.add(
        Expanded(child: Text(INDEX_WORDS[i],style: TextStyle(fontSize: 10,color: Colors.grey),),)
      );
    }
然后在build里面大致写一下索引条的界面,这样索引条就能显示出来了。
 Positioned(
      right: 0.0,
      top: screenHeight(context)/8,
      height: screenHeight(context)/2,
      width: 30,
      child: Column(
        children: words,
      ),
    );
索引条还需要捕捉到选中的是哪一个,所以先定义两个属性。
  Color _bkColor = Color.fromRGBO(1, 1, 1, 0.0);
  Color _textColor =  Colors.black;
然后将Column用GestureDetector包住。

将之前在initState中创建的text的文字颜色改为_textColor。将Column用Container包住之后颜色改为_bkColor。


在GestureDetector监听onVerticalDragDown以及onVerticalDragEnd,然后setState改变背景色和文字颜色。
    onVerticalDragDown: (DragDownDetails details){
          setState(() {
            _bkColor =  const Color.fromRGBO(1, 1, 1, 0.5);
            _textColor = Colors.white;
          });
        },
  onVerticalDragEnd: (DragEndDetails details){
           setState(() {
             _bkColor = const Color.fromRGBO(1, 1, 1, 0.0);
             _textColor = Colors.black;
           });
         },
这时候发现背景色变化来,但是文字颜色没有改变,这是因为文字颜色在initState里面。所以与界面相关的就不应该放在数据相关的地方,否则就容易出现bug,所以这里将words和循环放到build里面。

然后在GestureDetector监听onVerticalDragUpdate,使用context.findRenderObject找到最近的一个部件,然后用globalToLocal算出当前点击的地方距离部件的原点的y值,然后算出字符高度,算出是第几个item,然后得到点击的字母。
   onVerticalDragUpdate: (DragUpdateDetails details){
            //拿到当前小部件
            RenderBox box = context.findRenderObject() as RenderBox;
            //拿到y值,globalToLocal当前位置距离部件的原点的距离
            double y = box.globalToLocal(details.globalPosition).dy;
            // 算出字符高度
            var itemHeight = screenHeight(context) / 2 / INDEX_WORDS.length;
            // 算出第几个item
       int index = (y ~/ itemHeight).clamp(0, INDEX_WORDS.length - 1);
            print('${INDEX_WORDS[index]}');

          },
将里面的步骤封装成一个方法
String getIndex (BuildContext context,Offset globalPosition) {
  //拿到当前小部件
  RenderBox box = context.findRenderObject() as RenderBox;
  //拿到y值,globalToLocal当前位置距离部件的原点的距离
  double y = box.globalToLocal(globalPosition).dy;
  // 算出字符高度
  var itemHeight = screenHeight(context) / 2 / INDEX_WORDS.length;
  // 算出第几个item
  int index = (y ~/ itemHeight).clamp(0, INDEX_WORDS.length - 1);
 return INDEX_WORDS[index];
}
onVerticalDragUpdate里面调用
 onVerticalDragUpdate: (DragUpdateDetails details) {
            getIndex(context, details.globalPosition);
          },
这里需要把数据返回到通讯录页面,那么这里写一个回调。
  final void Function(String str)? indexBarCallBack;
  IndexBar({this.indexBarCallBack});
在onVerticalDragUpdate里面调用indexBarCallBack。
 onVerticalDragUpdate: (DragUpdateDetails details) {
            if (widget.indexBarCallBack != null) {
              widget.indexBarCallBack!(
                  getIndex(context, details.globalPosition));
            }
          },
在外面使用IndexBar就耀传入这个indexBarCallBack
IndexBar(indexBarCallBack: (String str){

        }),
接下来要根据点击的字母进行滚动,那么就需要计算每个字母的滚动距离。
这里需要先声明一个ScrollController
ScrollController _scrollController = ScrollController();
将其设为_scrollController的controller。
controller: _scrollController,
之后声明map,_cellHeight以及_groupHeight
  final Map _groupOffsetMap = {};
    final double _cellHeight = 54.5;
    double _groupHeight = 30;
然后在initState里面计算滚动距离。
  var _groupOffset  = _cellHeight * _headerData.length;
    //通过循环计算,将每一个头的位置算出来,放入字典。
    for (int i = 0; i < _listDatas.length; i ++) {
      if (i < 1){//第一个cell一定有头
        _groupOffsetMap.addAll({_listDatas[i].indexLetter:_groupOffset});
        //保存完了在加_groupOffset
        _groupOffset += _cellHeight + _groupHeight;
      } else if (_listDatas[i].indexLetter == _listDatas[i-1].indexLetter ) {
        _groupOffset += _cellHeight;
      } else {
        _groupOffsetMap.addAll({_listDatas[i].indexLetter:_groupOffset});
        _groupOffset += _cellHeight + _groupHeight;
      }
    }
然后就可以在IndexBar回调中滚动了。
 IndexBar(indexBarCallBack: (String str){
          if (_groupOffsetMap[str] != null) {
            _scrollController.animateTo(
                _groupOffsetMap[str], duration: Duration(microseconds: 100),
                curve: Curves.easeIn);
          }
        }),
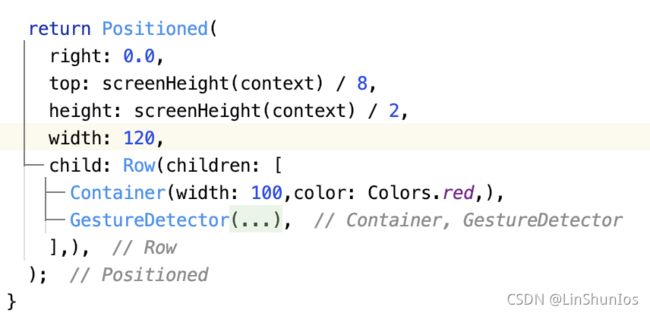
接下来要做左边的气泡,那么这里先将Indexbar的索引条包起来。
然后在Container里面添加图片以及文字。
 Container(
            alignment: Alignment(0,-1.1),
            width: 100,
            color: Colors.red,
            child: Stack(
              alignment:   Alignment(-0.2, 0),
              children:  [
                Image(
                  image: AssetImage('images/气泡.png'),
                  width: 60,
                ),
                Text(
                  'A',
                  style: TextStyle(
                    fontSize: 35,
                    color: Colors.white,
                  ),
                ),
              ],
            ),
          ),
接下来需要根据点击的位置变换气泡文字,以及在释放时隐藏气泡,所以这里声明三个属性。
  double _indicatorY = 0.0;
  String _indicatorText = "A";
  bool _indicatorHidden = true;
修改getIndex成只返回index,然后在onVerticalDragDown和onVerticalDragUpdate里面修改_indicatorY和_indicatorText,并且把_indicatorHidden设为false,然后在onVerticalDragEnd里面把_indicatorHidden设为true。
onVerticalDragDown: (DragDownDetails details) {
                int index =  getIndex(context, details.globalPosition);

                if (widget.indexBarCallBack != null) {
                  widget.indexBarCallBack!(
                      INDEX_WORDS[index]);

                }

                setState(() {
                  _indicatorY = 2.2 / INDEX_WORDS.length * index - 1.1;
                  _indicatorText = INDEX_WORDS[index];
                  _indicatorHidden = false;
                  _bkColor = const Color.fromRGBO(1, 1, 1, 0.5);
                  _textColor = Colors.white;
                });
              },
              onVerticalDragUpdate: (DragUpdateDetails details) {
                int index =  getIndex(context, details.globalPosition);

                if (widget.indexBarCallBack != null) {
                  widget.indexBarCallBack!(
                      INDEX_WORDS[index]);
                }
                setState(() {
                  _indicatorY = 2.2 / INDEX_WORDS.length * index - 1.1;
                  _indicatorText = INDEX_WORDS[index];
                  _indicatorHidden = false;
                });

              },
              onVerticalDragEnd: (DragEndDetails details) {
                setState(() {
                  _bkColor = const Color.fromRGBO(1, 1, 1, 0.0);
                  _textColor = Colors.black;
                  _indicatorHidden = true;
                });
              },
然后修改气泡这边,如果_indicatorHidden为true就返回null,否则就返回气泡,气泡的位置跟着_indicatorY变化而变化。
Container(
            alignment: Alignment(0,_indicatorY),
            width: 100,
            color: Colors.red,
            child: _indicatorHidden ? null : Stack(
              alignment:   Alignment(-0.2, 0),
              children:  [
                Image(
                  image: AssetImage('images/气泡.png'),
                  width: 60,
                ),
                Text(
                  _indicatorText,
                  style: TextStyle(
                    fontSize: 35,
                    color: Colors.white,
                  ),
                ),
              ],
            ),
          ),