Linux 部署Mysql 8.0集群+脚本分发,最新教程,细到极致
Hello,小伙伴们,又到了一年一度虐狗的时间了,对于那些有女朋友的小伙伴们,祝福你们,对于那些没有女朋友的小伙伴们,老哥想说,呜呜呜,我与你们同在
咽下这口苦水,老哥还是做点正事算了,该来的终究会来的,急也没用。下午,趁着摸鱼的时间,开始我最感兴趣的集群部署,Mysql。可以说,你把Mysql集群搞懂了,基本上在集群搭建这一块已经难不倒你了。正所谓开局一把刀,装备全靠捡,能不能玩好集群,就看你会不会用好Mysql这边刀了。
Mysql8.0集群部署实现主从复制有两种方式,一种是早期的binlog,基于binlog和position的异步复制,一种是MySQL 5.6.5 版本以后新增的GTID主从复制,全局事务标识(Global Transaction Identifier),基于UUID和TID的异步复制,今天,老哥想写点关于GTID方式的,那么,不多说了,准备开始吧。
简单聊下GTID 工作原理:
- 主库 master 提交一个事务时会产生 GTID,并且记录在 binlog 日志中
- 从库 slave I/O 线程读取 master 的 binlog 日志文件,并存储在 slave 的 relay log中。slave 将 master 的 GTID 这个值,设置到 gtid_next 中,即下一个要读取的 GTID 值。
- slave 读取这个 gtid_next,然后对比 slave 自己的 binlog 日志中是否有这个 GTID
- 如果有这个记录,说明这个 GTID 的事务已经执行过了,可以忽略掉
- 如果没有这个记录,slave 就会执行该 GTID 事务,并记录到 slave 自己的 binlog日志中。在读取执行事务前会先检查其他 session 持有该 GTID,确保不被重复执行。
- 在解析过程中会判断是否有主键,如果没有就用二级索引,如果没有就用全部扫描。
2、上传安装包,这个我相信大家都会
[root@VM-4-2-centos mysql]# pwd
/opt/mysql
[root@VM-4-2-centos mysql]# ll
total 527520
-rw-r--r-- 1 root root 540173160 May  3 22:12 mysql-8.0.29-linux-glibc2.12-x86_64.tar.xz
3、然后是单台Mysql8.0的安装,我是这样考虑的,一台安装好,然后使用脚本分发,分发到另外两台服务器,修改一下参数,最后整个集群启动
3A、我们先增加一下主机映射,三台服务器都需要,我们可以使用curl ifconfig.me查看主机公网Ip
[root@VM-4-2-centos ~]# curl ifconfig.me
101.35.245.191
[root@VM-4-2-centos ~]# vi /etc/hosts
增加内容如下:
101.35.245.191 tencent01
101.34.7.236   tencent02
124.222.204.94 tencent03
5、ping一下,没有问题
[root@VM-4-2-centos ~]# ping tencent02
PING tencent02 (101.34.7.236) 56(84) bytes of data.
64 bytes from tencent02 (101.34.7.236): icmp_seq=1 ttl=57 time=3.98 ms
64 bytes from tencent02 (101.34.7.236): icmp_seq=2 ttl=57 time=3.97 ms
6、创建分发脚本文件夹
[root@VM-4-2-centos mysql]# mkdir -p mysql/xsync_bin
7、进入分发脚本文件夹
[root@VM-4-2-centos opt]# cd mysql/xsync_bin/
[root@VM-4-2-centos xsync_bin]# pwd
/opt/mysql/xsync_bin
8、配置一下环境变量
[root@VM-4-2-centos xsync_bin]# vi /etc/profile
export XSYNC_HOME=/opt/mysql/xsync_bin
export PATH=$PATH:$XSYNC_HOME
9、刷新配置
[root@VM-4-2-centos xsync_bin]# source /etc/profile
10、编写分发脚本,这个脚本在Hadoop篇已经讲过了,这里离就不赘述了。
[root@VM-4-2-centos xsync_bin]# vim xsync
#!/bin/bash

#1. 判断参数个数

if [ $# -lt 1 ]

then

  echo Not Enough Arguement!

  exit;

fi

#2. 遍历集群所有机器

for host in tencent02 tencent03

do

  echo ====================  $host  ====================

  #3. 遍历所有目录,挨个发送

  for file in $@

  do

    #4 判断文件是否存在

    if [ -e $file ]

    then

      #5. 获取父目录

      pdir=$(cd -P $(dirname $file); pwd)

      #6. 获取当前文件的名称

      fname=$(basename $file)

      ssh $host "mkdir -p $pdir"

      rsync -av $pdir/$fname $host:$pdir

    else

      echo $file does not exists!

    fi

  done

done
11、给脚本赋予执行权限
[root@VM-4-2-centos xsync_bin]# chmod 777 xsync
12、同步之前,我们需要配置一次Rsa秘钥,避免上面的脚本执行过程中,输入密码。我们直接配置免密登录,互换公钥,然后自己私钥加密数据,用对方的公钥解密,保证数据安全
[root@VM-4-2-centos xsync_bin]# cd /root/
[root@VM-4-2-centos ~]# ssh-keygen -t rsa
13、进入.ssh文件夹,发现2个rsa文件,第一个是私钥,密码很长,可以用cat命令查看,第二个是公钥,我们需要把公钥发给另外两台服务器
[root@VM-4-2-centos ~]# cd ./.ssh/
[root@VM-4-2-centos .ssh]# ll
total 8
-rw------- 1 root root 2602 May 19 14:53 id_rsa
-rw-r--r-- 1 root root  572 May 19 14:53 id_rsa.pub
14、发送,第一次发送需要验证密码,可以给本机也配置一个rsa密码
[root@VM-4-2-centos .ssh]# ssh-copy-id tencent01
[root@VM-4-2-centos .ssh]# ssh-copy-id tencent02
[root@VM-4-2-centos .ssh]# ssh-copy-id tencent03
15、准备工作差不多了,然后我们安装mysql需要的依赖
[root@VM-4-2-centos mysql]# yum -y install libaio-devel.x86_64
[root@VM-4-2-centos mysql]# yum -y install numactl libncurses*
16、解压mysql,然后重命名
[root@VM-4-2-centos mysql]# tar -xvf mysql-8.0.29-linux-glibc2.12-x86_64.tar.xz
[root@VM-4-2-centos mysql]# mv mysql-8.0.29-linux-glibc2.12-x86_64 mysql-8.0
17、创建一个Mysql用户,并且禁止使用登录我们的操作系统,该用户的组会自动创建,我们可以通过id mysql 查看当前用户
[root@VM-4-2-centos mysql]# useradd -r -s /sbin/nologin mysql
18、移动mysql到/usr/local目录下,方便管理
[root@VM-4-2-centos mysql]# mkdir -p /usr/local/mysql
[root@VM-4-2-centos mysql]# mv mysql-8.0 /usr/local/mysql/
[root@VM-4-2-centos mysql]# cd /usr/local/mysql/mysql-8.0/
19、然后将这个文件的执行权限给到mysql用户
[root@VM-4-2-centos mysql-8.0]# chown -R mysql.mysql /usr/local/mysql/mysql-8.0
20、创建一个data文件夹,同样赋予执行权限
[root@VM-4-2-centos mysql-8.0]# cd ..
[root@VM-4-2-centos mysql]# mkdir data
[root@VM-4-2-centos mysql]# chmod 750 /usr/local/mysql/data -R
21、修改配置环境
[root@VM-12-13-centos mysql]# vi /etc/profile
export PATH=$PATH:/usr/local/mysql/mysql-8.0/bin:/usr/local/mysql/mysql-8.0/lib
[root@VM-12-13-centos mysql]# source /etc/profile
[root@VM-12-13-centos mysql]# echo $PATH
/usr/local/sbin:/usr/local/bin:/usr/sbin:/usr/bin:/root/bin:/usr/local/mysql/mysql-8.0/bin:/usr/local/mysql/mysql-8.0/lib
22、在第一台服务器,在/etc 新增my.cnf文件,windows是my.ini,这个大家都知道
[root@VM-12-13-centos mysql]# vi /etc/my.cnf
这里,编写好以后,下一步,我们会进行分发,不同的服务器配置只有一个不同,就是服务器的server-id
[client]
socket=/var/lib/mysql/mysql.sock

[mysqld]
port=3306

#集群id,一般设置为机器 IP 地址后三位
server-id=1

#开启gtid模式
gtid_mode=on
enforce_gtid_consistency=on

user=mysql
general_log = 1
general_log_file= /var/log/mysql/mysql.log
socket=/var/lib/mysql/mysql.sock
basedir=/usr/local/mysql/mysql-8.0
datadir=/usr/local/mysql/data

#binlog
log-bin=/usr/local/mysql/data/mysql-bin
log_replica_updates=true

innodb_data_home_dir=/usr/local/mysql/data
innodb_log_group_home_dir=/usr/local/mysql/data/
character-set-server=utf8mb4
#lower_case_table_names=1
autocommit=1
default_authentication_plugin=mysql_native_password
symbolic-links=0

[mysqld_safe]
log-error=/usr/local/mysql/data/mysql.log
pid-file=/usr/local/mysql/data/mysql.pid
23、按ESC+:wq!退出,然后开始分发到另外两台,此外,另外两台服务器,请重复12至21的步骤
[root@VM-4-2-centos mysql]# /opt/mysql/xsync_bin/xsync /usr/local/mysql/
[root@VM-4-2-centos mysql]# /opt/mysql/xsync_bin/xsync /etc/my.cnf
24、初始化,拿到初始化的密码,一定要保存,但是有些人粗心大意,就是不保存,然后找不到了,下一个介绍解决办法,小伙伴们可以选择跳过32、33、34、35
[root@VM-12-13-centos mysql]# cd mysql-8.0/bin/
./mysqld --user=mysql --basedir=/usr/local/mysql/mysql-8.0 --datadir=/usr/local/mysql/data/ --initialize

25、复制 mysql.server 文件,在/usr/local/mysql/mysql-8.0目录下执行
[root@VM-12-13-centos bin]# cd ..
[root@VM-12-13-centos mysql-8.0]# cp -a ./support-files/mysql.server /etc/init.d/mysql
26、赋予执行权限
[root@VM-12-13-centos mysql-8.0]# chown 777 /etc/my.cnf
[root@VM-12-13-centos mysql-8.0]# chmod +x /etc/init.d/mysql
27、我们在my.cnf配置了一个 /var/lib/mysql 配置文件,需要创建一个,然后分发
[root@VM-12-13-centos mysql-8.0]# mkdir /var/lib/mysql
[root@VM-12-13-centos mysql-8.0]# chown -R mysql:mysql /var/lib/mysql/
[root@VM-4-2-centos mysql]# /opt/mysql/xsync_bin/xsync /var/lib/mysql/
28、启动Mysql,太难了
[root@VM-12-13-centos mysql-8.0]# service mysql start
[root@VM-12-13-centos mysql-8.0]# mysql -uroot -p
mysql: error while loading shared libraries: libtinfo.so.5: cannot open shared object file: No such file or directory
30、新增一条配置,建立软链接,ln -s命令可能很多小伙伴不太懂,这里借用某度的解释: 当我们需要在不同的目录,用到相同的文件时,我们不需要在每一个需要的目录下都放一个必须相同的文件,我们只要在某个固定的目录,放上该文件,然后在其它的目录下用ln命令链接(link)它就可以,不必重复的占用磁盘空
[root@VM-12-13-centos mysql-8.0]# sudo ln -s /usr/lib64/libtinfo.so.6.1 /usr/lib64/libtinfo.so.5
31、再次登陆,输入保存的密码,成功,32到35是忘记密码的操作,正常操作不需要使用
[root@VM-12-13-centos mysql-8.0]# mysql -uroot -p
mysql> ALTER USER 'root'@'localhost' IDENTIFIED BY 'root' PASSWORD EXPIRE NEVER;
mysql> flush privileges;
32、假如我们找不到初始化密码了,我们可以这样,首先修改一下my.cnf
[root@VM-12-13-centos mysql-8.0]# vi /etc/my.cnf
增加一条内容:skip-grant-tables,意思是启动 MySQL 服务的时候跳过权限表认证
[mysqld]
port=3306
skip-grant-tables
33、重启Mysql,登录,一直回车,
[root@VM-12-13-centos mysql-8.0]# service mysql restart
[root@VM-12-13-centos mysql-8.0]# mysql -uroot -p
34、修改密码,需要先修改为空,刷新后,再修改正常密码,这是老哥觉得有点艹蛋的地方
mysql> use mysql;
mysql> update user set authentication_string='' where user='root';
mysql> flush privileges;
mysql> alter user 'root'@'localhost' identified by 'root';
mysql> exit
35、然后将/etc/my.cnf 的skip-grant-tables 配置删掉,重启Mysql,然后重新登录
[root@VM-12-13-centos mysql-8.0]# vi /etc/my.cnf
[mysqld]
port=3306
[root@VM-12-13-centos mysql-8.0]# service mysql restart
36、登录进入mysql 以后,我们需要开放端口3306,同时设置可以远程访问,使用Navicat连接上去
mysql> use mysql;
mysql> update user set host='%' where user='root';
mysql> flush privileges;
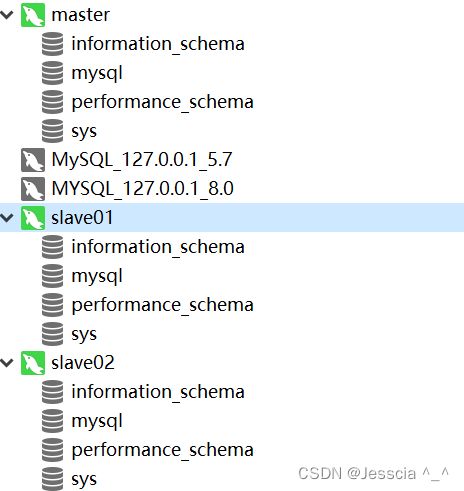
37、使用Navicat 连接上去,第二台、第三台需要重复以上步骤
38、下面开始我们的正式工作,主从复制,切换到第一台服务器
[root@VM-4-2-centos mysql]# mysql -uroot -p
这里需要注意一下,MySQL8.0.16版本中新增了一个system_user帐户类型,如果没有加入一下参数,会报错 ERROR 1227 (42000): Access denied; you need (at least one of) the SYSTEM_USER privilege(s) for this operation
mysql> grant system_user on *.* to 'root';
master 依次执行如下命令,一条一条执行,出了问题别又在那里叫
use mysql;
create user Jessica@'%' identified by 'root';
grant all privileges on *.* to Jessica@'%' with grant option;
ALTER USER 'Jessica'@'%' IDENTIFIED WITH mysql_native_password BY 'root';
flush privileges;
mysql> show master status;
+------------------+----------+--------------+------------------+------------------------------------------+
| File             | Position | Binlog_Do_DB | Binlog_Ignore_DB | Executed_Gtid_Set                        |
+------------------+----------+--------------+------------------+------------------------------------------+
| mysql-bin.000002 |     2039 |              |                  | dccbbc7f-d745-11ec-b4c4-525400e86022:1-8 |
+------------------+----------+--------------+------------------+------------------------------------------+
1 row in set (0.00 sec)
39、切换到第二台服务器,第三台也是同样如此
[root@VM-12-13-centos mysql-8.0]# mysql -uroot -p
40、slave 一次性执行以下命令,然后说下最后一条,MASTER_AUTO_POSITION = 1;
1 代表采用GTID协议复制
0 代表采用老的binlog复制
change master to \
master_host='101.35.245.191', \
master_user='Jessica', \
master_password='root', \
master_port=3306, \
MASTER_AUTO_POSITION = 1;
mysql> start slave;
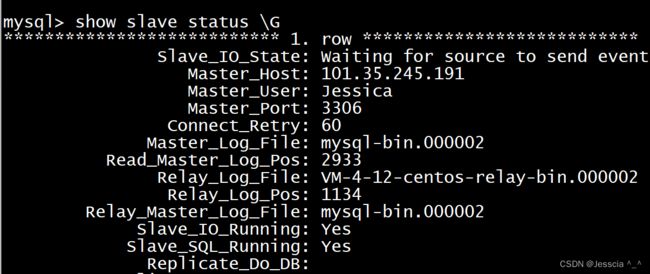
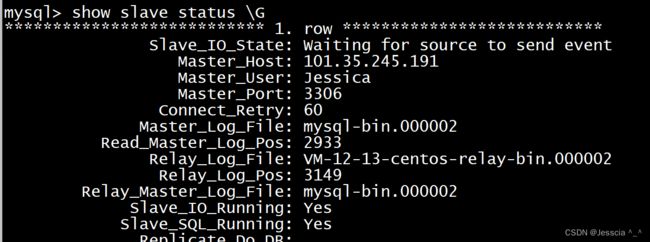
这里说明一下,Slave_IO_Running和Slave_SQL_Running都必须是YES,然后如果出现 Slave_IO_Running: NO,可以先 stop slave;然后执行change master to master_auto_position=0;把master的File 和 Position 同步过来,然后在重新切回master_auto_position=1;
mysql>show slave status \G
41、切换到master库,我们先创建一个test数据库,然后新建表,插入数据
mysql> create database test;
mysql> use test;
mysql> create table tab1(id int auto_increment,name varchar(10),primary key(id));
mysql> insert into tab1(id,name) values (1,'Jessica');
42、在主库master,查看从库信息
mysql> show slave hosts;
+-----------+------+------+-----------+--------------------------------------+
| Server_id | Host | Port | Master_id | Slave_UUID                           |
+-----------+------+------+-----------+--------------------------------------+
|         2 |      | 3306 |         1 | 52d02be3-d762-11ed-ba21-525400073dcb |
|         3 |      | 3306 |         1 | 7c50093d-d7e0-11ec-8344-525400c5d586 |
+-----------+------+------+-----------+--------------------------------------+
43、切换到slave01
mysql> show slave status \G
mysql> select * from test.tab1;
+----+---------+
| id | name    |
+----+---------+
|  1 | Jessica |
+----+---------+
1 row in set (0.00 sec)
43A、切换到slave02,没有任何问题,over
mysql> show slave status \G
mysql> select id,name from test.tab1;
+----+---------+
| id | name    |
+----+---------+
|  1 | Jessica |
+----+---------+
1 row in set (0.00 sec)
45、最后,就默默的说一句,屏幕前的各位大帅逼,还有大漂亮,看到这里,麻烦给老哥一个点赞、关注、收藏三连好吗,你的支持是老哥更新最大的动力,谢谢!


