在线文档生成:Swagger
1 简介
现在的项目开发都是前后端分离,前端和后端是两拨人在开发,所以这就涉及到前后端人员的接口交互了。如果使用自己维护的接口文档或口口相传的话,很容易出现接口更新不及时的问题。这个时候就需要像Swagger这样的在线文档生成框架出马了。更新接口信息并重新部署后,接口文档也会随之更新,同时Swagger也支持在线的接口调试功能。
2 简单使用
首先需要引入的依赖如下所示:
    io.springfox
    springfox-swagger2
    2.9.2


    io.springfox
    springfox-swagger-ui
    2.9.2
另外需要提一下的是,我的Spring Boot的版本是2.7.16,不同Spring Boot和Swagger的版本,实现会有所差异。
配置文件需要加上下面的配置项,否则启动会报错:
spring.mvc.pathmatch.matching-strategy=ant_path_matcher配置类的代码如下:
@Configuration
@EnableSwagger2
public class Swagger2Config {

    @Bean
    public Docket createRestApi() {
        return new Docket(DocumentationType.SWAGGER_2)
                .apiInfo(apiInfo())
                .select()
                .apis(RequestHandlerSelectors.basePackage("com.swagger.swaggerdemo.controller"))
                .paths(PathSelectors.any())
                .build();
    }

    private ApiInfo apiInfo() {
        return new ApiInfoBuilder()
                .title("用户API")
                .description("用户API")
                .termsOfServiceUrl("")
                .contact(new Contact("天瑕", "", "<[email protected]>"))
                .version("1.0")
                .build();
    }
}
用户Controller层:
@RestController
@RequestMapping(value = "user", produces = MediaType.APPLICATION_JSON_VALUE)
@Api(tags = {"用户相关api接口"})
public class UserController {

    @GetMapping("list")
    @ApiOperation(value = "用户列表", httpMethod = "GET")
    public Result> list() {
        UserRes userRes1 = new UserRes(1L, "Hou", 1, "18500000000", "[email protected]");
        UserRes userRes2 = new UserRes(2L, "Zhang", 0, "13400000000", "[email protected]");
        UserRes userRes3 = new UserRes(3L, "Li", 0, "12300000000", "[email protected]");
        List userResList = Lists.newArrayList(userRes1, userRes2, userRes3);
        return Result.ofSuccess(userResList);
    }

    @GetMapping("get/{id}")
    @ApiOperation(value = "用户信息", httpMethod = "GET")
    public Result get(@PathVariable("id") @ApiParam(name = "id", required = true, example = "1") Long id) {
        UserRes userRes1 = new UserRes(1L, "Hou", 1, "18500000000", "[email protected]");
        return Result.ofSuccess(userRes1);
    }
}
Controller类上需要加上@Api注解,每个方法上需要加上@ApiOperation注解。并且如果有入参和出参的话,需要加上相应的Swagger注解(而这也是Swagger一直所被人诟病的一点,侵入性太强)。
出参UserRes的代码如下所示:
@Data
@NoArgsConstructor
@AllArgsConstructor
@ApiModel("用户")
public class UserRes implements Serializable {

    private static final long serialVersionUID = 5488579168437533031L;

    @ApiModelProperty(value = "用户id", required = true, position = 1, example = "1")
    private Long id;

    @ApiModelProperty(value = "名称", required = true, position = 2, example = "天瑕")
    private String name;

    @ApiModelProperty(value = "性别 1:男0:女", required = true, position = 3, example = "1")
    private Integer gender;

    @ApiModelProperty(value = "手机号", required = true, position = 4, example = "18500000000")
    private String mobile;

    @ApiModelProperty(value = "邮箱", required = true, position = 5, example = "[email protected]")
    private String email;
}
启动项目,页面地址输入http://localhost:8080/swagger-ui.html,查看其结果:
最上面是项目及作者信息,中间是接口信息,最下面是模型信息。点击用户信息接口,查看接口详情:
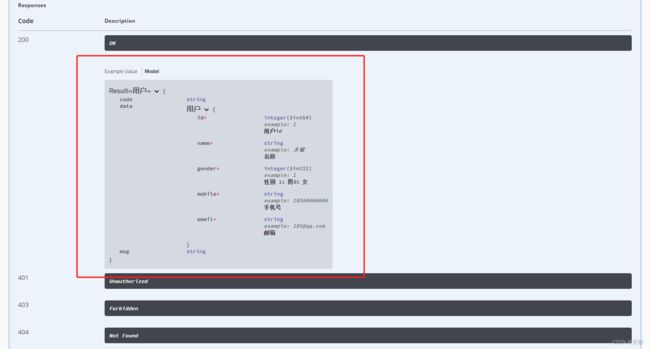
下面的“Model”按钮可以查看参数的信息:
2.1 在线调试
而右边的“Try it out”按钮可以在线调试接口:
2.2 环境配置
在实际的项目开发中,只有开发和测试环境才能使用Swagger生成在线文档,在生产环境中是禁用Swagger的。那么这个应该怎么实现呢?我们可以使用Swagger的配置开关enable:
@Configuration
@EnableSwagger2
public class Swagger2Config {

    @Bean
    public Docket createRestApi(Environment environment) {
        Profiles of = Profiles.of("dev", "stage");
        boolean b = environment.acceptsProfiles(of);
        return new Docket(DocumentationType.SWAGGER_2)
                .apiInfo(apiInfo())
                .enable(b)
                .select()
                .apis(RequestHandlerSelectors.basePackage("com.swagger.swaggerdemo.controller"))
                .paths(PathSelectors.any())
                .build();
    }

    //...
}
也可以使用Spring的@Profile注解实现:
@Configuration
@EnableSwagger2
@Profile({"dev", "stage"})
public class Swagger2Config {

    @Bean
    public Docket createRestApi() {
        return new Docket(DocumentationType.SWAGGER_2)
                .apiInfo(apiInfo())
                .select()
                .apis(RequestHandlerSelectors.basePackage("com.swagger.swaggerdemo.controller"))
                .paths(PathSelectors.any())
                .build();
    }

    //...
}
这里限制了只有dev和stage环境才能开启Swagger,而在配置文件中,我们设置当前环境为prd:
spring.profiles.active=prd查看页面:
可以看到,prd环境下是不能打开Swagger在线文档的,而在dev和stage环境下是可以的,实现了我们的需求。
2.3 添加请求头
在实际的项目开发中,我们还会在Swagger的接口文档中,添加默认的请求头,比如token等信息。这个时候就可以在配置类中使用globalOperationParameters配置项:
@Configuration
@EnableSwagger2
@Profile({"dev", "stage"})
public class Swagger2Config {

    @Bean
    public Docket createRestApi() {
        Parameter parameter = new ParameterBuilder()
                .name("sessionId")
                .description("会话ID")
                .modelRef(new ModelRef("string"))
                .parameterType("header")
                .required(false)
                .build();
        return new Docket(DocumentationType.SWAGGER_2)
                .apiInfo(apiInfo())
                .globalOperationParameters(Lists.newArrayList(parameter))
                .select()
                .apis(RequestHandlerSelectors.basePackage("com.swagger.swaggerdemo.controller"))
                .paths(PathSelectors.any())
                .build();
    }

    //...
}
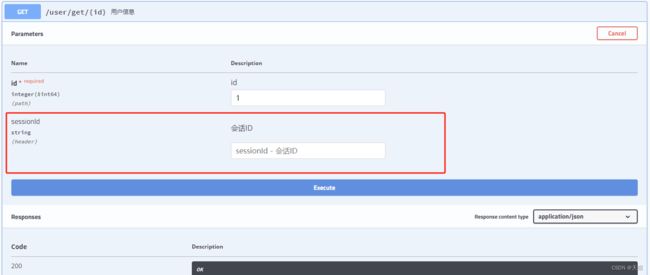
再次打开页面,查看在线调试功能。可以看到,多了一个sessionId的输入项:
最后我们修改一下Controller层的接口,打印一下获取到的token信息:
@GetMapping("list")
@ApiOperation(value = "用户列表", httpMethod = "GET")
public Result> list(@RequestHeader(value = "token", required = false) String token) {
    log.info("token:{}", token);
    UserRes userRes1 = new UserRes(1L, "Hou", 1, "18500000000", "[email protected]");
    UserRes userRes2 = new UserRes(2L, "Zhang", 0, "13400000000", "[email protected]");
    UserRes userRes3 = new UserRes(3L, "Li", 0, "12300000000", "[email protected]");
    List userResList = Lists.newArrayList(userRes1, userRes2, userRes3);
    return Result.ofSuccess(userResList);
}
在线调用一下用户列表接口,可以在控制台中看到token信息已经传过来了,于是就可以实现接口的权限验证了:
2023-09-30 12:51:00.709 INFO 23020 --- [nio-8080-exec-8] c.s.s.controller.UserController : token:12345


