基于TensorFlow Object Detection API实现RetinaNet目标检测网络(附源码)
文章目录
- 一、RetinaNet简介
-
- 1. Backbone网络
- 2. FPN网络
- 二、RetinaNet实现
-
- 1. tf.train.CheckPoint简介
- 2. RetinaNet的TensorFlow源码
一、RetinaNet简介
RetinaNet是作者Tsung-Yi Lin和Kaiming He于2018年发表的论文Focal Loss for Dense Object Detection中提出的网络。RetinaNet凭借其结构精简清晰、可扩展性强、检测准确率高等特点,成为了很多目标检测算法的baseline。

1. Backbone网络
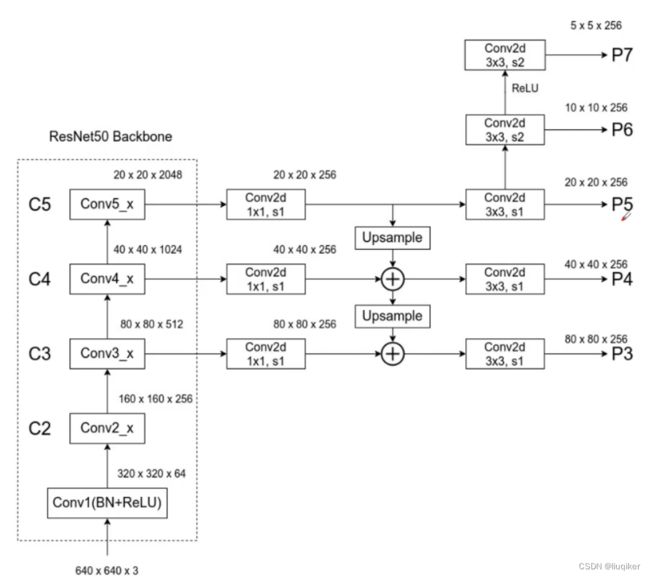
RetinaNet基本结构如上,主要由Backbone、FPN、和Head三部分组成。
其中Backbone为ResNet网络,ResNet一般从18层到152层(甚至更多)不等,主要区别在于采用的残差单元/模块不同或者堆叠残差单元/模块的数量和比例不同。
当前,ResNet已经被广泛运用于各种特征提取应用中,当深度学习网络层数越深时,理论上表达能力会更强,但是CNN网络达到一定的深度后,再加深,分类性能不会提高,而是会导致网络收敛更缓慢,准确率也随着降低,即使把数据集增大,解决过拟合的问题,分类性能和准确度也不会提高,而ResNet(残差网络)能够很好的解决这一问题。

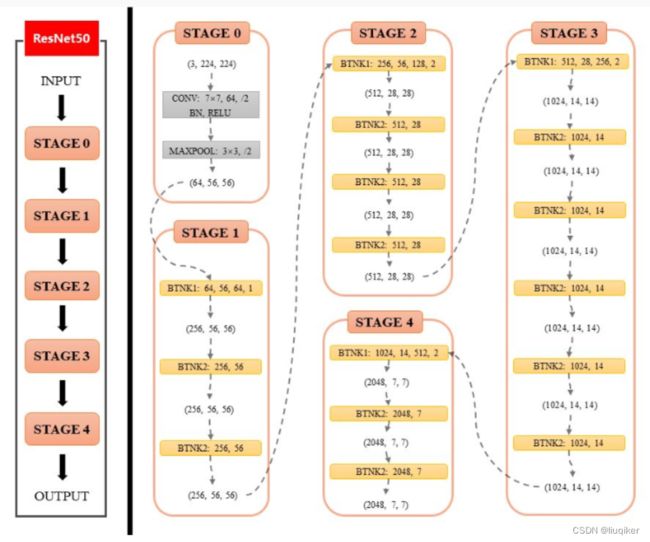
上图是ResNet50的网络结构,也是RetinaNet使用的Backbone网络,其中共包含五个Stage:
Stage 0是使输入先后经过卷积层、BN层、ReLU激活函数、和MaxPooling层,对输入图片做了初始处理,供后续4个Stage特征提取使用。
Stage 1-4的主要作用是在不同的感受野维度提取不同尺寸的特征图(下图中的C2 - C5),而利用不同感受野的特征图有助于目标的检测和识别。

2. FPN网络
我们都知道卷积神经网络在提取图像的过程中,特征图(feature map)会由于采样而导致其尺寸缩小。特征图尺寸减小的方向得到的特征图为高层特征(如上图的C5),反之则称为低层特征(如上图中的C2)。
而只使用某一层的特征图进行目标预测,会由于未使用足够低层的特征而丢失了图像的细节,最终导致结果的不准确。
而FPN网络则很好的解决了上述问题。FPN网络通过上采样(upsampling),将高层特征图(如上图的C5)的尺寸扩大为和低层特征图(如上图的C4)同样大小,再将高层特征(如上图的C5)与低层特征(如上图的C4)融合(上图中的特征“相加”),形成新的特征图(如上图的P4),之后再对新的特征图进行独立的预测。
这样做的优点是低层特征和高层特征相融合,提高了检测的性能,且预测结果更准确。
二、RetinaNet实现
1. tf.train.CheckPoint简介
在模型的训练过程中,经常会遇到这样的场景:我们需要保存某个时刻训练好的模型参数,这样在对模型进行微调时,才能使用保存好的参数继续训练,而不是再随机生成参数大范围的拟合。
这里保存模型的方法就是tf.train.Checkpoin。
具体用法参考官方文档。
2. RetinaNet的TensorFlow源码
Step 1:安装Tensorflow 2 Object Detection API及相关包
# 删除models文件夹下所有文件
!rm -rf ./models/
# 拷贝Tensorflow Model Garden
!git clone --depth 1 https://github.com/tensorflow/models/
# 编译Object Detection API protocol buffers
!cd models/research/ && protoc object_detection/protos/*.proto --python_out=.

%%writefile models/research/setup.py
import os
from setuptools import find_packages
from setuptools import setup

REQUIRED_PACKAGES = [
    'tf-models-official==2.8.0',
    'tensorflow_io==0.24.0',
    'numpy==1.21.5'
]

setup(
    name='object_detection',
    version='0.1',
    install_requires=REQUIRED_PACKAGES,
    include_package_data=True,
    packages=(
        [p for p in find_packages() if p.startswith('object_detection')] +
        find_packages(where=os.path.join('.', 'slim'))),
    package_dir={
        'datasets': os.path.join('slim', 'datasets'),
        'nets': os.path.join('slim', 'nets'),
        'preprocessing': os.path.join('slim', 'preprocessing'),
        'deployment': os.path.join('slim', 'deployment'),
        'scripts': os.path.join('slim', 'scripts'),
    },
    description='Tensorflow Object Detection Library',
    python_requires='>3.6',
)

# Run the setup script you just wrote
!python -m pip install models/research
Step 2:导入包
import matplotlib
import matplotlib.pyplot as plt

import os
import random
import io
import imageio
import glob
import scipy.misc
import numpy as np
from six import BytesIO
from PIL import Image, ImageDraw, ImageFont
from IPython.display import display, Javascript
from IPython.display import Image as IPyImage

import tensorflow as tf

from object_detection.utils import label_map_util
from object_detection.utils import config_util
from object_detection.utils import visualization_utils as viz_utils
from object_detection.utils import colab_utils
from object_detection.builders import model_builder

%matplotlib inline
Step 3:图片加载&画图工具函数定义
def load_image_into_numpy_array(path):
  """Load an image from file into a numpy array.

  Puts image into numpy array to feed into tensorflow graph.
  Note that by convention we put it into a numpy array with shape
  (height, width, channels), where channels=3 for RGB.

  Args:
    path: a file path.

  Returns:
    uint8 numpy array with shape (img_height, img_width, 3)
  """
  img_data = tf.io.gfile.GFile(path, 'rb').read()
  image = Image.open(BytesIO(img_data))
  (im_width, im_height) = image.size
  return np.array(image.getdata()).reshape(
      (im_height, im_width, 3)).astype(np.uint8)

def plot_detections(image_np,
                    boxes,
                    classes,
                    scores,
                    category_index,
                    figsize=(12, 16),
                    image_name=None):
  """Wrapper function to visualize detections.

  Args:
    image_np: uint8 numpy array with shape (img_height, img_width, 3)
    boxes: a numpy array of shape [N, 4]
    classes: a numpy array of shape [N]. Note that class indices are 1-based,
      and match the keys in the label map.
    scores: a numpy array of shape [N] or None.  If scores=None, then
      this function assumes that the boxes to be plotted are groundtruth
      boxes and plot all boxes as black with no classes or scores.
    category_index: a dict containing category dictionaries (each holding
      category index `id` and category name `name`) keyed by category indices.
    figsize: size for the figure.
    image_name: a name for the image file.
  """
  image_np_with_annotations = image_np.copy()
  viz_utils.visualize_boxes_and_labels_on_image_array(
      image_np_with_annotations,
      boxes,
      classes,
      scores,
      category_index,
      use_normalized_coordinates=True,
      min_score_thresh=0.8)
  if image_name:
    plt.imsave(image_name, image_np_with_annotations)
  else:
    plt.imshow(image_np_with_annotations)
Step 4:下载训练图片集(此处以training-zombie为例)
# download the images
!wget --no-check-certificate \
    https://storage.googleapis.com/tensorflow-3-public/datasets/training-zombie.zip \
    -O ./training-zombie.zip

import zipfile
# unzip to a local directory
local_zip = './training-zombie.zip'
zip_ref = zipfile.ZipFile(local_zip, 'r')
zip_ref.extractall('./training')
zip_ref.close()
Step 5:切换训练图片的路径,初始化训练图片list,并展示样例
train_image_dir = './training'
train_image_name = 'training-zombie'

# Load images and visualize
train_images_np = []
for i in range(1, 6):
  image_path = os.path.join(train_image_dir, train_image_name + str(i) + '.jpg')
  train_images_np.append(load_image_into_numpy_array(image_path))

plt.rcParams['axes.grid'] = False
plt.rcParams['xtick.labelsize'] = False
plt.rcParams['ytick.labelsize'] = False
plt.rcParams['xtick.top'] = False
plt.rcParams['xtick.bottom'] = False
plt.rcParams['ytick.left'] = False
plt.rcParams['ytick.right'] = False
plt.rcParams['figure.figsize'] = [14, 7]

for idx, train_image_np in enumerate(train_images_np):
  plt.subplot(2, 3, idx+1)  # 2, 3 -> 1, 5
  plt.imshow(train_image_np)
plt.show() # 样例展示
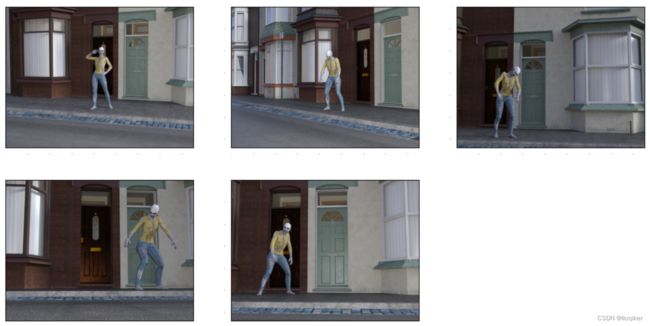
样例效果如下图:

Step 6:初始化边框位置(人为确定真实框线的坐标,用于训练)
gt_boxes = [
        np.array([[0.27333333, 0.41500586, 0.74333333, 0.57678781]], dtype=np.float32),
        np.array([[0.29833333, 0.45955451, 0.75666667, 0.61078546]], dtype=np.float32),
        np.array([[0.40833333, 0.18288394, 0.945, 0.34818288]], dtype=np.float32),
        np.array([[0.16166667, 0.61899179, 0.8, 0.91910903]], dtype=np.float32),
        np.array([[0.28833333, 0.12543962, 0.835, 0.35052755]], dtype=np.float32),
]
Step 7:初始化待检测目标的label和分类,由于我们只检测一种物体,故分类为1
zombie_class_id = 1
num_classes = 1

category_index = {zombie_class_id: {'id': zombie_class_id, 'name': 'zombie'}}
Step 8:将训练数据转换为tensor(即TensorFlow可识别的数据格式)
label_id_offset = 1
train_image_tensors = []
gt_classes_one_hot_tensors = []
gt_box_tensors = []
for (train_image_np, gt_box_np) in zip(
    train_images_np, gt_boxes):
  train_image_tensors.append(tf.expand_dims(tf.convert_to_tensor(
      train_image_np, dtype=tf.float32), axis=0))
  gt_box_tensors.append(tf.convert_to_tensor(gt_box_np, dtype=tf.float32))
  zero_indexed_groundtruth_classes = tf.convert_to_tensor(
      np.ones(shape=[gt_box_np.shape[0]], dtype=np.int32) - label_id_offset)
  gt_classes_one_hot_tensors.append(tf.one_hot(
      zero_indexed_groundtruth_classes, num_classes))
print('Done prepping data.')
Step 9:展示准备好的训练tensor和边框(在数据的预处理过程中,要多观察数据是否正确)
dummy_scores = np.array([1.0], dtype=np.float32)  # give boxes a score of 100%

plt.figure(figsize=(30, 15))
for idx in range(5):
  plt.subplot(2, 3, idx+1)
  plot_detections(
      train_images_np[idx],
      gt_boxes[idx],
      np.ones(shape=[gt_boxes[idx].shape[0]], dtype=np.int32),
      dummy_scores, category_index)
plt.show()
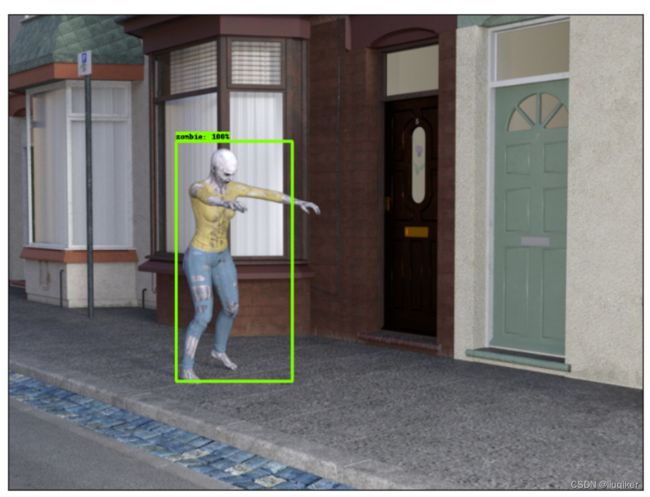
展示效果如下图:
Step 10:下载Retinanet模型
!wget http://download.tensorflow.org/models/object_detection/tf2/20200711/ssd_resnet50_v1_fpn_640x640_coco17_tpu-8.tar.gz
!tar -xf ssd_resnet50_v1_fpn_640x640_coco17_tpu-8.tar.gz
!mv ssd_resnet50_v1_fpn_640x640_coco17_tpu-8/checkpoint models/research/object_detection/test_data/
Step 11:模型加载、修改(主要修改检测物体的类别数量)、weights初始化(通过假数据的预测初始化weights)
tf.keras.backend.clear_session()

print('Building model and restoring weights for fine-tuning...', flush=True)
num_classes = 1
pipeline_config = 'models/research/object_detection/configs/tf2/ssd_resnet50_v1_fpn_640x640_coco17_tpu-8.config'
checkpoint_path = 'models/research/object_detection/test_data/checkpoint/ckpt-0'

# Load pipeline config and build a detection model.
configs = config_util.get_configs_from_pipeline_file(pipeline_config)
model_config = configs['model']
model_config.ssd.num_classes = num_classes
model_config.ssd.freeze_batchnorm = True
detection_model = model_builder.build(
      model_config=model_config, is_training=True)

fake_box_predictor = tf.train.Checkpoint(
    _base_tower_layers_for_heads=detection_model._box_predictor._base_tower_layers_for_heads,
    _box_prediction_head=detection_model._box_predictor._box_prediction_head,
    )
fake_model = tf.train.Checkpoint(
          _feature_extractor=detection_model._feature_extractor,
          _box_predictor=fake_box_predictor)
ckpt = tf.train.Checkpoint(model=fake_model)
ckpt.restore(checkpoint_path)

# Run model through a dummy image so that variables are created
image, shapes = detection_model.preprocess(tf.zeros([1, 640, 640, 3]))
prediction_dict = detection_model.predict(image, shapes)
_ = detection_model.postprocess(prediction_dict, shapes)
print('Weights restored!')
Step 12:定义train_step和train_loop
tf.keras.backend.set_learning_phase(True)

# 训练参数设置
batch_size = 4
learning_rate = 0.01
num_batches = 100

# 从模型中选择需要fine tune的参数
trainable_variables = detection_model.trainable_variables
to_fine_tune = []
prefixes_to_train = [
  'WeightSharedConvolutionalBoxPredictor/WeightSharedConvolutionalBoxHead',
  'WeightSharedConvolutionalBoxPredictor/WeightSharedConvolutionalClassHead']
for var in trainable_variables:
  if any([var.name.startswith(prefix) for prefix in prefixes_to_train]):
    to_fine_tune.append(var)

# train_step.
def get_model_train_step_function(model, optimizer, vars_to_fine_tune):
  """Get a tf.function for training step."""
  @tf.function
  def train_step_fn(image_tensors,
                    groundtruth_boxes_list,
                    groundtruth_classes_list):
    """A single training iteration.
    Args:
      image_tensors: A list of [1, height, width, 3] Tensor of type tf.float32.
        Note that the height and width can vary across images, as they are
        reshaped within this function to be 640x640.
      groundtruth_boxes_list: A list of Tensors of shape [N_i, 4] with type
        tf.float32 representing groundtruth boxes for each image in the batch.
      groundtruth_classes_list: A list of Tensors of shape [N_i, num_classes]
        with type tf.float32 representing groundtruth boxes for each image in
        the batch.

    Returns:
      A scalar tensor representing the total loss for the input batch.
    """
    shapes = tf.constant(batch_size * [[640, 640, 3]], dtype=tf.int32)
    model.provide_groundtruth(
        groundtruth_boxes_list=groundtruth_boxes_list,
        groundtruth_classes_list=groundtruth_classes_list)
    with tf.GradientTape() as tape:
      preprocessed_images = tf.concat(
          [detection_model.preprocess(image_tensor)[0]
           for image_tensor in image_tensors], axis=0)
      prediction_dict = model.predict(preprocessed_images, shapes)
      losses_dict = model.loss(prediction_dict, shapes)
      total_loss = losses_dict['Loss/localization_loss'] + losses_dict['Loss/classification_loss']
      gradients = tape.gradient(total_loss, vars_to_fine_tune)
      optimizer.apply_gradients(zip(gradients, vars_to_fine_tune))
    return total_loss

  return train_step_fn

# 优化器
optimizer = tf.keras.optimizers.SGD(learning_rate=learning_rate, momentum=0.9)
train_step_fn = get_model_train_step_function(
    detection_model, optimizer, to_fine_tune)

print('Start fine-tuning!', flush=True)

# 开始训练(即train_loop)
for idx in range(num_batches):
  # Grab keys for a random subset of examples
  all_keys = list(range(len(train_images_np)))
  random.shuffle(all_keys)
  example_keys = all_keys[:batch_size]

  gt_boxes_list = [gt_box_tensors[key] for key in example_keys]
  gt_classes_list = [gt_classes_one_hot_tensors[key] for key in example_keys]
  image_tensors = [train_image_tensors[key] for key in example_keys]

  # Training step (forward pass + backwards pass)
  total_loss = train_step_fn(image_tensors, gt_boxes_list, gt_classes_list)

  if idx % 10 == 0:
    print('batch ' + str(idx) + ' of ' + str(num_batches)
    + ', loss=' +  str(total_loss.numpy()), flush=True)

print('Done fine-tuning!')
Step 13:下载测试图片,用来测试上一步训练好的模型
# uncomment if you want to delete existing files
!rm zombie-walk-frames.zip
!rm -rf ./zombie-walk
!rm -rf ./results

# download test images
!wget --no-check-certificate \
    https://storage.googleapis.com/tensorflow-3-public/datasets/zombie-walk-frames.zip \
    -O zombie-walk-frames.zip

# unzip test images
local_zip = './zombie-walk-frames.zip'
zip_ref = zipfile.ZipFile(local_zip, 'r')
zip_ref.extractall('./results')
zip_ref.close()
Step 14:测试image to numpy 转换
test_image_dir = './results/'
test_images_np = []

# load images into a numpy array. this will take a few minutes to complete.
for i in range(0, 237):
    image_path = os.path.join(test_image_dir, 'zombie-walk' + "{0:04}".format(i) + '.jpg')
    print(image_path)
    test_images_np.append(np.expand_dims(
      load_image_into_numpy_array(image_path), axis=0))
Step 15:目标检测函数定义
@tf.function
def detect(input_tensor):
    """Run detection on an input image.
    Args:
    input_tensor: A [1, height, width, 3] Tensor of type tf.float32.
      Note that height and width can be anything since the image will be
      immediately resized according to the needs of the model within this
      function.

    Returns:
    A dict containing 3 Tensors (`detection_boxes`, `detection_classes`,
      and `detection_scores`).
    """
    preprocessed_image, shapes = detection_model.preprocess(input_tensor)
    prediction_dict = detection_model.predict(preprocessed_image, shapes)

    detections = detection_model.postprocess(prediction_dict, shapes)

    return detections
Step 16:调用目标检测函数,测试模型准确度
label_id_offset = 1
results = {'boxes': [], 'scores': []}

i = 150
images_np = test_images_np
# input_tensor = train_image_tensors[i]
input_tensor = tf.convert_to_tensor(images_np[i], dtype=tf.float32)
detections = detect(input_tensor)

detections['detection_boxes'][0].shape
detections['detection_classes'][0].shape
plot_detections(
  images_np[i][0],
  detections['detection_boxes'][0].numpy(),
  detections['detection_classes'][0].numpy().astype(np.uint32)
  + label_id_offset,
  detections['detection_scores'][0].numpy(),
  category_index, figsize=(15, 20))
