一,介绍
elasticsearch head 是一款开源的可视化的elasticsearch可视化工具,使用相当方便和广泛。
这个插件安装比较简单,网上已经有写得比较好的文章了,例如:Elasticsearch-head可视化工具安装及实例使用介绍_斌哥谈编程的博客-CSDN博客文章目录一、环境准备1.1 下载1.2 运行二、查看Elasticsearch-head界面2.1 服务端安装及配置2.2 配置跨域访问2.3 查看界面2.3.1 基本概念2.3.2 数据浏览2.3.3 基本查询2.3.4 复合查询一、环境准备由于ES官方并没有为ES提供界面管理工具,仅仅是提供了后台的服务。elasticsearch-head是一个为ES开发的一个页面客户端工具,其源码托管于GitHub,地址为:https://github.com/mobz/elasticsearch-head提https://blog.csdn.net/houpeibin2012/article/details/108482148
安装方式有4种,我也选择的是源码安装。
源码安装,通过npm run start启动
通过docker安装
通过chrome插件安装
通过ES的plugin方式安装
其实docker安装应该更好用,有兴趣的可以参考
https://jingyan.baidu.com/article/c1465413d7bd7a0bfdfc4c50.html https://jingyan.baidu.com/article/c1465413d7bd7a0bfdfc4c50.html
环境说明:
本文记录博主自己的安装步骤,以备今后查验。
操作系统版本:Red Hat Enterprise Linux release 8.2 (Ootpa)
二,安装步骤:
2.1,nodejs及npm安装
head是一个Node.js项目,所以需要先安装Node.js才可以运行head。安装了Node.js后,安装需要用到的npm命令就自带安装上了。
注意从这里开始要使用root用户。下载Nodejs:
Download | Node.jsNode.js® is a JavaScript runtime built on Chrome's V8 JavaScript engine. https://nodejs.org/en/download/
当前最新的版本是16.17.0
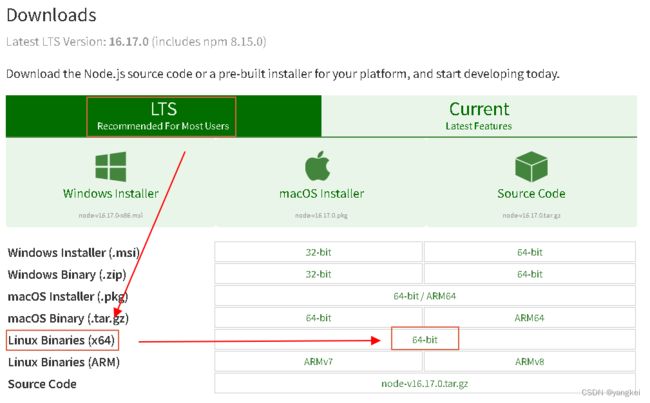
如果操作系统版本低的话可以选择低一些的版本,例如14.20.0
下滑到下载页面的底部:
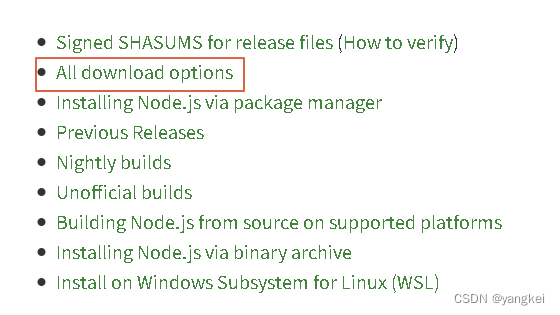
所有版本的下载列表:Index of /dist/ https://nodejs.org/dist/
上传下载的安装包,然后解压:
#xz -dk node-v16.17.0-linux-x64.tar.xz
#tar -xvf node-v16.17.0-linux-x64.tar
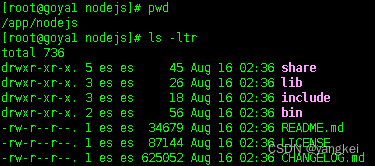
执行node命令 查看版本:
[root@goya1 bin]# ./node -v
v16.17.0
解压文件的 bin 目录底下包含了 node、npm 等命令,我们可以使用 ln 命令来设置软连接:
ln -s /app/nodejs/bin/npm /usr/local/bin/
ln -s /app/nodejs/bin/node /usr/local/bin/
设置npm镜像为国内的
npm config set registry http://registry.npm.taobao.org
可以通过输入npm命令来验证是否生效。

2.2,elasticsearch-head安装
GitHub - mobz/elasticsearch-head: A web front end for an elastic search clusterA web front end for an elastic search cluster. Contribute to mobz/elasticsearch-head development by creating an account on GitHub. https://github.com/mobz/elasticsearch-head
通过上面的连接下载安装包,然后将安装包上传到服务器。解压到目录/app/head-master

进入/app/head-master目录,执行npm install命令。

有错误产生,Nodejs版本过高。重新下载降级版本node-v14.20.0-linux-x64.tar来安装,成功通过。

也有另外一种解决办法就是安装phantomjs-prebuilt的2.1.14版本。读者可以自行测试。

运行elasticsearch-head:

使用elasticsearch-head:(说明:这里我连接是由3台ES节点组成的ES集群,且ES启用了x-pack,也就是需要用户名和密码访问)

这里其实无法连接到elasticsearch, 还需要解决跨域问题:
2.3,配置跨域访问:
由于前后端分离开发,所以会存在跨域问题,需要在服务端做CORS的配置,如下:
vim elasticsearch.yml
http.cors.enabled: true
http.cors.allow-origin: "*"
http.cors.allow-credentials: true
http.cors.allow-headers: Content-Type,Accept,Authorization,x-requested-with
#http.cors.allow-headers: "*"
配置完,后重启服务端程序。
cd bin
./elasticsearch 或 ./elasticsearch -d #后台启动
错误处理1:Access to XMLHttpRequest at xxx has been blocked by CORS policy: Request header field content-type is not allowed by Access-Control-Allow-Headers in preflight response.

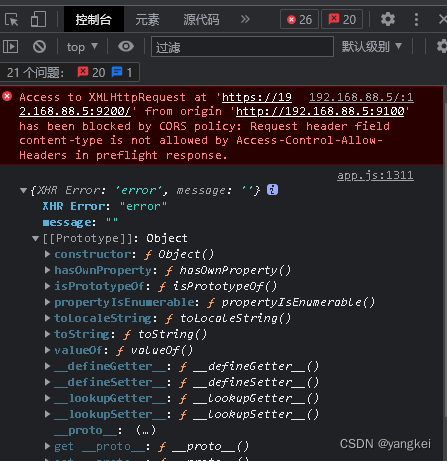
同源策略禁止读取位于 http://localhost:9200/_cluster/health 的远程资源。解决方法:在elasticsearch.yml中增配置内容如下:
http.cors.allow-headers: Content-Type,Accept,Authorization, x-requested-with
或者http.cors.allow-headers: "*"
错误2:vendor.js: GET https://:9200/ 401 (Unauthorized)。ES启用了X-pack,但是在elasticsearch-head 连接时提示401无权限访问。
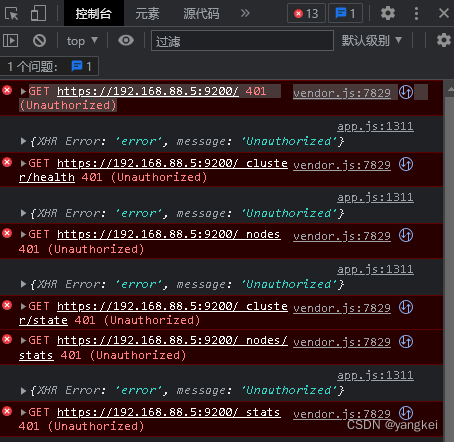
解决方法1(不推荐):修改ES配置文件,关闭x-pack功能,在elasticsearch.yml文件,添加如下一行内容:xpack.security.enabled: false
解决方法2:从head-master端解决。
2.4,配置head master 到 elasticsearch的加密访问。
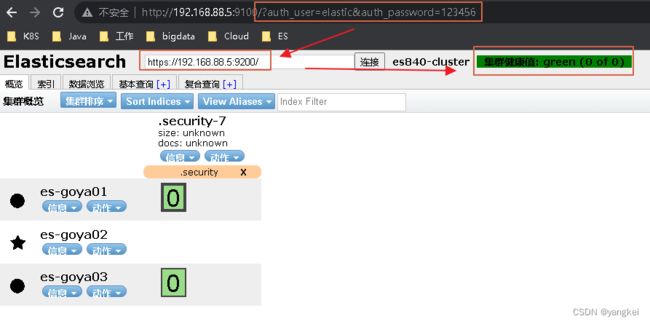
如何从head-master这边解决是作者花了两天时间都没有办法解决的问题,感谢万能的网络,最后找到了解决办法。思路就是带密码访问加密的ES。在输入elasticsearch-head访问地址时输入auth_user和auth_password两个变量值,如下图所示:
http://192.168.88.5:9100/?base_uri=https://192.168.88.5:9200&auth_user=elastic&auth_password=123456
三,其他技巧
3.1,设置master head需要用户名和密码登录。保障elasticsearch-head的访问安全。
参考:elasticsearch-head设置登录用户和密码_wangan094的博客-CSDN博客_es head 设置密码将elasticsearch-head-master/index.html路径下的index.html文件替换为如下代码,userName和userPassword自定义 elasticsearch-head&...</span><span class="link-link">https://blog.csdn.net/DH2442897094/article/details/105200039</span></span></p>
<p></p>
<p></p>
</div>
</div>
</div>
</div>
</div>
<!--PC和WAP自适应版-->
<div id="SOHUCS" sid="1708580700686462976"></div>
<script type="text/javascript" src="/views/front/js/chanyan.js"></script>
<!-- 文章页-底部 动态广告位 -->
<div class="youdao-fixed-ad" id="detail_ad_bottom"></div>
</div>
<div class="col-md-3">
<div class="row" id="ad">
<!-- 文章页-右侧1 动态广告位 -->
<div id="right-1" class="col-lg-12 col-md-12 col-sm-4 col-xs-4 ad">
<div class="youdao-fixed-ad" id="detail_ad_1"> </div>
</div>
<!-- 文章页-右侧2 动态广告位 -->
<div id="right-2" class="col-lg-12 col-md-12 col-sm-4 col-xs-4 ad">
<div class="youdao-fixed-ad" id="detail_ad_2"></div>
</div>
<!-- 文章页-右侧3 动态广告位 -->
<div id="right-3" class="col-lg-12 col-md-12 col-sm-4 col-xs-4 ad">
<div class="youdao-fixed-ad" id="detail_ad_3"></div>
</div>
</div>
</div>
</div>
</div>
</div>
<div class="container">
<h4 class="pt20 mb15 mt0 border-top">你可能感兴趣的:(es,elasticsearch)</h4>
<div id="paradigm-article-related">
<div class="recommend-post mb30">
<ul class="widget-links">
<li><a href="/article/1943213940909600768.htm"
title="k8s深度讲解----宏观架构与集群之脑 - API Server 和 etcd" target="_blank">k8s深度讲解----宏观架构与集群之脑 - API Server 和 etcd</a>
<span class="text-muted">weixin_42587823</span>
<a class="tag" taget="_blank" href="/search/%E4%BA%91%E5%8E%9F%E7%94%9F/1.htm">云原生</a><a class="tag" taget="_blank" href="/search/kubernetes/1.htm">kubernetes</a><a class="tag" taget="_blank" href="/search/%E6%9E%B6%E6%9E%84/1.htm">架构</a><a class="tag" taget="_blank" href="/search/etcd/1.htm">etcd</a>
<div>宏观架构与集群之脑-APIServer和etcd宏观架构:数据中心的操作系统在开始之前,让我们先建立一个高层视角。你可以将Kubernetes想象成一个管理整个数据中心的分布式操作系统。在这个操作系统中:控制平面(ControlPlane)就是它的“内核”,负责管理和决策。工作节点(WorkerNodes)就是它的“CPU和内存”,是真正运行应用程序的地方。我们常用的kubectl就是与这个“内核</div>
</li>
<li><a href="/article/1943213688181813248.htm"
title="docker启动报错" target="_blank">docker启动报错</a>
<span class="text-muted">时时刻刻看着自己的心</span>
<a class="tag" taget="_blank" href="/search/docker/1.htm">docker</a><a class="tag" taget="_blank" href="/search/%E5%AE%B9%E5%99%A8/1.htm">容器</a><a class="tag" taget="_blank" href="/search/%E8%BF%90%E7%BB%B4/1.htm">运维</a>
<div>[root@96-8-0-231~]#systemctlstatusdocker●docker.service-DockerApplicationContainerEngineLoaded:loaded(/etc/systemd/system/docker.service;enabled;vendorpreset:disabled)Active:failed(Result:exit-code)si</div>
</li>
<li><a href="/article/1943213561367031808.htm"
title="从互联网电脑迁移Dify到内网部署Dify方法记录" target="_blank">从互联网电脑迁移Dify到内网部署Dify方法记录</a>
<span class="text-muted"></span>
<div>一、在互联网电脑上准备迁移文件1.保存Docker镜像#获取所有Dify相关镜像(根据实际容器名调整)dockerps--filter"name=dify"--format"{{.Image}}"|sort-u>dify-images.list#保存镜像为.tar文件dockersave$(catdify-images.list)-odify-images.tar2.备份数据卷or直接复制路径(1</div>
</li>
<li><a href="/article/1943212427831209984.htm"
title="vue3 + element-plus el-table表格二次封装,支持复选框,排序,分页。" target="_blank">vue3 + element-plus el-table表格二次封装,支持复选框,排序,分页。</a>
<span class="text-muted"></span>
<a class="tag" taget="_blank" href="/search/%E5%89%8D%E7%AB%AFvue.js/1.htm">前端vue.js</a>
<div>一、customTable.vue组件{{(currentPage-1)*pageSize+scope.$index+1}}{{btn.text}}import{ref,onMounted}from"vue";letloading=defineModel("loading");constemits=defineEmits(["selection-change","sort-change"]);co</div>
</li>
<li><a href="/article/1943210032497750016.htm"
title="OpenGL 2. 着色器" target="_blank">OpenGL 2. 着色器</a>
<span class="text-muted">灿烂阳光g</span>
<a class="tag" taget="_blank" href="/search/c%2B%2B/1.htm">c++</a><a class="tag" taget="_blank" href="/search/%E5%BC%80%E5%8F%91%E8%AF%AD%E8%A8%80/1.htm">开发语言</a><a class="tag" taget="_blank" href="/search/OpenGL/1.htm">OpenGL</a>
<div>#include#include#include#include//函数声明voidframebuffer_size_callback(GLFWwindow*window,intwidth,intheight);voidprocessInput(GLFWwindow*window);voidcheckShaderCompileStatus(unsignedintshader,conststd::s</div>
</li>
<li><a href="/article/1943209150150406144.htm"
title="RK35xx cpu无法调频的可能原因" target="_blank">RK35xx cpu无法调频的可能原因</a>
<span class="text-muted"></span>
<div>RK35xxcpu无法调频的可能原因1、开发环境2、问题描述3、问题解析3.1收集log信息3.2分析问题4、验证5、结论1、开发环境芯片型号:rk3568kernel版本:linux4.192、问题描述用户想动态调控CPU的频率,正常来说,在系统目录/sys/devices/system/cpu/cpu0/cpufreq/下是可以进行动态调频的;不正常的情况下就是没有/sys/devices/s</div>
</li>
<li><a href="/article/1943208267865976832.htm"
title="Flex与Spring集成" target="_blank">Flex与Spring集成</a>
<span class="text-muted">hkmw</span>
<a class="tag" taget="_blank" href="/search/Flex/1.htm">Flex</a><a class="tag" taget="_blank" href="/search/%E9%85%8D%E7%BD%AE/1.htm">配置</a><a class="tag" taget="_blank" href="/search/spring/1.htm">spring</a><a class="tag" taget="_blank" href="/search/flex/1.htm">flex</a><a class="tag" taget="_blank" href="/search/application/1.htm">application</a><a class="tag" taget="_blank" href="/search/dependencies/1.htm">dependencies</a><a class="tag" taget="_blank" href="/search/components/1.htm">components</a><a class="tag" taget="_blank" href="/search/access/1.htm">access</a>
<div>Flex与Spring集成UsingFlexwithSpringUPDATE(1/12/2007):IputtogetheraTomcat-basedTestDriveServerthatincludesthesamplesdescribedbelowrunningout-of-thebox.Readthispostformoreinfo.WhatisSpring?Springisoneofthe</div>
</li>
<li><a href="/article/1943207762251018240.htm"
title="【视频观看系统】- 技术与架构选型" target="_blank">【视频观看系统】- 技术与架构选型</a>
<span class="text-muted"></span>
<div>✅项目技术选型方案一、整体架构风格项目层级技术选型说明架构风格微服务架构(SpringCloud)独立部署、易扩展、易维护服务通信HTTP(RestTemplate或Feign)+RocketMQ同步调用+异步事件注册中心Nacos服务注册、发现、配置中心配置中心Nacos配置管理多服务统一配置API网关SpringCloudGateway路由转发、权限验证、限流服务监控SpringBootAdm</div>
</li>
<li><a href="/article/1943207006173196288.htm"
title="EgoAlpha/prompt-in-context-learning项目解析:Prompt Engineering核心技术指南" target="_blank">EgoAlpha/prompt-in-context-learning项目解析:Prompt Engineering核心技术指南</a>
<span class="text-muted">霍日江Eagle-Eyed</span>
<div>EgoAlpha/prompt-in-context-learning项目解析:PromptEngineering核心技术指南prompt-in-context-learningAwesomeresourcesforin-contextlearningandpromptengineering:MasteryoftheLLMssuchasChatGPT,GPT-3,andFlanT5,withup-</div>
</li>
<li><a href="/article/1943205867679707136.htm"
title="题解:P13017 [GESP202506 七级] 线图" target="_blank">题解:P13017 [GESP202506 七级] 线图</a>
<span class="text-muted">YLCHUP</span>
<a class="tag" taget="_blank" href="/search/%E5%88%B7%E9%A2%98%E4%B9%8B%E8%B7%AF/1.htm">刷题之路</a><a class="tag" taget="_blank" href="/search/%E7%AE%97%E6%B3%95/1.htm">算法</a><a class="tag" taget="_blank" href="/search/%E5%9B%BE%E8%AE%BA/1.htm">图论</a><a class="tag" taget="_blank" href="/search/%E6%B7%B1%E5%BA%A6%E4%BC%98%E5%85%88/1.htm">深度优先</a><a class="tag" taget="_blank" href="/search/%E6%95%B0%E5%AD%A6%E5%BB%BA%E6%A8%A1/1.htm">数学建模</a><a class="tag" taget="_blank" href="/search/c%2B%2B/1.htm">c++</a><a class="tag" taget="_blank" href="/search/%E6%95%B0%E6%8D%AE%E7%BB%93%E6%9E%84/1.htm">数据结构</a><a class="tag" taget="_blank" href="/search/%E7%AC%94%E8%AE%B0/1.htm">笔记</a>
<div>首先明白定义:线图L(G)L(G)L(G)的顶点对应原图GGG的边,当且仅当原图中的两条边有公共顶点时,对应的线图顶点之间有一条边。不难想到,对于原图中的每个顶点vvv,其度数d(v)d(v)d(v)对应的边集可以形成(d(v)2)\binom{d(v)}{2}(2d(v))对相邻边。每对相邻边在线图中会产生一条边。用公式表示就是这样的(设G=(V,E)G=(V,E)G=(V,E)):∣EL(G)</div>
</li>
<li><a href="/article/1943205869802024960.htm"
title="自动化测试 | UI Automator 进阶指南" target="_blank">自动化测试 | UI Automator 进阶指南</a>
<span class="text-muted">aihuanshang9340</span>
<div>UIAutomator相关介绍:跨应用的用户界面自动化测试包含在AndroidXTest(https://developer.android.com/training/testing)中支持的Android系统:>=Android4.3(APIlevel18)基于instrumentation,依赖于AndroidJUnitRunner测试运行器设置UIAutomator(SetupUIAutom</div>
</li>
<li><a href="/article/1943202716956291072.htm"
title="手机FunASR识别SIM卡通话占用内存和运行性能分析" target="_blank">手机FunASR识别SIM卡通话占用内存和运行性能分析</a>
<span class="text-muted"></span>
<div>手机FunASR识别SIM卡通话占用内存和运行性能分析--本地AI电话机器人上一篇:手机无网离线使用FunASR识别SIM卡语音通话内容下一篇:手机通话语音离线ASR识别商用和优化方向一、前言书接上一文《阿里FunASR本地断网离线识别模型简析》,我们其实在2023年底的时候输出过一版基于离线FunASR的ASR转文字方案。当时为了减少模型文件的数量和大小,只引入了【vad_res】、【asr_o</div>
</li>
<li><a href="/article/1943201080502448128.htm"
title="Flutter SnackBar 控件详细介绍" target="_blank">Flutter SnackBar 控件详细介绍</a>
<span class="text-muted">江上清风山间明月</span>
<a class="tag" taget="_blank" href="/search/Flutter/1.htm">Flutter</a><a class="tag" taget="_blank" href="/search/flutter/1.htm">flutter</a><a class="tag" taget="_blank" href="/search/SnackBar/1.htm">SnackBar</a><a class="tag" taget="_blank" href="/search/dart/1.htm">dart</a>
<div>文章目录FlutterSnackBar控件详细介绍基本特性基本用法1.显示简单SnackBar2.自定义持续时间主要属性高级用法1.带操作的SnackBar2.自定义样式3.浮动式SnackBarSnackBarAction属性实际应用场景注意事项完整示例建议FlutterSnackBar控件详细介绍SnackBar是FlutterMaterialDesign中的一个轻量级消息提示控件,用于向用户</div>
</li>
<li><a href="/article/1943196037518782464.htm"
title="ubuntu miktex安装教程" target="_blank">ubuntu miktex安装教程</a>
<span class="text-muted">傅小凤-</span>
<a class="tag" taget="_blank" href="/search/ubuntu/1.htm">ubuntu</a><a class="tag" taget="_blank" href="/search/linux/1.htm">linux</a><a class="tag" taget="_blank" href="/search/ubuntu/1.htm">ubuntu</a><a class="tag" taget="_blank" href="/search/linux/1.htm">linux</a><a class="tag" taget="_blank" href="/search/%E8%BF%90%E7%BB%B4/1.htm">运维</a><a class="tag" taget="_blank" href="/search/miktex/1.htm">miktex</a>
<div>ubuntumiktex安装教程安装miktex之前必须先安装texlive,否则会无法安装miktex。sudoapt-getinstalltexlive-fullcjk-latexlatex-cjk-chinese然后就按照miktex官网的安装教程一步一步执行就可以了:https://miktex.org/download</div>
</li>
<li><a href="/article/1943195028985802752.htm"
title="Nginx中如何配置WebSocket代理?" target="_blank">Nginx中如何配置WebSocket代理?</a>
<span class="text-muted">m0_74824025</span>
<a class="tag" taget="_blank" href="/search/%E9%9D%A2%E8%AF%95/1.htm">面试</a><a class="tag" taget="_blank" href="/search/%E5%AD%A6%E4%B9%A0%E8%B7%AF%E7%BA%BF/1.htm">学习路线</a><a class="tag" taget="_blank" href="/search/%E9%98%BF%E9%87%8C%E5%B7%B4%E5%B7%B4/1.htm">阿里巴巴</a><a class="tag" taget="_blank" href="/search/nginx/1.htm">nginx</a><a class="tag" taget="_blank" href="/search/websocket/1.htm">websocket</a><a class="tag" taget="_blank" href="/search/%E8%BF%90%E7%BB%B4/1.htm">运维</a>
<div>Nginx可以配置为WebSocket代理,将WebSocket连接从客户端转发到后端服务器。以下是如何在Nginx中配置WebSocket代理的详细步骤和示例配置。1.安装Nginx确保你已经安装了Nginx。如果没有安装,可以使用以下命令进行安装:sudoapt-getupdatesudoapt-getinstallnginx2.配置WebSocket代理编辑Nginx配置文件,通常位于/et</div>
</li>
<li><a href="/article/1943192003957288960.htm"
title="AAAI—24—Main—paper(关于Multi—Modal的全部文章摘要)" target="_blank">AAAI—24—Main—paper(关于Multi—Modal的全部文章摘要)</a>
<span class="text-muted"></span>
<div>我们生活在一个由多种模态(Multimodal)信息构成的世界,包括视觉信息、听觉信息、文本信息、嗅觉信息等等,当研究的问题或者数据集包含多种这样的模态信息时我们称之为多模态学习多模态机器学习旨在处理学习(视觉,听觉,语言等)不同模态融合交织的信息。下游任务(1)视觉问答1.视觉问答(visualquestionanswering,VQA).给予视觉输入(图像或视频),VQA代表了正确提供一个问题</div>
</li>
<li><a href="/article/1943190617802731520.htm"
title="Pandas 学习(数学建模篇)" target="_blank">Pandas 学习(数学建模篇)</a>
<span class="text-muted">停走的风</span>
<a class="tag" taget="_blank" href="/search/%E6%95%B0%E5%AD%A6%E5%BB%BA%E6%A8%A1/1.htm">数学建模</a><a class="tag" taget="_blank" href="/search/pandas/1.htm">pandas</a><a class="tag" taget="_blank" href="/search/%E5%AD%A6%E4%B9%A0/1.htm">学习</a>
<div>今天学习数学建模2023年C篇(228)优秀论文2023高教社杯全国大学生数学建模竞赛C题论文展示(C228)-2023C题论文-中国大学生在线一.pd.DataFramepd.DataFrame()是pandas库中用于创建二维表格数据结构(DataFrame)的核心函数。它的作用是将各种格式的数据(如字典、列表、Series等)转换为带有行索引和列标签的表格形式,便于数据处理和分析.impor</div>
</li>
<li><a href="/article/1943185449098997760.htm"
title="Centos系统及国产麒麟系统设置自己写的go服务的开机启动项完整教程" target="_blank">Centos系统及国产麒麟系统设置自己写的go服务的开机启动项完整教程</a>
<span class="text-muted">二当家的素材网</span>
<a class="tag" taget="_blank" href="/search/%E8%BF%90%E7%BB%B4/1.htm">运维</a><a class="tag" taget="_blank" href="/search/centos/1.htm">centos</a><a class="tag" taget="_blank" href="/search/linux/1.htm">linux</a><a class="tag" taget="_blank" href="/search/%E8%BF%90%E7%BB%B4/1.htm">运维</a>
<div>1、创建服务文件在/etc/systemd/system/下新建服务配置文件(需sudo权限),例如:sudonano/etc/systemd/system/mygo.service如下图,创建的mygo.service2、创建内容如下:Description=ThegoHTTPandreverseproxyserverAfter=network.targetremote-fs.targetnss</div>
</li>
<li><a href="/article/1943184315047276544.htm"
title="linux 定时任务" target="_blank">linux 定时任务</a>
<span class="text-muted">小小小欣</span>
<div>crontab-e0*/1***/usr/bin/curlhttp://manage.baicmotorsales.com/Lists/clueData每一小时访问一次这个方法servicecrondrestart重启任务crontab-l查看定时任务tail-f/var/log/cron查看任务日志</div>
</li>
<li><a href="/article/1943183809205825536.htm"
title="Django核心知识点详解:JSON、AJAX、Cookie、Session与用户认证" target="_blank">Django核心知识点详解:JSON、AJAX、Cookie、Session与用户认证</a>
<span class="text-muted">PythonicCC</span>
<a class="tag" taget="_blank" href="/search/django/1.htm">django</a><a class="tag" taget="_blank" href="/search/json/1.htm">json</a><a class="tag" taget="_blank" href="/search/ajax/1.htm">ajax</a>
<div>1.JSON数据格式详解1.1什么是JSON?JSON(JavaScriptObjectNotation)是一种轻量级的数据交换格式,具有以下特点:独立于语言,几乎所有编程语言都支持易于人阅读和编写易于机器解析和生成基于文本,比XML更简洁1.2JSON基本格式对象格式{"name":"rose","age":20}使用大括号{}包裹键值对形式,键必须用双引号包裹多个键值对用逗号分隔数组格式["j</div>
</li>
<li><a href="/article/1943182675078606848.htm"
title="如何解决小程序发布之后不能访问任何请求的问题?" target="_blank">如何解决小程序发布之后不能访问任何请求的问题?</a>
<span class="text-muted">嘉琪001</span>
<a class="tag" taget="_blank" href="/search/%E5%B0%8F%E7%A8%8B%E5%BA%8F/1.htm">小程序</a><a class="tag" taget="_blank" href="/search/apache/1.htm">apache</a><a class="tag" taget="_blank" href="/search/php/1.htm">php</a>
<div>(1)域名白名单设置不正确:小程序需要在微信公众平台后台请求域名添加到request合法域名白名单中,否则无法发送请求,确保所有域名添加到白名单中服务器SSL/HTTPS配置问题:小程序要求必须使用HTTPS协议进行网络请求,如果服务器没有配置好SSL证书,就无法访问,跨域问题:在服务器配置好CORS的跨域策略接口权限限制:如果请求是像某个特定的接口发送,确保你在小程序后台设置了相应接口权限有些接</div>
</li>
<li><a href="/article/1943182043156377600.htm"
title="C#实现SVM支持向量机(附完整源码)" target="_blank">C#实现SVM支持向量机(附完整源码)</a>
<span class="text-muted">源代码大师</span>
<a class="tag" taget="_blank" href="/search/C%23%E5%AE%9E%E6%88%98%E6%95%99%E7%A8%8B/1.htm">C#实战教程</a><a class="tag" taget="_blank" href="/search/c%23/1.htm">c#</a><a class="tag" taget="_blank" href="/search/%E6%94%AF%E6%8C%81%E5%90%91%E9%87%8F%E6%9C%BA/1.htm">支持向量机</a><a class="tag" taget="_blank" href="/search/%E5%BC%80%E5%8F%91%E8%AF%AD%E8%A8%80/1.htm">开发语言</a>
<div>C#实现SVM支持向量机下面是使用C#实现支持向量机(SVM)的示例代码:usingSystem;usingAccord.MachineLearning.VectorMachines;usingAccord.MachineLearning.VectorMachines.Learning;usingAccord</div>
</li>
<li><a href="/article/1943180782218571776.htm"
title="经典JS面试题——数组去重" target="_blank">经典JS面试题——数组去重</a>
<span class="text-muted">MonsterQy</span>
<a class="tag" taget="_blank" href="/search/javascript/1.htm">javascript</a><a class="tag" taget="_blank" href="/search/%E5%89%8D%E7%AB%AF/1.htm">前端</a><a class="tag" taget="_blank" href="/search/%E5%BC%80%E5%8F%91%E8%AF%AD%E8%A8%80/1.htm">开发语言</a>
<div>文章目录一、双指针二、filter方法三、includes四、indexOf五、reduce()六、set一、双指针基本思想:遍历数组,两层for循环比较元素是否相等,相等就删除重复元素。代码如下for(vari=0;i{returnarr.indexOf(value)==index})三、includes基本思想:利用includes方法去判断新声明的数组中是否已存在待操作的元素。vararr=</div>
</li>
<li><a href="/article/1943176626019823616.htm"
title="3DXML 转换为 SOLIDWORKS 技术指南:含迪威模型网在线转换方案" target="_blank">3DXML 转换为 SOLIDWORKS 技术指南:含迪威模型网在线转换方案</a>
<span class="text-muted"></span>
<div>在工业设计协同工作中,不同CAD软件的文件格式转换是常见需求。3DXML作为DassaultSystèmes旗下CATIA软件的轻量型三维数据格式,因体积小、便于传输,被广泛用于模型预览和跨平台共享。但当需要在SOLIDWORKS中进行深入设计或工程分析时,需将3DXML格式转换为SOLIDWORKS兼容格式。本文将为技术人员和学生详细介绍转换全流程,并推荐实用的在线转换平台——迪威模型网。一、3</div>
</li>
<li><a href="/article/1943170828023689216.htm"
title="LeetCode 1:两数之和(Two Sum)解法汇总" target="_blank">LeetCode 1:两数之和(Two Sum)解法汇总</a>
<span class="text-muted"></span>
<div>文章目录暴力解法/我的解法两遍哈希表一遍哈希表更多LeetCode题解暴力解法/我的解法这种办法很容易理解,就不赘述了,直接上代码首先上javapublicint[]twoSum(int[]nums,inttarget){for(inti=0;itwoSum(vector&nums,inttarget){vectorresult;vector::iteratorib=nums.begin();ve</div>
</li>
<li><a href="/article/1943168435072593920.htm"
title="Android网络层架构:统一错误处理的问题分析到解决方案与设计实现" target="_blank">Android网络层架构:统一错误处理的问题分析到解决方案与设计实现</a>
<span class="text-muted">wzj_what_why_how</span>
<a class="tag" taget="_blank" href="/search/Android/1.htm">Android</a><a class="tag" taget="_blank" href="/search/%23/1.htm">#</a><a class="tag" taget="_blank" href="/search/Android%E2%80%94%E2%80%94%E6%9E%B6%E6%9E%84%E5%92%8C%E8%AE%BE%E8%AE%A1/1.htm">Android——架构和设计</a><a class="tag" taget="_blank" href="/search/android/1.htm">android</a><a class="tag" taget="_blank" href="/search/%E6%9E%B6%E6%9E%84/1.htm">架构</a>
<div>前言在Android项目开发中,我们经常遇到需要统一处理某些特定状态码的场景。本文分享一个项目中遇到的4406状态码(实名认证)处理不统一问题,从问题分析到完整解决方案,提供一套可复用的架构设计模式。目录前言问题分析不同框架的回调处理机制解决方案关键技术细节添加应用拦截器循环依赖问题与回调接口模式问题分析解决方案:回调接口模式ResponseBody流管理问题现象原因总结源码分析总结其设计原理重复</div>
</li>
<li><a href="/article/1943167804219912192.htm"
title="Jenkins Pipeline(二)" target="_blank">Jenkins Pipeline(二)</a>
<span class="text-muted">tomorrow.hello</span>
<a class="tag" taget="_blank" href="/search/Maven/1.htm">Maven</a><a class="tag" taget="_blank" href="/search/jenkins/1.htm">jenkins</a><a class="tag" taget="_blank" href="/search/%E8%BF%90%E7%BB%B4/1.htm">运维</a>
<div>1.Pipeline变量在Jenkins管道(Pipeline)中,变量是一种非常有用的功能,它们可以帮助你在构建过程中存储和传递数据。Jenkins管道支持多种方式来定义和使用变量,包括环境变量、脚本变量以及全局变量。1.2脚本变量在pipeline脚本中,你可以使用Groovy脚本来定义和操作变量。pipeline{agentanystages{stage('Example'){steps{s</div>
</li>
<li><a href="/article/1943166040921927680.htm"
title="leetcode393. UTF-8 编码验证" target="_blank">leetcode393. UTF-8 编码验证</a>
<span class="text-muted">wl1929</span>
<a class="tag" taget="_blank" href="/search/leetcode/1.htm">leetcode</a>
<div>classSolution{publicbooleanvalidUtf8(int[]data){intnumberOfBytesToProcess=0;for(inti=0;i=8?binRep.substring(binRep.length()-8):"00000000".substring(binRep.length()%8)+binRep;if(numberOfBytesToProcess=</div>
</li>
<li><a href="/article/1943163520132640768.htm"
title="brew java 切换_Java jdk11 在Mac上的安装和配置以及JDK多个版本之间切换" target="_blank">brew java 切换_Java jdk11 在Mac上的安装和配置以及JDK多个版本之间切换</a>
<span class="text-muted">weixin_39570838</span>
<a class="tag" taget="_blank" href="/search/brew/1.htm">brew</a><a class="tag" taget="_blank" href="/search/java/1.htm">java</a><a class="tag" taget="_blank" href="/search/%E5%88%87%E6%8D%A2/1.htm">切换</a>
<div>1、JDK11安装1)下载JDK11wgethttps://download.java.net/java/GA/jdk11/13/GPL/openjdk-11.0.1_osx-x64_bin.tar.gz2)解压安装包(系统中默认安装位置:/Library/Java/JavaVirtualMachines/)sudotar-zxfopenjdk-11.0.1_osx-x64_bin.tar.gz-</div>
</li>
<li><a href="/article/1943162381018394624.htm"
title="2025 Next.js项目提前编译并在服务器" target="_blank">2025 Next.js项目提前编译并在服务器</a>
<span class="text-muted">风吹落叶花飘荡</span>
<a class="tag" taget="_blank" href="/search/%E5%89%8D%E7%AB%AF/1.htm">前端</a><a class="tag" taget="_blank" href="/search/javascript/1.htm">javascript</a><a class="tag" taget="_blank" href="/search/%E6%9C%8D%E5%8A%A1%E5%99%A8/1.htm">服务器</a><a class="tag" taget="_blank" href="/search/%E5%BC%80%E5%8F%91%E8%AF%AD%E8%A8%80/1.htm">开发语言</a>
<div>要让一个Next.js项目提前编译并在服务器上运行,可以按照以下步骤操作:1.本地构建项目首先在开发环境中完成构建:#安装依赖pnpminstall#生产环境构建(生成优化版本)npmrunbuild这会生成:.next/目录(包含编译后的应用)public/目录(静态资源)node_modules/(生产依赖)2.准备部署文件需要上传到服务器的文件:.next/public/package.js</div>
</li>
<li><a href="/article/57.htm"
title="多线程编程之join()方法" target="_blank">多线程编程之join()方法</a>
<span class="text-muted">周凡杨</span>
<a class="tag" taget="_blank" href="/search/java/1.htm">java</a><a class="tag" taget="_blank" href="/search/JOIN/1.htm">JOIN</a><a class="tag" taget="_blank" href="/search/%E5%A4%9A%E7%BA%BF%E7%A8%8B/1.htm">多线程</a><a class="tag" taget="_blank" href="/search/%E7%BC%96%E7%A8%8B/1.htm">编程</a><a class="tag" taget="_blank" href="/search/%E7%BA%BF%E7%A8%8B/1.htm">线程</a>
<div>现实生活中,有些工作是需要团队中成员依次完成的,这就涉及到了一个顺序问题。现在有T1、T2、T3三个工人,如何保证T2在T1执行完后执行,T3在T2执行完后执行?问题分析:首先问题中有三个实体,T1、T2、T3, 因为是多线程编程,所以都要设计成线程类。关键是怎么保证线程能依次执行完呢?
Java实现过程如下:
public class T1 implements Runnabl</div>
</li>
<li><a href="/article/184.htm"
title="java中switch的使用" target="_blank">java中switch的使用</a>
<span class="text-muted">bingyingao</span>
<a class="tag" taget="_blank" href="/search/java/1.htm">java</a><a class="tag" taget="_blank" href="/search/enum/1.htm">enum</a><a class="tag" taget="_blank" href="/search/break/1.htm">break</a><a class="tag" taget="_blank" href="/search/continue/1.htm">continue</a>
<div>java中的switch仅支持case条件仅支持int、enum两种类型。
用enum的时候,不能直接写下列形式。
switch (timeType) {
case ProdtransTimeTypeEnum.DAILY:
break;
default:
br</div>
</li>
<li><a href="/article/311.htm"
title="hive having count 不能去重" target="_blank">hive having count 不能去重</a>
<span class="text-muted">daizj</span>
<a class="tag" taget="_blank" href="/search/hive/1.htm">hive</a><a class="tag" taget="_blank" href="/search/%E5%8E%BB%E9%87%8D/1.htm">去重</a><a class="tag" taget="_blank" href="/search/having+count/1.htm">having count</a><a class="tag" taget="_blank" href="/search/%E8%AE%A1%E6%95%B0/1.htm">计数</a>
<div>hive在使用having count()是,不支持去重计数
hive (default)> select imei from t_test_phonenum where ds=20150701 group by imei having count(distinct phone_num)>1 limit 10;
FAILED: SemanticExcep</div>
</li>
<li><a href="/article/438.htm"
title="WebSphere对JSP的缓存" target="_blank">WebSphere对JSP的缓存</a>
<span class="text-muted">周凡杨</span>
<a class="tag" taget="_blank" href="/search/WAS+JSP+%E7%BC%93%E5%AD%98/1.htm">WAS JSP 缓存</a>
<div> 对于线网上的工程,更新JSP到WebSphere后,有时会出现修改的jsp没有起作用,特别是改变了某jsp的样式后,在页面中没看到效果,这主要就是由于websphere中缓存的缘故,这就要清除WebSphere中jsp缓存。要清除WebSphere中JSP的缓存,就要找到WAS安装后的根目录。
现服务</div>
</li>
<li><a href="/article/565.htm"
title="设计模式总结" target="_blank">设计模式总结</a>
<span class="text-muted">朱辉辉33</span>
<a class="tag" taget="_blank" href="/search/java/1.htm">java</a><a class="tag" taget="_blank" href="/search/%E8%AE%BE%E8%AE%A1%E6%A8%A1%E5%BC%8F/1.htm">设计模式</a>
<div>1.工厂模式
1.1 工厂方法模式 (由一个工厂类管理构造方法)
1.1.1普通工厂模式(一个工厂类中只有一个方法)
1.1.2多工厂模式(一个工厂类中有多个方法)
1.1.3静态工厂模式(将工厂类中的方法变成静态方法)
&n</div>
</li>
<li><a href="/article/692.htm"
title="实例:供应商管理报表需求调研报告" target="_blank">实例:供应商管理报表需求调研报告</a>
<span class="text-muted">老A不折腾</span>
<a class="tag" taget="_blank" href="/search/finereport/1.htm">finereport</a><a class="tag" taget="_blank" href="/search/%E6%8A%A5%E8%A1%A8%E7%B3%BB%E7%BB%9F/1.htm">报表系统</a><a class="tag" taget="_blank" href="/search/%E6%8A%A5%E8%A1%A8%E8%BD%AF%E4%BB%B6/1.htm">报表软件</a><a class="tag" taget="_blank" href="/search/%E4%BF%A1%E6%81%AF%E5%8C%96%E9%80%89%E5%9E%8B/1.htm">信息化选型</a>
<div>引言
随着企业集团的生产规模扩张,为支撑全球供应链管理,对于供应商的管理和采购过程的监控已经不局限于简单的交付以及价格的管理,目前采购及供应商管理各个环节的操作分别在不同的系统下进行,而各个数据源都独立存在,无法提供统一的数据支持;因此,为了实现对于数据分析以提供采购决策,建立报表体系成为必须。 业务目标
1、通过报表为采购决策提供数据分析与支撑
2、对供应商进行综合评估以及管理,合理管理和</div>
</li>
<li><a href="/article/819.htm"
title="mysql" target="_blank">mysql</a>
<span class="text-muted">林鹤霄</span>
<div>转载源:http://blog.sina.com.cn/s/blog_4f925fc30100rx5l.html
mysql -uroot -p
ERROR 1045 (28000): Access denied for user 'root'@'localhost' (using password: YES)
[root@centos var]# service mysql</div>
</li>
<li><a href="/article/946.htm"
title="Linux下多线程堆栈查看工具(pstree、ps、pstack)" target="_blank">Linux下多线程堆栈查看工具(pstree、ps、pstack)</a>
<span class="text-muted">aigo</span>
<a class="tag" taget="_blank" href="/search/linux/1.htm">linux</a>
<div>原文:http://blog.csdn.net/yfkiss/article/details/6729364
1. pstree
pstree以树结构显示进程$ pstree -p work | grep adsshd(22669)---bash(22670)---ad_preprocess(4551)-+-{ad_preprocess}(4552) &n</div>
</li>
<li><a href="/article/1073.htm"
title="html input与textarea 值改变事件" target="_blank">html input与textarea 值改变事件</a>
<span class="text-muted">alxw4616</span>
<a class="tag" taget="_blank" href="/search/JavaScript/1.htm">JavaScript</a>
<div>// 文本输入框(input) 文本域(textarea)值改变事件
// onpropertychange(IE) oninput(w3c)
$('input,textarea').on('propertychange input', function(event) {
console.log($(this).val())
});
</div>
</li>
<li><a href="/article/1200.htm"
title="String类的基本用法" target="_blank">String类的基本用法</a>
<span class="text-muted">百合不是茶</span>
<a class="tag" taget="_blank" href="/search/String/1.htm">String</a>
<div>
字符串的用法;
// 根据字节数组创建字符串
byte[] by = { 'a', 'b', 'c', 'd' };
String newByteString = new String(by);
1,length() 获取字符串的长度
&nbs</div>
</li>
<li><a href="/article/1327.htm"
title="JDK1.5 Semaphore实例" target="_blank">JDK1.5 Semaphore实例</a>
<span class="text-muted">bijian1013</span>
<a class="tag" taget="_blank" href="/search/java/1.htm">java</a><a class="tag" taget="_blank" href="/search/thread/1.htm">thread</a><a class="tag" taget="_blank" href="/search/java%E5%A4%9A%E7%BA%BF%E7%A8%8B/1.htm">java多线程</a><a class="tag" taget="_blank" href="/search/Semaphore/1.htm">Semaphore</a>
<div>Semaphore类
一个计数信号量。从概念上讲,信号量维护了一个许可集合。如有必要,在许可可用前会阻塞每一个 acquire(),然后再获取该许可。每个 release() 添加一个许可,从而可能释放一个正在阻塞的获取者。但是,不使用实际的许可对象,Semaphore 只对可用许可的号码进行计数,并采取相应的行动。
S</div>
</li>
<li><a href="/article/1454.htm"
title="使用GZip来压缩传输量" target="_blank">使用GZip来压缩传输量</a>
<span class="text-muted">bijian1013</span>
<a class="tag" taget="_blank" href="/search/java/1.htm">java</a><a class="tag" taget="_blank" href="/search/GZip/1.htm">GZip</a>
<div> 启动GZip压缩要用到一个开源的Filter:PJL Compressing Filter。这个Filter自1.5.0开始该工程开始构建于JDK5.0,因此在JDK1.4环境下只能使用1.4.6。
PJL Compressi</div>
</li>
<li><a href="/article/1581.htm"
title="【Java范型三】Java范型详解之范型类型通配符" target="_blank">【Java范型三】Java范型详解之范型类型通配符</a>
<span class="text-muted">bit1129</span>
<a class="tag" taget="_blank" href="/search/java/1.htm">java</a>
<div>
定义如下一个简单的范型类,
package com.tom.lang.generics;
public class Generics<T> {
private T value;
public Generics(T value) {
this.value = value;
}
} </div>
</li>
<li><a href="/article/1708.htm"
title="【Hadoop十二】HDFS常用命令" target="_blank">【Hadoop十二】HDFS常用命令</a>
<span class="text-muted">bit1129</span>
<a class="tag" taget="_blank" href="/search/hadoop/1.htm">hadoop</a>
<div>1. 修改日志文件查看器
hdfs oev -i edits_0000000000000000081-0000000000000000089 -o edits.xml
cat edits.xml
修改日志文件转储为xml格式的edits.xml文件,其中每条RECORD就是一个操作事务日志
2. fsimage查看HDFS中的块信息等
&nb</div>
</li>
<li><a href="/article/1835.htm"
title="怎样区别nginx中rewrite时break和last" target="_blank">怎样区别nginx中rewrite时break和last</a>
<span class="text-muted">ronin47</span>
<div>在使用nginx配置rewrite中经常会遇到有的地方用last并不能工作,换成break就可以,其中的原理是对于根目录的理解有所区别,按我的测试结果大致是这样的。
location /
{
proxy_pass http://test; </div>
</li>
<li><a href="/article/1962.htm"
title="java-21.中兴面试题 输入两个整数 n 和 m ,从数列 1 , 2 , 3.......n 中随意取几个数 , 使其和等于 m" target="_blank">java-21.中兴面试题 输入两个整数 n 和 m ,从数列 1 , 2 , 3.......n 中随意取几个数 , 使其和等于 m</a>
<span class="text-muted">bylijinnan</span>
<a class="tag" taget="_blank" href="/search/java/1.htm">java</a>
<div>
import java.util.ArrayList;
import java.util.List;
import java.util.Stack;
public class CombinationToSum {
/*
第21 题
2010 年中兴面试题
编程求解:
输入两个整数 n 和 m ,从数列 1 , 2 , 3.......n 中随意取几个数 ,
使其和等</div>
</li>
<li><a href="/article/2089.htm"
title="eclipse svn 帐号密码修改问题" target="_blank">eclipse svn 帐号密码修改问题</a>
<span class="text-muted">开窍的石头</span>
<a class="tag" taget="_blank" href="/search/eclipse/1.htm">eclipse</a><a class="tag" taget="_blank" href="/search/SVN/1.htm">SVN</a><a class="tag" taget="_blank" href="/search/svn%E5%B8%90%E5%8F%B7%E5%AF%86%E7%A0%81%E4%BF%AE%E6%94%B9/1.htm">svn帐号密码修改</a>
<div>问题描述:
Eclipse的SVN插件Subclipse做得很好,在svn操作方面提供了很强大丰富的功能。但到目前为止,该插件对svn用户的概念极为淡薄,不但不能方便地切换用户,而且一旦用户的帐号、密码保存之后,就无法再变更了。
解决思路:
删除subclipse记录的帐号、密码信息,重新输入</div>
</li>
<li><a href="/article/2216.htm"
title="[电子商务]传统商务活动与互联网的结合" target="_blank">[电子商务]传统商务活动与互联网的结合</a>
<span class="text-muted">comsci</span>
<a class="tag" taget="_blank" href="/search/%E7%94%B5%E5%AD%90%E5%95%86%E5%8A%A1/1.htm">电子商务</a>
<div>
某一个传统名牌产品,过去销售的地点就在某些特定的地区和阶层,现在进入互联网之后,用户的数量群突然扩大了无数倍,但是,这种产品潜在的劣势也被放大了无数倍,这种销售利润与经营风险同步放大的效应,在最近几年将会频繁出现。。。。
如何避免销售量和利润率增加的</div>
</li>
<li><a href="/article/2343.htm"
title="java 解析 properties-使用 Properties-可以指定配置文件路径" target="_blank">java 解析 properties-使用 Properties-可以指定配置文件路径</a>
<span class="text-muted">cuityang</span>
<a class="tag" taget="_blank" href="/search/java/1.htm">java</a><a class="tag" taget="_blank" href="/search/properties/1.htm">properties</a>
<div>#mq
xdr.mq.url=tcp://192.168.100.15:61618;
import java.io.IOException;
import java.util.Properties;
public class Test {
String conf = "log4j.properties";
private static final</div>
</li>
<li><a href="/article/2470.htm"
title="Java核心问题集锦" target="_blank">Java核心问题集锦</a>
<span class="text-muted">darrenzhu</span>
<a class="tag" taget="_blank" href="/search/java/1.htm">java</a><a class="tag" taget="_blank" href="/search/%E5%9F%BA%E7%A1%80/1.htm">基础</a><a class="tag" taget="_blank" href="/search/%E6%A0%B8%E5%BF%83/1.htm">核心</a><a class="tag" taget="_blank" href="/search/%E9%9A%BE%E7%82%B9/1.htm">难点</a>
<div>注意,这里的参考文章基本来自Effective Java和jdk源码
1)ConcurrentModificationException
当你用for each遍历一个list时,如果你在循环主体代码中修改list中的元素,将会得到这个Exception,解决的办法是:
1)用listIterator, 它支持在遍历的过程中修改元素,
2)不用listIterator, new一个</div>
</li>
<li><a href="/article/2724.htm"
title="1分钟学会Markdown语法" target="_blank">1分钟学会Markdown语法</a>
<span class="text-muted">dcj3sjt126com</span>
<a class="tag" taget="_blank" href="/search/markdown/1.htm">markdown</a>
<div>markdown 简明语法 基本符号
*,-,+ 3个符号效果都一样,这3个符号被称为 Markdown符号
空白行表示另起一个段落
`是表示inline代码,tab是用来标记 代码段,分别对应html的code,pre标签
换行
单一段落( <p>) 用一个空白行
连续两个空格 会变成一个 <br>
连续3个符号,然后是空行</div>
</li>
<li><a href="/article/2851.htm"
title="Gson使用二(GsonBuilder)" target="_blank">Gson使用二(GsonBuilder)</a>
<span class="text-muted">eksliang</span>
<a class="tag" taget="_blank" href="/search/json/1.htm">json</a><a class="tag" taget="_blank" href="/search/gson/1.htm">gson</a><a class="tag" taget="_blank" href="/search/GsonBuilder/1.htm">GsonBuilder</a>
<div>转载请出自出处:http://eksliang.iteye.com/blog/2175473 一.概述
GsonBuilder用来定制java跟json之间的转换格式
二.基本使用
实体测试类:
温馨提示:默认情况下@Expose注解是不起作用的,除非你用GsonBuilder创建Gson的时候调用了GsonBuilder.excludeField</div>
</li>
<li><a href="/article/2978.htm"
title="报ClassNotFoundException: Didn't find class "...Activity" on path: DexPathList" target="_blank">报ClassNotFoundException: Didn't find class "...Activity" on path: DexPathList</a>
<span class="text-muted">gundumw100</span>
<a class="tag" taget="_blank" href="/search/android/1.htm">android</a>
<div>有一个工程,本来运行是正常的,我想把它移植到另一台PC上,结果报:
java.lang.RuntimeException: Unable to instantiate activity ComponentInfo{com.mobovip.bgr/com.mobovip.bgr.MainActivity}: java.lang.ClassNotFoundException: Didn't f</div>
</li>
<li><a href="/article/3105.htm"
title="JavaWeb之JSP指令" target="_blank">JavaWeb之JSP指令</a>
<span class="text-muted">ihuning</span>
<a class="tag" taget="_blank" href="/search/javaweb/1.htm">javaweb</a>
<div>
要点
JSP指令简介
page指令
include指令
JSP指令简介
JSP指令(directive)是为JSP引擎而设计的,它们并不直接产生任何可见输出,而只是告诉引擎如何处理JSP页面中的其余部分。
JSP指令的基本语法格式:
<%@ 指令 属性名="</div>
</li>
<li><a href="/article/3232.htm"
title="mac上编译FFmpeg跑ios" target="_blank">mac上编译FFmpeg跑ios</a>
<span class="text-muted">啸笑天</span>
<a class="tag" taget="_blank" href="/search/ffmpeg/1.htm">ffmpeg</a>
<div>1、下载文件:https://github.com/libav/gas-preprocessor, 复制gas-preprocessor.pl到/usr/local/bin/下, 修改文件权限:chmod 777 /usr/local/bin/gas-preprocessor.pl
2、安装yasm-1.2.0
curl http://www.tortall.net/projects/yasm</div>
</li>
<li><a href="/article/3359.htm"
title="sql mysql oracle中字符串连接" target="_blank">sql mysql oracle中字符串连接</a>
<span class="text-muted">macroli</span>
<a class="tag" taget="_blank" href="/search/oracle/1.htm">oracle</a><a class="tag" taget="_blank" href="/search/sql/1.htm">sql</a><a class="tag" taget="_blank" href="/search/mysql/1.htm">mysql</a><a class="tag" taget="_blank" href="/search/SQL+Server/1.htm">SQL Server</a>
<div>有的时候,我们有需要将由不同栏位获得的资料串连在一起。每一种资料库都有提供方法来达到这个目的:
MySQL: CONCAT()
Oracle: CONCAT(), ||
SQL Server: +
CONCAT() 的语法如下:
Mysql 中 CONCAT(字串1, 字串2, 字串3, ...): 将字串1、字串2、字串3,等字串连在一起。
请注意,Oracle的CON</div>
</li>
<li><a href="/article/3486.htm"
title="Git fatal: unab SSL certificate problem: unable to get local issuer ce rtificate" target="_blank">Git fatal: unab SSL certificate problem: unable to get local issuer ce rtificate</a>
<span class="text-muted">qiaolevip</span>
<a class="tag" taget="_blank" href="/search/%E5%AD%A6%E4%B9%A0%E6%B0%B8%E6%97%A0%E6%AD%A2%E5%A2%83/1.htm">学习永无止境</a><a class="tag" taget="_blank" href="/search/%E6%AF%8F%E5%A4%A9%E8%BF%9B%E6%AD%A5%E4%B8%80%E7%82%B9%E7%82%B9/1.htm">每天进步一点点</a><a class="tag" taget="_blank" href="/search/git/1.htm">git</a><a class="tag" taget="_blank" href="/search/%E7%BA%B5%E8%A7%82%E5%8D%83%E8%B1%A1/1.htm">纵观千象</a>
<div>// 报错如下:
$ git pull origin master
fatal: unable to access 'https://git.xxx.com/': SSL certificate problem: unable to get local issuer ce
rtificate
// 原因:
由于git最新版默认使用ssl安全验证,但是我们是使用的git未设</div>
</li>
<li><a href="/article/3613.htm"
title="windows命令行设置wifi" target="_blank">windows命令行设置wifi</a>
<span class="text-muted">surfingll</span>
<a class="tag" taget="_blank" href="/search/windows/1.htm">windows</a><a class="tag" taget="_blank" href="/search/wifi/1.htm">wifi</a><a class="tag" taget="_blank" href="/search/%E7%AC%94%E8%AE%B0%E6%9C%ACwifi/1.htm">笔记本wifi</a>
<div>还没有讨厌无线wifi的无尽广告么,还在耐心等待它慢慢启动么
教你命令行设置 笔记本电脑wifi:
1、开启wifi命令
netsh wlan set hostednetwork mode=allow ssid=surf8 key=bb123456
netsh wlan start hostednetwork
pause
其中pause是等待输入,可以去掉
2、</div>
</li>
<li><a href="/article/3740.htm"
title="Linux(Ubuntu)下安装sysv-rc-conf" target="_blank">Linux(Ubuntu)下安装sysv-rc-conf</a>
<span class="text-muted">wmlJava</span>
<a class="tag" taget="_blank" href="/search/linux/1.htm">linux</a><a class="tag" taget="_blank" href="/search/ubuntu/1.htm">ubuntu</a><a class="tag" taget="_blank" href="/search/sysv-rc-conf/1.htm">sysv-rc-conf</a>
<div>安装:sudo apt-get install sysv-rc-conf 使用:sudo sysv-rc-conf
操作界面十分简洁,你可以用鼠标点击,也可以用键盘方向键定位,用空格键选择,用Ctrl+N翻下一页,用Ctrl+P翻上一页,用Q退出。
背景知识
sysv-rc-conf是一个强大的服务管理程序,群众的意见是sysv-rc-conf比chkconf</div>
</li>
<li><a href="/article/3867.htm"
title="svn切换环境,重发布应用多了javaee标签前缀" target="_blank">svn切换环境,重发布应用多了javaee标签前缀</a>
<span class="text-muted">zengshaotao</span>
<a class="tag" taget="_blank" href="/search/javaee/1.htm">javaee</a>
<div>更换了开发环境,从杭州,改变到了上海。svn的地址肯定要切换的,切换之前需要将原svn自带的.svn文件信息删除,可手动删除,也可通过废弃原来的svn位置提示删除.svn时删除。
然后就是按照最新的svn地址和规范建立相关的目录信息,再将原来的纯代码信息上传到新的环境。然后再重新检出,这样每次修改后就可以看到哪些文件被修改过,这对于增量发布的规范特别有用。
检出</div>
</li>
</ul>
</div>
</div>
</div>
<div>
<div class="container">
<div class="indexes">
<strong>按字母分类:</strong>
<a href="/tags/A/1.htm" target="_blank">A</a><a href="/tags/B/1.htm" target="_blank">B</a><a href="/tags/C/1.htm" target="_blank">C</a><a
href="/tags/D/1.htm" target="_blank">D</a><a href="/tags/E/1.htm" target="_blank">E</a><a href="/tags/F/1.htm" target="_blank">F</a><a
href="/tags/G/1.htm" target="_blank">G</a><a href="/tags/H/1.htm" target="_blank">H</a><a href="/tags/I/1.htm" target="_blank">I</a><a
href="/tags/J/1.htm" target="_blank">J</a><a href="/tags/K/1.htm" target="_blank">K</a><a href="/tags/L/1.htm" target="_blank">L</a><a
href="/tags/M/1.htm" target="_blank">M</a><a href="/tags/N/1.htm" target="_blank">N</a><a href="/tags/O/1.htm" target="_blank">O</a><a
href="/tags/P/1.htm" target="_blank">P</a><a href="/tags/Q/1.htm" target="_blank">Q</a><a href="/tags/R/1.htm" target="_blank">R</a><a
href="/tags/S/1.htm" target="_blank">S</a><a href="/tags/T/1.htm" target="_blank">T</a><a href="/tags/U/1.htm" target="_blank">U</a><a
href="/tags/V/1.htm" target="_blank">V</a><a href="/tags/W/1.htm" target="_blank">W</a><a href="/tags/X/1.htm" target="_blank">X</a><a
href="/tags/Y/1.htm" target="_blank">Y</a><a href="/tags/Z/1.htm" target="_blank">Z</a><a href="/tags/0/1.htm" target="_blank">其他</a>
</div>
</div>
</div>
<footer id="footer" class="mb30 mt30">
<div class="container">
<div class="footBglm">
<a target="_blank" href="/">首页</a> -
<a target="_blank" href="/custom/about.htm">关于我们</a> -
<a target="_blank" href="/search/Java/1.htm">站内搜索</a> -
<a target="_blank" href="/sitemap.txt">Sitemap</a> -
<a target="_blank" href="/custom/delete.htm">侵权投诉</a>
</div>
<div class="copyright">版权所有 IT知识库 CopyRight © 2000-2050 E-COM-NET.COM , All Rights Reserved.
<!-- <a href="https://beian.miit.gov.cn/" rel="nofollow" target="_blank">京ICP备09083238号</a><br>-->
</div>
</div>
</footer>
<!-- 代码高亮 -->
<script type="text/javascript" src="/static/syntaxhighlighter/scripts/shCore.js"></script>
<script type="text/javascript" src="/static/syntaxhighlighter/scripts/shLegacy.js"></script>
<script type="text/javascript" src="/static/syntaxhighlighter/scripts/shAutoloader.js"></script>
<link type="text/css" rel="stylesheet" href="/static/syntaxhighlighter/styles/shCoreDefault.css"/>
<script type="text/javascript" src="/static/syntaxhighlighter/src/my_start_1.js"></script>
</body>
</html>
![]() https://jingyan.baidu.com/article/c1465413d7bd7a0bfdfc4c50.html
https://jingyan.baidu.com/article/c1465413d7bd7a0bfdfc4c50.html![]() https://nodejs.org/en/download/
https://nodejs.org/en/download/![]() https://nodejs.org/dist/
https://nodejs.org/dist/![]() https://github.com/mobz/elasticsearch-head
https://github.com/mobz/elasticsearch-head


