交换机、路由器、防火墙IOS导入、密码破解
目录
IOS相关操作
路由器IOS恢复
交换机IOS导入
升级IOS
复制IOS
破解密码
ASA防火墙
路由器
交换机
4500系列交换机
junper防火墙
H3C交换机
TFTP抓取配置文件
导出
导入
清理回收站squeeze sup-bootflash:
清空配置 erase running-config
防火墙clear configure all
juniper有两款防火墙,一款netscreen,默认为用户名:netscreen,密码:netscreen;
一款SRX的,默认出厂用户名:root,密码为空
修改CONSOLE口、VTY线路、enable密码:
line console 0
login
password xxxxxx
line vty 0 15
login
passowrd xxxxxxx
enable password xxxxxx
或enable sectet xxxxxx
对明文口令加密可以用
service password-encryption
IOS相关操作
路由器IOS恢复
第一种方法:系统还可以启动到配置模式时,使用copy tftp flash即可升级
第二种方法:IOS被删除后的恢复
开启路由器电源,由于没有有效版本,路由器启动后将直接进入监控模式。
Rommon1>
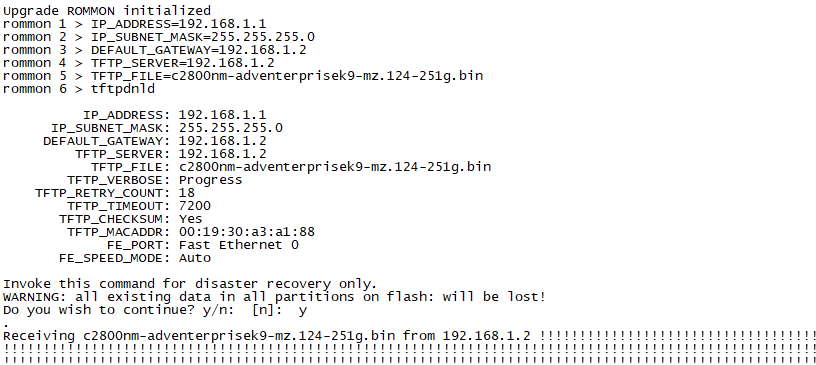
如果因为误操作将FLASH中的IOS删除了,原IOS中的大部分命令都无法操作,具体的过程如下,那么路由器将进入Rommon。此时,可以通过TFTP 服务器向中存储的基本IOS模式,在这种模式下ROUTER 传输IOS,使系统得已恢复。
其在一台机器上安装TFTP服务器软件,将IOS文件放置在 TFTP服务器的默认根目录下,打开TFTP服务器,用控制线(console线)将这台主机与路由器连接起来,另外用交叉网线连接机器的网卡和ROUTER的第一个以太口。(也可以用普通的网线将ROUTER和交换机相连再连接机器)做好以 上工作后,打开主机的超级终端工具(CRT),连接上ROUTER,此时窗口中出现的命令行提示符为: ROMMON 1 > (其中“1”代表命令行的行数)。在提示符后输入命令:(可以使用ctrl+break组合键进入ROMMON模式)
ROMMON 1 >IP_ADDRESS= ROUTER的IP地址(第一个以太口IP要和TFTP服务器在同一网段内)
ROMMON 1 >IP_ADDRESS=192.168.1.6: 将192.168.1.6地址配置到路由器的第一 个以太端口
ROMMON 2 >IP_SUBNET_MASK= ROUTER的子网掩码
Rommon2>IP_SUBNET_MASK=255.255.255.0:设置掩码
ROMMON 3 >DEFAUT_GATEWAY= 默认网关地址 (可以没有,也可以是TFTP服务器)
Rommon3>DEFAULT_GATEWAY=192.168.1.7: 指定TFTP服务器地址
ROMMON 4 >TFTP_SERVER= TFTP 服务器IP地址
ROMMON 4 > TFTP_SERVER= 192.168.1.7
ROMMON 5 >TFTP_FILE= IOS文件名(只给出文件名,不需要路径)
Rommon5>TFTP_FILE=c2600-i-mz.121-3.T.bin
ROMMON 6 >sync
ROMMON 7 >tftpdnld 回车
注意:前面的几条命令必须使用大写,而最后的tftpdnld则要用小写。
在tftpdnld命令执行后,只行下,输入reset重启ROUTER,要根据提示选,就可完成文件的传输,重启后就又回到了熟悉的IOS模式下传输。当文件传输完后,将自动回到命令甚至连以前配置的信息都不会丢失。
如下图所示:
交换机IOS导入
第一步:执行flash_init
switch: flash_init
第二步:修改波特率
为了提高文件传输速率,需要修改console口的波特率,先使用如下指令修改设备的波特率
switch: set BAUD 115200
然后修改超级终端软件的波特率为115200
(注:此步骤可以跳过,相当于采用默认波特率(9600)进行文件传输,需要消耗较长的传输时间。跳过第二步的同时请跳过第五步。)
第三步:是用xmodem传输IOS文件
在设备上输入如下指令:
switch: copy xmodem: flash:c3560-ipservicesk9-mz.122-53.SE.bin
flash:后面的“c3560-ipservicesk9-mz.122-53.SE.bin”为IOS文件名,需要在本地PC上事先准备好。
然后点击超级终端“发送”菜单,选择发送文件,使用xmodem方式。
文件开始通过console发送到交换机上,传输时间是根据文件大小决定的,10M的文件大约需要50分钟。
第四步:设置启动文件
当IOS文件正确传输到交换机上市,执行以下指令设置启动文件。
switch: set BOOT flash:c3560-ipservicesk9-mz.122-53.SE.bin
第五步:重置波特率
交换机上执行如下指令重置波特率:
switch: unset BAUD
PC上将超级终端的波特率改回9600
第六步:启动IOS
在交换机上执行以下指令,启动IOS。
switch: boot
交换机路由器 Boot system xxx.bin
防火墙 Boot system disk0:/xxx.bin
升级IOS
copy tftp: c3750-ipservicesk9-mz.122-40.SE.bin flash: c3750-ipservicesk9-mz.122-40.SE.bin
boot system flash:/c3750-ipservicesk9-mz.122-40.SE.bin
end
wr
sh boot
reload
或者
Switch#copy tftp flash: //复制文件从tftp到flash;
Address or name of remote host []? 192.168.0.1
Source filename []?
c2950-i6k2l2q4-mz.121-22.EA**in(回车)
Destination filename [c2950-i6k2l2q4-mz.121-22.EA**in]?(回车)
经过一阵感叹号后,新的IOS文件成功复制到flash中
复制IOS
Switch#copy flash tftp 复制文件从flash到tftp;
Source filename []?c2950-c3h2s-mz.120-5.3.WC.1.bin
Address or name of remote host []?192.168.0.1 电脑IP地址
Destination filename [c2950-c3h2s-mz.120-5.3.WC.1.bin]?
破解密码
ASA防火墙
在设备启动过程中按ESC或CTRL+BREAK键进入Rommon状态
romman#0>confreg 0x41 修改配置寄存器
rommin#1>boot 重启
enable
# copy starup-config running-config
(config)# enable password .....
(config)#enable secret .....
(config)#config-register 0x1 修改回原来的配置寄存器的值,该值视防火墙而定
(config)#copy running-config startup-config 保存
路由器
重启30秒内按住CTRL+BREAK
rommon1>confreg 0x2142
rommon1>reset
重启后跳过密码进入系统后将寄存器值修改会去并重置密码
Router#copy startup-config running-config
Router(config)#config-register 0x2102
Router(config)#enable secret ....
copy run start
交换机
按住mode键
flash_init
dir flash:
rename flash:config.text flash:config.old
boot
rename flash:config.old flash:config.text
copy flash:config.text system:running-config
4500系列交换机
rommon 2 >confreg
Configuration Summary :
=> load rom after netboot fails
=> console baud: 9600
=> autoboot from: commands specified in 'BOOT' environment variable
do you wish to change the configuration? y/n [n]: y
enable "diagnostic mode"? y/n [n]: n
enable "use net in IP bcast address"? y/n [n]: n
disable "load rom after netboot fails"? y/n [n]: n
enable "use all zero broadcast"? y/n [n]: n
enable "break/abort has effect"? y/n [n]: n
enable "ignore system config info"? y/n [n]: y
change console baud rate? y/n [n]: n
change the boot characteristics? y/n [n]: n
Configuration Summary :
=> load rom after netboot fails
=> ignore system config info
=> console baud: 9600
=> autoboot from: commands specified in 'BOOT' environment variable
do you wish to save this configuration? y/n [n]: y
You must reset or power cycle for new configuration to take effect
rommon 3 >reset
如果当你在“ignore system config info”时选择了N,系统没有将寄存器值修改为0x2142,则需进行下面那一步了。
rommon 1 >confreg 0x2142
You must reset or power cycle for the new configuration to take effect
然后修改把寄存值修改回来
Switch(config)#config-register 0x2102(原有配置根据需求可要可不要,用copy命令)
junper防火墙
在重启过程中敲回车
boot -s
recovery
H3C交换机
1重启设备,在提示按CTRL+B的时候按下此键,提示输入password。默认情况下是没有密码,直接回车就可以进入bootrom菜单了。
2看7选项,我们输入7,提示输入y,选项有可能会是6.仔细分辨.Skip current system configuration
3选择0,重启
4直接reset save清空配置
TFTP抓取配置文件
导出
copy startup-config tftp
Address or name of remote host []? 192.168.1.2
Destination filename [fsshangye-confg]? 123.cfg
导入
Switch#copy tftp run
Switch#copy tftp running-config
Address or name of remote host []? 192.168.1.2
Source filename []? 2960
Destination filename [running-config]?
Accessing tftp://192.168.1.2/2960...
Loading 2960 from 192.168.1.2 (via Vlan1): !
[OK - 3425 bytes]
然后保存copy running-config startup-config
重启
华三USB的IOS导入
all Set the startup software image for all the slot
slot Specify the slot
backup Specify the packages as the backup startup software images
main Specify the packages as the main startup software images
Verifying the file flash:/s5130hi-cmw710-r1122p02.ipe on slot 1.......Done.
H3C S5130-54C-PWR-HI images in IPE:
s5130hi-cmw710-boot-r1122p02.bin
s5130hi-cmw710-system-r1122p02.bin
This command will set the main startup software images. Continue? [Y/N]:y
Add images to slot 1.
Decompressing file s5130hi-cmw710-boot-r1122p02.bin to flash:/s5130hi-cmw710-boot-r1122p02.bin.......Done.
Decompressing file s5130hi-cmw710-system-r1122p02.bin to flash:/s5130hi-cmw710-system-r1122p02.bin..................................Done.
Verifying the file flash:/s5130hi-cmw710-boot-r1122p02.bin on slot 1...Done.
Verifying the file flash:/s5130hi-cmw710-system-r1122p02.bin on slot 1...%Jan 1 00:12:40:883 2013 H3C DEV/1/FAN_DIRECTION_NOT_PREFERRED: Fan 1 airflow direction is not preferred on slot 1, please check it.
%Jan 1 00:12:40:891 2013 H3C DEV/1/FAN_DIRECTION_NOT_PREFERRED: Fan 2 airflow direction is not preferred on slot 1, please check it.
...Done.
The images that have passed all examinations will be used as the main startup software images at the next reboot on slot 1.
Decompression completed.
Do you want to delete flash:/s5130hi-cmw710-r1122p02.ipe now? [Y/N]:n
Software images on slot 1:
Current software images:
flash:/s5130hi-cmw710-boot-r1122.bin
flash:/s5130hi-cmw710-system-r1122.bin
Main startup software images:
flash:/s5130hi-cmw710-boot-r1122p02.bin
flash:/s5130hi-cmw710-system-r1122p02.bin
Backup startup software images:
None
Start to check configuration with next startup configuration file, please wait.........DONE!
Current configuration may be lost after the reboot, save current configuration? [Y/N]:n
This command will reboot the device. Continue? [Y/N]:y

