MybatisPlus方法详细使用,实现无SQL式开发
一、项目创建
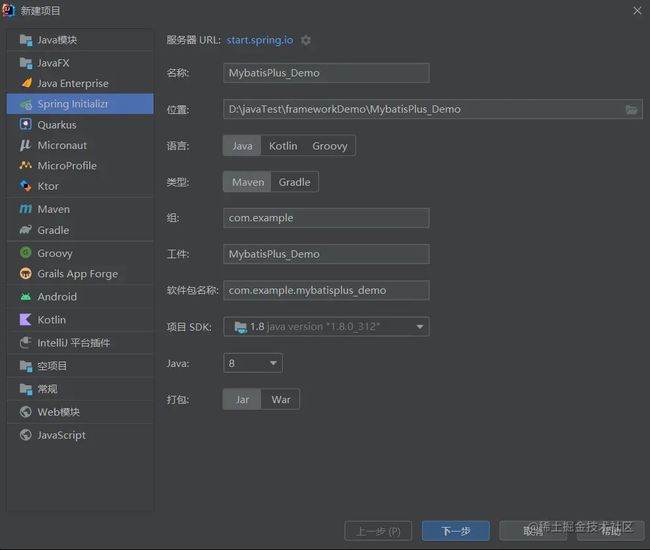
可以选择SpringIntializr创建也可以使用Maven方式创建
选好之后点击下一步
这里只需要选中最基本的依赖项,后续依赖我们会在pom.xml中引入
二、引入依赖
spring Initializr创建项目需要在pom.xml文件的标签中添加如下依赖
            mysql
            mysql-connector-java


            org.projectlombok
            lombok


            com.baomidou
            mybatis-plus-boot-starter
            3.4.2

复制代码
如果是Maven方式创建项目,若想使用SpringBoot还需添加SpringBoot相关依赖
    4.0.0

        org.springframework.boot
        spring-boot-starter-parent
        2.7.0


    com.example
    MybatisPlus-Demo
    0.0.1-SNAPSHOT
    MybatisPlus-Demo
    MybatisPlus-Demo

        1.8


            org.springframework.boot
            spring-boot-starter-web


            org.springframework.boot
            spring-boot-starter-test
            test


            mysql
            mysql-connector-java


            org.projectlombok
            lombok


            com.baomidou
            mybatis-plus-boot-starter
            3.4.2


                org.springframework.boot
                spring-boot-maven-plugin


复制代码
三、创建数据库及引入数据库
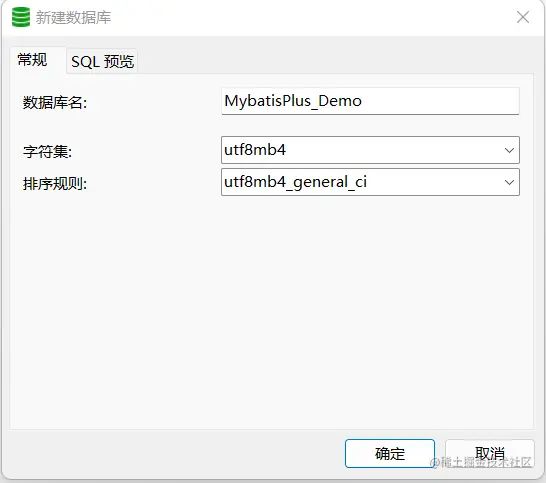
1. 创建数据库
若已经有数据库则跳过至步骤二
我这里使用的是Navicat创建数据库
完成数据库创建后添加数据表
-- 判断要创建的表名称是否已经存在
DROP TABLE IF EXISTS student;
CREATE TABLE student(
	id BIGINT(20) NOT NULL COMMENT '主键ID,学号',
	name VARCHAR(30) NULL DEFAULT NULL COMMENT '姓名',
	age INT(11) NULL DEFAULT NULL COMMENT '年龄',
	email VARCHAR(50) NULL DEFAULT NULL COMMENT '邮箱',
-- 设置id主键
	PRIMARY KEY (id),
-- 在id字段创建普通索引
	index(id)
);
-- 插入数据
INSERT INTO student (id, name, age, email)
VALUES
(1001, 'Jone', 18, '[email protected]'),
(1002, 'Jack', 20, '[email protected]'),
(1003, 'Tom', 28, '[email protected]'),
(1004, 'Sandy', 21, '[email protected]'),
(1005, 'Billie', 24, '[email protected]');

复制代码
创建表时详细索引参考->文档地址
2. 引入数据库
2.1 连接数据库
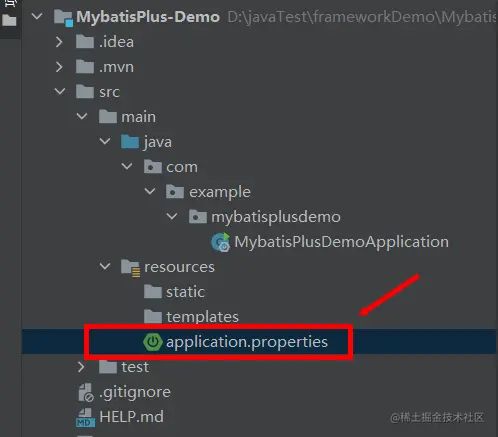
数据库连接语句在resource资源目录下的application.properties文件中书写
在MySQL8.0版本后,连接语句发生了变化(相关文档)。
MySQL8.0版本后的语句书写
# 数据库连接配置
spring.datasource.username=root
spring.datasource.password=root
spring.datasource.url=jdbc:mysql://localhost:3306/mybatisPlus_demo?useSSL=false&useUnicode=true&characterEncoding=utf-8&serverTimezone=GMT%2B8
spring.datasource.driver-class-name=com.mysql.cj.jdbc.Driver
# 配置日志 sql语句在执行时不可见,所以为了便于错误排查,需要通过日志打印语句。
mybatis-plus.configuration.log-impl=org.apache.ibatis.logging.stdout.StdOutImpl
注意:如果你是5.*数据库版本,就需要将com.mysql.cj.jdbc.Driver改为:com.mysql.jdbc.Driver。
复制代码
yml文件书写语句
server:
  port: 8080
spring:
  application:
    name: mybatis-plus
  datasource:
    url: jdbc:mysql://www.xlz.com/mybatis-plus?		useEncoding=utf8mb4&serverTimezone=Asia/Shanghai&useSSL=false
    username: root
    password: 123456
    driver-class-name: com.mysql.cj.jdbc.Driver
复制代码
四、自动创建对应实体类及接口和xml文件
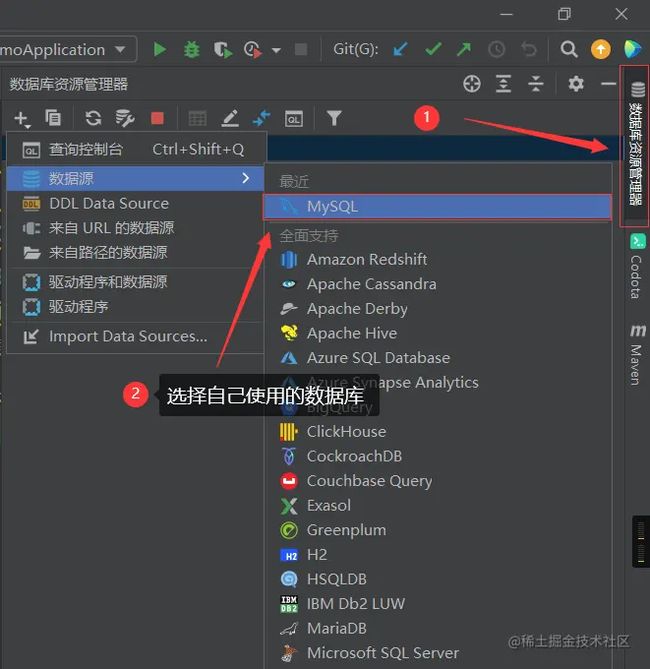
1 在idea中引入数据源
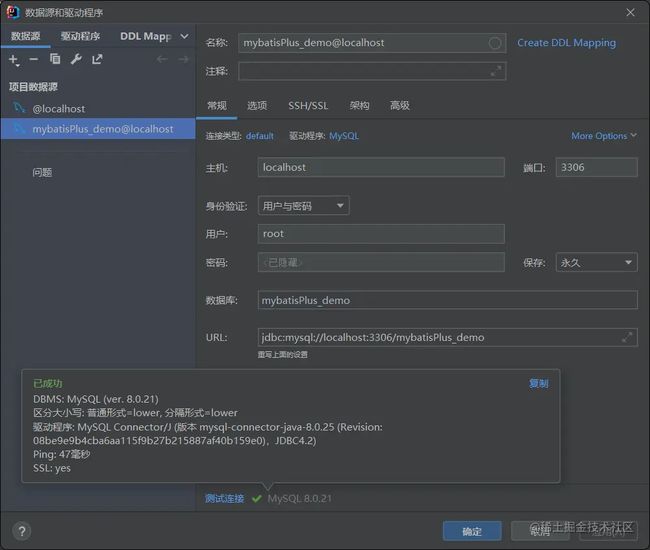
进入数据源后填写相关信息,点击下方测试链接通过后,点击确定按钮
2 使用Mybatis-generator自动创建
在导入完数据源后,找到要映射的数据表。右键选择mybatis-generator选项
进入mybatis-generate tool,填写对应信息
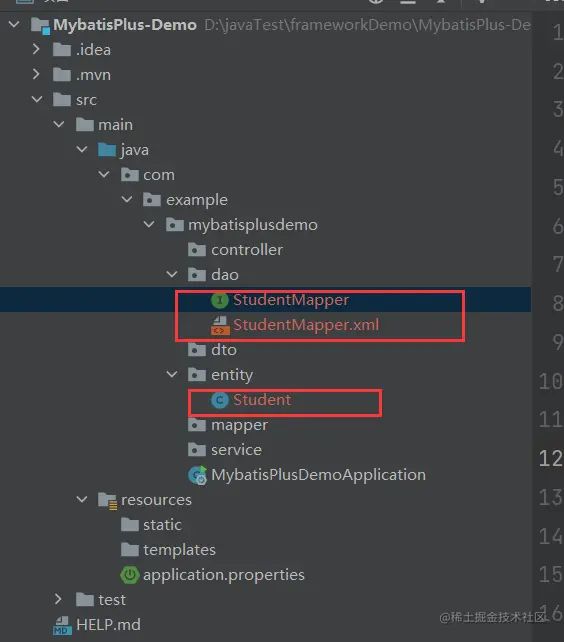
点击ok后,在指定路径总计生成三个文件(文件因路径不同,生成位置不同)。至此自动配置完成。
\
也可以使用语句生成
代码生成器(旧) | MyBatis-Plus
五、接口测试
一般创建SpringBoot项目中有内置Junit5的,这时可以通过使用快捷键alt+Insert快捷生成测试
书写如下代码,测试是否有数据输出。
@SpringBootTest
class StudentMapperTest{

    @Autowired
    StudentMapper studentMapper;

    @Test
    void selectByPrimaryKey (){
        Student student = studentMapper.selectByPrimaryKey (1001L);
        System.out.println (student);
    }
}
复制代码
六、日志打印
日志主要体现在当运行程序的时候,将会在控制台将会打印日志信息
使用在 application.xml 文件中加入
mybatis-plus.configuration.log-impl=org.apache.ibatis.logging.stdout.StdOutImpl
复制代码
\
七、MybatisPlus常用注解
7.1 @MapperScan
作用: 为了集成Spring而写的注解,该注解主要是扫描某个包目录下的Mapper,将Mapper接口类交给Spring进行管理。
使用位置: 在Springboot启动类上添加
示例:
@SpringBootApplication
@MapperScan("com.example.mybatisplusdemo")
public class MybatisPlusDemoApplication{

	public static void main (String[] args){
		SpringApplication.run (MybatisPlusDemoApplication.class , args);
	}

}
复制代码
7.2 @Mapper
作用: 在接口类上添加了@Mapper,在运行时会生成相应的接口实现类,这个要一个一个去加,不如用@MapperScan全部扫描添加
添加位置: 接口类上面
示例:
@Mapper
public interface StudentMapper extends BaseMapper{
    ...
}
复制代码
7.3 @TableName
作用: 用于标识实体类对应的表名
添加位置: 实体类之上
示例:
@TableName("user")
public class User {
    ...
}
复制代码
7.4 @Data
作用: 简化开发,使用这个注解,就可以省略getter()、setter()、toString()、重写该类的equals()和hashCode()方法
使用位置: 实体类之上
示例:
@Data
public class User {
    ...
}
复制代码
7.5 @TableId
作用:
用于标识主键列,MyBatis-Plus在实现增删改查时,会默认将id作为主键列,在插入数据时,若对应字段为空,则默认使用基于雪花算法的策略生成id。
当使用@TableId(value = "id")语句时,若实体类和表中表示主键的不是id,而是其他字段,例如代码中的uid,MyBatis-Plus会自动识别uid为主键列,否则就会报错。
当使用@TableId(value = "id",type = IdType.AUTO)语句时,代表着使用数据库的自增策略,注意,该类型请确保数据库设置了id自增,否则无效!
@TableId的功能,也可以写在application.yml配置文件中,配置如下:
mybatis-plus:
  global-config:
    banner: false
    db-config:
      # 配置MyBatis-Plus操作表的默认前缀
      table-prefix: "t_"
      # 配置MyBatis-Plus的主键策略
      id-type: auto
  # 配置MyBatis日志
  configuration:
    log-impl: org.apache.ibatis.logging.stdout.StdOutImpl
复制代码
使用位置: 主键映射字段之上
示例:
/**
 * student
 * @author
 */
@Data
@TableName("mybatisplus_demo")
public class Student implements Serializable {
    /**
     * 主键ID,学号
     */
    @TableId(value = "id",type = IdType.AUTO )
    private Long id;
}
复制代码
7.6 @TableField
作用: 用于保证实体类中的属性名与数据表中字段名一致。
注: 若实体类中的属性使用的是驼峰命名风格,而表中的字段使用的是下划线命名风格。
例如实体类属性userName,表中字段user_name,此时MyBatis-Plus会自动将下划线命名风格转化为驼峰命名风格
若实体类中的属性和表中的字段不满足上述条件,例如实体类属性name,表中字段username,此时需要在实体类属性上使用@TableField("username")设置属性所对应的字段名
使用位置: 实体类除主键字段外其他映射字段之上
@Data
@TableName("mybatisplus_demo")
public class Student implements Serializable {
    /**
     * 主键ID,学号
     */
    @TableId(value = "id",type = IdType.AUTO )
    private Long id;

    /**
     * 姓名
     */
    @TableField(value = "name")
    private String name;
}
复制代码
7.7 @TableLogic
作用: 逻辑删除,并不会永久删除数据,实体类加上这个注解再执行删除方法的时候会变成修改。前台再根据所加注解字段进行显隐即可达到逻辑删除效果。
@Data
@TableName("mybatisplus_demo")
public class Student implements Serializable {
    /**
     * 主键ID,学号
     */
    @TableId(value = "id",type = IdType.AUTO )
    private Long id;

    /*
        删除标识

        @TableLogic(value=“原值”,delval=“修改值”)
        注解参数
            value = “” 未删除的值,默认值为0
            delval = “” 删除后的值,默认值为1
     */

    @TableField(value = "del")
    @TableLogic(value = "0",delval = "1")
    private Integer del;
}
复制代码
\
调用BaseMapper的deleteById(id)或者调用IService的removeById(id)
效果:
    没有@TableLogic注解调用deleteById/removeById,直接删除数据。
        SQL:delete from table where id = 1
    有注解走Update方法
        SQL:Update table set isDelete = 1 where id = 1
复制代码
\
7.8 @Param
作用:用于标识传入参数的名称
使用位置:形参列表
示例:
@Mapper
public interface StudentMapper extends BaseMapper{
       int insert(@Param (value = "record") Student record);
}
复制代码
与之对应的XML文件就可以使用${record}变量
7.9 @Version
作用: 可以在实体 bean 中使用@Version 注解,通过这种方式可添加对乐观锁定的支持,一个类中只能有一个@Version注解。
| 不可选属性 | String | ||
|---|---|---|---|
| 可选属性 | int | Integer | Long |
@Data
@TableName("mybatisplus_demo")
public class Student implements Serializable {
    /**
     * 主键ID,学号
     */
    @TableId(value = "id",type = IdType.AUTO )
    private Long id;

    /**
     * 版本号
     */
    @Version (value = "version")
    private int version;
}
复制代码
7.10 @EnumValue 和 JsonValue
@JsonValue
可以用在get方法或者属性字段上,一个类只能用一个,当加上@JsonValue注解时,该类的json化结果,只有这个get方法的返回值,而不是这个类的属性键值对.
案例: 男,女,后台存储的是1,2,前端展示的是男女
第一步:
创建枚举类,在需要存储数据库的属性上添加 @EnumValue注解,在需要前端展示的属性上添加 @JsonValue注解;
package com.demo.mybatisplus.constant;

import com.baomidou.mybatisplus.annotation.EnumValue;
import com.fasterxml.jackson.annotation.JsonValue;

public enum SexEnum {

    MAN(1, "男"),
    WOMAN(2, "女");

    @EnumValue
    private Integer key;

    @JsonValue
    private String display;

    SexEnum(Integer