【Java缓存】demo01-了解缓存Cache+实现Spring缓存实例
目录
1.介绍
1.1什么是缓存?
1.2web应用的缓存分类
1.2.1基于web应用的系统架构图
1.2.2基于web应用的缓存分类
1.2.3应用程序缓存
2.Java缓存
2.1基于Map实现
2.1.1创建Maven项目准备父项目环境
2.1.2准备子项目环境和service类
2.1.3准备Test测试
3.Spring Cache缓存
3.1基于SpringCache实现
3.1.1准备子项目并添加service类、缓存配置类
3.1.2准备Test测试
3.2 debug 看 CacheManager
3.2.1简单实现类结构介绍
3.2.2debug查看
主要学习Java缓存,web 应用缓存。
主要工具:InterlliJ IDEA2018.1、Maven3.3.9、SpringBoot2.3.0注解版
代码地址:gitee仓库上的
1.介绍
1.1什么是缓存?
缓存(Cache)就是复制了频繁使用的数据以利于快速访问。
就是把频繁访问的数据从访问速度慢慢的存储地方A复制一份放到访问速度快的存储地方B,这样每次拿取这个数据时先访问B有没有这个数据有就从B拿取,没有就继续访问A从A中拿取。
1.2web应用的缓存分类
1.2.1基于web应用的系统架构图
图片来源->->java缓存技术的介绍
1.2.2基于web应用的缓存分类
在系统架构的不同层级之间,为了加快访问速度,都可以存在缓存:
- 操作系统磁盘缓存->减少磁盘机械操作
- 数据库缓存->减少文件系统I/O
- 应用程序缓存->减少对数据库的查询
- Web服务器缓存->减少应用服务器请求
- 客户端浏览器缓存->减少对网站的访问
1.2.3应用程序缓存
那么我学习记录的基于java的缓存就属于应用程序的缓存。
注意,缓存的方法类型有很多,我经常看到什么LRU、LFU缓存机制,什么字节二面,让写一个LFU缓存策略,等等,这些都属于算法类的,我先学习的是怎样运用工具实现程序,涉及到的底层源码尽量剖析,但和算法是有区别的。(长期任务-刷算法)
2.Java缓存
在不使用其他的缓存工具的情况下(例如:redis 、springCache .etc),Java实现缓存的方式有很多,例如:使用static Map 实现存储数据,就相当于jvm内置缓存。
但是也会伴随很多缺点:容易内存溢出OOM、需要主动持久化(服务重启后丢失)、线程可能不安全、多个服务器(多个jvm)之间的数据不能共享。
2.1基于Map实现
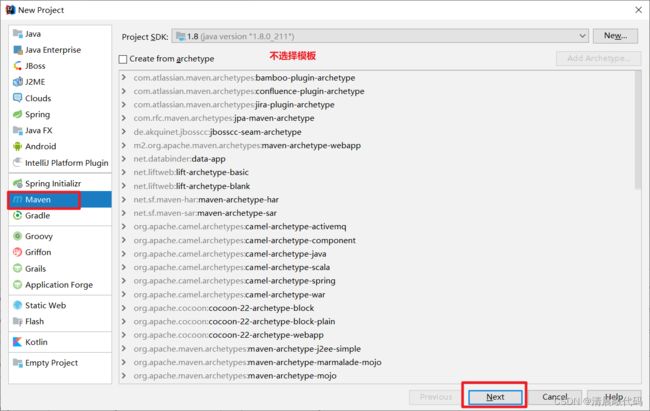
2.1.1创建Maven项目准备父项目环境
因为可能会有很多例子,所以就打算按照父子项目来建项目
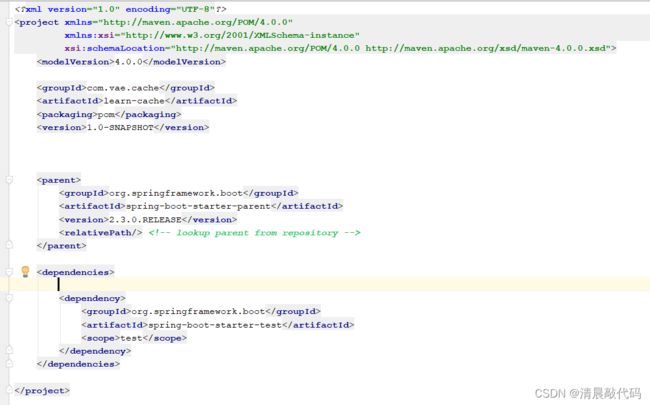
然后我们编写 .pom 文件,引入 spring boot 包,因为我们需要使用springboot Test 工具:
    4.0.0

    com.vae.cache
    learn-cache
    pom
    1.0-SNAPSHOT


        org.springframework.boot
        spring-boot-starter-parent
        2.3.0.RELEASE


            org.springframework.boot
            spring-boot-starter-test
            test
2.1.2准备子项目环境和service类
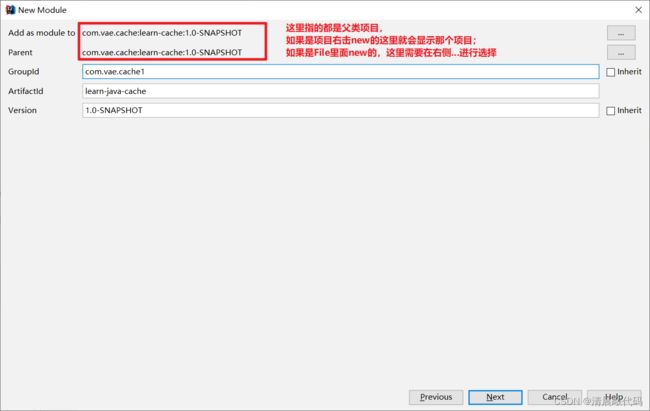
在项目名称上面右击 ,new 一个 module
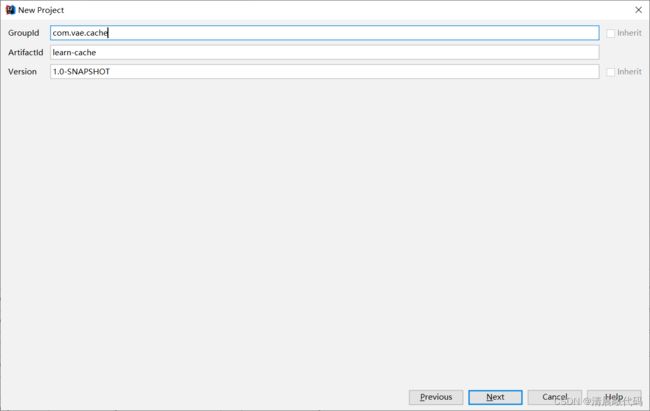
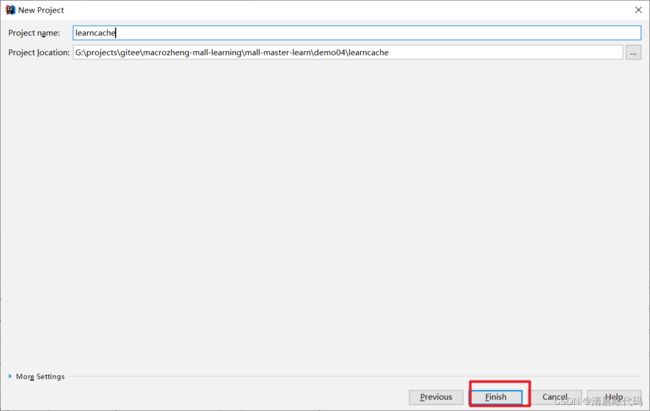
也是创建Maven项目,就是在 new 是需要选择父项目:
准备 pom 文件:
        learn-cache
        com.vae.cache
        1.0-SNAPSHOT

    4.0.0

    com.vae.cache1
    learn-java-cache
    1.0-SNAPSHOT
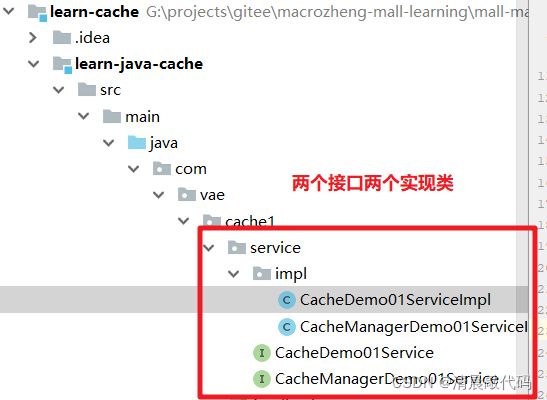
准备 service 处理类:我们的思路是有一个 CacheManagerDemo 类准备缓存数据的业务,有一个 CacheDemo 类进行数据搜索的业务。那么程序需要调用CacheDemo获取数据,然后CacheDemo先调用CacheManagerDemo判断缓存中是否有数据,没有再选择从其余地方拿取。
所以我们创建四个类:
package com.vae.cache1.service;

import java.util.Map;

public interface CacheManagerDemo01Service {

    //接口中的静态变量一定是常量
    //当前service类的bean是单例的,所以多个请求是访问的静态变量 hashMapCache 是同一个变量数据。
//     HashMap hashMapCache = new HashMap<>();

    /*
     * 添加缓存的元素
     */
     String setCache(String key,String value);
    /*
     * 获取缓存的元素
     */
     String getCache(String key);
    /*
     * 获取缓存中所有的元素
     */
     Map getAll();
}

package com.vae.cache1.service.impl;

import com.vae.cache1.service.CacheManagerDemo01Service;
import org.springframework.stereotype.Service;

import java.util.HashMap;
import java.util.Map;

/**
 * description: CacheManagerDemo01ServiceImpl

 * date: 2022/1/22 12:56

 * author: vae

 * version: 1.0

 */


@Service
public class CacheManagerDemo01ServiceImpl implements CacheManagerDemo01Service {

    static HashMap hashMapCache = new HashMap<>();

    @Override
    public String setCache(String key,String value) {
        return hashMapCache.put(key,value);
    }

    @Override
    public String getCache(String key) {
        //缓存找不到就返回 null
        return hashMapCache.get(key);
    }

    @Override
    public Map getAll(){
        for(Map.Entry entry :hashMapCache.entrySet()){
            System.out.println("键 key :"+entry.getKey()+" 值value :"+entry.getValue());
        }
        return hashMapCache;
    }
}
package com.vae.cache1.service;

import java.util.Map;

public interface CacheDemo01Service {
     Object getFromCache(String id);

     Object setToCache(String id,String value);

    Map getAll();
}
package com.vae.cache1.service.impl;

import com.vae.cache1.service.CacheDemo01Service;
import com.vae.cache1.service.CacheManagerDemo01Service;
import org.springframework.beans.factory.annotation.Autowired;
import org.springframework.cache.annotation.Cacheable;
import org.springframework.stereotype.Service;

import java.util.HashMap;
import java.util.Map;

/**
 * description: CacheDemo01ServiceImpl

 * date: 2022/1/16 20:33

 * author: vae

 * version: 1.0

 */
@Service
public class CacheDemo01ServiceImpl implements CacheDemo01Service {

    @Autowired
    CacheManagerDemo01Service cacheManagerDemo01Service;

    @Override
    public Object getFromCache(String id) {
        //若没有开启缓存,则每次使用相同的参数调用该方法都会执行方法的业务,若开启了缓存,如果入参相同则直接返回相同的结果,不会执行方法内部的业务。

        String value = cacheManagerDemo01Service.getCache(id);
        if(value == null){
            System.out.println("没有缓存或缓存已删除啦~~~模拟去db查询~~~" + id);
        }else {
            System.out.println("缓存中拿到了~~~数据是:" + value);
        }

        return "hello cache1...";
    }

    @Override
    public Object setToCache(String id, String value) {
        return cacheManagerDemo01Service.setCache(id,value);
    }

    @Override
    public Map getAll(){

        return cacheManagerDemo01Service.getAll();
    }
}
2.1.3准备Test测试
我们准备使用springboot的Test工具测试,会使用到两个测试注解:
- @RunWith
- @SpringBootTest
@SpringBootTest使用时,需要有springboot启动类,也就是@SpringBootApplication或@SpringBootConfiguration注解注释的类。因为需要加载ApplicationContext,启动spring容器。
我们创建一个Application类,这个类的包路径需要放到service类的父路径上:
package com.vae.cache1;

import org.springframework.boot.SpringApplication;
import org.springframework.boot.autoconfigure.SpringBootApplication;
import org.springframework.boot.context.properties.EnableConfigurationProperties;

/**
 * Hello world!
 *
 */
@SpringBootApplication
public class Application
{
    public static void main( String[] args )
    {
        SpringApplication.run(Application.class, args);
    }
}
类都准备完毕,我们准备测试类,注意测试类的包路径需要和我们启动类的包路径一样:
package com.vae.cache1;

import com.vae.cache1.service.CacheDemo01Service;
import org.junit.Test;
import org.junit.runner.RunWith;
import org.springframework.beans.factory.annotation.Autowired;
import org.springframework.boot.test.context.SpringBootTest;
import org.springframework.test.context.junit4.SpringJUnit4ClassRunner;


/**
 * description: Test

 * date: 2022/1/16 20:35

 * author: vae

 * version: 1.0

 */
@RunWith(SpringJUnit4ClassRunner.class)
//@SpringBootTest 目的是加载ApplicationContext,启动spring容器。会自动检索程序的配置文件,检索顺序是从当前包开始,逐级向上查找被@SpringBootApplication或@SpringBootConfiguration注解的类。
@SpringBootTest(classes = {Application.class})
public class Test01SpringBean {

    @Autowired
    private CacheDemo01Service cacheDemo01Service;


    @Test
    public void test1() {
        System.out.println("------------------------先存储几个的缓存数据:张三:zhangsan,李四:lisi,王五:wangwu ");
        cacheDemo01Service.setToCache("张三","zhangsan");
        cacheDemo01Service.setToCache("李四","lisi");
        cacheDemo01Service.setToCache("王五","wangwu");
        //获取缓存中所有数据
        cacheDemo01Service.getAll();


        // 获取数据~~~~
        System.out.println("------------------------获取数据,入参是:张三");
        cacheDemo01Service.getFromCache("张三");
        System.out.println("------------------------获取数据,入参是:李四");
        cacheDemo01Service.getFromCache("李四");
        System.out.println("------------------------获取数据,入参是:王六");
        cacheDemo01Service.getFromCache("王六");
        System.out.println("------------------------获取数据,入参是:赵六");
        cacheDemo01Service.getFromCache("赵六");

    }

}
运行成功!
这是属于java内存中存储的缓存,如果缓存的数量太大的话会内存溢出OOM。
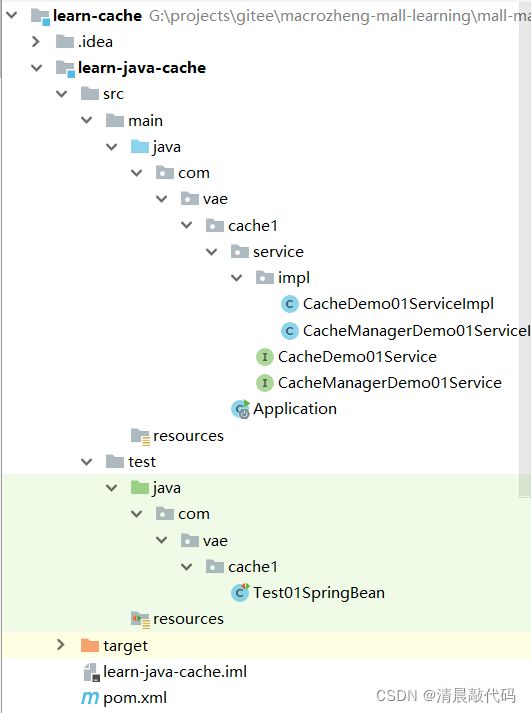
最终的项目目录:
3.Spring Cache缓存
spring也提供了缓存机制Spring Cache,这个整合了好多框架,比如Redis、Memcached、Guava、Caffeine等等。那么在这些整合的机制中,SpringCache是所有Spring支持的缓存框架的基础,而且所有的缓存的使用最后都要归结于SpringCache。
有些人说“ springcache 时没有提供缓存机制的,完全需要配合欺压的缓存框架进行缓存使用。”
我没太理解这句话,其实如果单纯使用 springcache 也可以实现缓存,就是也是基于JavaJVM内存的缓存策略。
有能够解释的人看到,希望给我一点指点~~~///(^v^)\\\~~~
下面先开始使用,首先,我们了解一下 Spring Cache 的使用步骤:
- 添加依赖;
- 开启缓存;
- 配置缓存管理器;
- 添加缓存注解;
前两点好理解,第3点,这个缓存管理器就相当于一个管理的工厂,其中可以有很多缓存器,缓存器中就保存着很多缓存数据,缓存器就相当于我们创建使用的缓存工具,要么是默认的一种类型,要么是我们注入的 Redis 等框架的缓存器。
第4点,注解,springcache的缓存策略不是我们在2.中的缓存策略。spring cache 其核心思想是:当在调用一个缓存注解的方法时会把该方法参数和返回结果作为一个键值存放在缓存中,等到下次利用同样的参数调用该方法时将不再执行该方法,而是直接从缓存中获取结果进行返回。所以在使用Spring Cache的时候我们要保证我们的缓存的方法对于相同的方法参数要有相同的返回结果。
这种方式的好处就是可以通过 AOP 来使用缓存,想使用时就加注解,不想使用就去掉,Spring Cache就是一个这个框架!!!!
所以我们先来学习一下实例,开始!
3.1基于SpringCache实现
3.1.1准备子项目并添加service类、缓存配置类
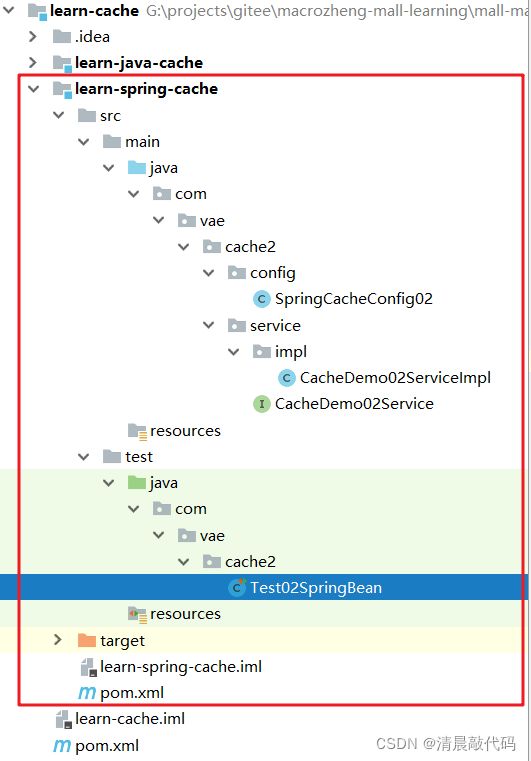
和上面的方法相同,再创建一个项目,
准备 pom 文件:
        learn-cache
        com.vae.cache
        1.0-SNAPSHOT

    4.0.0

    com.vae.cache2
    learn-spring-cache
    1.0-SNAPSHOT
准备service 类:
package com.vae.cache2.service;

public interface CacheDemo02Service {
    public Object getFromDB(Integer id);
}


package com.vae.cache2.service.impl;

import com.vae.cache2.service.CacheDemo02Service;
import org.springframework.cache.annotation.Cacheable;
import org.springframework.stereotype.Service;

/**
 * description: CacheDemo01ServiceImpl

 * date: 2022/1/16 20:33

 * author: vae

 * version: 1.0

 */
@Service
public class CacheDemo02ServiceImpl implements CacheDemo02Service {

    //cacheNames/value:这两个属性都是用来指定缓存组件的名称,即将方法的返回结果放在哪个缓存中,属性定义为数组,可以指定多个缓存;
    //key:通过 key 属性来指定缓存数据所使用的的 key,默认使用的是方法调用传过来的参数作为 key。最终缓存中存储的内容格式为:Entry 形式。
    @Cacheable(cacheNames = "demoCache", key = "#id")
    @Override
    public Object getFromDB(Integer id) {
        //若没有开启缓存,则每次使用相同的参数调用该方法都会执行方法的业务,若开启了缓存,如果入参相同则直接返回相同的结果,不会执行方法内部的业务。
        System.out.println("service:没有缓存或缓存以删除啦~~~模拟去db查询~~~" + id);
        return "返回值="+id;
    }
}
准备缓存管理器配置类:
package com.vae.cache2.config;

import org.springframework.cache.annotation.EnableCaching;
import org.springframework.cache.concurrent.ConcurrentMapCacheManager;
import org.springframework.context.annotation.Bean;
import org.springframework.context.annotation.ComponentScan;
import org.springframework.context.annotation.Configuration;

/**
 * description: CacheConfig

 * date: 2022/1/16 20:32

 * author: vae

 * version: 1.0

 */
@EnableCaching
@Configuration
public class SpringCacheConfig02 {

    @Bean
    public ConcurrentMapCacheManager cacheManager() {
        ConcurrentMapCacheManager cacheManager = new ConcurrentMapCacheManager();
        //cacheManager.setStoreByValue(true); //true表示缓存一份副本,否则缓存引用
        return cacheManager;
    }

}
添加springboot启动类;
package com.vae.cache2;

import org.springframework.boot.SpringApplication;
import org.springframework.boot.autoconfigure.SpringBootApplication;

/**
 * Hello world!
 *
 */
@SpringBootApplication
public class Application02
{
    public static void main( String[] args )
    {
        SpringApplication.run(Application02.class, args);
    }
}
3.1.2准备Test测试
package com.vae.cache2;

import com.vae.cache2.config.SpringCacheConfig02;
import com.vae.cache2.service.CacheDemo02Service;
import org.junit.Test;
import org.junit.runner.RunWith;
import org.springframework.beans.factory.annotation.Autowired;
import org.springframework.boot.test.context.SpringBootTest;
import org.springframework.cache.Cache;
import org.springframework.cache.CacheManager;
import org.springframework.test.context.ContextConfiguration;
import org.springframework.test.context.junit4.SpringJUnit4ClassRunner;


/**
 * description: Test

 * date: 2022/1/16 20:35

 * author: vae

 * version: 1.0

 */
@RunWith(SpringJUnit4ClassRunner.class)
//@ContextConfiguration(classes = {SpringCacheConfig02.class})
@SpringBootTest(classes = {Application02.class})
public class Test02SpringBean {

    @Autowired
    private CacheDemo02Service cacheDemo02Service;
    @Autowired
    private CacheManager cacheManager;

    @Test
    public void test1() {
        System.out.println("------------------------先存储几个的缓存数据:1:值*1,2:值*2,3:值*3 ");
        System.out.println("key=1的设置缓存的返回值"+ cacheDemo02Service.getFromDB(1));
        System.out.println("key=2的设置缓存的返回值"+ cacheDemo02Service.getFromDB(2));
        System.out.println("key=3的设置缓存的返回值"+ cacheDemo02Service.getFromDB(3));

        cacheDemo02Service.getFromDB(2);
        cacheDemo02Service.getFromDB(3);

        // 获取数据~~~~
        System.out.println("------------------------获取数据,入参是:1");
        System.out.println(cacheDemo02Service.getFromDB(1));
        System.out.println("------------------------获取数据,入参是:2");
        System.out.println(cacheDemo02Service.getFromDB(2));
        System.out.println("------------------------获取数据,入参是:3");
        System.out.println(cacheDemo02Service.getFromDB(3));
        System.out.println("------------------------获取数据,入参是:4,第一次缓存");
        System.out.println(cacheDemo02Service.getFromDB(4));
        System.out.println("------------------------获取数据,入参是:5,第一次缓存");
        System.out.println(cacheDemo02Service.getFromDB(5));

        System.out.println("------------------------校验缓存中的数据内容");
        // 校验缓存里的内容~~~~
        System.out.println("---------拿取缓存器,名称 = demoCache");
        Cache demoCache1 = cacheManager.getCache("demoCache");

        System.out.println(demoCache1.get(1, String.class));
        System.out.println(demoCache1.get(2, String.class));
        System.out.println(demoCache1.get(3, String.class));
        System.out.println(demoCache1.get(4, String.class));
        System.out.println(demoCache1.get(5, String.class));
        System.out.println(demoCache1.get(6, String.class));
        System.out.println(demoCache1.get(7, String.class));


    }

}
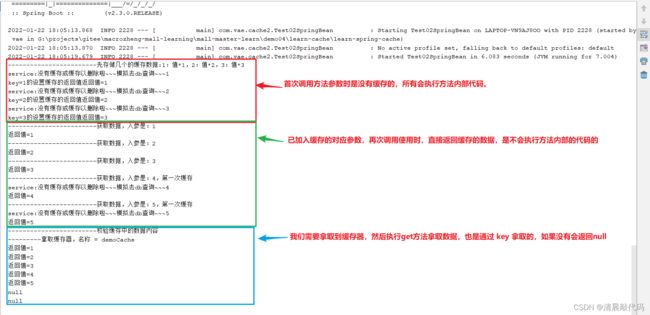
运行结果为:
3.2 debug 看 CacheManager
3.2.1简单实现类结构介绍
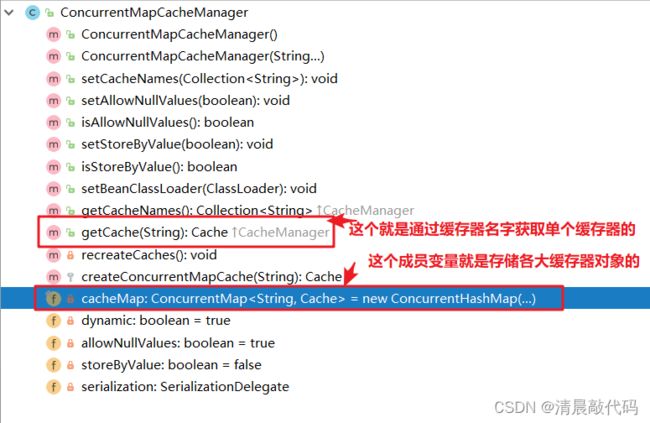
CacheManager 是抽象类,他有很多实现类,Spring Cache默认的实现类是 ConcurrentMapCacheManager,我们来看一下它的结构:
可以看到cacheMap变量是
可以看到最终缓存的数据的结构也是 Map 类型的!和我们2.中的逻辑是一样的!就是SpringCache的代码逻辑和质量高!!!*(੭*ˊᵕˋ)੭*
3.2.2debug查看
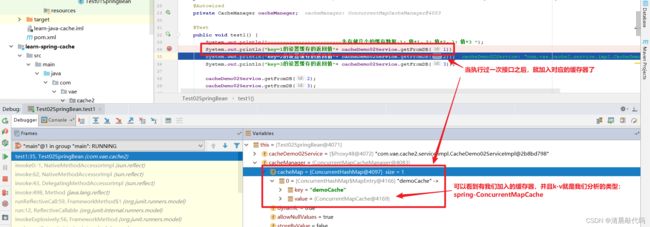
我们同debug 来运行Test2看一下:
完成撒花~~~
学会了最基本的使用,就可以学习springcache整合redis的使用了!!!!
文章参考:
java缓存技术的介绍

