RocketMQ 基于时间轮算法实现指定时间点的定时消息原理解析
在 RocketMQ 4.x 版本,使用延时消息来实现消息的定时消费。延时消息可以一定程度上实现定时发送,但是有一些局限。
RocketMQ 新版本基于时间轮算法引入了定时消息,目前,精确到秒级的定时消息实现的 pr 已经提交到社区,今天来介绍一下。
1 延时消息
1.1 简介
RocketMQ 的延时消息是指 Producer 发送消息后,Consumer 不会立即消费,而是需要等待固定的时间才能消费。在一些场景下,延时消息是很有用的,比如电商场景下关闭 30 分钟内未支付的订单。
使用延时消息非常简单,只需要给消息的 delayTimeLevel 属性赋值就可以。参考下面代码:
Message message = new Message("TestTopic", ("Hello scheduled message " + i).getBytes());
//第 3 个级别,10s
message.setDelayTimeLevel(3);
producer.send(message);
延时消息有 18 个级别,如下:
org.apache.rocketmq.common.message.Message messageExt = this.sendMessageActivity.buildMessage(null,
 Lists.newArrayList(
  Message.newBuilder()
   .setTopic(Resource.newBuilder()
    .setName(TOPIC)
    .build())
   .setSystemProperties(SystemProperties.newBuilder()
    .setMessageId(msgId)
    .setQueueId(0)
    .setMessageType(MessageType.DELAY)
    .setDeliveryTimestamp(Timestamps.fromMillis(deliveryTime))
    //定义消息投递时间
    .setBornTimestamp(Timestamps.fromMillis(System.currentTimeMillis()))
    .setBornHost(StringUtils.defaultString(RemotingUtil.getLocalAddress(), "127.0.0.1:1234"))
    .build())
   .setBody(ByteString.copyFromUtf8("123"))
   .build()
 ),
Resource.newBuilder().setName(TOPIC).build()).get(0);
1.2 实现原理
延时消息的实现原理如下图:

Producer 把消息发送到 Broker 后,Broker 判断到是延时消息,首先会把消息投递到延时队列(Topic = SCHEDULE_TOPIC_XXXX,queueId = delayTimeLevel - 1)。定时任务线程池会有 18 个线程来对延时队列进行调度,每个线程调度一个延时级别,调度任务把延时消息再投递到原始队列,这样 Consumer 就可以拉取到了。
1.3 存在不足
延时消息存在着一些不足:
-
延时级别只有 18 个,并不能满足所有场景;
-
如果通过修改 messageDelayLevel 配置来自定义延时级别,并不灵活,比如一个在大规模的平台上,延时级别成百上千,而且随时可能增加新的延时时间;
-
延时时间不准确,后台的定时线程可能会因为处理消息量大导致延时误差大。
2 定时消息
为了弥补延时消息的不足,RocketMQ 5.0 引入了定时消息。
2.1 时间轮算法
为了解决定时任务队列遍历任务导致的性能开销,RocketMQ 定时消息引入了秒级的时间轮算法。如下图:

图中是一个 60s 的时间轮,时间轮上会有一个指向当前时间的指针定时地移动到下一个时间(秒级)。
时间轮算法的优势是不用去遍历所有的任务,每一个时间节点上的任务用链表串起来,当时间轮上的指针移动到当前的时间时,这个时间节点上的全部任务都执行。
虽然上面只是一个 60s 的时间轮,但是对于所有的时间延时,都是支持的。可以在每个时间节点增加一个 round 字段,记录时间轮转动的圈数,比如对于延时 130s 的任务,round 就是 2,放在第 10 个时间刻度的链表中。这样当时间轮转到一个节点,执行节点上的任务时,首先判断 round 是否等于 0,如果等于 0,则把这个任务从任务链表中移出交给异步线程执行,否则将 round 减 1 继续检查后面的任务。
2.2 使用方式
基于时间轮算法的思想,RocketMQ 实现了精准的定时消息。使用 RocketMQ 定时消息时,客户端定义消息的示例代码如下:
protected void fillDelayMessageProperty(apache.rocketmq.v2.Message message, org.apache.rocketmq.common.message.Message messageWithHeader) {
 if (message.getSystemProperties().hasDeliveryTimestamp()) {
  Timestamp deliveryTimestamp = message.getSystemProperties().getDeliveryTimestamp();
  //delayTime 这个延时时间默认不能超过 1 天,可以配置
  long deliveryTimestampMs = Timestamps.toMillis(deliveryTimestamp);
  validateDelayTime(deliveryTimestampMs);
        //...
  String timestampString = String.valueOf(deliveryTimestampMs);
  //MessageConst.PROPERTY_TIMER_DELIVER_MS="TIMER_DELIVER_MS"
  MessageAccessor.putProperty(messageWithHeader, MessageConst.PROPERTY_TIMER_DELIVER_MS, timestampString);
 }
}
2.3 实现原理
2.3.1 消息投递
上面的代码构中,Producer 创建消息时给消息传了一个系统属性 deliveryTimestamp,这个属性指定了消息投递的时间,并且封装到消息的 TIMER_DELIVER_MS 属性,代码如下:
//TimerMessageStore类
ByteBuffer tmpBuffer = timerLogBuffer;
tmpBuffer.clear();
tmpBuffer.putInt(TimerLog.UNIT_SIZE); //size
tmpBuffer.putLong(slot.lastPos); //prev pos
tmpBuffer.putInt(magic); //magic
tmpBuffer.putLong(tmpWriteTimeMs); //currWriteTime
tmpBuffer.putInt((int) (delayedTime - tmpWriteTimeMs)); //delayTime
tmpBuffer.putLong(offsetPy); //offset
tmpBuffer.putInt(sizePy); //size
tmpBuffer.putInt(hashTopicForMetrics(realTopic)); //hashcode of real topic
tmpBuffer.putLong(0); //reserved value, just set to 0 now
long ret = timerLog.append(tmpBuffer.array(), 0, TimerLog.UNIT_SIZE);
if (-1 != ret) {
 // If it's a delete message, then slot's total num -1
 // TODO: check if the delete msg is in the same slot with "the msg to be deleted".
 timerWheel.putSlot(delayedTime, slot.firstPos == -1 ? ret : slot.firstPos, ret,
  isDelete ? slot.num - 1 : slot.num + 1, slot.magic);

}
Broker 收到这个消息后,如果判断到 TIMER_DELIVER_MS 这个属性有值,就会把这个消息投递到 Topic 是 rmq_sys_wheel_timer 的队列中,queueId 是 0,同时会保存原始消息的 Topic、queueId、投递时间(TIMER_OUT_MS)。
TimerMessageStore 中有个定时任务 TimerEnqueueGetService 会从 rmq_sys_wheel_timer 这个 Topic 中读取消息,然后封装 TimerRequest 请求并放到队列 enqueuePutQueue。
2.3.2 绑定时间轮
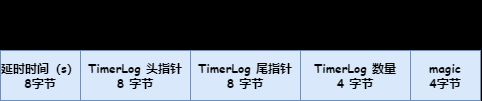
RocketMQ 使用 TimerLog 来保存消息的原始数据绑定到时间轮上。首先看一下 TimerLog 保存的数据结构,如下图:

参考下面代码:
//类 TimerWheel
public void putSlot(long timeMs, long firstPos, long lastPos, int num, int magic) {
 localBuffer.get().position(getSlotIndex(timeMs) * Slot.SIZE);
 localBuffer.get().putLong(timeMs / precisionMs);
 localBuffer.get().putLong(firstPos);
 localBuffer.get().putLong(lastPos);
 localBuffer.get().putInt(num);
 localBuffer.get().putInt(magic);
}
TimerEnqueuePutService 这个定时任务从上面的 enqueuePutQueue(2.3.1 节) 取出 TimerRequest 然后封装成 TimerLog。
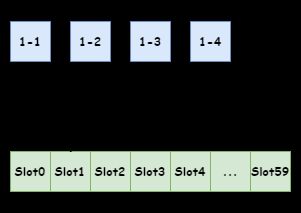
那时间轮是怎么跟 TimerLog 关联起来的呢?RocketMQ 使用 TimerWheel 来描述时间轮,TimerWheel 中每一个时间节点是一个 Slot,Slot 保存了这个延时时间的 TimerLog 信息。数据结构如下图:
参考下面代码:
//类 TimerWheel
public void putSlot(long timeMs, long firstPos, long lastPos, int num, int magic) {
 localBuffer.get().position(getSlotIndex(timeMs) * Slot.SIZE);
 localBuffer.get().putLong(timeMs / precisionMs);
 localBuffer.get().putLong(firstPos);
 localBuffer.get().putLong(lastPos);
 localBuffer.get().putInt(num);
 localBuffer.get().putInt(magic);
}
这样时间轮跟 TimerLog 就关联起来了,见下图:
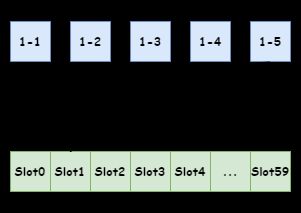
如果时间轮的一个时间节点(Slot)上有一条新的消息到来,那只要新建一个 TimerLog,然后把它的指针指向该时间节点的最后一个 TimerLog,然后把 Slot 的 lastPos 属性指向新建的这个 TimerLog,如下图:
从源码上看,RocketMQ 定义了一个 7 天的以秒为单位的时间轮。
2.3.3 时间轮转动
转动时间轮时,TimerDequeueGetService 这个定时任务从当前时间节点(Slot)对应的 TimerLog 中取出数据,封装成 TimerRequest 放入 dequeueGetQueue 队列。
2.3.4 CommitLog 中读取消息
定时任务 TimerDequeueGetMessageService 从队列 dequeueGetQueue 中拉取 TimerRequest 请求,然后根据 TimerRequest 中的参数去 CommitLog(MessageExt) 中查找消息,查出后把消息封装到 TimerRequest 中,然后把 TimerRequest 写入 dequeuePutQueue 这个队列。
2.3.5 写入原队列
定时任务 TimerDequeuePutMessageService 从 dequeuePutQueue 队列中获取消息,把消息转换成原始消息,投入到原始队列中,这样消费者就可以拉取到了。
3 总结
RocketMQ 4.x 版本只支持延时消息,有一些局限性。而 RocketMQ 新版本引入了定时消息,弥补了延时消息的不足。定时消息的处理流程如下图:

可以看到,RocketMQ 的定时消息的实现还是有一定复杂度的,这里用到 5 个定时任务和 3 个队列来实现。
最后,对于定时时间的定义,客户端、Broker 和时间轮的默认最大延时时间定义是不同的,使用的时候需要注意。