three.js
基本安装以及引入
three.js处于飞速发展中,基本每个月都会发布一个新的版本,主要是增加一些新的功能,或者废弃一些api。
版本大全:Releases · mrdoob/three.js · GitHub
如果使用前端框架,需要先安装three.js,然后引入即可使用
npm i three --save除了核心库外,还有一些扩展库在example/jsm下,可以看到不同功能的扩展库。一般来说,你的项目用到哪个就引入哪个。
import {OrbitControls} from 'three/addons/contrls/OrbitControls.js'html通过script标签引入
Document
通过配置script,实现和vue等前端框架一样的引入写法
Document
三维场景
创建三维场景
const scene = new three.Scene()几何体
three.js提供了各种各样的几何体API,用来表示三维物体的集合形状,文档可搜索 geometry
参考文档:three.js docs
| 长方体 | BoxGeometry | wdth:x轴上的宽度,默认是1 height:y轴上的高度,默认是1 depth:z轴上的深度,默认是1 |
| 圆柱体 | CylinderGeometry | radiusTop -圆柱体顶部的半径。默认值为1。 radiusBottom -圆柱体底部的半径。默认值为1。 height-气缸的高度。默认值为1。 radialSegments -围绕圆柱体圆周的分割面数量。默认为32 heightSegments-沿圆柱体高度的面行数。默认值为1。 openEnded -一个布尔值,指示圆柱体的两端是打开的还是封顶的。默认值为false,表示已封顶。 thetaStart -第一个片段的起始角度,默认= 0(三点钟位置)。 thetaLength-圆心角,通常称为θ。默认值是2*Pi,这是一个完整的圆柱体。 |
| 球体 | SphereGeometry | radius-球体半径。默认值为1。 widthSegments -水平段的数量。最小值为3,默认值为32。 heightSegments -垂直段的数量。最小值为2,默认值为16。 phiStart -指定水平起始角度。默认为0。 phiLength-指定水平扫描角大小。默认是Math。乘以2。 thetaStart -指定垂直起始角度。默认为0。 thetaLength -指定垂直扫描角大小。默认是Math.PI。 几何图形是通过扫描和计算Y轴(水平扫描)和Z轴(垂直扫描)周围的顶点来创建的。因此,不完整的球体(类似于“球体切片”)可以通过使用phiStart, phiLength, thetaStart和thetaLength的不同值来创建,以定义我们开始(或结束)计算这些顶点的点。 |
| 圆锥 | ConeGeometry | radius-锥底的半径。默认值为1。 height-锥体的高度。默认值为1。 radialSegments -圆锥体圆周周围的分割面数量。默认为32 heightSegments -沿圆锥体高度的面行数。默认值为1。 openEnded -一个布尔值,指示锥体的底部是打开的还是封顶的。默认值为false,表示已封顶。 thetaStart -第一个片段的起始角度,默认= 0(三点钟位置)。 thetaLength-圆心角,通常称为θ。默认值是2*Pi,这是一个完整的圆锥体。 |
| 矩形平面 | PlaneGeometry | width-沿X轴的宽度。默认值为1。 height -沿Y轴的高度。默认值为1。 widthSegments -可选。默认值为1。 heightSegments—可选。默认值为1。 |
| 圆平面 | CircleGeometry | radius -圆的半径,默认= 1。 segments -段(三角形)的数量,最小值= 3,默认值= 32。 thetaStart -第一个片段的起始角度,默认= 0(三点钟位置)。 thetaLength-圆心角,通常称为θ。默认值是2*Pi,这是一个完整的圆。 |
其他的可参考文档
import * as three from 'three'

//创建3维场景
const scene = new three.Scene()

// 添加物体
// 长方体,长宽高各100
const geometry = new three.BoxGeometry( 100, 100, 100 );

//球体
const geometry = new three.SphereGeometry(50);

//圆柱体
const geometry = new three.CylinderGeometry(50,50,100);

//矩形平面
const geometry = new three.PlaneGeometry(100,50);

//原型平面
const geometry = new three.CircleGeometry(100,50);
物体外观:材质
如果你想定义物体的外观效果,比如颜色,就要通过Material相关的api实现。threejs的材质默认正面可见,反面不可见,对于矩形平面,圆形平面如果想看到两面可以设置side属性,默认值是three.FrontSide
const material = new three.MeshLambertMaterial({
    color: 0x00ff00,
    transparent: true,
    opacity: 0.5,
    side:three.DoubleSide,
});| 网格基础材质 | MeshBasicMaterial 不受光照影响 |
| 网格漫反射型 | MeshLamberMaterial 受光照影响 |
| 网格高光材质 | MeshPhongMetarial 受光照影响 |
| 物理材质 | MeshStandardMaterial MeshPhysicalMaterial |
| 点材质 | PointsMaterial |
| 线基础材质 | LineBasicMaterial |
| 精灵材质 | SpriteMaterial |
//创建一个材质对象
const material = new three.MeshBasicMaterial( {color: 0x00ff00,transparent:true,opacity:0.5} );
参考文档:three.js docs
物体:网络模型
在three.js中可以通过网格模型Mesh表示一个虚拟的物体。
const mesh = new three.Mesh( geometry, material );把物体添加到场景中,也可以添加多个
scene.add( mesh );
//scene.add( mesh1,mesh2,mesh3);
有添加也有删除
scene.remove( mesh );
//scene.remove( mesh1,mesh2,mesh3);
模型位置:position
默认是原点(0,0,0)
mesh.position.set(0,10,10)整理写法:
import * as three from 'three'

//创建3维场景
const scene = new three.Scene()

// 添加物体
// 长方体,长宽高各100
const geometry = new three.BoxGeometry( 100, 100, 100 );
//创建一个材质对象
const material = new three.MeshBasicMaterial( {color: 0x00ff00} );
//创建一个网格物体
const mesh = new three.Mesh( geometry, material );
//设置位置
mesh.position.set(0,10,10)

scene.add( mesh );
此时还是不能够看到效果,还需要其他的配置。
透视投影相机
three.js提供了正投影相机OrthographicCamera和透视投影相机PerspectiveCamera.
透视投影相机PerspectiveCamera
本质上就是在模拟人眼观察这个世界的规律。透视投影相机的投影规律是远小近大,通过相机观察阵列立方体大小变化,可以看到距离相机越远,立方体的渲染效果越好。
//创建一个透视投影相机对象
const camera = new three.PerspectiveCamera(fov,aspect,near,far)
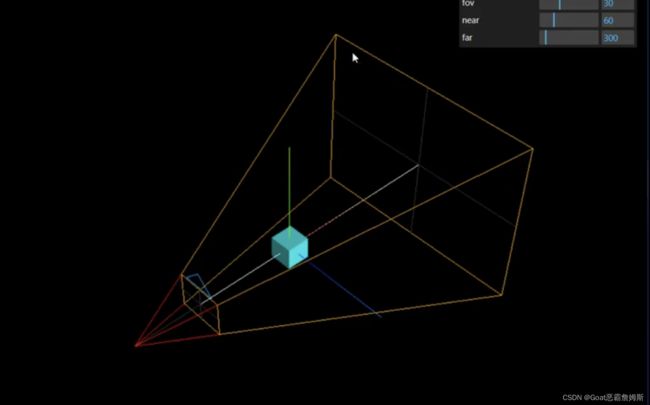
fov:摄像机视椎体垂直视野角度,默认50,视野更大,意味着乐意渲染的范围更大,远小近大的效果越明显。
aspect:摄像机视椎体长宽比,用画布的宽高比即可,默认1
near:摄像机视椎体近端面,默认0.1
far:摄像机视椎体远端面,默认2000
四个参数构成一个四棱台3d空间,被称为视椎体,只有视椎体之内的物体才能渲染出来,视椎体范围之外的物体不会显示在canvas画布上,其它参数可查看文档。
相机位置设置
camera.position.set(200,200,200)相机观察目标,具体说相机对准那个物体或者哪个坐标,对于three.js相机而言,就是设置.lookAt()方法参数,指定一个3D坐标。默认值为(0,0,0)
//相机的视线 观察点的坐标
camera.lookAt(0,0,0) //坐标原点
camera.lookAt(0,10,0) //y轴位置上10
camera.lookAt(mesh.position)指向mesh对应的位置
定义相机渲染输出的画布尺寸
对于three.js而言,需要定义相机在网页上输出的画布尺寸,canvas画布:threejs虚拟相机渲染三维场景在浏览器网页上呈现的结果称为canvas画布。
//画布宽高
const width =800
const height = 500
const camera = new three.PerspectiveCamera(30,width/height,0.1,3000)相机轨道控制器Orbit Controls
平时代码开发或展示模型的时候,可以通过相机控件Orbit Controls实现旋转缩放预览效果。包括旋转,缩放,平移。
//创建控制器
const controls = new OrbitControls(camera,renderer.domElement)
//添加change监听事件,然后重新用渲染器渲染页面
controls.addEventListener('change',()=>{
    renderer.render(scene,camera)
})
渲染器
对于threejs而言,完成拍照需要一个新的对象那就是webgl渲染器WebGLRender。文档:three.js docs
//实例化渲染器
const render = new three.WebGLRenderer();
设置canvas的大小,可以直接使用之前设置过得宽高。渲染页面,生成一个canvas画布,并把三维场景scene呈现在canvas画布上,类比相机拍照功能。
renderer.render(scene,camera) //执行渲染webGLrenderer通过属性domElement可以获得渲染方法render()生成的canvas画布,domElement本质上就是一个HTML元素:canvas画布,然后添加dom元素到页面。
document.body.append(renderer.domElement)渲染器锯齿属性
设置渲染器锯齿属性 antialias的值可以直接在参数中设置,也可以通过渲染器对象属性设置,能够让图像变得平滑没有锯齿感。
设备像素比
设备像素比devicePixelRatio是window对象的一个属性,该属性值和你的设备屏幕相关,不同的设备屏幕的值可能不同,可能是1,1.5,2.0等其他值。避免设备显示模糊。一定要设置
renderer.setPixelRatio(window.devicePixelRatio)设置背景颜色
renderer.setClearColor(0x444444)注:如果你的devicePixelRatio值刚好是1,那么配置执行setPixelRatio不会有明显差异,不过为了适应不同的硬件设备屏幕,通常需要执行该方法。
三维坐标系
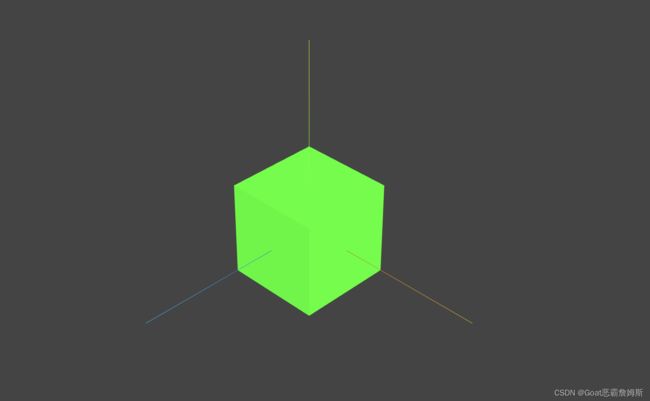
three.AxesHelper()的参数表示坐标系坐标轴线段尺寸大小,可以根据需要改变尺寸,坐标轴颜色红R,绿G,蓝B分别对应坐标系的x,y,z轴,y轴默认朝上
//创建一个三维坐标轴
const axesHelper = new three.AxesHelper(150)
//坐标轴对象添加到场景中
scene.add(axesHelper)
光源对物体表面的影响
实际生活中物体表面的明暗效果是会受到光照的影响,threejs中同样也要模拟光照Light对网格模型mesh表面的影响。
基础网络材质MeshBasicMaterial不会受到光照影响。
漫反射网格材质MeshLambertMaterial会收到光照影响,该材质也可以成为Lambert网格材质。
const material = new three.MeshLambertMaterial(options);threejs提供了多种模拟生活中的光源api,参考文档:three.js docs
| 环境光 | AmbientLight |
| 点光源 | PointLight |
| 聚光灯光源 | SpotLight |
| 平行光 | DirectionalLight |
点光源
点光源可以类比为一个发光点,就像一个灯泡以灯泡为中心向四周发射光线。
color:光照颜色,十六进制
intensity:光照强度,缺省值1。
distance:这个距离表示从光源到光照强度为0的位置,当设置为0,光永远不会消失(距离无穷大)。缺省值0.
decay沿着光照距离的衰退量,缺省值2。
//创建一个点光源
const pointLight = new three.PointLight(0xffffff,1.0)
//点光源的位置
pointLight.position.set(400,0,0)
//添加到场景
scene.add(pointLight)
点光源辅助观察
//可视化点光源
const pointLightHelper = new three.PointLightHelper(pointLight,5)//第一个参数是光源,第二个参数是光源大小
scene.add(pointLightHelper)
环境光
环境光AmbientLight没有特定方向,只是整体改变场景的光照明暗
//添加环境光
const AmbientLight = new three.AmbientLight(0xffffff,1.0)
scene.add(AmbientLight)
平行光
平行光DirectionLight就是沿着特定方向发射。也有辅助观察的可视化光源。
//添加平行光
const directionalLight = new three.DirectionalLight(0xffffff,0.5)
directionalLight.position.set(50,50,60)
//directionalLight.target = mesh //设置光照对象,如果不设置,默认就是坐标原点
scene.add(directionalLight)
//可视化平行光
const dirLightHelper = new three.DirectionalLightHelper(directionalLight,5)
scene.add(dirLightHelper)
平行光照射到网格模型Mesh表面,光线和模型表面构成一个入射角度,入射角度不同,对光照的反射能力不同。
动画渲染循环
threejs可以借助HTML5的api请求动画帧window.requestAnimationFrame实现动画渲染。
//周期性执行,默认理想状态下每秒钟执行60次
function render(){
    mesh.rotateY(0.01) //周期性旋转0.01弧度
    renderer.render(scene,camera)//canvas画布上的内容
    requestAnimationFrame(render)
}
render()
计算两帧渲染时间间隔和帧率
//周期性执行,默认理想状态下每秒钟执行60次
const clock = new three.Clock() //创建一个时钟对象
function render(){
    const spt = clock.getDelta()*1000 //毫秒 时间间隔
    mesh.rotateY(0.01) //周期性旋转0.01弧度
    renderer.render(scene,camera)//canvas画布上的内容
    requestAnimationFrame(render)
}
render()
如果执行了动画循环,那么可以不用执行控制器的change方法,因为一直在重新渲染。
实例一
Document
import * as three from 'three'
import {OrbitControls} from 'three/addons/controls/OrbitControls.js'

//创建3维场景
const scene = new three.Scene()

// 添加物体
// 长方体,长宽高各50
const geometry = new three.BoxGeometry(50, 50, 50);

//创建一个材质对象
const material = new three.MeshLambertMaterial({
    color: 0x00ff00,
});

//创建一个网格物体
const mesh = new three.Mesh(geometry, material);
//设置位置默认是(0,0,0)
// mesh.position.set(0, 10, 10)
scene.add(mesh);

//创建一个三维坐标轴
const axesHelper = new three.AxesHelper(100)
//坐标轴对象添加到场景中
scene.add(axesHelper)

//创建一个点光源
const pointLight = new three.PointLight(0xffffff,1.0)
//点光源的位置
pointLight.position.set(150,100,100)
//添加到场景
scene.add(pointLight)
//可视化点光源
const pointLightHelper = new three.PointLightHelper(pointLight,3)
scene.add(pointLightHelper)
//添加环境光
const AmbientLight = new three.AmbientLight(0xffffff,1.0)
scene.add(AmbientLight)
//添加平行光
const directionalLight = new three.DirectionalLight(0xffffff,0.5)
directionalLight.position.set(80,50,40)
//directionalLight.target = mesh //设置光照对象,如果不设置,默认就是坐标原点
scene.add(directionalLight)
//可视化平行光
const dirLightHelper = new three.DirectionalLightHelper(directionalLight,5)
scene.add(dirLightHelper)

//画布宽高
const width = 800
const height = 500

//创建一个透视投影相机对象
const camera = new three.PerspectiveCamera(30, width / height, 0.1, 3000)
//相机的位置设置
camera.position.set(200, 200, 200)
//相机的视线 观察点的坐标
camera.lookAt(mesh.position)

//实例化渲染器
const renderer = new three.WebGLRenderer();
renderer.setSize(width, height)//输出照片的宽高度
renderer.render(scene, camera) //执行渲染
document.body.append(renderer.domElement)

//周期性执行,默认理想状态下每秒钟执行60次
const clock = new three.Clock() //创建一个时钟对象
function render(){
    const spt = clock.getDelta()*1000 //毫秒 时间间隔
    mesh.rotateY(0.01) //周期性旋转0.01弧度
    renderer.render(scene,camera)//canvas画布上的内容
    requestAnimationFrame(render)
}
render()

//创建控制器
const controls = new OrbitControls(camera,renderer.domElement)
//添加change监听事件,然后重新用渲染器渲染页面
// controls.addEventListener('change',()=>{
//     renderer.render(scene,camera)
// })
canvas画布宽高动态变化
全屏,以及屏幕变化时,画布随着窗口变化而变化
const width = window.innerWidth
const height = window.innerHeight


window.onresize = function(){
    renderer.setSize(window.innerWidth,window.innerHeight)
    camera.aspect = window.innerWidth/window.innerHeight
    camera.updateProjectionMatrix() //相机属性发生变化,需要更新
}
stats性能监视器(计算渲染帧率FPS)
threejs每执行WebGL渲染器render方法一次,就在ccanvas画布上得到一帧图像,不停的周期性执行就可以更新canvas画布内容,一般场景越复杂往往渲染性能越低,也就是每秒执行render的次数越低。
通过stats.js库可以查看threejs当前的渲染性能,具体说就是计算threejs的渲染帧率(FPS),所谓渲染帧率,简单说就是threejs每秒完成渲染的次数,一般渲染达到每秒钟60刺为最佳状态。
可以通过setMode()方法的参数mode值设置首次打开页面,测试结果的显示模式,鼠标单击可以横换不同的显示模式。0是默认模式,显示帧数。
import Stats from "three/addons/libs/stats.module.js"//创建stats对象
const stats = new Stats()
//stats.setMode(1) //设置现实的模式
document.body.append(stats.domElement)
//跟随时间重新渲染
function render(){
stats.update()
mesh.rotateY(0.01) //周期性旋转0.01弧度
renderer.render(scene,camera)//canvas画布上的内容
requestAnimationFrame(render)
}性能测试
//批量创建长方体性能测试
for (let i = 0; i < 10000; i++) {
    // 长方体,长宽高各50
    const geometry = new three.BoxGeometry(5, 5, 5);

    //创建一个材质对象
    const material = new three.MeshLambertMaterial({
        color: 0x00ff00,
    });
    const mesh = new three.Mesh(geometry, material);
    const x = (Math.random()-0.5)*200
    const y = (Math.random()-0.5)*200
    const z = (Math.random()-0.5)*200
    mesh.position.set(x,y,z)
    scene.add(mesh);
}
阵列立方体和相机适配体验
沿着x轴阵列多个立方体网格模型
//沿着x轴阵列多个立方体网格模型
for (let i = 0; i < 10; i++) {
    const mesh = new three.Mesh(geometry, material);
    mesh.position.set(i*100,0,0) //沿轴阵列
    scene.add(mesh);
}
沿着xoz阵列多个立方体网格模型
//沿着xoz阵列多个立方体网格模型
for (let i = 0; i < 10; i++) {
    for (let j = 0; j < 10; j++) {
        const mesh = new three.Mesh(geometry, material);
        mesh.position.set(i*20,0,j*20) //沿轴阵列
        scene.add(mesh);
    }
}
相机拉远一点,可以看到的范围更广,如果距离超出相机的范围,那么多余的地方会被截掉不显示。
camera.position.set(800, 800, 800)注:改变相机的lookAt坐标时,OrbitControls会影响到lookAt的设置,也要同时一起修改参数
camera.lookAt(140, 0, 140)

const controls = new OrbitControls(camera, renderer.domElement)
controls.target.set(140, 0, 140)
controls.update()
代码:
import * as three from 'three'
import { OrbitControls } from 'three/addons/controls/OrbitControls.js'
import Stats from "three/addons/libs/stats.module.js"
//创建3维场景
const scene = new three.Scene()

// 添加物体
// 长方体,长宽高各50
const geometry = new three.BoxGeometry(10, 10, 10);

//创建一个材质对象
const material = new three.MeshLambertMaterial({
    color: 0x00ff00,
    transparent: true,
    opacity: 0.5
});


//沿着xoz阵列多个立方体网格模型
for (let i = 0; i < 10; i++) {
    for (let j = 0; j < 10; j++) {
        const mesh = new three.Mesh(geometry, material);
        mesh.position.set(i * 20, 0, j * 20) //沿轴阵列
        scene.add(mesh);
    }
}


//创建一个三维坐标轴
const axesHelper = new three.AxesHelper(100)
//坐标轴对象添加到场景中
scene.add(axesHelper)


//添加环境光
const AmbientLight = new three.AmbientLight(0xffffff, 1.0)
scene.add(AmbientLight)
//添加平行光
const directionalLight = new three.DirectionalLight(0xffffff, 5)
directionalLight.position.set(80, 50, 40)
//directionalLight.target = mesh //设置光照对象,如果不设置,默认就是坐标原点
scene.add(directionalLight)
//可视化平行光
const dirLightHelper = new three.DirectionalLightHelper(directionalLight, 5)
// scene.add(dirLightHelper)

//画布宽高
const width = window.innerWidth
const height = window.innerHeight

//创建一个透视投影相机对象
const camera = new three.PerspectiveCamera(60, width / height, 0.1, 3000)
//相机的位置设置
camera.position.set(600, 600, 600)
//相机的视线 观察点的坐标
camera.lookAt(140, 0, 140)

//实例化渲染器
const renderer = new three.WebGLRenderer();
renderer.setSize(width, height)//输出照片的宽高度
renderer.render(scene, camera) //执行渲染
document.body.append(renderer.domElement)

//创建stats对象
const stats = new Stats()
document.body.append(stats.domElement)

//周期性执行,默认理想状态下每秒钟执行60次
function render() {
    stats.update()
    // mesh.rotateY(0.01) //周期性旋转0.01弧度
    renderer.render(scene, camera)//canvas画布上的内容
    requestAnimationFrame(render)
}
render()

//创建控制器
const controls = new OrbitControls(camera, renderer.domElement)
controls.target.set(140, 0, 140)
controls.update()
//添加change监听事件,然后重新用渲染器渲染页面
controls.addEventListener('change', () => {
    // renderer.render(scene,camera)
})

window.onresize = function () {
    renderer.setSize(window.innerWidth, window.innerHeight)
    camera.aspect = window.innerWidth / window.innerHeight
    camera.updateProjectionMatrix() //相机属性发生变化,需要更新
}
高光网络材质
高光网络材质MeshPhongMaterial和基础网格材质MeshBasicMaterial,漫反射网格材质MeshLambertMaterial一样都是王贺模型的mesh材质。高光网络材质和漫反射网格材质一样都会受到光照影响,但是对于光的反射有差异。
MeshPhongMaterial可以实现MeshLambertMaterial不能实现的高光反射效果。对于高光效果,在太阳下的观察一辆车,你会在特定角度和位置,你可以看到车表面某个局部区域非常高亮。
MeshPhongMaterial可以提供一个镜面反射效果,而MeshLambertMaterial是漫反射。通过MeshPhongMaterial的高光亮度shininess属性,可以控制高光反射效果,specular控制高光颜色,一般一起使用。
const material = new three.MeshPhongMaterial({
    color: 0x00ff00,
    shininess:30,//高光强度属性默认30
    specular:  0x444444  , //默认是深灰色
});
dat.gui.js库
gui.js说白了就是一个前端库,对html,css和js进行了封装,gui.js可以快速创建控制三维场景的UI交互界面。threejs官方文件里是有这个库的,可以直接使用。
import { GUI } from 'three/addons/libs/lil-gui.module.min.js' //引入gui库

const gui =new GUI()
//可以修改样式
gui.domElement.style.right = '0px'
gui.domElement.style.width = '300px'
add方法
add方法可以快速创建一个UI交互界面,比如一个拖动条,可以用来改变一个js对象属性的属性值。格式:add(控制对象,对象具体属性,其它参数)
其它参数:可以一个或者多个,数据类型也可以不同,gui会自动根据参数形式,自动生成对应的交互界面
参数3和参数4,分别是一个数字,交互界面是一个可以拖动的拖动条,可以在一个区间改变属性的值,执行gui.add(obj,'x',0,100),你会发现在右上角gui界面增加了新的内容,可以控制obj对象x属性的新交互界面。
注:一定要开启循环动画,否则不会重新渲染,导致滑块无效
const obj = {
    x:30
}

gui.add(obj,'x',0,100)
//添加环境光
const AmbientLight = new three.AmbientLight(0xffffff, 0)
console.log(AmbientLight.intensity);
gui.add(AmbientLight,'intensity',0,2)
scene.add(AmbientLight)
//创建一个网格物体
const mesh = new three.Mesh(geometry, material);
//设置位置默认是(0,0,0)
// mesh.position.set(0, 10, 10)
scene.add(mesh);
gui.add(mesh.position,'x',0,180)
gui.add(mesh.position,'y',0,180)
gui.add(mesh.position,'z',0,180)参数3如果是一个数组,那么生成的就是一个下拉菜单
const obj ={
    color:0x00ffff,
    scale:0,
    bool:false,
}
gui.add(obj,'scale',[-100,0,100]).onChange(value=>{
    mesh.position.y = value
})
参数3如果是一个对象,那么生成的就是一个下拉菜单
const obj ={
    color:0x00ffff,
    scale:0,
    bool:false,
}
gui.add(obj,'scale',{
    left:-100,
    center:0,
    right:100
}).name('方位选择').onChange(value=>{
    mesh.position.x = value
})
对bool值进行创建
const obj ={
    color:0x00ffff,
    scale:0,
    bool:false,
}
gui.add(obj, 'bool').onChange(value => {
    console.log(value);
})
//勾选判断是否需要循环动画
function render() {
    if (obj.bool) {
        mesh.rotateY(0.01)
    }
    renderer.render(scene, camera)//canvas画布上的内容
    requestAnimationFrame(render)
}
name方法
add创建的交互界面,会默认显示所改变的属性的名字,可以通过name方法改变gui生成交互页面现实的内容。
gui.add(AmbientLight,'intensity',0,2).name('环境光强度')step方法
可以设置交互界面每次改变属性值间隔是多少
gui.add(AmbientLight,'intensity',0,2).name('环境光强度').step(0.1)onChange事件
当gui界面某个值变化的时候,onChange方法就会执行,可以执行某些代码。其实也就是拖动条的change事件,返回对应的数值。
gui.add(AmbientLight,'intensity',0,2).name('环境光强度').step(0.1).onChange((value)=>{
    console.log(value);
})
addColor生成颜色值改变交互页面
先生成一个选色板,然后可以改变材质的颜色
const obj ={
    color:0x00ffff
}
gui.addColor(obj,'color').onChange(value=>{
    mesh.material.color.set(value)
})
参考代码:
import { GUI } from 'three/addons/libs/lil-gui.module.min.js' //引入gui库
import * as three from 'three'
import { OrbitControls } from 'three/addons/controls/OrbitControls.js'

const gui = new GUI()
//可以修改样式
gui.domElement.style.right = '0px'
gui.domElement.style.width = '300px'

//创建3维场景
const scene = new three.Scene()

// 添加物体
// 长方体,长宽高各50
const geometry = new three.BoxGeometry(100, 100, 100);

//创建一个材质对象
const material = new three.MeshPhongMaterial({
    color: 0x00ff00,
    shininess: 30,//高光强度属性默认30
    specular: 0x444444, //默认是深灰色
});

//创建一个网格物体
const mesh = new three.Mesh(geometry, material);
//设置位置默认是(0,0,0)
// mesh.position.set(0, 10, 10)
scene.add(mesh);
gui.add(mesh.position, 'x', 0, 180)
gui.add(mesh.position, 'y', 0, 180)
gui.add(mesh.position, 'z', 0, 180)

//创建一个三维坐标轴
const axesHelper = new three.AxesHelper(200)
//坐标轴对象添加到场景中
scene.add(axesHelper)


//添加环境光
const AmbientLight = new three.AmbientLight(0xffffff, 0)
//环境光强度生成滑动组件
gui.add(AmbientLight, 'intensity', 0, 2).name('环境光强度').step(0.1).onChange((value) => {
    console.log(value);
})

//生成变色器
const obj = {
    color: 0x00ffff,
    scale: 0,
    bool: false,
}
gui.addColor(obj, 'color').onChange(value => {
    mesh.material.color.set(value)
})
scene.add(AmbientLight)

gui.add(obj, 'scale', [-100, 0, 100]).onChange(value => {
    mesh.position.y = value
})
gui.add(obj, 'scale', {
    left: -100,
    center: 0,
    right: 100
}).name('方位选择').onChange(value => {
    mesh.position.x = value
})
gui.add(obj, 'bool').onChange(value => {
    console.log(value);
})

//添加平行光
const directionalLight = new three.DirectionalLight(0xffffff, 5)
directionalLight.position.set(80, 50, 40)
//directionalLight.target = mesh //设置光照对象,如果不设置,默认就是坐标原点
scene.add(directionalLight)
//可视化平行光
const dirLightHelper = new three.DirectionalLightHelper(directionalLight, 5)
// scene.add(dirLightHelper)

//画布宽高
const width = window.innerWidth
const height = window.innerHeight

//创建一个透视投影相机对象
const camera = new three.PerspectiveCamera(30, width / height, 0.1, 3000)
//相机的位置设置
camera.position.set(500, 500, 500)
//相机的视线 观察点的坐标,必须设置
camera.lookAt(mesh.position)

//实例化渲染器
const renderer = new three.WebGLRenderer({
    antialias: true //启用抗锯齿
});
renderer.setPixelRatio(window.devicePixelRatio)//告诉threejs你的屏幕像素比
renderer.setClearColor(0x444444)
renderer.setSize(width, height)//输出照片的宽高度
renderer.render(scene, camera) //执行渲染
document.body.append(renderer.domElement)

//周期性执行,默认理想状态下每秒钟执行60次
function render() {
    if (obj.bool) {
        mesh.rotateY(0.01)
    }
    renderer.render(scene, camera)//canvas画布上的内容
    requestAnimationFrame(render)
}
render()

//创建控制器
const controls = new OrbitControls(camera, renderer.domElement)
//添加change监听事件,然后重新用渲染器渲染页面
controls.addEventListener('change', () => {
    renderer.render(scene, camera)
})

window.onresize = function () {
    renderer.setSize(window.innerWidth, window.innerHeight)
    camera.aspect = window.innerWidth / window.innerHeight
    camera.updateProjectionMatrix() //相机属性发生变化,需要更新
}
gui.js库分组方法addFolder()
当gui交互界面需要控制的属性比较多的时候,为了避免混合,可适当分组管理,这样更加清晰。
new GUI()实例化一个gui对象,默认创建一个总裁单,通过gui对象的addFolder()方法可以创建一个子菜单,当你通过GUI控制的属性比较多的时候,可以使用addFolder()进行分组。
addFolder 返回的子文件夹对象,同样具有gui对象的add,onChange,addColor等属性。
close和open方法默认打开或者关闭。
const mat = gui.addFolder('材质')
mat.addColor(obj, 'color').onChange(value => {
    mesh.material.color.set(value)
})
scene.add(AmbientLight)

mat.add(obj, 'scale', [-100, 0, 100]).onChange(value => {
    mesh.position.y = value
})
mat.close()
const direction = gui.addFolder('方位')
direction.add(obj, 'scale', {
    left: -100,
    center: 0,
    right: 100
}).name('方位选择').onChange(value => {
    mesh.position.x = value
})
direction.add(obj, 'bool').onChange(value => {
    console.log(value);
})
direction.close()
同时addFolder存在嵌套写法,子菜单
const dirFolder = gui.addFolder('平行光')
const dirFolder2 = dirFolder.addFolder('位置')
语法总结:
关于material的属性,可以直接通过其属性名直接访问,设置需要通过set方法来执行,包括其他的对象属性都可以这样访问以及膝盖。
//读取属性值
console.log(material.color);
//设置属性值
const material = new three.MeshPhongMaterial({
    color: 0x00ff00,
    shininess: 30,//高光强度属性默认30
    specular: 0x444444, //默认是深灰色
});
material.transparent = 0.5
material.color = 0xffffff
几何体顶点位置数据和点模型对象points
缓冲类型几何体BufferGeometry
threejs的长方体BoxGeometry,球体SphereGeometry等几何体都是基于BufferGeometry类构建的,BufferGeometry是一个没有形状的空间几何,你可以通过BufferGeometry自定义任何几何形状,具体一点说就是定义顶点数据
定义几何体顶点数据
通过js类型化数组Float32Array创建一组xyz坐标数据用来表示集合体的顶点坐标。
//添加顶点数据
const vertices = new Float32Array([
    0,0,0,
    50,0,0,
    0,100,0,
    0,0,10,
    0,0,100,
    50,0,10
])通过threejs的属性缓冲对象BufferAttribute表示threejs几何体顶点数据,3个数据为一组。
//BufferAttribute属性缓冲对象表示顶点数据,3个数据为一组
const attribute = new three.BufferAttribute(vertices,3)
设置集合体顶点attributes.position
通过geometry.attributes.position设置几何体顶点位置属性的值BufferAttribute
//设置几何体的顶点位置属性
geometry.attributes.position = attribute
完整代码:
import * as three from 'three'
//创建一个空的几何体对象
const geometry = new three.BufferGeometry()
//添加顶点数据,类型化数组定义的一组顶点坐标数据
const vertices = new Float32Array([
    0,0,0,
    50,0,0,
    0,100,0,
    0,0,10,
    0,0,100,
    50,0,10
])
//BufferAttribute属性缓冲对象表示顶点数据,3个数据为一组
const attribute = new three.BufferAttribute(vertices,3)
//设置几何体的顶点位置属性
geometry.attributes.position = attribute
点模型
点模型Points和网格模型Mesh一样,都是threejs的一种模型对象,知识大部分情况下都是用Mesh表示物体。
网格模型Mesh都有自己对应的材质,同样点模型Points有自己对应的点材质PointsMaterial
import * as three from 'three'
//创建一个空的几何体对象
const geometry = new three.BufferGeometry()
//添加顶点数据,类型化数组定义的一组顶点坐标数据
const vertices = new Float32Array([
    0,0,0,
    50,0,0,
    0,100,0,
    0,0,10,
    0,0,100,
    50,0,10
])
//BufferAttribute属性缓冲对象表示顶点数据,3个数据为一组
const attribute = new three.BufferAttribute(vertices,3)
//设置几何体的顶点位置属性
geometry.attributes.position = attribute


//点材质
const material = new three.PointsMaterial({
    color:0xffff00,
    size:20
})

const points = new three.Points(geometry,material)


export default points
import { GUI } from 'three/addons/libs/lil-gui.module.min.js' //引入gui库
import * as three from 'three'
import { OrbitControls } from 'three/addons/controls/OrbitControls.js'
import model from './model.js'
const gui = new GUI()
//可以修改样式
gui.domElement.style.right = '0px'
gui.domElement.style.width = '300px'
//创建3维场景
const scene = new three.Scene()
// 添加物体
// 长方体,长宽高各50
scene.add(model)
//创建一个三维坐标轴
const axesHelper = new three.AxesHelper(200)
//坐标轴对象添加到场景中
scene.add(axesHelper)
//添加环境光
const AmbientLight = new three.AmbientLight(0xffffff, 0)
//环境光强度生成滑动组件
gui.add(AmbientLight, 'intensity', 0, 2).name('环境光强度').step(0.1).onChange((value) => {
console.log(value);
})
//添加平行光
const directionalLight = new three.DirectionalLight(0xffffff, 5)
directionalLight.position.set(80, 50, 40)
//directionalLight.target = mesh //设置光照对象,如果不设置,默认就是坐标原点
scene.add(directionalLight)
//可视化平行光
const dirLightHelper = new three.DirectionalLightHelper(directionalLight, 5)
// scene.add(dirLightHelper)
//画布宽高
const width = window.innerWidth
const height = window.innerHeight
//创建一个透视投影相机对象
const camera = new three.PerspectiveCamera(30, width / height, 0.1, 3000)
//相机的位置设置
camera.position.set(500, 500, 500)
//相机的视线 观察点的坐标,必须设置
camera.lookAt(0, 0, 0)
//实例化渲染器
const renderer = new three.WebGLRenderer({
antialias: true //启用抗锯齿
});
renderer.setPixelRatio(window.devicePixelRatio)//告诉threejs你的屏幕像素比
renderer.setClearColor(0x444444)
renderer.setSize(width, height)//输出照片的宽高度
renderer.render(scene, camera) //执行渲染
document.body.append(renderer.domElement)
//周期性执行,默认理想状态下每秒钟执行60次
function render() {
// mesh.rotateY(0.01)
renderer.render(scene, camera)//canvas画布上的内容
requestAnimationFrame(render)
}
render()
//创建控制器
const controls = new OrbitControls(camera, renderer.domElement)
//添加change监听事件,然后重新用渲染器渲染页面
controls.addEventListener('change', () => {
renderer.render(scene, camera)
})
window.onresize = function () {
renderer.setSize(window.innerWidth, window.innerHeight)
camera.aspect = window.innerWidth / window.innerHeight
camera.updateProjectionMatrix() //相机属性发生变化,需要更新
}线模型line渲染顶点数据
从第一个点开始到最后一个点,依次连成线。
import * as three from 'three'
//创建一个空的几何体对象
const geometry = new three.BufferGeometry()
//添加顶点数据,类型化数组定义的一组顶点坐标数据
const vertices = new Float32Array([
    0,0,0,
    50,0,0,
    0,100,0,
    0,0,10,
    0,0,100,
    50,0,10
])
//BufferAttribute属性缓冲对象表示顶点数据,3个数据为一组
const attribute = new three.BufferAttribute(vertices,3)
//设置几何体的顶点位置属性
geometry.attributes.position = attribute


//点材质
const material = new three.PointsMaterial({
    color:0xffff00,
    size:20
})

const points = new three.Points(geometry,material)


export default points
还包括LineLoop闭合线条,LineSegments非连续的线条(两两相连),区别在于绘制线条的规则不同。
const line = new three.LineLoop(geometry,material)//闭合线条

const line = new three.LineSegments(geometry,material)//非连续的线条
网格模型(三角形概念)
网格模型mesh其实就一个一个三角形面拼接而成的。
引入模块后直接添加到场景scene即可。
import triangle from './triangle.js'

scene.add(triangle)
import * as three from 'three'
//创建一个空的几何体对象
const geometry = new three.BufferGeometry()
//添加顶点数据,类型化数组定义的一组顶点坐标数据
const vertices = new Float32Array([
0,0,0,
50,0,0,
0,100,0,
0,0,10,
0,0,100,
50,0,10
])
//BufferAttribute属性缓冲对象表示顶点数据,3个数据为一组
const attribute = new three.BufferAttribute(vertices,3)
//设置几何体的顶点位置属性
geometry.attributes.position = attribute
//线材质
const material = new three.MeshBasicMaterial({
color:0x00ffff,
side:three.DoubleSide,
})
const mesh = new three.Mesh(geometry,material)
export default mesh正面:逆时针,反面:顺时针,默认正面可见,反面不可见。side取值:正面,反面,以及两面可见。
side:three.DoubleSide,
side:three.BackSide,
构建一个矩形平面几何体
只需要改下之前的坐标即可,两个三角形拼成一个矩形。
import * as three from 'three'
//创建一个空的几何体对象
const geometry = new three.BufferGeometry()
//添加顶点数据,类型化数组定义的一组顶点坐标数据
const vertices = new Float32Array([
    0,0,0,
    50,0,0,
    0,100,0,
    50,100,0,
    0,100,0,
    50,0,0
])
//BufferAttribute属性缓冲对象表示顶点数据,3个数据为一组
const attribute = new three.BufferAttribute(vertices,3)
//设置几何体的顶点位置属性
geometry.attributes.position = attribute


//线材质
const material = new three.MeshBasicMaterial({
    color:0x00ffff,
    side:three.DoubleSide,
})

const mesh = new three.Mesh(geometry,material)


export default mesh
几何体顶点索引数据
通过js类型化数组Uint16Array创建顶点索引index数据
//类型化数组创建顶点数据
const indexes = new Uint16Array([
    0,1,2,0,2,3
])
//几何体顶点索引的定义
geometry.index =new three.BufferAttribute(indexes,1)
import * as three from 'three'
//创建一个空的几何体对象
const geometry = new three.BufferGeometry()
//添加顶点数据,类型化数组定义的一组顶点坐标数据
const vertices = new Float32Array([
0,0,0,
50,0,0,
50,100,0,
0,100,0,
])
//BufferAttribute属性缓冲对象表示顶点数据,3个数据为一组
const attribute = new three.BufferAttribute(vertices,3)
//设置几何体的顶点位置属性
geometry.attributes.position = attribute
//类型化数组创建顶点数据
const indexes = new Uint16Array([
0,1,2,0,2,3
])
//几何体顶点索引的定义
geometry.index =new three.BufferAttribute(indexes,1)
//线材质
const material = new three.MeshBasicMaterial({
color:0x00ffff,
side:three.DoubleSide,
})
const mesh = new three.Mesh(geometry,material)
export default mesh顶点法线数据(geometry.attributes.normal)
无顶点索引,可以直接定义每个顶点的法向量,就像每个顶点都有一个位置数据,是一一对应的关系。
//无顶点索引时
const normals = new Float32Array([
    //法向量沿着z轴
    0,0,1, //顶点1法向量
    0,0,1, //顶点2法向量
    0,0,1, //顶点3法向量
    0,0,1, //顶点4法向量
    0,0,1, //顶点5法向量
    0,0,1, //顶点6法向量
])
geometry.attributes.normal = new three.BufferAttribute(normals,3)
import * as three from 'three'
//创建一个空的几何体对象
const geometry = new three.BufferGeometry()
//添加顶点数据,类型化数组定义的一组顶点坐标数据
const vertices = new Float32Array([
0,0,0,
50,0,0,
0,100,0,
50,100,0,
0,100,0,
50,0,0
])
//BufferAttribute属性缓冲对象表示顶点数据,3个数据为一组
const attribute = new three.BufferAttribute(vertices,3)
//设置几何体的顶点位置属性
geometry.attributes.position = attribute
//无顶点索引时
const normals = new Float32Array([
//法向量沿着z轴
0,0,1, //顶点1法向量
0,0,1, //顶点2法向量
0,0,1, //顶点3法向量
0,0,1, //顶点4法向量
0,0,1, //顶点5法向量
0,0,1, //顶点6法向量
])
geometry.attributes.normal = new three.BufferAttribute(normals,3)
//线材质
const material = new three.MeshLambertMaterial({
color:0x00ffff,
side:three.DoubleSide,
})
const mesh = new three.Mesh(geometry,material)
export default mesh有索引值的话,那么只需要添加对应的几个点的即可
import * as three from 'three'
//创建一个空的几何体对象
const geometry = new three.BufferGeometry()
//添加顶点数据,类型化数组定义的一组顶点坐标数据
const vertices = new Float32Array([
    0,0,0,
    50,0,0,
    50,100,0,
    0,100,0,
])
//BufferAttribute属性缓冲对象表示顶点数据,3个数据为一组
const attribute = new three.BufferAttribute(vertices,3)
//设置几何体的顶点位置属性
geometry.attributes.position = attribute
//无顶点索引时
const normals = new Float32Array([
    //法向量沿着z轴
    0,0,1, //顶点1法向量
    0,0,1, //顶点2法向量
    0,0,1, //顶点3法向量
    0,0,1, //顶点4法向量
])
geometry.attributes.normal = new three.BufferAttribute(normals,3)
//类型化数组创建顶点数据
const indexes = new Uint16Array([
    0,1,2,0,2,3
])
//几何体顶点索引的定义
geometry.index =new three.BufferAttribute(indexes,1)

//线材质
const material = new three.MeshLambertMaterial({
    color:0x00ffff,
    side:three.DoubleSide,
})

const mesh = new three.Mesh(geometry,material)


export default mesh
threejs自带几何体顶点结构,基类(父类)BufferGeometry
BufferGeometry是长方体,球体,等的共同父类。所以可以直接在BufferGeometry的属性里查找对应子类的属性,因为是继承关系。
材质属性wireframe
会被拆分成三角形,默认值为false
//线材质
const material = new three.MeshLambertMaterial({
    color:0x00ffff,
    side:three.DoubleSide,
    wireframe:true
})
几何细分数
widthSegments — (可选)平面的宽度分段数,默认值是1。
heightSegments — (可选)平面的高度分段数,默认值是1
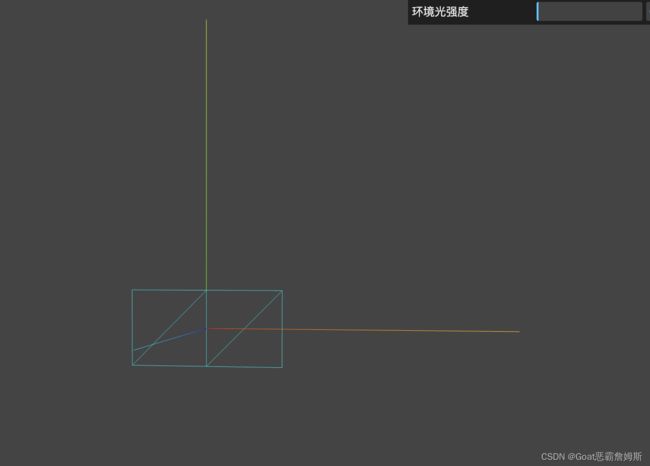
以矩型平面为例,至少要两个三角形拼接而成,把矩形一切为二,总共四个三角形
const geometry = new three.PlaneGeometry(100,50,2,1)const geometry = new three.PlaneGeometry(100,50,2,2)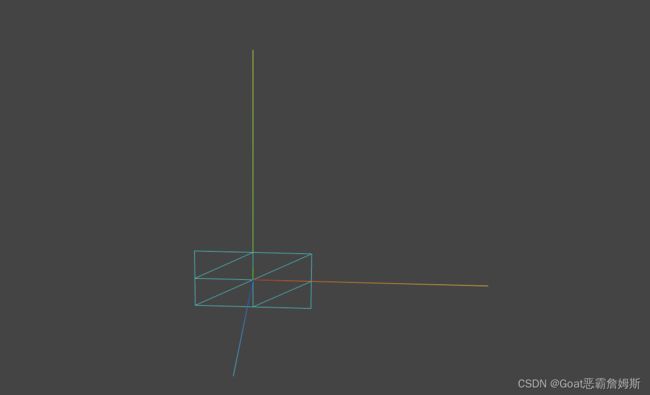 球体细分数
球体细分数
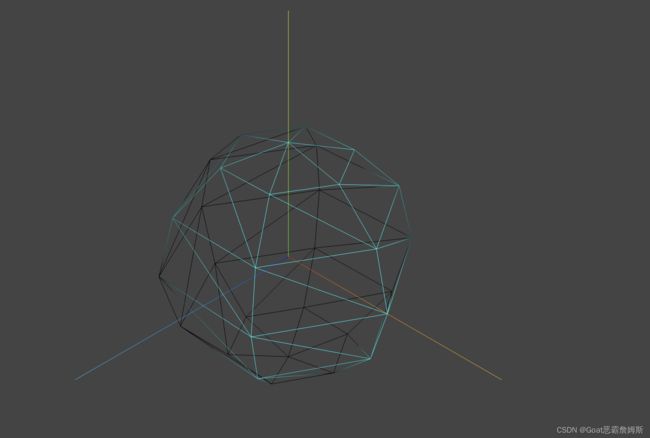
球体SphereGeometry参数2,3,分别代表宽高两个方向上的细分数,默认为32,16,具体多少按照试用版本看,如果球体细分数较低,表面就不会那么光滑。
import * as three from 'three'
//创建一个空的几何体对象
const geometry = new three.SphereGeometry(100,6,6)

const material = new three.MeshLambertMaterial({
    color:0x00ffff,
    side:three.DoubleSide,
    wireframe:true
})

const mesh = new three.Mesh(geometry,material)


export default mesh
BufferGeometry的旋转,缩放,平移方法
通过一下方法可以对几何体本身进行缩放,平移,旋转,这些方法的本质上都是改变几何体的顶点数据。
| 缩放 | scale() |
| 平移 | translate() |
| 绕x旋转 | rotateX() |
| 绕y旋转 | rotateY() |
| 绕z旋转 | rotateZ() |
| 居中 | center() |
import * as three from 'three'
//创建一个空的几何体对象
const geometry = new three.PlaneGeometry(50,50)

geometry.scale(2,2,2) //x,y,z变两倍
geometry.translate(50,0,0) //x轴平移50
// geometry.rotateX(Math.PI/4) //x轴旋转45
geometry.center()

//线材质
const material = new three.MeshLambertMaterial({
    color:0x00ffff,
    side:three.DoubleSide,
})

const mesh = new three.Mesh(geometry,material)


export default mesh
三维向量vector3与模型位置,缩放属性。
点模型,线模型,网格模型等模型对象的父类都是Object3D,对这些模型进行旋转,缩放,平移等操作。
三维向量
三维向量Vector有x,y,z三个分量,threejs中会用三维向量Vector3表示很多种数据
import * as three from 'three'
//创建一个空的几何体对象
const geometry = new three.BoxGeometry(50,50,50)

const material = new three.MeshLambertMaterial({
    color:0x00ffff,
    side:three.DoubleSide,
    transparent:true,
    opacity:0.5
})

const mesh = new three.Mesh(geometry,material)

const v3 =new three.Vector3(100,100,100)
v3.x=50
console.log(v3.x);
//mesh.position.set(100,0,0)
//也可以直接设置
mesh.position.x=100
mesh.scale.set(2,2,2)
mesh.scale.x=1
mesh.translateY(100) //本质改变的就是y的分量

const v = new three.Vector3(13,33,44)
v.normalize() //转化为单位向量
mesh.translateOnAxis(v,100)//自定义方向平移
export default mesh
注:对于自定义平移translateOnAxis,一定要将方向转化为单位向量。
v.normalize() //转化为单位向量角度属性rotation
这个属性是网格物体mesh的属性,模型的角度属性rotation和四元数属性quaternion都是表示模型的角度状态,只是表示的方法不同,rotation属性值是欧拉对象Euler,quaternion属性是四元数对象Quaternion。
创建欧拉对象
const eu = new three.Euler(0,Math.PI,0) //在x,y,z的旋转角度其中也还包括rotateX,rotateZ,rotateY方法
import * as three from 'three'
//创建一个空的几何体对象
const geometry = new three.BoxGeometry(50,50,50)

const material = new three.MeshLambertMaterial({
    color:0x00ffff,

})
const mesh = new three.Mesh(geometry,material)
//const eu = new three.Euler(0,Math.PI,0) //在x,y,z的旋转角度
mesh.rotation.y = Math.PI/4
mesh.rotateX(Math.PI/4)
export default mesh
旋转动画也可以换个写法
function render() {
    // test.rotateY(0.01)
    test.rotation.y+=0.01
    renderer.render(scene, camera)//canvas画布上的内容
    requestAnimationFrame(render)
}
render()
模型材质颜色(Color对象)
颜色对象有三个属性,r,g,b,表示颜色RGB的三个分量,默认值都为1,值在0~1之间。
setRGB,setStyle,set等,参考文档:http://www.yanhuangxueyuan.com/threejs/docs/index.html?q=color#api/zh/math/Color
const color = new three.Color()//默认是纯白色0xfffffff

const color = new three.Color(0x00ff00) //查看Color对象的rgb的值
import * as three from 'three'
//创建一个空的几何体对象
const geometry = new three.BoxGeometry(50,50,50)
const material = new three.MeshLambertMaterial({
color:0x00ffff,
})
console.log(material.color);
const color = new three.Color()
color.r = 0
color.setRGB(1,1,0)
color.setStyle("#fff")
color.set("#000")//可以八进制,也可以十六进制,rgb也可以
material.color = color
const mesh = new three.Mesh(geometry,material)
export default mesh材质父类Material
所有材质的父类Material,所有子类都会继承Material的属性及方法。material属性可以在初始化时参数中设置,也可以直接访问,或者改值。通过mesh网格物体对象也是可以访问修改geometry以及material的值。
mesh.material.color = color

mesh.geometry.translateY(20)
clone©
threejs有很多对象都是有clone和copy方法。(Vector,Material,mesh等)
const v1 = new three.Vector3(1,2,3)

const v2 = v1.clone()


const v3 = new three.Vector3(4,5,6)

v3.copy(v1)

mesh2 = mesh.clone()

mesh2.material = mesh.material.clone()

mesh2.positon.copy(mesh.position)

mesh2.rotation.copy(mesh.rotation)
Group层级模型
将几个网格模型放在一个group里面,在将group添加到scene场景中,构成层级模型。
import * as three from 'three'
//创建一个空的几何体对象
const geometry = new three.BoxGeometry(50,50,50)

const material = new three.MeshLambertMaterial({
    color:0x00ffff,
})
const mesh = new three.Mesh(geometry,material)
const mesh2 = new three.Mesh(geometry,material)
mesh2.translateX(70)

const group = new three.Group()
group.add(mesh,mesh2)
export default group
查看子对象
console.log(group.children)如果子对象想要做不同的操作,可以分别去写设置。如果整体操作,可以直接操作父对象即可
group.translateX(20)注:Object3D也可以用来当做Group使用,Group更加语义化,Object3D本身就是表示模型节点的意思,mesh也可以添加子对象,mesh和group父类都是object3D,本质上也可以认为都是Object3D。
import * as three from 'three'
//创建一个空的几何体对象
const geometry = new three.BoxGeometry(50,50,50)

const material = new three.MeshLambertMaterial({
    color:0x00ffff,
})
const mesh1 = new three.Mesh(geometry,material)
const mesh2 = new three.Mesh(geometry,material)
mesh2.translateX(70)

const group = new three.Mesh()
group.add(mesh1,mesh2)
group.translateX(20)
export default group
层级模型节点命名,查找,遍历
递归遍历
//递归遍历所有的模型节点
model.traverse((obj)=>{
    if(obj.isMesh){
        obj.material.color.set(0xffff00)
    }
})
查找某个具体的模型
threejs和前端dom一样,可以通过一个方法查找树结构父元素的某个后代对象,对于普通前端而言可以通过name或者id等方式查找一个或多个dom元素,threejs同样可以通过一些方法查找一个模型书中的某个节点。
//获取
const obj = model.getObjectByName('4号楼')
console.log(obj);
obj.material.color.set(0xff0000)
代码:
import * as three from 'three'


const group1 = new three.Group();
for (let i = 0; i < 5; i++) {
    const geometry = new three.BoxGeometry(25, 50, 50)
    const material = new three.MeshLambertMaterial({
        color: 0x00ffff,
    })
    const mesh = new three.Mesh(geometry, material)
    mesh.position.x = i * 30
    mesh.name = i + 1 + '号楼'
    group1.add(mesh)
}
group1.name = '高层'
const group2 = new three.Group();
for (let i = 0; i < 5; i++) {
    const geometry = new three.BoxGeometry(25, 25, 25)
    const material = new three.MeshLambertMaterial({
        color: 0x00ffff,
    })
    const mesh = new three.Mesh(geometry, material)
    mesh.position.x = i * 30
    mesh.name = i + 6 + '号楼'
    group2.add(mesh)
}
group2.position.z = 80
group2.name = '洋房'

const model = new three.Group()
model.name = '小区'
model.add(group1,group2)
//递归遍历所有的模型节点
model.traverse((obj)=>{
    if(obj.isMesh){
        obj.material.color.set(0xffff00)
    }
})
//获取
const obj = model.getObjectByName('4号楼')
console.log(obj);
obj.material.color.set(0xff0000)
export default model
本地坐标(局部)和世界坐标
改变子对象的position,子对象在3D空间中的坐标会发生变化。
改变父对象的position,子对象在3D空间中的位置也会跟着变化,也就是说父对象position和子对象position叠加才是子对象的position,可以理解为,子对象的位置是相对于父对象,不是相对于坐标轴。
任何一个模型的本地坐标(局部坐标)就是模型的positiion属性。
一个模型的世界坐标,就是模型资深position和所有父对象position累加的坐标。也就是相对坐标轴的坐标。可以理解为相对坐标和绝对坐标
获取世界坐标
mesh.getWorldPositiion(Vector3)import * as three from 'three'
//创建一个空的几何体对象
const geometry = new three.BoxGeometry(50,50,50)
const material = new three.MeshLambertMaterial({
color:0x00ffff,
})
const mesh = new three.Mesh(geometry,material)
const group = new three.Group()
group.add(mesh)
mesh.position.x = 50
group.position.x = 50
const v3 = new three.Vector3()
mesh.getWorldPosition(v3)
console.log(v3);
export default group给子坐标添加一个局部坐标系
mesh.add(坐标系) 给mesh添加一个局部坐标系。
import * as three from 'three'

//创建一个空的几何体对象
const geometry = new three.BoxGeometry(50,50,50)
const material = new three.MeshLambertMaterial({
    color:0x00ffff,
})
const mesh = new three.Mesh(geometry,material)
const group = new three.Group()
group.add(mesh)

const meshAxesHelper = new three.AxesHelper(50)
mesh.add(meshAxesHelper);

export default group
改变模型相对局部坐标原点的位置
通过改变几何体顶点坐标,可以改变模型自身相对坐标原点的位置。
import * as three from 'three'

//创建一个空的几何体对象
const geometry = new three.BoxGeometry(50,50,50)
const material = new three.MeshLambertMaterial({
    color:0x00ffff,
})
const mesh = new three.Mesh(geometry,material)

const group = new three.Group()
group.add(mesh)
group.translateX(100)
geometry.translate(25,0,0)
export default group
移除对象remove
与add方法相反,移除对象,将children属性添加或者移除。适用于scene,group等,也可以批量删除
group.remove(mesh,mesh2)模型隐藏或显示
Object3D 封装了visible属性,它和该子类通过该属性可以显示或隐藏一个模型。
mesh.visilble=false
group.visible =false
import * as three from 'three'
//创建一个空的几何体对象
const geometry = new three.BoxGeometry(50,50,50)
const material = new three.MeshLambertMaterial({
color:0x00ffff,
})
const mesh = new three.Mesh(geometry,material)
mesh.visible=false
export default mesh材质属性visible
Material封装了一个visible属性,通过该属性可以控制是否隐藏该材质对应的模型对象。
mesh.material.visibl=falseimport * as three from 'three'
//创建一个空的几何体对象
const geometry = new three.BoxGeometry(50,50,50)
const material = new three.MeshLambertMaterial({
color:0x00ffff,
})
const mesh = new three.Mesh(geometry,material)
material.visible=false
export default mesh注:如果一个网格材料不可见,那么所有使用它的网格模型都将不可见
创建纹理贴图
通过纹理贴图加载器TextureLoader的load方法加载一张图片可以返回一个纹理对象Texture,纹理对象Texture可以作为模型材质颜色贴图map属性的值
import * as three from 'three'

//创建一个空的几何体对象
const geometry = new three.SphereGeometry(50,50,50)
//创建一个纹理加载器对象
const loadTex = new three.TextureLoader()
const texture = loadTex.load('./earth.jpg')
const material = new three.MeshLambertMaterial({
    // color:0x00ffff,
    map:texture
})
//material.map = texture
const mesh = new three.Mesh(geometry,material)
export default mesh
自定义顶点UV坐标
顶点UV坐标的作用是从纹理贴图上提取像素映射到网格模型Mesh的几何体表面上。顶点UV坐标在0~1之间任意取值。可以理解为一张图,你可以自定义选择哪一块是你需要贴上去的。以下是用平面矩形为例。
import * as three from 'three'
//创建一个空的几何体对象
const geometry = new three.PlaneGeometry()
//添加顶点数据,类型化数组定义的一组顶点坐标数据
const vertices = new Float32Array([
    0,0,0,
    100,0,0,
    100,50,0,
    0,50,0,
])
//BufferAttribute属性缓冲对象表示顶点数据,3个数据为一组
const attribute = new three.BufferAttribute(vertices,3)
//设置几何体的顶点位置属性
geometry.attributes.position = attribute

//类型化数组创建顶点数据
const indexes = new Uint16Array([
    0,1,2,0,2,3
])
const uvs = new Float32Array([
    0,0,
    0.5,0,
    0.5,0.5,
    0,0.5
])

//几何体顶点索引的定义
geometry.index =new three.BufferAttribute(indexes,1)
//uv坐标,两个表示uv坐标
geometry.attributes.uv =new three.BufferAttribute(uvs,2)

//线材质
const material = new three.MeshBasicMaterial({
    // color:0x00ffff,
    side:three.DoubleSide,
})
const loadTex = new three.TextureLoader()
const texture = loadTex.load('./earth.jpg')
material.map = texture
const mesh = new three.Mesh(geometry,material)


export default mesh
圆形平面CircleGeometry设置纹理贴图
CirlceGeometry的UV坐标会对颜色纹理贴图map进行提取,CircleGeometry的UV坐标默认提取的就是一个圆形轮廓。
import * as three from 'three'

//创建一个空的几何体对象
const geometry = new three.CircleGeometry(50,100)
//创建一个纹理加载器对象
const loadTex = new three.TextureLoader()
const texture = loadTex.load('./earth.jpg')
const material = new three.MeshLambertMaterial({
    map:texture
})
console.log(geometry.attributes.uv)
const mesh = new three.Mesh(geometry,material)
export default mesh
纹理对象Texture阵列(瓷砖地面案例)
//设置阵列模式
texture.wrapS = three.RepeatWrapping
texture.wrapT = three.RepeatWrapping
//uv两个方向纹理重复数量
texture.repeat.set(30,30)
import * as three from 'three'
//创建一个空的几何体对象
const geometry = new three.PlaneGeometry(2000,2000)
//创建一个纹理加载器对象
const loadTex = new three.TextureLoader()
const texture = loadTex.load('./earth.jpg')
//设置阵列模式
texture.wrapS = three.RepeatWrapping
texture.wrapT = three.RepeatWrapping
//uv两个方向纹理重复数量
texture.repeat.set(30,30)
const material = new three.MeshLambertMaterial({
map:texture
})
const mesh = new three.Mesh(geometry,material)
export default mesh矩形Mesh+背景透明png贴图(场景标注)
把一个背景透明的png图片作为平面矩形网格模型mesh的颜色贴图,是一个非常有用的功能,通过这样的功能,可以对threejs三维场景进行标注。
创建一个矩形平面,设置颜色贴图map,注意选择背景透明的png图像作为颜色贴图,同时这只transparent:true,这样png图片背景完全透明的部分不显示 。
添加一个辅助网格地面
const gridHelper = new three.GridHelper(600,50,0x004444,0x004444)
scene.add(gridHelper)
参数:
size:坐标格尺寸,默认为10,
divisions:坐标格细分次数,默认为10,也就是每行有多少个
colorCenterLine:中线颜色,值可以为Color类型,16进制和css颜色名。默认为0x444444
colorGrid:坐标格网格线颜色,值可以为Color类型,16进制和css颜色名。默认为0x888888
import * as three from 'three'

//创建一个空的几何体对象
const geometry = new three.PlaneGeometry(100,100)
//创建一个纹理加载器对象
const loadTex = new three.TextureLoader()
const texture = loadTex.load('./touming.png')
const material = new three.MeshLambertMaterial({
    transparent:true,
    map:texture
})
const mesh = new three.Mesh(geometry,material)
mesh.position.y=1 //和xoz平面区分一下,不重合即可
mesh.rotateX(-Math.PI/2)//放在xoz上,绕x轴旋转-90度
export default mesh
UV动画(偏移属性offset)
纹理对象Texture的offset功能是偏移贴图在Mesh上的位置,本质上相当于修改了UV顶点坐标。
texture.offset.x+=0.5
texture.offset.y+=0.5
纹理wrapS或者wrapT与offset组合使用。
当你通过offset设置了纹理映射偏移后,是否把wrapS或者wrapT设置为重复映射模式RepeatingWrapping
wrapS:定义了纹理贴图在水平方向上将如何包裹,在UV映射中对应U,默认值是three.ClampToEdgeWrapping,即纹理边缘将被推导外部边缘的纹素,其他两个分别是three.RepeatWrapping和three.MirroredRepeatWrapping.
wrapT:定义了纹理贴图在垂直方向上将如何包裹,在UV映射中对应V
import * as three from 'three'

//创建一个空的几何体对象
const geometry = new three.PlaneGeometry(100,30)
//创建一个纹理加载器对象
const loadTex = new three.TextureLoader()
const texture = loadTex.load('./earth.jpg')
const material = new three.MeshLambertMaterial({
    map:texture
})
console.log(texture.offset);
texture.offset.x=-0.5 //修改x轴的UV坐标,多余的部分会被减掉,其他地方会空处理
// texture.offset.y=-0.5 //修改x轴的UV坐标,多余的部分会被减掉,其他地方会空处理
texture.wrapS=three.RepeatWrapping;
texture.repeat.x=10 //在x轴上的个数
const mesh = new three.Mesh(geometry,material)
mesh.rotateX(-Math.PI/2)//放在xoz上,绕x轴旋转-90度
export default mesh
//周期性执行,默认理想状态下每秒钟执行60次
function render() {
// test.rotateY(0.01)
test.material.map.offset.x+=0.01
// test.rotation.y+=0.01
renderer.render(scene, camera)//canvas画布上的内容
requestAnimationFrame(render)
}
render()建模软件绘制3D场景(比如Blender)
对于简单的立方体,球体等模型,可以通过threejs相关api快速实现,但是错综复杂的模型一般就要通过3D建模软件来实现,常见的有:Blender轻量开源,3dMx,C4D,maya等。
一般使用三维软件绘制3D模型,导出gltf等常见格式,然后通过程序加载解析三维软件绘制3维模型。比如使用blender导出gltf格式模型,然后通过threejs加载三维模型。
gltf格式是最新2015年发布的三维模型格式,随着物联网,webgl,5g的进一步发展,会有更多的互联网项目web端引入3D元素,你可以吧gltf格式的三维模型理解为jpg,png格式图片一样,现在的网站,图片基本是标配,对于以后的网站来说如果需要展示一个场景,使用3d来代替图片表达也是常见的。图片有很多格式,对于Web3D来说也一样,肯定会根据需要选择一个常见的格式,随时间的发展,gltf必然是一个极为重要的标准格式,其他的webgl三维引擎cesium,babylonjs都对gltf格式有良好的支持。
gltf就是通过JSON文件的方式以来记录模型的信息。有些gltf文件会关联一个或多个bin文件,斌文件以二进制形式存储了模型的顶点数据等信息,bin文件中的信息其实就是对应gltf文件中的buffers属性,buffers.bin中的模型数据,可以存储在gtlf文件中,也可以单独一个二进制bin文件。
二进制glb,gltf文件不一定就是以扩展名gltf结尾,glb就是gltf格式的二进制文件。比如你可以吧gtlf模型和贴图信息全部合成得到一个glb文件中,glb文件相对gltf文件体积更小,网络传输自然更快。
加载gltf文件
gltg模型加载器GLTFLoader.js
import * as three from 'three'
import { GLTFLoader } from "three/addons/loaders/GLTFLoader.js"


//实例化一个加载器对象
const loader = new GLTFLoader();
const model = new three.Group()

loader.load("./barrel_handpainted_free/scene.gltf",(gltf)=>{
    console.log(gltf);
    model.add(gltf.scene)
})


export default model
相机选择:
如果想要预览一个三维场景,一般有正投影相机和透视摄影相机可选择,大部分3D项目都是透视投影相机。如果你希望渲染的结果符合人眼的进校园大的规律,毫无疑问要选择透视相机。
相机的参数配置,根据自己的需求,来调整相机位置,达到需求效果,全貌或者部分展示。
对于相机的观察中心,需要使用lookAt来实现,与此同时控制器的target也要保持同一个坐标。可以参考模型的尺寸。
远裁界面参数
近裁界面near和远裁界面far,要能包含你想渲染的场景,否则超出的话会被裁掉,简单说就是near足够小,far足够大,主要是far。
纹理贴图颜色偏差解决
改变Webgl渲染器默认的编码方式outputEncoding即可
renderer.outputEncoding = three.sRGBEncoding;也可以通过OrbitControls来获取camera的位置坐标从而设置camera的position,因为OrbitControls的本质就是修改了camera的position。
const controls = new OrbitControls(camera, renderer.domElement)
controls.target.set(22,22,22)
controls.update()

//周期性执行,默认理想状态下每秒钟执行60次
function render() {
    // test.rotateY(0.01)
    // test.material.map.offset.x+=0.01
    // test.rotation.y+=0.01
    console.log(camera.position);
    renderer.render(scene, camera)//canvas画布上的内容
    requestAnimationFrame(render)
}
render()
gltf不同文件形式(.glb,贴图,bin)
单独gltf文件
单独glb文件
gltf+bin+贴图文件
这些不同形式的gltf模型,加载代码其实没啥区别
注:gltf模型的有些数据是可以单独存在的,比如纹理贴图单独存在,比如bin包含gltf的顶点数据。要注意的就是贴图等数据单独是一个文件的时候,不要随意改变子文件相对符文剑gltf的目录,避免找不到资源。
根据name获取模型节点
const nameNode = gltf.scene.getObjectByName('1号楼')
nameNode.material.color.set(0xff0000)//改变1号楼Mesh材质颜色
递归遍历底层模型修改材质
loader.load("./barrel_handpainted_free/scene.gltf",(gltf)=>{
    console.log(gltf);
    gltf.scene.getObjectByName('小区房子').traverse((obj)=>{
    if(obj.isMesh){
        obj.material = new three.MeshLambertMaterial({
            color:0xffffff
        })
    }
})
    model.add(gltf.scene)
})
外部模型材质是否共享的问题
const mesh1 = gltf.scene.getObjectByName('1号楼')
mesh1.material.name = '材质'
const mesh2 = gltf.scene.getObjectByName('1号楼')
console.log(mesh2.material.name) //如果也是 材质 则是共享了材质
解决办法:
loader.load("./barrel_handpainted_free/scene.gltf",(gltf)=>{
    gltf.scene.getObjectByName('小区房子').traverse((obj)=>{
    if(obj.isMesh){
        obj.material = obj.material.clone()
    }
})
    model.add(gltf.scene)
})
PBR
threejs提供了两个PBR材质相关的api MeshStandardMeterial和MeshPhysicalMaterial,MeshPhysicalMaterial是MeshStandardMeterial的扩展子类,提供了更多功能属性。基于物理的光照模型,能够提供更逼真的更接近生活材质效果,当然也会占用更多资源。
PBR材质金属度和粗糙度(金属效果)
金属度:metalness表示材质像金属的程度,非金属材料,如木材或石材,使用0.0,金属使用1.0。threejs的PBR材质,metalness默认是0.5,0.0~1.0之间的值可用于生锈金属外观。
参考文档:three.js docs
const material = new three.MeshStandardMaterial({
    metalness:1.0
})

material.metalness = 1.0
粗糙度:表示模型表面的光滑或者说粗糙程度,越光滑镜面反射能力越强,越粗糙,表面镜面反射能力越弱,更多表现为漫反射。0.0表示平滑的镜面反射,1.0表示完全漫反射,默认为0.5。
const material = new three.MeshStandardMaterial({
    roughness:1.0
})

material.roughness = 1.0
环境贴图envMap(金属效果)
环境贴图对PBR材质渲染效果影响还是比较大,一般PBR材质的模型,最好设置一个何时的环境贴图。
立方体纹理加载器CubeTextureLoader
立方体纹理加载器CubeTextureLoader.load方法施加在6张图片,返回一个立方体纹理对象CubeTexture,其父类对象是Texture,这个属性很有必要。
const loader = new GLTFLoader();
const textureCube = new three.CubeTextureLoader().setPath('./资源目录').load([
    '1.png','1.png','1.png','1.png','1.png','1.png'
])

loader.load("./barrel_handpainted_free/scene.gltf",(gltf)=>{
    gltf.scene.traverse((obj)=>{
    if(obj.isMesh){
        obj.envMap = textureCube //设置环境贴图属性为立方体纹理对象
    }
})
    model.add(gltf.scene)
})
环境贴图反射率
MeshStandardMaterial的envMapIntensity属性主要用于设置模型表面反射周围环境贴图的能力,或者说环境贴图对模型表面的影响能力。具体说envMapIntensity相当于环境贴图的系数,环境贴图像素值乘以该系数后,在用于影响模型表面。默认值为1(可以为20,30),设置为0相当于没有环境贴图。
const loader = new GLTFLoader();
const textureCube = new three.CubeTextureLoader().setPath('./资源目录').load([
    '1.png','1.png','1.png','1.png','1.png','1.png'
])

loader.load("./barrel_handpainted_free/scene.gltf",(gltf)=>{
    gltf.scene.traverse((obj)=>{
    if(obj.isMesh){
        obj.envMapIntensity =1.0 //设置环境贴图属性为立方体纹理对象
    }
})
    model.add(gltf.scene)
})
实际生活中光源照射到一个物体上,这个物体反射出去的光线也会影响其他的物体,环境贴图就是一种简单方式,近似模拟一个物体周边环境对物体表面的影响。
对于PBR材质,如果threejs三维场景不添加任何光源,物体就是完全黑色的,你可以不添加任何光源,尝试只使用环境贴图,你会发现物体表面的颜色也能看到,这说明环境贴图其实相当于提供了物体缓解经发射或反射的光线。这种情况下,即使没有光源也能够看到模型。
场景环境属性enviroment
网格模型可以通过材质的envMap属性设置环境贴图,如果一个gltf模型中所有的Mesh都要设置环境贴图就需要递归遍历gltf模型,给里面的每个Mesh的材质这只envMap,这样太麻烦了,我们可以设置场景中的enviroment属性来设置。
const textureCube = new three.CubeTextureLoader().setPath('./资源目录').load([
    '1.png','1.png','1.png','1.png','1.png','1.png'
])


scene.enviroment = textureCube
MeshPhysicalMaterial清漆层
作为MeshStandardMaterial的子类,除了继承MeshStandardMaterial的属性,还增加了清漆clearcoat,透光率transmission,反射率热饭了抽屉vit有,光泽sheen,折射率ior等等各种英语模拟生活中不同材质的属性。
清漆层clearcoat
清漆层属性clearcoat可以用来模拟物体表面一层透明图层,就好比你在物体表面刷了一层透明清漆,喷了点水,有倒影的感觉,取值0~1,默认0
const material = new three.MeshPhysicalMaterial({
    clearcoat:1.0 //物体表面清漆层或者说透明涂层的厚度
})
物理材质透光率transmission
为了更好的模拟玻璃,半透明塑料一类的视觉效果,可以使用物理透明度transmission属性代替Mesh普通透明度属性opacity。使用transmission属性设置Mesh透明度,即便完全透射的情况下仍可以保持高反射率。
物理光学透明度transmission的值范围是从0.0到1.0.默认值为0.0。
mesh.material = new three.MeshPhysicalMaterial({
    transmission:1
})
折射率ior
非金属材料的折射率从1.0~2.333。默认值为1.5
mesh.material = new three.MeshPhysicalMaterial({
    ior:1.5
})
实际开发中很多时候PBR材质属性都是在三维建模软件中设置的,然后通过gltf导出即可,这样就不需要再threejs代码设置。
有些三维建模不能导出pbr材质,或者部分pbr材质属性无法导出,那就需要用代码方式添加材质,这样就比较麻烦。
threejs在解析gltf模型会用PBR材质解析,如果MeshStandardMaterial可以,那么就用这个,如果不可以就用MeshPhysicalMaterial。比如clearcoat,transmission等属性,MeshStandardMaterial无法表达,那么只能使用MeshPhysicalMaterial。
实现canvas画布透明在页面上
只需要插入到对应的元素里即可
webgl.appendChild(renderer.domElement)threejs渲染结果保存为图片
配置webgl渲染器
//实例化渲染器
const renderer = new three.WebGLRenderer({
    antialias: true, //启用抗锯齿
    preserveDrawingBuffer:true
});
添加事件
download.onclick = function(){
    const link = document.createElement('a')
    const canvas = renderer.domElement
    link.href = canvas.toDataURL('image/png')
    link.download = 'threejs.png'
    link.click()
}
深度冲突(模型闪烁)
对于模型闪烁的原因就是深度冲突属性Z-fighting。问题就是两个mesh重合,电脑分不清楚谁在前谁在后,这种现象称为深度冲突。如果两个模型都很近,有间隔,但是也会有这种情况,因为计算机的精度识别能力有限。
当然透视投影机对距离影响(深度冲突),改变相机的position属性,你会发现距离三维模型较远的时候也会出现深度冲突,当然可以通过controls缩放功能,改变相机模型的距离进行观察。主要还是因为,远小近大的原因,距离远了尺寸越小,三维模型之间就无限的接近,所以就会有这种深度冲突。
webgl渲染器设置对数深度缓冲区
当一个三位场景中有一些面距离很近,有深度冲突,可以设置渲染器设置对数缓冲区logarithmicDepthBuffer:true作用来说,就是两个面间距比较小的时候,让threejs更容易区分两个面,谁在前谁在后。
const renderer = new three.WebGLRenderer({
    antialias: true, //启用抗锯齿
    preserveDrawingBuffer:true, //支持下载文件
    logarithmicDepthBuffer:true //优化深度冲突问题
})
import * as three from 'three'
//创建一个空的几何体对象
const geometry = new three.PlaneGeometry(100,100)
const geometry2 = new three.PlaneGeometry(80,80)
const material = new three.MeshLambertMaterial({
color:0xffffff,
side:three.DoubleSide
})
const mesh = new three.Mesh(geometry,material)
const material2 = new three.MeshLambertMaterial({
color:0xffff00,
side:three.DoubleSide
})
const mesh2 = new three.Mesh(geometry2,material2)
mesh2.position.z=0.01
const group = new three.Group()
group.add(mesh,mesh2)
export default group注:但是即便如此,也是优化功能,也不是能够完全解决,当两个面间隙过小或者重合也是没有用的。
模型加载进度条
web3d可视化项目开发,很多时候,3d模型的大小要比普通前端项目文件大得多,这是往往需要设置一个进度条,表示模型加载的进度。如何获取百分比呢?
import * as three from 'three'
import { GLTFLoader } from "three/addons/loaders/GLTFLoader.js"


//实例化一个加载器对象
const loader = new GLTFLoader();
const model = new three.Group()

loader.load("./barrel_handpainted_free/scene.gltf",(gltf)=>{
    console.log(gltf);
    model.add(gltf.scene)
},xhr=>{
    const percent = xhr.loaded/xhr.total //加载百分比
})


export default model
后处理(高光发亮描边OutlinePass)
threejs提供了一个扩展库EffectComposer.js,通过EffectComposer可以实现一些后期处理效果。
OutlinePass.js:高亮发光描边。
UnrealBloomPass.js:Bloom发光
GlitchPass.js:画面抖动效果
在examples/jsm/postprocessing/找到并引入。
创建处理后对象EffectComposer
import { EffectComposer } from 'three/addons/postprocessing/EffectComposer.js'

//创建处理后对象EffectComposer,webgl渲染器作为参数
const composer = new EffectComposer(renderer)
scene.add(composer)
引入渲染器通道
通过EffectComposer(renderer)指定了需要后处理的渲染器WebGLRender,渲染器通道RenderPass的作用是指定后处理对应的相机camera和场景scene。
import { EffectComposer } from 'three/addons/postprocessing/EffectComposer.js'
import { RenderPass } from 'three/addons/postprocessing/RenderPass.js'

//创建处理后对象EffectComposer,webgl渲染器作为参数
const composer = new EffectComposer(renderer)
//创建一个渲染器通道,场景和相机作为参数
const renderPass = new RenderPass(scene,camera)
composer.addPass(renderPass)
OutlinePass通道
可以给指定的饿某个模型对象添加一个高亮发光描边效果。
import { EffectComposer } from 'three/addons/postprocessing/EffectComposer.js'
import { RenderPass } from 'three/addons/postprocessing/RenderPass.js'
import { OutlinePass } from 'three/addons/postprocessing/OutlinePass.js'

//创建处理后对象EffectComposer,webgl渲染器作为参数
const composer = new EffectComposer(renderer)
//创建一个渲染器通道,场景和相机作为参数
const renderPass = new RenderPass(scene,camera)
composer.addPass(renderPass)
// 创建OutlinePass通道,第一个参数v2尺寸和canvas画布保持一致
const v2 = new three.Vector2(window.innerWidth,window.innerHeight)
const outlinePass = new OutlinePass(v2,scene,camera)
OutlinePass属性selectedObjects
threejs场景有多个模型,你希望给那个模型设置发光描边,可以通过这个属性设置。
import { EffectComposer } from 'three/addons/postprocessing/EffectComposer.js'
import { RenderPass } from 'three/addons/postprocessing/RenderPass.js'
import { OutlinePass } from 'three/addons/postprocessing/OutlinePass.js'

//创建处理后对象EffectComposer,webgl渲染器作为参数
const composer = new EffectComposer(renderer)
//创建一个渲染器通道,场景和相机作为参数
const renderPass = new RenderPass(scene,camera)
composer.addPass(renderPass)
// 创建OutlinePass通道,第一个参数v2尺寸和canvas画布保持一致
const v2 = new three.Vector2(window.innerWidth,window.innerHeight)
const outlinePass = new OutlinePass(v2,scene,camera)
outlinePass.selectedObjects=[test] //可以写多个
composer.addPass(outlinePass)

//周期性执行,默认理想状态下每秒钟执行60次
function render() {
    composer.render() //代替renderer的render方法
    // renderer.render(scene, camera)//canvas画布上的内容
    requestAnimationFrame(render)
}
代码:
import { GUI } from 'three/addons/libs/lil-gui.module.min.js' //引入gui库
import * as three from 'three'
import { OrbitControls } from 'three/addons/controls/OrbitControls.js'
import { EffectComposer } from 'three/addons/postprocessing/EffectComposer.js'
import { RenderPass } from 'three/addons/postprocessing/RenderPass.js'
import { OutlinePass } from 'three/addons/postprocessing/OutlinePass.js'
import test from './test.js'

const gui = new GUI()
//可以修改样式
gui.domElement.style.right = '0px'
gui.domElement.style.width = '300px'

//创建3维场景
const scene = new three.Scene()

// 添加物体
// 长方体,长宽高各50
scene.add(test)

//创建一个三维坐标轴
const axesHelper = new three.AxesHelper(200)
//坐标轴对象添加到场景中
scene.add(axesHelper)

//创建一个辅助网格地面
// const gridHelper = new three.GridHelper(600,50,0x004444,0x004444)
// scene.add(gridHelper)

//添加环境光
const AmbientLight = new three.AmbientLight(0xffffff, 0.5)
//环境光强度生成滑动组件
gui.add(AmbientLight, 'intensity', 0, 2).name('环境光强度').step(0.1).onChange((value) => {
})
scene.add(AmbientLight)
//添加平行光
const directionalLight = new three.DirectionalLight(0xffffff, 1)
directionalLight.position.set(80, 50, 40)
//directionalLight.target = mesh //设置光照对象,如果不设置,默认就是坐标原点
scene.add(directionalLight)
//可视化平行光
const dirLightHelper = new three.DirectionalLightHelper(directionalLight, 5)
// scene.add(dirLightHelper)

//画布宽高
const width = window.innerWidth
const height = window.innerHeight

//创建一个透视投影相机对象
const camera = new three.PerspectiveCamera(30, width / height, 0.1, 3000)
//相机的位置设置
camera.position.set(500, 500, 500)
//相机的视线 观察点的坐标,必须设置
camera.lookAt(0, 0, 0)

//实例化渲染器
const renderer = new three.WebGLRenderer({
    antialias: true, //启用抗锯齿
    preserveDrawingBuffer:true, //支持下载文件
    logarithmicDepthBuffer:true //优化深度冲突问题
});
renderer.setPixelRatio(window.devicePixelRatio)//告诉threejs你的屏幕像素比
renderer.setClearColor(0x444444)
renderer.setSize(width, height)//输出照片的宽高度
renderer.render(scene, camera) //执行渲染
document.body.append(renderer.domElement)

//创建处理后对象EffectComposer,webgl渲染器作为参数
const composer = new EffectComposer(renderer)
//创建一个渲染器通道,场景和相机作为参数
const renderPass = new RenderPass(scene,camera)
composer.addPass(renderPass)
// 创建OutlinePass通道,第一个参数v2尺寸和canvas画布保持一致
const v2 = new three.Vector2(window.innerWidth,window.innerHeight)
const outlinePass = new OutlinePass(v2,scene,camera)
outlinePass.selectedObjects=[test] //可以写多个
composer.addPass(outlinePass)


//周期性执行,默认理想状态下每秒钟执行60次
function render() {
    composer.render()
    // renderer.render(scene, camera)//canvas画布上的内容
    requestAnimationFrame(render)
}
render()

//创建控制器
const controls = new OrbitControls(camera, renderer.domElement)
//添加change监听事件,然后重新用渲染器渲染页面
controls.addEventListener('change', () => {
    renderer.render(scene, camera)
})

window.onresize = function () {
    renderer.setSize(window.innerWidth, window.innerHeight)
    camera.aspect = window.innerWidth / window.innerHeight
    camera.updateProjectionMatrix() //相机属性发生变化,需要更新
}
Raycaster(鼠标点击选中模型)
实际开发中,射线投射器Raycaster会经常使用到,通过其拾取网格模型,被拾取到的网格模型改变颜色。
坐标转化(屏幕坐标转标准设备坐标)
addEventListener('click',function(e){
    //屏幕坐标
    const px = e.offsetX
    const py = e.offsetY
    // 转canvas画布宽高
    const x = (px/width)*2 -1
    const y = -(py/height)*2 +1
})
计算射线(setFromCamera)
把鼠标单机位置和相机作为setFromCamera方法的参数,会计算射线投射器的射线属性ray,简单来说就是在点击位置创建一条射线,用来拾取模型对象。
addEventListener('click',function(e){
    //屏幕坐标
    const px = e.offsetX
    const py = e.offsetY
    // 转canvas画布宽高
    const x = (px/width)*2 -1
    const y = -(py/height)*2 +1
    //创建一个射线投射器raycaster
    const raycaster = new three.Raycaster()
    raycaster.setFromCamera(new three.Vector2(x,y),camera)
})
射线投射器Raycaster具有一个射线属性ray,该属性的值就是上节课讲解的射线对象Ray。
射线交叉计算(intersectObjects()方法)
addEventListener('click',function(e){
    //屏幕坐标
    const px = e.offsetX
    const py = e.offsetY
    // 转canvas画布宽高
    const x = (px/width) * 2 -1
    const y = -(py/height)*2 +1
    //创建一个射线投射器raycaster
    const raycaster = new three.Raycaster()
    raycaster.setFromCamera(new three.Vector2(x,y),camera)
    //获取被射线穿过的模型对象
    const intersects = raycaster.intersectObjects([test]);
    //找到对应的模型,然后改变材质颜色
    if(intersects.length>0){
        intersects[0].object.material.color.set(0xff0000)
    }
})
代码:
import { GUI } from 'three/addons/libs/lil-gui.module.min.js' //引入gui库
import * as three from 'three'
import { OrbitControls } from 'three/addons/controls/OrbitControls.js'
import { EffectComposer } from 'three/addons/postprocessing/EffectComposer.js'
import { RenderPass } from 'three/addons/postprocessing/RenderPass.js'
import { OutlinePass } from 'three/addons/postprocessing/OutlinePass.js'
import model from './model.js'
import line from './line.js'
import triangle from './triangle.js'
import rect from './rect.js'
import Sphere from './Sphere.js'
import test from './test.js'

const gui = new GUI()
//可以修改样式
gui.domElement.style.right = '0px'
gui.domElement.style.width = '300px'

//创建3维场景
const scene = new three.Scene()

// 添加物体
// 长方体,长宽高各50
scene.add(test)

//创建一个三维坐标轴
const axesHelper = new three.AxesHelper(200)
//坐标轴对象添加到场景中
scene.add(axesHelper)

//创建一个辅助网格地面
// const gridHelper = new three.GridHelper(600,50,0x004444,0x004444)
// scene.add(gridHelper)

//添加环境光
const AmbientLight = new three.AmbientLight(0xffffff, 0.5)
//环境光强度生成滑动组件
gui.add(AmbientLight, 'intensity', 0, 2).name('环境光强度').step(0.1).onChange((value) => {
})
scene.add(AmbientLight)
//添加平行光
const directionalLight = new three.DirectionalLight(0xffffff, 1)
directionalLight.position.set(80, 50, 40)
//directionalLight.target = mesh //设置光照对象,如果不设置,默认就是坐标原点
scene.add(directionalLight)
//可视化平行光
const dirLightHelper = new three.DirectionalLightHelper(directionalLight, 5)
// scene.add(dirLightHelper)

//画布宽高
const width = window.innerWidth
const height = window.innerHeight

//创建一个透视投影相机对象
const camera = new three.PerspectiveCamera(30, width / height, 0.1, 3000)
//相机的位置设置
camera.position.set(500, 500, 500)
//相机的视线 观察点的坐标,必须设置
camera.lookAt(0, 0, 0)

//实例化渲染器
const renderer = new three.WebGLRenderer({
    antialias: true, //启用抗锯齿
    preserveDrawingBuffer:true, //支持下载文件
    logarithmicDepthBuffer:true //优化深度冲突问题
});
renderer.setPixelRatio(window.devicePixelRatio)//告诉threejs你的屏幕像素比
renderer.setClearColor(0x444444)
renderer.setSize(width, height)//输出照片的宽高度
renderer.render(scene, camera) //执行渲染
document.body.append(renderer.domElement)

//创建处理后对象EffectComposer,webgl渲染器作为参数
const composer = new EffectComposer(renderer)
//创建一个渲染器通道,场景和相机作为参数
const renderPass = new RenderPass(scene,camera)
composer.addPass(renderPass)
// 创建OutlinePass通道,第一个参数v2尺寸和canvas画布保持一致
const v2 = new three.Vector2(window.innerWidth,window.innerHeight)
const outlinePass = new OutlinePass(v2,scene,camera)
outlinePass.selectedObjects=[test] //可以写多个
composer.addPass(outlinePass)


//周期性执行,默认理想状态下每秒钟执行60次
function render() {
    // test.rotateY(0.01)
    // test.material.map.offset.x+=0.01
    // test.rotation.y+=0.01
    composer.render()
    // renderer.render(scene, camera)//canvas画布上的内容
    requestAnimationFrame(render)
}
render()

//创建控制器
const controls = new OrbitControls(camera, renderer.domElement)
//添加change监听事件,然后重新用渲染器渲染页面
controls.addEventListener('change', () => {
    renderer.render(scene, camera)
})
addEventListener('click',function(e){
    //屏幕坐标
    const px = e.offsetX
    const py = e.offsetY
    // 转canvas画布宽高
    const x = (px/width) * 2 -1
    const y = -(py/height)*2 +1
    //创建一个射线投射器raycaster
    const raycaster = new three.Raycaster()
    raycaster.setFromCamera(new three.Vector2(x,y),camera)
    //获取被射线穿过的模型对象
    const intersects = raycaster.intersectObjects([test]);
    //找到对应的模型,然后改变材质颜色
    if(intersects.length>0){
        intersects[0].object.material.color.set(0xff0000)
    }
})
window.onresize = function () {
    renderer.setSize(window.innerWidth, window.innerHeight)
    camera.aspect = window.innerWidth / window.innerHeight
    camera.updateProjectionMatrix() //相机属性发生变化,需要更新
}
import * as three from 'three'
//创建一个空的几何体对象
const geometry = new three.BoxGeometry(100,100,100)
const material = new three.MeshLambertMaterial({
color:0xfff00,
})
const mesh = new three.Mesh(geometry,material)
const group = new three.Group()
group.add(mesh)
export default groupthreejs就先介绍到这里,其他的功能可以参考官网
