【SpringBoot】SpringBoot学习笔记——应用开发
文章目录
- 3. 应用开发
-
- 3.1 文件上传与下载
-
- 3.1.1 单文件上传
- 3.1.2 多文件上传
- 3.1.3 文件下载
- 3.2 定时器
-
- 3.2.1 Task
- 3.2.2 Quartz
- 3.3 SpringBoot发送Email
-
- 3.3.1 发送邮件需要的配置
- 3.3.2 使用SpringBoot发送邮件
3. 应用开发
3.1 文件上传与下载
SpringBoot没有自己的文件上传与下载技术,它依赖于Spring MVC的文件上传与下载技术,只不过在SpringBoot中做了更一步的简化,更为方便。
3.1.1 单文件上传
上传文件必须将表单method设置为POST,并将enctype设置为multipart/form-data。只有这样,浏览器才会把用户所选文件的二进制数据发送给服务器。Spring MVC在文件上传时,会将上传的文件映射为MultipartFile对象,并对MultipartFile对象进行文件的解析和保存。
MultipartFile接口有以下几个常用方法:
- byte[]getBytes():获取文件数据。
- String getContentType():获取文件MIME类型,如application/pdf、image/pdf等。
- InputStream getInputStream ():获取文件流。
- String get()riginalFileName():获取上传文件的原名称。
- long getSize():获取文件的字节大小,单位为Byte。
- boolean isEmpty():是否有上传的文件。
- void transfrtTO(File dest):将上传的文件保存到一个目标文件中。
首先创建一个SpringBoot项目并添加spring-boot-starter-web依赖。然后在src/main/resources目录下的static目录下新建upload.html文件:
DOCTYPE html>
<html>
<head>
    <meta http-equiv="Content-type" content="text/html; charset=UTF-8">
    <meta http-equiv="X-UA-Compatible" content="IE=edge,chrome=1"/>
    <title>单文件上传title>
head>
<body>
<form method="post" action="/file/upload" enctype="multipart/form-data">
    <input type="file" name="file">
    <input type="submit" value="提交">
form>
body>
html>
接下来在application.yml文件中添加如下配置:
server:
  port: 8080

spring:
  servlet:
    multipart:
      enabled: true
      #最大支持文件大小
      max-file-size: 100MB
      #最大支持请求大小
      max-request-size: 100MB
接下来创建文件上传的处理接口FileController类:
package com.shenziyi.demo.controller;

import org.springframework.beans.factory.annotation.Value;
import org.springframework.stereotype.Controller;
import org.springframework.web.bind.annotation.*;
import org.springframework.web.multipart.MultipartFile;
import org.springframework.web.multipart.MultipartHttpServletRequest;

import javax.servlet.http.HttpServletRequest;
import javax.servlet.http.HttpServletResponse;
import java.io.*;
import java.net.URLEncoder;
import java.nio.file.Files;
import java.nio.file.Path;
import java.nio.file.Paths;
import java.util.List;
import java.util.UUID;
@Controller
@RequestMapping("/file/")
public class FileController {
    /*单文件上传*/
    @RequestMapping("upload")
    @ResponseBody
    public String upload (@RequestParam("file") MultipartFile file) {
        // 获取原始名字
        String fileName = file.getOriginalFilename();
        // 文件保存路径
        String filePath = "d:/file/";
        // 文件重命名,防止重复
        fileName = filePath + UUID.randomUUID() + fileName;
        // 文件对象
        File dest = new File(fileName);
        // 判断路径是否存在,如果不存在则创建
        if(!dest.getParentFile().exists()) {
            dest.getParentFile().mkdirs();
        }
        try {
            // 保存到服务器中
            file.transferTo(dest);
            return "上传成功";
        } catch (Exception e) {
            e.printStackTrace();
        }
        return "上传失败";
    }
}
项目启动后,在浏览器输入http://localhost:8080/upload.html进行文件上传。
3.1.2 多文件上传
多个文件上传与单个文件上传方法基本一致,只是在控制器中多一个遍历的步骤。首先在upload.html中添加多文件上传代码:
<p>多文件上传p>
<form method="POST" enctype="multipart/form-data" action="/file/uploads">

    <p>文件:<input type="file" multiple name="file" />p>
    <p><input type="submit" value="上传" />p>
form>
然后在后台控制器中添加多文件上传的逻辑代码:
/*多文件上传*/
    @PostMapping("/uploads")
    @ResponseBody
    public String handleFileUpload(HttpServletRequest request) {
        List<MultipartFile> files = ((MultipartHttpServletRequest) request)
                .getFiles("file");
        MultipartFile file = null;
        for (int i = 0; i < files.size(); ++i) {
            file = files.get(i);
            if (!file.isEmpty()) {
                try {
                    // 获取原始名字
                    String fileName = file.getOriginalFilename();
                    // 文件保存路径
                    String filePath = "d:/file/";
                    // 文件重命名,防止重复
                    fileName = filePath + UUID.randomUUID() + fileName;
                    // 文件对象
                    File dest = new File(fileName);
                    // 保存到服务器中
                    file.transferTo(dest);
                } catch (Exception e) {
                    e.printStackTrace();
                    return "上传失败";
                }
            }else {
                return "上传失败";
            }
        }
        return "上传成功";
    }
这样就可以实现多个文件同时上传。
3.1.3 文件下载
文件下载,这个时候就不需要创建html文件了,可以直接输入网址进行下载,核心代码如下:
@RequestMapping("download")
    public void download(HttpServletResponse response) throws Exception {
        // 文件地址,真实环境是存放在数据库中的
        String filename="a.txt";
        String filePath = "D:/file" ;
        File file = new File(filePath + "/" + filename);
        // 创建输入对象
        FileInputStream fis = new FileInputStream(file);
        // 设置相关格式
        response.setContentType("application/force-download");
        // 设置下载后的文件名以及header
        response.setHeader("Content-Disposition", "attachment;fileName=" +filename);
        // 创建输出对象
        OutputStream os = response.getOutputStream();
        // 常规操作
        byte[] buf = new byte[1024];
        int len = 0;
        while((len = fis.read(buf)) != -1) {
            os.write(buf, 0, len);
        }
        fis.close();
    }
启动项目,在地址栏输入http://localhost:8080/file/download发现可以下载。(但是我又寄了)
3.2 定时器
定时任务在企业开发中尤其重要,很多业务都需要定时任务去完成。例如10点开售某件商品,凌晨0点统计注册人数,以及统计其他各种信息等。这个时候不可能人为去开启某个开关或者人为去统计某些数据。
SpringBoot定时器的使用一般有以下几种实现方式:
- Timer:这时Java自带的java.util.Timer类,这个类允许调度一个java.util.TimerTask任务。使用这种方式可以让程序按照某一频率执行,但不能在指定时间运行,一般用的少。
- ScheduledExecutorService:jdk自带的一个类,是基于线程池设计的定时任务类,每个调度任务都会分配到线程池中的一个线程去执行,也就是说任务是并发执行的。它们之间互不影响。
- SpringTask:Spring3.0以后自带的Task,可以将它看成一个轻量级的Quartz,而且使用起来比Quartz简单许多。
- Quartz:这是一个功能比较强大的调度器,可以让程序在指定时间执行,也可以按照某一个频率执行,配置起来略显复杂。
简单的定时任务可以直接通过Spring自带的task实现,复杂的定时任务可以通过集成的Quartz实现。
3.2.1 Task
-
创建工程
首先创建一个SpringBoot Web工程项目。
-
开启定时任务
在启动类添加@EnableScheduling注解,开启对定时任务的支持:
package com.shenziyi.demo; import org.springframework.boot.SpringApplication; import org.springframework.boot.autoconfigure.SpringBootApplication; import org.springframework.scheduling.annotation.EnableScheduling; @SpringBootApplication @EnableScheduling public class DemoApplication { public static void main(String[] args) { SpringApplication.run(DemoApplication.class, args); } } -
设置定时任务
定时任务主要通过@Scheduled注解来实现:
@Component
public class ScheduledTask{
    private Logger log=LoggeerFactory.getLogger(ScheduledTask.class);
    @Scheduled(cron="0 0/1 * * * ?")
    public void testOne(){
        log.info("每分钟执行一次");
    }

    @Scheduled(fixedRate=30000)
    public void testTwo(){
        log.info("每30s执行一次");
    }

    @Scheduled(cron="0 0 1  * * ?")//表示每天凌晨一点执行
    public void initTask(){
        log.info("执行任务"+new Date());
    }
}
配置完成后启动SpringBoot项目,观察控制台日志打印信息,如下:
- cronExpression表达式
参考:https://www.cnblogs.com/pipi-changing/p/5697481.html
3.2.2 Quartz
SpringBoot可以使用Quartz实现定时器的功能,是一个完全由Java编写的开源任务调度框架,通过触发器设置作业定时运行规则、控制作业的运行时间。Quartz定时器作用有很多,例如定时发送信息、定时生成报表等。
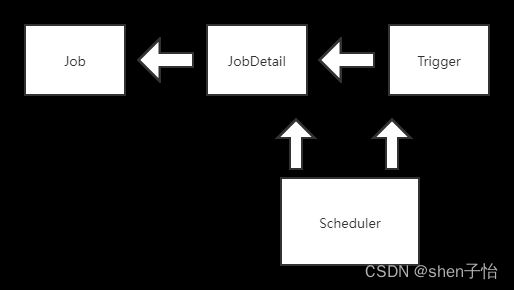
Quartz框架主要核心组件包括调度器、触发器、作业。调度器作为作业的总指挥,触发器作为作业的操作者,作业作为应用的功能模块,组件之间的关系如下所示:

- Job表示一个任务(工作),要执行的具体内容。
- JobDetail表示一个具体的可执行的调度程序,Job是这个可执行调度程序所要执行的内容,另外JobDetail还包含了这个任务调度的方案和策略。告诉调度器将来执行哪个类(job)的哪个方法。
- Trigger是一个类,代表一个调度参数的配置,描述触发Job执行的时间及触发规则。一个Job可以对应多个Trigger,但一个Trigger只能对应一个Job。
- Scheduler代表一个调度容器,一个调度容器中可以注册多个JobDetail和Trigger。Scheduler可以将Trigger绑定到某一个JobDetail中,这样当Trigger触发时,对应的Job就会执行。
当JobDetail和Trigger在Scheduler容器上注册后,形成了装配好的作业(JobDetail和Trigger所组成的一对),这样就可以伴随容器启动而调度执行了。
添加Quartz依赖:
        <dependency>
            <groupId>org.quartz-schedulergroupId>
            <artifactId>quartzartifactId>
            <version>2.2.1version>
        dependency>

        <dependency>
            <groupId>org.springframeworkgroupId>
            <artifactId>spring-context-supportartifactId>
        dependency>

        <dependency>
            <groupId>org.springframeworkgroupId>
            <artifactId>spring-txartifactId>
        dependency>
任务执行类(任务执行,并且通过控制器的接口实现时间间隔的动态修改任务类):
package com.shenziyi.demo.timerset;


import org.springframework.context.annotation.Configuration;
import org.springframework.scheduling.annotation.EnableScheduling;
import org.springframework.stereotype.Component;

import java.text.SimpleDateFormat;
import java.util.Date;

@Configuration
@Component
@EnableScheduling
public class JobTask {
    public void start() throws InterruptedException {
        SimpleDateFormat format=new SimpleDateFormat("yyyy-MM-dd HH:mm:ss");
        System.err.println("定时任务开始执行。"+format.format(new Date()));
    }
}
Quartz的详细配置类:
package com.shenziyi.demo.timerset;


import org.quartz.Trigger;
import org.springframework.context.annotation.Bean;
import org.springframework.context.annotation.Configuration;
import org.springframework.scheduling.quartz.CronTriggerFactoryBean;
import org.springframework.scheduling.quartz.MethodInvokingJobDetailFactoryBean;
import org.springframework.scheduling.quartz.SchedulerFactoryBean;

@Configuration
public class QuartzConfigration {
    @Bean(name = "jobDetail")
    public MethodInvokingJobDetailFactoryBean detailFactoryBean(JobTask task) {
        // ScheduleTask为需要执行的任务
        MethodInvokingJobDetailFactoryBean jobDetail = new MethodInvokingJobDetailFactoryBean();
        /*
         *  是否并发执行
         *  例如每3s执行一次任务,但是当前任务还没有执行完,就已经过了3s了.
         *  如果此处为true,则下一个任务会bing执行,如果此处为false,则下一个任务会等待上一个任务执行完后,再开始执行
         */
        jobDetail.setConcurrent(true);
        jobDetail.setName("scheduler");// 设置任务的名字
        jobDetail.setGroup("scheduler_group");// 设置任务的分组,这些属性都可以存储在数据库中,在多任务的时候使用

        /*
         * 这两行代码表示执行task对象中的scheduleTest方法。定时执行的逻辑都在scheduleTest。
         */
        jobDetail.setTargetObject(task);
        jobDetail.setTargetMethod("start");
        return jobDetail;
    }

    @Bean(name = "jobTrigger")
    public CronTriggerFactoryBean cronJobTrigger(MethodInvokingJobDetailFactoryBean jobDetail) {
        CronTriggerFactoryBean tigger = new CronTriggerFactoryBean();
        tigger.setJobDetail(jobDetail.getObject());
        tigger.setCronExpression("*/5 * * * * ?");//每五秒执行一次
        tigger.setName("myTigger");// trigger的name
        return tigger;
    }
    @Bean(name = "scheduler")
    public SchedulerFactoryBean schedulerFactory(Trigger cronJobTrigger) {
        SchedulerFactoryBean bean = new SchedulerFactoryBean();
        //设置是否任意一个已定义的Job会覆盖现在的Job。默认为false,即已定义的Job不会覆盖现有的Job。
        bean.setOverwriteExistingJobs(true);
        // 延时启动,应用启动5秒后  ,定时器才开始启动
        bean.setStartupDelay(5);
        // 注册定时触发器
        bean.setTriggers(cronJobTrigger);
        return bean;
    }
    //多任务时的Scheduler,动态设置Trigger。一个SchedulerFactoryBean可能会有多个Trigger
    @Bean(name = "multitaskScheduler")
    public SchedulerFactoryBean schedulerFactoryBean(){
        SchedulerFactoryBean schedulerFactoryBean = new SchedulerFactoryBean();
        return schedulerFactoryBean;
    }
}
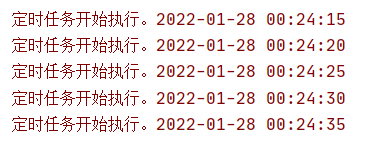
到此为止,定时任务就配置成功了。启动SpringBoot项目,查看控制台日志信息:

3.3 SpringBoot发送Email
在开发中,经常会碰到Email发送邮件的场景,如注册、找回密码、发送验证码、向客户发送邮件、通过邮件发送系统情况、通过邮件发送报表信息等,实际应用场景很多。
首先介绍以下与发送和接收邮件相关的一些协议:
-
发送邮件:
SMPT、MIME,是一种关于“推”的协议,通过SMPT协议将邮件发送到邮件服务器,MIME协议是对SMPT协议的一种补充,如发送图片附件等。
-
接收邮件:
POP、IMAP,是一种基于“拉”的协议,收件人通过POP协议从邮件服务器拉取邮件。
3.3.1 发送邮件需要的配置
因为各大邮件运营商都有其对应的安全系统,不是项目想用就可以用的,我们必须获得其对应的客户端授权码才行,获得授权码后,在项目中配置SMTP服务协议以及主机配置账户,这样就可以在项目中使用各大邮件运营商发送邮件了。
以QQ邮箱为例。登录QQ邮箱,单击“设置”按钮,然后选择账户选项,向下拉并选择开启POP3/SMTP服务,如下:

单击“开启”按钮后会进入验证过程,根据引导发送短信,验证成功后即可得到自己QQ邮箱的客户端授权码了。
获得授权码后就可以在SpringBoot工程中配置文件application.yml或者properties文件中进行配置了。
3.3.2 使用SpringBoot发送邮件
-
环境搭建:首先创建SpringBoot项目,需要引入如下Email依赖:
            org.springframework.boot
            spring-boot-starter-mail
然后在配置文件application.yml中加入相关配置信息:
mail: host: smtp.qq.com #发送邮件服务器 username: [email protected] #发送邮件的邮箱地址 password: ***************** #客户端授权码 smtp.port: 465 #端口号465或587 from: [email protected] #发送邮件的地址和上面username的邮箱地址一致 properties.mail.smtp.starttls.enable: true properties.mail.smtp.starttls.required: true properties.mail.smtp.ssl.enable: true default-encoding: UTF-8 -
发送普通邮件:普通邮件是指最为普通的纯文本邮件。创建MailService类用来封装邮件的发送,代码如下:
package com.shenziyi.demo.mail;


import org.slf4j.Logger;
import org.slf4j.LoggerFactory;
import org.springframework.beans.factory.annotation.Autowired;
import org.springframework.beans.factory.annotation.Value;
import org.springframework.mail.SimpleMailMessage;
import org.springframework.mail.javamail.JavaMailSender;
import org.springframework.stereotype.Service;

@Service
public class MailService {
    private final Logger logger = LoggerFactory.getLogger(this.getClass());
    /**
     * Spring Boot 提供了一个发送邮件的简单抽象,使用的是下面这个接口,这里直接注入即可使用
     */
    @Autowired
    private JavaMailSender mailSender;

    /**
     * 获取配置文件中自己的qq邮箱
     */
    @Value("${spring.mail.from}")
    private String from;

    /**
     * 简单文本邮件
     * @param to 收件人
     * @param subject 主题
     * @param content 内容
     */
    public void sendSimpleMail(String to, String subject, String content) {
        //创建SimpleMailMessage对象
        SimpleMailMessage message = new SimpleMailMessage();
        //邮件发送人
        message.setFrom(from);
        //邮件接收人
        message.setTo(to);
        //邮件主题
        message.setSubject(subject);
        //邮件内容
        message.setText(content);
        //通过JavaMailSender类把邮件发送出去
        mailSender.send(message);
    }
}
代码解释:
- JavaMailSender是SpringBoot提供的邮件发送接口,直接注入即可使用。
- 简单邮件通过SimpleMailMessage对象封装打包数据,最后通过JavaMailSender类将数据发送出去。
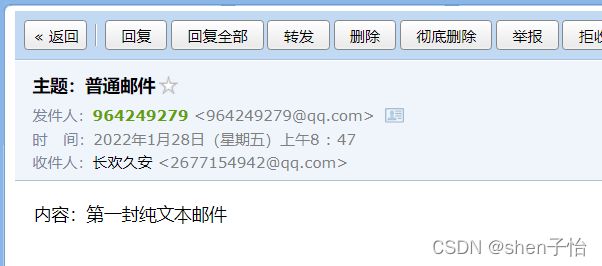
配置完成之后在SpringBoot提供的主测试类中进行测试:
package com.shenziyi.demo;

import com.shenziyi.demo.mail.MailService;
import org.junit.Test;
import org.junit.runner.RunWith;
import org.springframework.beans.factory.annotation.Autowired;
import org.springframework.boot.test.context.SpringBootTest;
import org.springframework.test.context.junit4.SpringRunner;
import org.thymeleaf.TemplateEngine;

@RunWith(SpringRunner.class)
@SpringBootTest
public class DemoApplicationTests {


    /*注入发送邮件的接口*/
    @Autowired
    private MailService mailService;

    /*TemplateEngine来对模板进行渲染*/
    @Autowired
    private TemplateEngine templateEngine;

    /** 测试发送文本邮件*/
    @Test
    public void sendmail() {
        mailService.sendSimpleMail("[email protected]","主题:普通邮件","内容:第一封纯文本邮件");
    }
}
注意:
- 添加完毕后,在测试类中添加@RunWith(SpringRunner.class)并导入相关的包。@Test包是org.junit.Test而不是org.junit.jupiter.api.Test。
- 将类和方法设置为public才可运行。
-
发送HTML邮件:
很多时候需要邮件有美观的样式。这时候可以 使用HTML样式。我们需要使用JavaMailSender的createMimeMessage方法,构建一个MimeMessage,然后使用MimeMessage实例创建一处MimeMessageHelper,在MailService中添加如下方法:
/**
     * html邮件
     * @param to 收件人
     * @param subject 主题
     * @param content 内容
     */
    public void sendHtmlMail(String to, String subject, String content) {
        //获取MimeMessage对象
        MimeMessage message = mailSender.createMimeMessage();
        MimeMessageHelper messageHelper;
        try {
            messageHelper = new MimeMessageHelper(message, true);
            //邮件发送人
            messageHelper.setFrom(from);
            //邮件接收人
            messageHelper.setTo(to);
            //邮件主题
            message.setSubject(subject);
            //邮件内容,html格式
            messageHelper.setText(content, true);
            //发送
            mailSender.send(message);
            //日志信息
            logger.info("邮件已经发送。");
        } catch (Exception e) {
            logger.error("发送邮件时发生异常!", e);
        }
    }
在测试类中添加如下方法进行测试:
@Test public void sendmailHtml(){ mailService.sendHtmlMail("[email protected]","主题:html邮件",""); }这是一个html界面
-
带附件的邮件:
很多时候发送邮件的时候需要附带一些附件一起发送,那么在JavaMailSender中也有带附件的方法,在MailService中添加如下方法:
/* 带附件邮件*/
    public void sendAttachmentMail(String to, String subject, String content, String filePath) {
        logger.info("发送带附件邮件开始:{},{},{},{}", to, subject, content, filePath);
        MimeMessage message = mailSender.createMimeMessage();
        MimeMessageHelper helper;
        try {
            helper = new MimeMessageHelper(message, true);
            //true代表支持多组件,如附件,图片等
            helper.setFrom(from);
            helper.setTo(to);
            helper.setSubject(subject);
            helper.setText(content, true);
            FileSystemResource file = new FileSystemResource(new File(filePath));
            String fileName = file.getFilename();
            helper.addAttachment(fileName, file);//添加附件,可多次调用该方法添加多个附件
            mailSender.send(message);
            logger.info("发送带附件邮件成功");
        } catch (MessagingException e) {
            logger.error("发送带附件邮件失败", e);
        }
    }
在测试类中添加如下内容:
/** * 发送带附件的邮件 */ @Test public void sendAttachmentMail() { String content = ""
+ "大家好,这是springboot发送的HTML邮件,有附件哦" + ""; String filePath = "E:\\2021-2022-1学期\\冬季学校安排\\0-冬季学校安排.docx"; mailService.sendAttachmentMail("[email protected]", "发送邮件测试", content, filePath); } -
发送带图片的邮件:
带图片即在正文中使用< img >标签,并设置我们需要发送的照片,在HTML基础上添加一些参数即可,在MailService中添加如下方法:
 /*发送带图片的邮件*/
    public void sendInlineResourceMail(String to, String subject, String content, String rscPath, String rscId) {

        logger.info("发送带图片邮件开始:{},{},{},{},{}", to, subject, content, rscPath, rscId);
        MimeMessage message = mailSender.createMimeMessage();

        MimeMessageHelper helper;
        try {
            helper = new MimeMessageHelper(message, true);
            helper.setFrom(from);
            helper.setTo(to);
            helper.setSubject(subject);
            helper.setText(content, true);
            FileSystemResource res = new FileSystemResource(new File(rscPath));
            helper.addInline(rscId, res);//重复使用添加多个图片
            mailSender.send(message);
            logger.info("发送带图片邮件成功");
        } catch (MessagingException e) {
            logger.error("发送带图片邮件失败", e);
        }
    }
在测试类中添加如下方法:
@Test public void sendInlineResourceMail() { String rscPath = "D:\\壁纸\\银临.jpg"; String rscId = "001"; /*使用cid标注出静态资源*/ String content = ""
+ "大家好,这是springboot发送的HTML邮件,有图片哦" + "" + "+ rscId + "\'>"; mailService.sendInlineResourceMail("[email protected]", "发送邮件测试", content, rscPath, rscId); }
效果如下:
-
模板邮件:
通常我们使用邮件发送所需服务信息的时候,都会有一些固定的场景,例如重置密码、注册确认等,给每个用户发送的内容可能只有小部分是变化的。所以,很多时候我们会使用模板引擎将各类邮件设置成模板,这样只需在发送时替换变换部分的参数。
在SpringBoot中使用模板引擎实现模板化的邮件发送也是非常容易的,下面我们以Thymeleaf为例实现模板化的邮件发送。
-
首先添加Thymeleaf依赖。
-
在template文件夹下创建emailTemplate.html:
DOCTYPE html> <html lang="en" xmlns:th="http://www.thymeleaf.org"> <head> <meta charset="UTF-8"> <title>邮件模板title> head> <body> 您好,感谢您的注册,这是一封验证邮件,请点击下面的链接完成注册,感谢您的支持!<br> <a href="#" th:href="@{http://www.bestbpf.com/register/{id}(id=${id})}">激活账户a> body> html> -
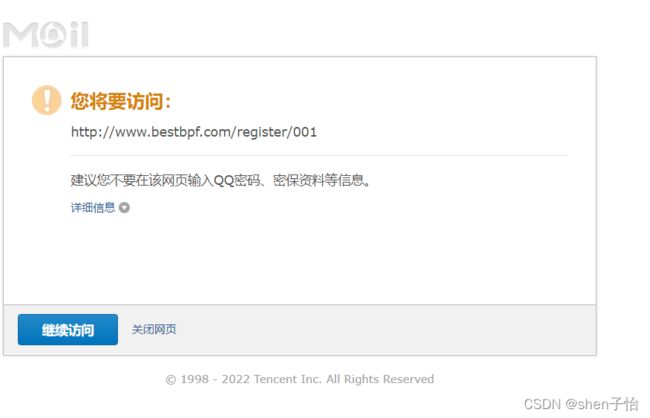
在模板页面中,id是动态变化的,需要传参设置,其实就是传参后,将页面解析为HTML字符串,作为邮件发送的主体内容。在测试类中添加如下代码进行测试:
@Test
    public void testTemplateMail() {
        //向Thymeleaf模板传值,并解析成字符串
        Context context = new Context();
        context.setVariable("id", "001");
        String emailContent = templateEngine.process("emailTemplate", context);

        mailService.sendHtmlMail("[email protected]", "这是一个模板文件", emailContent);
    }
-


