nginx高可用配置(五)
keepalived
keepalived安装
1.#进入根目录下的 usr目录
cd /usr
2.#安装keepalived
yum install keepalived -y
3.安装完成后在根目录etc下会有个keepalived目录

4.进入keepalived目录
cd keepalived/
5.ll命令查看,会有个配置文件 keepalived.conf

6.keepalived.conf具体内容
! Configuration File for keepalived

global_defs {
   notification_email {
     [email protected]
     [email protected]
     [email protected]
   }
   notification_email_from [email protected]
   smtp_server 192.168.200.1
   smtp_connect_timeout 30
   router_id LVS_DEVEL
   vrrp_skip_check_adv_addr
   vrrp_strict
   vrrp_garp_interval 0
   vrrp_gna_interval 0
}

vrrp_instance VI_1 {
    state MASTER
    interface eth0
    virtual_router_id 51
    priority 100
    advert_int 1
    authentication {
        auth_type PASS
        auth_pass 1111
    }
    virtual_ipaddress {
        192.168.200.16
        192.168.200.17
        192.168.200.18
    }
}

virtual_server 192.168.200.100 443 {
    delay_loop 6
    lb_algo rr
    lb_kind NAT
    persistence_timeout 50
    protocol TCP

    real_server 192.168.201.100 443 {
        weight 1
        SSL_GET {
            url {
              path /
              digest ff20ad2481f97b1754ef3e12ecd3a9cc
            }
            url {
              path /mrtg/
              digest 9b3a0c85a887a256d6939da88aabd8cd
            }
            connect_timeout 3
            nb_get_retry 3
            delay_before_retry 3
        }
    }
}

virtual_server 10.10.10.2 1358 {
    delay_loop 6
    lb_algo rr
    lb_kind NAT
    persistence_timeout 50
    protocol TCP

    sorry_server 192.168.200.200 1358

    real_server 192.168.200.2 1358 {
        weight 1
        HTTP_GET {
            url {
              path /testurl/test.jsp
              digest 640205b7b0fc66c1ea91c463fac6334d
            }
            url {
              path /testurl2/test.jsp
              digest 640205b7b0fc66c1ea91c463fac6334d
            }
            url {
              path /testurl3/test.jsp
              digest 640205b7b0fc66c1ea91c463fac6334d
            }
            connect_timeout 3
            nb_get_retry 3
            delay_before_retry 3
        }
    }

    real_server 192.168.200.3 1358 {
        weight 1
        HTTP_GET {
            url {
              path /testurl/test.jsp
              digest 640205b7b0fc66c1ea91c463fac6334c
            }
            url {
              path /testurl2/test.jsp
              digest 640205b7b0fc66c1ea91c463fac6334c
            }
            connect_timeout 3
            nb_get_retry 3
            delay_before_retry 3
        }
    }
}

virtual_server 10.10.10.3 1358 {
    delay_loop 3
    lb_algo rr
    lb_kind NAT
    persistence_timeout 50
    protocol TCP

    real_server 192.168.200.4 1358 {
        weight 1
        HTTP_GET {
            url {
              path /testurl/test.jsp
              digest 640205b7b0fc66c1ea91c463fac6334d
            }
            url {
              path /testurl2/test.jsp
              digest 640205b7b0fc66c1ea91c463fac6334d
            }
            url {
              path /testurl3/test.jsp
              digest 640205b7b0fc66c1ea91c463fac6334d
            }
            connect_timeout 3
            nb_get_retry 3
            delay_before_retry 3
        }
    }

    real_server 192.168.200.5 1358 {
        weight 1
        HTTP_GET {
            url {
              path /testurl/test.jsp
              digest 640205b7b0fc66c1ea91c463fac6334d
            }
            url {
              path /testurl2/test.jsp
              digest 640205b7b0fc66c1ea91c463fac6334d
            }
            url {
              path /testurl3/test.jsp
              digest 640205b7b0fc66c1ea91c463fac6334d
            }
            connect_timeout 3
            nb_get_retry 3
            delay_before_retry 3
        }
    }
}
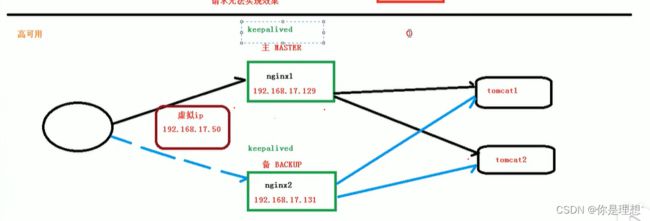
使用keepalived完成高可用的例子
demo
使用两台服务器,ip分别为192.168.2.150 ,192.168.2.202,分别安装nginx和keepalived,在这里我们使用150作为主服务器,使用202作为备用服务器,虚拟ip为192.168.2.130,不论主服务器还是备服务器都需要编写keepalived的配置文件 ,keepalived.conf
192.168.2.150 keepalived的配置文件(MASTER)
这里需要注意vrrp_instance VI_1里面 interface ens192 ,ens192是服务器的网卡,需要根据自己的服务器自行修改
可以使用ip addr命令 查看

192.168.2.150 keepalived的配置文件(MASTER)
! Configuration File for keepalived

global_defs {
   notification_email {
     [email protected]
     [email protected]
     [email protected]
   }
   notification_email_from [email protected]
   smtp_server 192.168.2.150
   smtp_connect_timeout 30
   router_id LVS_DEVEL
   vrrp_skip_check_adv_addr
   vrrp_strict
   vrrp_garp_interval 0
   vrrp_gna_interval 0
}

#检测脚本
vrrp_script chk_http_port {
    script "/usr/local/src/check_nginx_pid.sh" #心跳执行的脚本,检测nginx是否启动
    interval 2                          #(检测脚本执行的间隔,单位是秒)
    weight 2                            #权重
}
#vrrp 实例定义部分
vrrp_instance VI_1 {
    state MASTER            # 指定keepalived的角色,MASTER为主,BACKUP为备
    interface ens192         # 当前进行vrrp通讯的网络接口卡(当前centos的网卡) 用ifconfig查看你具体的网卡
    virtual_router_id 100    # 虚拟路由编号,主从要一致
    priority 100            # 优先级,数值越大,获取处理请求的优先级越高
    advert_int 1            # 检查间隔,默认为1s(vrrp组播周期秒数)
    #授权访问
    authentication {
        auth_type PASS #设置验证类型和密码,MASTER和BACKUP必须使用相同的密码才能正常通信
        auth_pass 1111
    }
    track_script {
        chk_http_port            #(调用检测脚本)
    }
    virtual_ipaddress {
        192.168.2.130            # 定义虚拟ip(VIP),可多设,每行一个
    }
}
192.168.2.202 keepalived的配置文件(BACKUP)
! Configuration File for keepalived

global_defs {
   notification_email {
     [email protected]
     [email protected]
     [email protected]
   }
   notification_email_from [email protected]
   smtp_server 192.168.2.202
   smtp_connect_timeout 30
   router_id LVS_DEVEL
   vrrp_skip_check_adv_addr
   vrrp_strict
   vrrp_garp_interval 0
   vrrp_gna_interval 0
}

#检测脚本
vrrp_script chk_http_port {
    script "/usr/local/src/check_nginx_pid.sh" #心跳执行的脚本,检测nginx是否启动
    interval 2                          #(检测脚本执行的间隔,单位是秒)
    weight 2                            #权重
}
#vrrp 实例定义部分
vrrp_instance VI_1 {
    state BACKUP            # 指定keepalived的角色,MASTER为主,BACKUP为备
    interface ens192         # 当前进行vrrp通讯的网络接口卡(当前centos的网卡) 用ifconfig查看你具体的网卡
    virtual_router_id 100    # 虚拟路由编号,主从要一致
    priority 60            # 优先级,数值越大,获取处理请求的优先级越高
    advert_int 1            # 检查间隔,默认为1s(vrrp组播周期秒数)
    #授权访问
    authentication {
        auth_type PASS #设置验证类型和密码,MASTER和BACKUP必须使用相同的密码才能正常通信
        auth_pass 1111
    }
    track_script {
        chk_http_port            #(调用检测脚本)
    }
    virtual_ipaddress {
        192.168.2.130            # 定义虚拟ip(VIP),可多设,每行一个
    }
}
给两台服务器的keepalived.conf 分别赋予644权限 ,不然会报错,chmod 644 /etc/keepalived/keepalived.conf
与此同时,在两台服务器/usr/local/src/ 目录下,分别分别上传check_nginx_pid.sh 脚本 ,并且赋予777权限
#!/bin/bash
#检测nginx是否启动了
A=`ps -C nginx --no-header |wc -l`
if [ $A -eq 0 ];then    #如果nginx没有启动就启动nginx
      systemctl start nginx                #重启nginx
      if [ `ps -C nginx --no-header |wc -l` -eq 0 ];then    #nginx重启失败,则停掉keepalived服务,进行VIP转移
              killall keepalived
      fi
fi
开始启动:
首先停掉每台服务器上的nginx和keepalived.conf,然后启动依次启动主备服务器的nginx和keepalived服务
cd /usr/local/nginx/sbin/

 ./nginx -s stop

systemctl stop keepalived

./nginx

systemctl start keepalived