VSCode 环境配置管理
上篇文章我们讲解了VScode的基本安装,现在我们搭建一个最基础的C++环境(由浅入深)。
1.首先安装基本插件
| 插件名称 | 插件说明 |
|---|---|
| C/C++ | IntelliSense, debugging, and code browsing。提供C/C++支持 |
| C/C++ Extension Pack | 支持查看STL 变量等信息 |
| Code Runner | 提供编译后程序的运行环境 |
| C/C++ Snippets | 提供一些常用的C/C++片段 |
| EPITECH C/C++ Headers | 为C/C++文件添加头部(包括作者、创建和修改日期等),并为.h头文件添加防重复的宏 |
| File Templates | 文件模板,可以自己添加文件模板 |
| GBKtoUTF8 | GBK编码文件转换为UTF-8 |
| Include Autocomplete | 头文件自动补全 |
| One Dark Pro | 可以打造好看的VS Code主题 |
VSCode 常见的预定义变量列表
your-project:为打开的文件夹
| 变量 | 说明 |
|---|---|
| ${userHome} | /home/your-username |
| ${workspaceFolder} | /home/your-username/your-project |
| ${workspaceFolderBasename} | your-project |
| ${file} | /home/your-username/your-project/folder/file.ext |
| ${fileWorkspaceFolder} | /home/your-username/your-project |
| ${relativeFile} | folder/file.ext |
| ${relativeFileDirname} | folder |
| ${fileBasename} | file.ext |
| ${fileBasenameNoExtension} | file |
| ${fileDirname} | /home/your-username/your-project/folder |
| ${fileExtname} | .ext |
| ${lineNumber} | line number of the cursor |
| ${selectedText} | text selected in your code editor |
| ${execPath} | location of Code.exe |
| ${pathSeparator} | / on macOS or linux, \ on Windows |
launch.json关键字说明
| 关键字 | 说明 |
|---|---|
| preLaunchTask | 执行调试前 要完成的任务。该值需要与tasks.json中的label想对应 |
| externalConsole | 调试是否显示控制台。如果需要输入东西,最好修改为true使用外部控制台(在运行时额外打开终端)。否则用vscode内置的控制台不能输入东西 |
| type | 配置类型。不能改 |
| program | 调试程序所在路径和程序名 |
| stopAtEntry | 为true时程序暂停在程序入口,一般填false |
| cwd | 程序的工作目录 |
| miDebuggerPath | 调试器路径,Windows下后缀不能省略 |
task.json关键字说明
| 关键字 | 说明 |
|---|---|
| type | 指定任务类型,eg:shell,cppbuild |
| label | 任务名称,需要唯一,后续指定任务依赖都以label为准 |
| cwd | 程序的工作目录 |
| command | 执行任务的程序路径 |
| dependsOn | 当前任务依赖的任务,和label对应 |
VSCode运行原理:
F5调试或运行launch.json指定的program,但launch.json并不生成program。需要通过指定前置任务preLaunchTask 来生成指定的program。任务则由task.json创建。以及C++环境配置选项c_cpp_properties.json。
实例展示
前面我们讲解过CMake,下面我们将以CMake来编译配置C++的VSCode运行环境。CMake 编译运行步骤如下:
#步骤一创建build的编译目录
# mkdir -p build
#步骤二进入build目录,执行CMake
# cmake ../
#步骤三进入build目录,编译文件
# cmke --build ./
通过上面分析已知,编译生成一个可执行文件需要上面三个task。下面将在task.json实现上述三个task
配置task.json任务生成目标
task.json的生成:终端->配置任务
{
    "tasks": [
        {
            "type": "shell",
            "label": "cmake build",
            "command": "/usr/bin/cmake",
            "args": [
                "--build",
                "./"
            ],
            "options": {
                "cwd": "${workspaceFolder}/build"
            },
            "problemMatcher": [
                "$gcc"
            ],
            "group": "build",
            "detail": "调试器生成可执行文件。",
            "dependsOn": "cmake cfg"
        },
        {
            "type": "shell",
            "label": "cmake cfg",
            "command": "/usr/bin/cmake",
            "args": [
                "../"
            ],
            "options": {
                "cwd": "${workspaceFolder}/build"
            },
            "problemMatcher": [
                "$gcc"
            ],
            "group": {
                "kind": "build"
            },
            "detail": "执行cmake配置",
            "dependsOn": "mkdir build"
        },
        {
            "type": "shell",
            "label": "mkdir build",
            "command": "/usr/bin/mkdir",
            "args": [
                "-p",
                "build"
            ],
            "options": {
                "cwd": "${workspaceFolder}"
            },
            "group": {
                "kind": "build"
            },
            "detail": "创建build目录"
        }

    ],
    "version": "2.0.0"
}
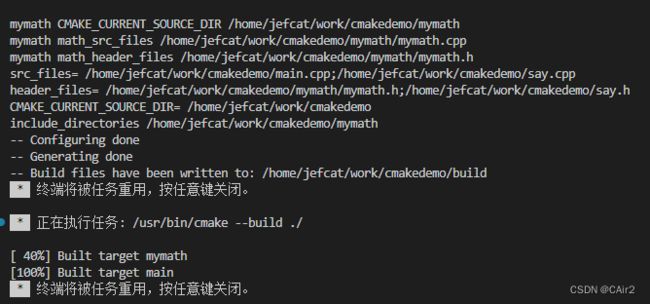
通过终端->运行任务来验证task.json的准确性。如图:

配置launch.json运行调试程序
launch.json:用于设置调试和运行,用来执行编译好的文件,VSCode默认就会生成launch.json。如果没有的话可以通过:运行->打开/添加配置生成launch.json。
{
    "version": "0.2.0",
    "configurations": [
      {
      //调试或者运行前需要执行的任务。和taskjson的label想对应。
        "preLaunchTask": "cmake build",
        "name": "C/C++ Runner: Debug Session",
        "type": "cppdbg",
        "request": "launch",
        "args": [
          ""
        ],
        "stopAtEntry": false,

         //指定工作目录
        "cwd": "${workspaceFolder}/build/bin",
        "environment": [],
        //指定运行程序,屏蔽部分都是模板默认生成的,所以我们需要修改一下。
        //"program": "/home/jefcat/work/vscodedemo/build/Debug/outDebug",
        "program": "${workspaceFolder}/build/bin/main",
        "internalConsoleOptions": "openOnSessionStart",
        "MIMode": "gdb",
        "miDebuggerPath": "/usr/bin/gdb",
        "externalConsole": false,
        "setupCommands": [
          {
            "description": "Enable pretty-printing for gdb",
            "text": "-enable-pretty-printing",
            "ignoreFailures": true
          }
        ]
      }
    ]
  }
基本调试步骤:运行任务==》调试程序,但是我们往往是F5直接调试程序,所以我们就需要指定运行前需要执行的任务,即配置preLaunchTask字段。此时F5就可以实现一键编译和调试了。
C++环境属性配置
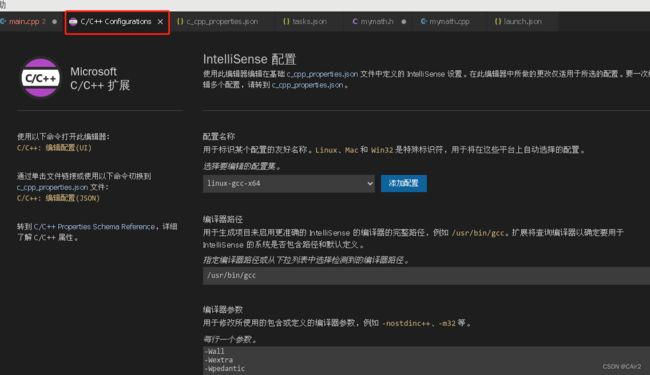
c_cpp_properties.json针对C/C++相关拓展的配置。可以直接编辑c_cpp_properties.json也可以打开UI界面设置:ctrl+shirt+p,下搜索框输入C/C++: Edit configurations(UI),此时就可以打开设置界面了

实战:配置C++11环境
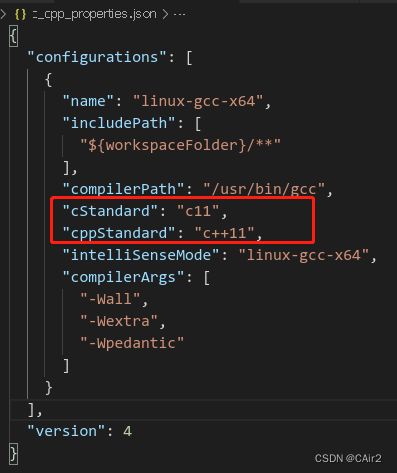
在使用C++11的时候,vscode可能会提示语法问题,这是因为vscode没有指定c++11的语法检查环境,所以此时只需要把c_cpp_properties.json里面的c++标准修改成c++11即可。

关于VSCode的快捷键以及插件配置同步可以参考:史上最全vscode配置使用教程
