Spring 常用注解汇总和使用
大家好,我是猿码。又是一个双休,春节马上就要到了,面对疫情的不确定性,你们今年能否回家呢?
注解在 Java 开发中非常常见,随着 Spring 系列的框架逐渐占据主流,知道 Spring 都有哪些注解以及它们的作用至关重要,也某种程度的决定了我们开发的灵活与便捷。
开始之前,我们先学习如何创建一个注解(@interface),以及注解的属性。
一、Java 注解入门
注解是 JDK 1.5 开始推出的特性。它的功能主要包括:
- 标识;
- 嵌入信息
注解是一种标识接口,但也分门别类。
一个自定义注解,一般由作用域,生命周期两个部分组成。而嵌入作用域和生命周期又需要用到其它注解,而这一类注解我们称呼其为:meta-annotations,即元注解。加上这些注解后,才能构成一个完整自定义注解。下面介绍常用的元注解
自定义注解的属性:
- 标记目标(@Target)。其唯一成员变量是一个 ElmentType 枚举类数组。该枚举类提供 TYPE(类)、METHOD(方法)、FIELD(字段)、PARAMETER(参数)、CONSTRUCTOR(构造函数) 等 10 种类型。这 10 种类型决定该注解的作用域。使用方式: @Target(ElementType.TYPE)
- 维持状态(@Retention)。该注解唯一的成员变量是一个 RetentionPolicy 枚举类对象,其提供 3 种维持状态,分别为:SOURCE(禁止编译器编译)、CLASS(标识后供class文件使用与Runtime相反)、RUNTIME(可以在JVM运行时使用,但不会被编译成字节码文件)。使用方式:@Retention(RetentionPolicy.RUNTIME)
如何创建一个自定义注解:
  @Retention(RetentionPolicy.RUNTIME)
  @Target(ElementType.METHOD)
  @Documented public @interface OneBean {

      // 后面的 default 是表示默认值
      String value() default "";

      String[] values() default {};
  }
二、Spring 常用注解
@Bean
该注解使用区域:【注解】与【方法】。常用于方法,结合 Spring 容器使用,意味着由该方法产生的 Bean(对象)都会交由 Spring 容器管理。
使用方式:
  // b1 和 b2 是别名,但别名不能与声明该注解的方法同名
  @Bean({"b1", "b2"})
  public MyBean myBean() {
      // 初始化或返回实现配置好的 MyBean
      return new MyBean();
  }

  public static void main(String[] args) {
      Class[] classes = new Class[1];
      classes[0] = IBean.class;
      // ApplicationContext 接口的实现类,会有多种。具体我在后面简单介绍一下
      ApplicationContext an = new AnnotationConfigApplicationContext(classes);
      Object b1 = an.getBean("b1");
      Object b2 = an.getBean("b2");
  }
通过 AnnotationConfigApplicationContext 类初始化 Bean。这些 Bean 初始化后会交由 Spring 容器管理。上面的 b1 和 b2 的 hashCode 值都是一样的,这是因为由 @Bean 注解生成的对象默认为 Singleton 单例的。这又引导我们去了解下一个注解
@Scope
该注解作用于【类】和【方法】两个区域。常与 @Component 和 @Bean 注解一起使用。定义该注解的 Bean 会有 2 种生命周期。
- Singleton
- Prototype
第一种是 "单例" 模式,该模式下的对象,在同一个 Context 中只会被初始化 1 次,意味着以后从 Spring 容器中获取的该对象都是同 1 个对象,它们的 hashCode 值相同。
第二种是"原型"模式,该模式下的对象,每次从 Spring 容器中获取,都会获取 1 个新的对象,它们的 hashCode 值不相同。
使用方式:
@Component
@Scope(ConfigurableBeanFactory.SCOPE_PROTOTYPE)
public class IBean {

    public IBean(){
        System.out.println("执行了");
    }
//    @Scope(ConfigurableBeanFactory.SCOPE_SINGLETON)
//    @Bean("b1")
//    public IBean getBean(){
//        return new IBean();
//    }
    public static void main(String[] args) {
        AnnotationConfigApplicationContext an
                = new AnnotationConfigApplicationContext(IBean.class);
        Assert.notNull(an.getBean(IBean.class));
        Assert.notNull(an.getBean(IBean.class));
    }
}
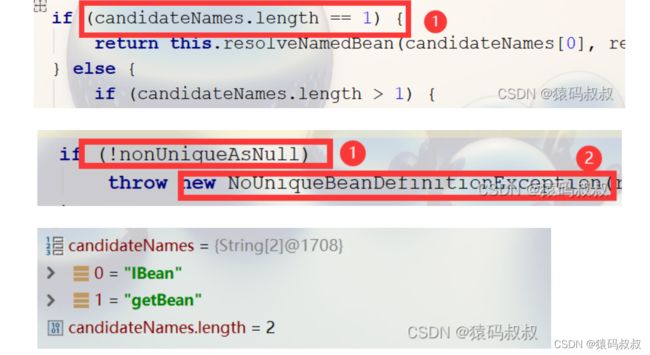
代码 @Bean 部分注释掉,是因为 @Component 与 @Bean 在同一个类中使用时,如果 @Bean 初始化的类与 @Component 定义的类相同,会抛出 “NoUniqueBeanDefinitionException: No qualifying bean of type XXX” 异常。是因为,这样做违反了 Spring 容器管理的定义,而且它也无法确定该优先使用哪种方式去注入。下图的中的 candidateNames 长度是所有声明了 @Bean 或 @Component 来告诉 Spring 容器要管理 "IBean" 这个对象的数量,包含类或方法。其数量只能是 1,否则会抛出如上异常。
@Component
顾名思义,组件与模块的意思。注解的使用区域为【类】。也是@Controller、@Service、@Repository 等的元注解。因此他们与 @Component 注解的功能类似。但这个注解我们不用自己定义,因为 SpringBoot 启动类中的 @SpringBootApplication 注解中,已经定义了该注解
使用方式:
@Component
public class IBean {
    public static void main(String[] args) {
        // 初始化 ApplicationContext 容器
        AnnotationConfigApplicationContext an
                = new AnnotationConfigApplicationContext(IBean.class);
        Assert.notNull(an.getBean(IBean.class));
    }
}
该注解容易与 @Bean 混淆,主要因为两者的功能很相似。稍后我会在后面做一个列表区分一下。
@Controller
控制器,使用区域为【类】。了解过MVC执行流程的伙伴也许知道前端控制器(DispatcherServelet),它会通过前端请求的 URL 去适配相应的 Controller。我们经常会将它与 RequestMapping 搭配使用。它与 RestController 的功能大体相同。后者封装了 @ResponseBody,而前者则需要我们自己声明。前者如果没有增加 @ResponseBody 且也没有部署试图解析器(ViewResolver),前端将无法收到响应的数据。
使用方式:
  @Controller
  @ResponseBody
  // @RestController
  public class TestController {

      @RequestMapping("/test")
      public String getName() {
          return "This is the content for test!";
      }
  }
@RequestMapping
请求映射器:使用区域为【类】或【方法】。DispatcherServelet 接收到所有前端请求后会根据前端请求的 URL 与我们使用的 RquestMapping 中的 "URL Pattern" 进行匹配,然后决定使用哪个 Handler 来进一步处理业务。
当修饰 Controller 类时,往往起到过滤的作用,比如“订单”控制器,那么对于类上使用可以是这样:@RequestMapping("/order/*"),通配符 “*” 则表示前部分能与 “order” 匹配的所有 URL。
使用方式:
  @Controller
  @ResponseBody
  // @RestController
  // 此处如果不加值,会默认为 '/'
  @RequestMapping("/annotation")
  public class TestController {

      @RequestMapping("/test")
      public String getName() {
          return "This is the content for test!";
      }
  }
@PathVariable
路径变量:使用区域为【参数】。
我们传统使用 GET 请求时会按照这种方式:localhost:80/test?id=1,这样容易暴漏参数,但不难发现 “?id = 1” 这样的操作规范。
如果使用了 pathVariable,取而代之的是:localhost:80/test/1。省去了 '?' 和 'id' 变量。
使用方式:
    @RequestMapping(value = "/test/{id}", method = RequestMethod.GET)
    // name = "id" 中的 id 必须与请求 path 中的一致
    public String getName(@PathVariable(name = "id") String id) {
        return "This is the content for { "+ id +" }!";
    }
@RequestBody
请求体:使用区域为【参数】。一般是用于解析前端请求的参数体为 JSON 类型的 Object时。类似于 { Object: {name: "xx", age: "xx"} } ,反之如果为普通型变量,比如字符串、数字等可以不用。
使用方式:
	// consumes:是指定媒体类型
    @PostMapping(value = "book", consumes = { MediaType.APPLICATION_JSON_VALUE })
	public ResponseEntity addBook(@RequestBody Book book, UriComponentsBuilder builder) {
		bookService.addBook(book);
		HttpHeaders headers = new HttpHeaders();
		headers.setLocation(builder.path("/book/{id}").buildAndExpand(book.getBookId()).toUri());
		return new ResponseEntity(book, headers, HttpStatus.CREATED);
	}
@ComponentScan
组件扫描:使用区域为【类】。可添加参数 basePacakages。该参数是一个数组,因此可以添加多个需要该注解扫描的包或其子包。前面我们使用的 @Component 或 @Bean 标识的类或方法,需要手动注册到 Context 当中,是不是很麻烦?使用了这个注解,我们只需要指定他要扫描的包,然后将当前的类注册到 Context 当中,即可触发 @Component 注解的自动扫描功能。
使用方式如下:
  // 指定扫描的包
  @ComponentScan(basePackages = "com.example.springannotation.annotation")
  public class IComponent {

      public static void main(String[] args) {
          // 注册当前类到 Context 当中
          AnnotationConfigApplicationContext an =
                  new AnnotationConfigApplicationContext(IComponent.class);
          Object iBean = an.getBean("a1");
          Assert.notNull(iBean);
      }
  }
@Configuration
配置:使用区域为【类】。如果使用上述注解 @ComponentScan,则被 @Configuration 标识的类会被自动注册到 Spring 容器当中。因此,一般该注解用于定位某个类当中会有多个被 @Bean 标识的方法生成对象将交由 Spring 容器管理。结合 @ComponentScan 我们可以以某个类为配置中心,将需要动态配置的信息编写成方法放到该类当中。比如:数据库连接信息、Reids 集群配置、MySQL 集群配置等等...
使用方法:
  @Configuration
  public class IConfiguration {

      @Autowired
      Environment env;

      @Bean
      public IComponent iComponent () {
          return new IComponent(env.getProperty("bean.name"));
      }
  }
@AutoWired
自动装配:使用区域为【类】、【构造函数】、【字段】、【方法】和【参数】。这个注解大家都已经不陌生了。因为我们一般写项目的增删改查功能时,都需要注入 Dao 接口 或 Mapper 接口来进行数据库操作。不过它还有一个非亲非故的兄弟 @Resource。两者的最大区别在于,一个属于 Spring,另一个属于 JSR-250 规范。之所以说是兄弟,是因为两者都可以自动装配 Spring 容器管理的 Bean。
使用方式:
@Component
public class DataServiceImpl {
@Autowired IBean iBean;
public List@Service
业务:使用区域为【类】。作为 @Component 注解的派生版,目的是细化 @Component 的功能,一般用于标识某个类属于 "业务" 层。
使用方式:
@Service
public class DataServiceImpl {
@Autowired IBean iBean;
public List@Repository
容器:使用区域为【类】。同样是 @Component 注解的派生类。一般用于标识某个类为“持久层(DAO)”所用。
使用方式:
  @Repository
  public interface IOrderDao extends JpaRepository{
    // ....
  }
下面是被标识有 @Component 元注解的注解。@ComponentScan 指定扫描的包名后,会自动扫描以下注解,除 @Component 外,其他注解之所以会被Spring容器自动扫描到,是因为它们都标识有 Component 元注解。
| 名称 | 作用区域 | 参数 | 应用 |
| @Component | 类 | String | 一般组件和模块都可以使用 |
| @Bean | 方法、注解 | String、String[] | 与Configuration和Component注解搭配使用 |
| @Service | 类 | String | 业务层 |
| @Configuration | 类 | String | 配置类 |
| @Repository | 类 | String | 持久层 |
| @Controller | 类 | String | Web层 |
今天就写到这里了,后续还会持续更新,谢谢大家的阅读!
