Linux Ubuntu20.04 版本下安装 GAMMA 2020版 安装步骤 安装教程
GAMMA 2020版 安装步骤 安装教程
1. 解压GAMMA文件,设置环境变量
1.1 解压压缩包
选择解压压缩包的路径,建议的文件路径为 /usr/local, 从terminal进入该路径:
cd /usr/local
GAMMA安装包一般是以 gzip和tar打包的,将安装包拷贝到上一步的路径中:
cp GAMMA_SOFTWARE-yymmdd.src.tar.gz /usr/local
cd /usr/local
解压文件:
gunzip -从GAMMA_SOFTWARE-yyyymmdd.src.tar.gz > GAMMA_SOFTWARE-yyyymmdd.src.tar
tar -xuf GAMMA_SOFTWARE-yyyymmdd.src.tar
或者直接用下面代码一步解压:
sudo tar -zxvf GAMMA_SOFTWARE-yyyymmdd.tar.gz
1.2 设置环境变量
默认的运行shell是bash,环境变量可以在bashrc中进行设置,先打开bashrc文件
sudo gedit ~/.bashrc
将下面的内容复制到bashrc中
export GAMMA_HOME=/usr/local/GAMMA_SOFTWARE-yyyymmdd
export MSP_HOME=$GAMMA_HOME/MSP
export ISP_HOME=$GAMMA_HOME/ISP
export DIFF_HOME=$GAMMA_HOME/DIFF
export DISP_HOME=$GAMMA_HOME/DISP
export LAT_HOME=$GAMMA_HOME/LAT
export IPTA_HOME=$GAMMA_HOME/IPTA
export GEO_HOME=$GAMMA_HOME/GEO

export PATH=$PATH:.:$MSP_HOME/bin:$ISP_HOME/bin:$DIFF_HOME/bin:$LAT_HOME/bin:$DISP_HOME/bin:$IPTA_HOME/bin:\
$MSP_HOME/scripts:$ISP_HOME/scripts:$DIFF_HOME/scripts:$LAT_HOME/scripts:$IPTA_HOME/scripts:$DISP_HOME/scripts
export OS=linux64
#This adds the Gamma Software main directory to the Python path
export PYTHONPATH=.:$GAMMA_HOME:$PYTHONPATH
#This command disables version checking for HDF5
export HDF5_DISABLE_VERSION_CHECK=1
#This sets the Gnuplot default terminal type to be QT
export GNUTERM=qt
#Alternately, this sets the default terminal type to be WXT
#export GNUTERM=wxt
#set default raster format to BMP
export GAMMA_RASTER="BMP"
第一行代码中的yyyymmdd修改为你自己的安装包日期
1.3选择默认的栅格图片格式
默认的栅格图片格式可以被设置,默认的是bitmap(BMP)格式。
SUN_RASTER (file extension: ras)
BMP (file extension: bmp)
TIFF (file extension: tif)
选择BMP则在bashrc中修改为
export GAMMA_RASTER="BMP"
选择TIFF格式则修改为
export GAMMA_RASTER="TIFF"
选择Sun raster (不建议)则修改为
export GAMMA_RASTER="SUN_RASTER"
注意:
Compilation of the software is carried out using the make utility and associated makefiles.
The directory structure includes a set of subdirectories for each of the Gamma packages MSP, ISP, DIFF, DISP, GEO, LAT, and IPTA. Each of the package subdirectories contains a src, bin, html subdirectories. The executable binaries are located in the bin directories of each package and source code is in the src directories. In each src directory there are several makefiles for different platforms:
- makefile_static Linux build (default)
- makefile_static_mingw64-2 Windows build
- makefile_static_macOS MacOS build
The GCC compiler is used on all platforms. On Linux, use gcc 4.6 or later.
2 安装FFTW3
Linux系统((Debian, Ubuntu … have packages for FFTW3))下安装代码为
sudo apt-get install libfftw3-dev
基于Rdehat或者更老的版本请参考文章末尾的附录
3 安装Gnuplot和GIMP
Linux系统下的Gnuplot默认使用QT和WXT小工具集:
sudo apt install gnuplot gnuplot-data gimp
可以画sin(x)来测试Gnup,首先将下面一行代码确认添加到了bashrc中
export GNUTERM=wxt
然后在terminal中分别输入
gnuplot
plot sin(x)
如果打不开gnuplot,可以重启终端再尝试
4 安装GTK 2+开发者包
sudo apt -y install libgtk2.0-dev
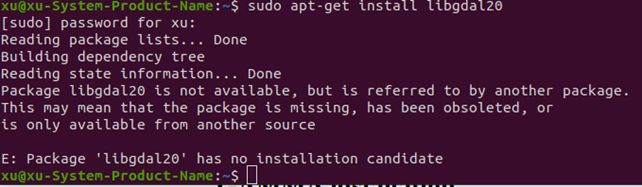
5 安装GDAL
sudo apt install gdal-bin libgdal-dev libgdal20
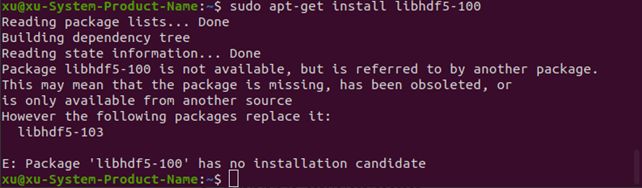
6 安装HDF5 library (COSMO/SKYMED数据需要)
sudo apt -y install libhdf5-dev libhdf5-100
7 安装LAPACK和BLAS
sudo apt -y install libblas-dev libblas3 liblapack-dev liblapack3
8 编译GAMMA软件
在每个源文件目录下都有(DISP/src, ISP/src, MSP/src, DIFF/src, IPTA/src, and LAT/src),编译时要每个文件都执行一遍,因为$DISP_HOME等的环境变量都已经设置好了,所以以下代码可以在任意目录下执行。
cd $DISP_HOME/src
make -f makefile_static
9 测试软件
可以输入disras快速检查GAMMA软件和library的path设置是否正确
10 附录
(1) 个人
安装libgdal20和libhdf5-100两个library时出错
(2)(官方安装说明)
Installing the software requires the following steps:
-
Expanding of the Gamma Software gzipped tar file and setup environment variables
-
Unpack the Gamma Software archive
-
Set Environment variables
-
Select and Set Default Raster Image Format
Notes -
Install the FFTW3 libraries for data that are 32-bit floating point numbers (libfftw3f.so)
-
Install Gnuplot and GIMP programs
-
Install the GTK 2+ library developer packages
-
Install the GDAL library (required for Terrasar-X PRI and geocoded data, both binary and development on Linux)
-
Install the HDF5 library (required for COSMO/SKYMED data, both binary and development)
-
Install LAPACK and BLAS libraries if you have the LAT package (both binary and development on Linux)
-
Compile Gamma Software
-
Test the software installation
-
Gamma Software documentation
-
Installation of Anaconda Python3 including Scipy/Numpy/Matplotlib
Note: Ubuntu LTS configuration for running Gamma Software -
Expanding of the Gamma software gzipped tar file and setup environment variables
1.1 Unpack the Gamma Software archive
Select the directory where you would like to unpack the Gamma Software. The suggested location is /usr/local. Go to this directory:
cd /usr/local
The software is delivered as a gzipped tar file. Place this file in the directory selected in step 1.
cp GAMMA_SOFTWARE-yyyymmdd.src.tar.gz /usr/local/
cd /usr/local
Unpack the distribution using gunzip and tar:
gunzip -c GAMMA_SOFTWARE-yyyymmdd.src.tar.gz > GAMMA_SOFTWARE-yyyymmdd.src.tar
tar -xvf GAMMA_SOFTWARE-yyyymmdd.src.tar
1.2 Set Environment Variables
The default shell to run the software is bash. The environment variables for compilation and running the software can be set in the .bashrc file located in your home directory.
export GAMMA_HOME=/usr/local/GAMMA_SOFTWARE-yyyymmdd
export MSP_HOME=$GAMMA_HOME/MSP
export ISP_HOME=$GAMMA_HOME/ISP
export DIFF_HOME=$GAMMA_HOME/DIFF
export DISP_HOME=$GAMMA_HOME/DISP
export LAT_HOME=$GAMMA_HOME/LAT
export IPTA_HOME=$GAMMA_HOME/IPTA
export GEO_HOME=$GAMMA_HOME/GEO

export PATH=$PATH:.:$MSP_HOME/bin:$ISP_HOME/bin:$DIFF_HOME/bin:$LAT_HOME/bin:$DISP_HOME/bin:$IPTA_HOME/bin:\
$MSP_HOME/scripts:$ISP_HOME/scripts:$DIFF_HOME/scripts:$LAT_HOME/scripts:$IPTA_HOME/scripts:$DISP_HOME/scripts
export OS=linux64
#This adds the Gamma Software main directory to the Python path
export PYTHONPATH=.:$GAMMA_HOME:$PYTHONPATH
#This command disables version checking for HDF5
export HDF5_DISABLE_VERSION_CHECK=1
#This sets the Gnuplot default terminal type to be QT
export GNUTERM=qt
Alternately, this sets the default terminal type to be WXT
#export GNUTERM=wxt
#set default raster format to BMP
export GAMMA_RASTER="BMP"
1.3 Select and Set Default Raster Image Format
The default raster image format can be set. By default it is bitmap (BMP) on all platforms. The environment variable GAMMA_RASTER can be set to change the default format for your installation:
SUN_RASTER (file extension: ras)
BMP (file extension: bmp)
TIFF (file extension: tif)
To select BMP as the default raster format, then enter:
export GAMMA_RASTER="BMP"
export GAMMA_RASTER="TIFF"
will set the default format to TIFF
export GAMMA_RASTER="SUN_RASTER"
will set the default format to Sun raster (not recommended)
To make the command permanent, add the export command to your .bashrc file.
Notes
Compilation of the software is carried out using the make utility and associated makefiles.
The directory structure includes a set of subdirectories for each of the Gamma packages MSP, ISP, DIFF, DISP, GEO, LAT, and IPTA. Each of the package subdirectories contains a src, bin, html subdirectories. The executable binaries are located in the bin directories of each package and source code is in the src directories. In each src directory there are several makefiles for different platforms:
- makefile_static Linux build (default)
- makefile_static_mingw64-2 Windows build
- makefile_static_macOS MacOS build
The GCC compiler is used on all platforms. On Linux, use gcc 4.6 or later.
- Install the FFTW3 libraries
This library of FFT routines is required for the Gamma Software to run and must be installed on your system. The libraries come in 2 forms, either for float (4 byte, 32-bit) or double (64 bit) floating point numbers. Gamma Software uses the FFTW3 version that works with 32-bit float numbers (single) and generates the libfftw3f.so shared object library. The Gamma Software requires libfftw3f.so
Redhat based Linux distributions (RHEL, Fedora, Centos) have FFTW3 RPM packages
yum search fftw
sudo yum install fftw-devel
Debian based Linux distributions (Debian, Ubuntu … have packages for FFTW3)
sudo apt-get install libfftw3-dev
Alternately, and preferred on older OS (RHEL5), download FFTW3 source code from the FFTW3 server:
http://www.fftw.org/download.html
The source code file is fftw-3.3.4.tar.gz
Use the following configure options to build the software:
./configure --disable-fortran --enable-single --enable-shared --enable-sse --enable-sse2
To build and install the software:
make
sudo make install
- Install Gnuplot and GIMP programs
Gnuplot on Linux (Ubuntu, Debian) now uses the QT and WXT widget sets by default:
Ubuntu:sudo apt install gnuplot gnuplot-data gimp
To test your installation of gnuplot, start the program and plot sin(x) in a pop-up window: add this to your .bashrc file:
export GNUTERM=wxt
test installation:
gnuplot
plot sin(x)
If your Linux distribution is RHEL7, CentOS7, only the X11 terminal is supported, while on CentOS8 the QT terminal is supported:
sudo yum install gnuplot gimp
add this to your .bashrc
export GNUTERM=qt #or GNUTERM=x11 for RHEL7
to test your gnuplot installation:
gnuplot
plot sin(x)
-
Install the GTK 2+ library developer packages
These libraries are included in all Linux distributions. For compilation of the Gamma software, the developer packages need to be installed:
Ubuntu:sudo apt -y install libgtk2.0-dev
CentOS, RHEL:sudo yum install gtk2-devel -
Install the GDAL library
Ubuntu:sudo apt install gdal-bin libgdal-dev libgdal20
CentOS7, RHEL7:sudo yum install gdal gdal-devel
This package is available as precompiled package Debian, Ubuntu, Redhat, Fedora Linux distributions and can be installed using package manager on your system. Please make sure that you not only install the GDAL binaries but also the library and the development files. The home web page for GDAL is:
http://www.gdal.org/
GDAL not only features a data abstraction library but has also powerful tools to convert geospatial data between different formats and map projections.
Building GDAL from source On CentOS 8 it is necessary to build gdal from source code currently.
First install a number of packages and download the source code of GDAL version 3.1.2 as a gzipped tar.gz file.
https://gdal.org/download.html#current-releases
sudo yum upgrade
sudo yum config-manager --set-enabled PowerTools
sudo yum install gtk2-devel glib2-devel
sudo yum install lapack lapack-devel
sudo yum install csh
sudo yum install wget
sudo yum install epel-release
sudo yum install hdf5 hdf5-devel
sudo yum install subversion
sudo yum install ImageMagick-devel
tar -zxvf gdal-3.1.2.tar.gz
configure
make
make install
- Install the HDF5 library (needed for COSMO/SKYMED data)
Ubuntu:sudo apt -y install libhdf5-dev libhdf5-100
CentOS, RHEL:sudo yum install hdf5 hdf5-devel
HDF5 is currently only needed for par_CS_*
The HDF5 library is available as precompiled package for most Linux distributions and can be installed using package manager on your system. To build and run the GAMMA binaries depending on HDF5 you need the library libhdf5.
In some cases when installing with installed HDF5 libraries, you want to add the following command to disable version checking for HDF5 in the .bashrc file of each user:
export HDF5_DISABLE_VERSION_CHECK=1
The home web page for HDF5 is:
https://portal.hdfgroup.org/display/support
On the HDFgroup website there are binaries for almost any OS system:
https://portal.hdfgroup.org/display/support/Downloads
If your platform is not supported yet you can build the library from the source code.
-
Install LAPACK and BLAS libraries
Ubuntu:sudo apt -y install libblas-dev libblas3 liblapack-dev liblapack3
CentOS, RHEL:sudo yum install blas blas-devel lapack lapack-devel
All major Linux distributions include the LAPACK and BLAS Libraries as prebuilt packages that can be downloaded and installed. These libraries are used for linear algebra calculations. Be sure to also install the developer packages (*-dev) since you are compiling programs with LAPACK. -
Compile Gamma Software
In each source directory of the distributed software that you have
(DISP/src, ISP/src, MSP/src, DIFF/src, IPTA/src, and LAT/src),
compile as follows:
cd $DISP_HOME/src
make -f makefile_static
Do the same in each src directory of the packages.
- Test the software installation
For a quick test to check that the search path is correctly set for the Gamma Software and libraries enter:
disras
The command line options for this program should then be displayed in the terminal window.
Another test can be to open the Gamma Software documentation using the gamma_doc script. Enter for example:
gamma_doc data2geotiff
The documentation related to data2geotiff should open up in the web browser.
-
Gamma Software documentation
The Gamma Software documentation browser is an HTML-based system for viewing the web pages and PDF documents. The documentation browser includes for each module a Contents sidebar on the right side of the screen and a search functionality (within the module). You can access the documentation by opening Gamma_documentation_contents_sidebar.html (located in the main Gamma Software directory) in your web browser.
The program gamma_doc facilitates the access to the documentation related to a given module or program:
gamma_doc Opens the main page of the Gamma documentation browser.
gamma_doc DIFF Opens the DIFF&GEO documentation.
gamma_doc gc_map Opens the reference manual web page for gc_map. -
Installation of Anaconda Python3 including Scipy/Numpy/Matplotlib/Pandas stack
The Python display tools in the $DISP_HOME/scripts can be run using Python3 installed using the Conda-Forge Python3.7 distribution.
If you previously installed Anaconda3, and this is working, then you can leave this installation, if you want to change, then follow the directions for removal of anaconda3:
https://docs.anaconda.com/anaconda/install/uninstall/
To install the Conda-Forge python3.7 download the text-based installer Miniforge3-Linux-aarch64.sh Then run the installer from the command-line:
cd Downloads
sh Miniforge3-Linux-aarch64.sh Install these recommended packages:
conda install scipy matplotlib numpy pandas gdal pyserial pillow oct2py pytz
conda install seaborn cmocean colorcet
The Conda-Forge installer will add a section at the end of your .bashrc that modifies the path so that the Conda-Forge Python distribution is at the start of the path ensuring that this is the Python version that runs. It is recommended to use #!/usr/bin/env python as the first line in any script so that the path is searched for the first instance of Python and that interpreter is used for the program.
Note: Ubuntu configuration for building Gamma Software
includes some optional improvements and cleanup.
When Ubuntu installation completed
- Login with your chosen username and password
- Plug in Ethernet
- Make sure connected to Internet using Firefox
The simplest way to open a terminal window on Ubuntu Linux is to use the shortcut CTRL+ALT+T. Alternately you can click on Activities located on the left top corner. Using search type terminal. Once the terminal icon appears simply left-click on it to open terminal on Ubuntu.
Install suggested and required packages:
sudo apt install subversion synaptic openssh-server libgdal-dev gdal-bin python-gdal libgtk2.0-dev libblas-dev libblas3 liblapack-dev liblapack3 gnuplot5
sudo apt install sshfs screen checkinstall gir1.2-gtksource-3.0 ntp gparted htop libfftw3-3 libfftw3-dev
sudo apt install swig git gimp openssl openssh-client filezilla lm-sensors
Delete unnecessary directories in home directory
Modify options of gedit editing application to improve:
- With gedit open, the taskbar at the top of the Desktop will show options for gedit. Select the Preferences menu:
- Edit->Preferences
Under the View tab: - Check the Display line numbers, Highlight current line, Highlight matching brackets boxes
Under the Editor tab: - Uncheck Enable automatic indentation box
- Uncheck the Create a backup copy of files before saving box
- Uncheck the Autosave files every 10 minutes box
Under the Fonts and Colors tab: - Uncheck Use the system fixed width font
- Select Monospace 9 as the font
OPTION:
There are many other editors available: Atom, Visual Studio Code…