WPF中嵌入Echarts,通过CefSharp实现前后端数据交互
前言
毕业已经三年了,曾多次想记录在开发过程中遇到的一些问题,奈何一直觉得自己所知过于片面,故一直拖到今天才有勇气开始写自己的第一篇博客。此文中若有不正确的地方,望大家多多指正。
一、简介
WPF无疑是很强大的,可以自己绘制各式各样的控件,当然也包括各类图表,笔者因水平有限,所以只能选择较为简单的方法,在WPF中嵌入ECharts图表,此处不对ECharts做介绍,下面简单介绍嵌入图表的三种方式:
- WebBrowser:这是微软自身的一款以IE为内核的控件,存在兼容性较差以及内存泄漏。笔者在使用中只是觉得 一直弹出脚本错误的提示框,所以未使用该控件。这个理由…
- WebKit.Net :并无太多了解,只是看到它太多年没有更新了,所以未使用该控件。
- CefSharp: 以谷歌为内核,也是本文中所要使用的控件,低版本的Cef是不支持AnyCPU模式的,所以需要使用低版本Cef的小伙伴,记得将平台更改为对应的x86或者x64版本。
二、使用步骤
下面从新建一个空的解决方案来逐步实现
1.引用Echarts
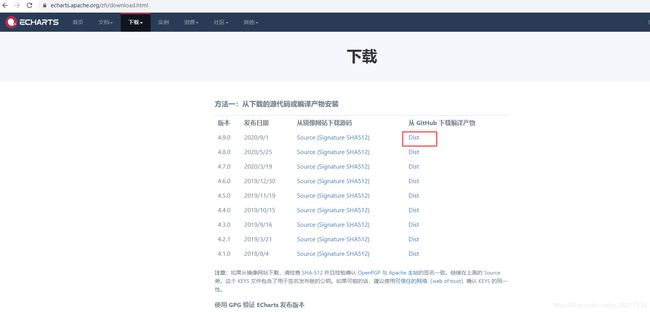
(1)在ECharts官网或者GitHub下载对应的JS包
(2)将下载好的压缩包解压,并将dist文件夹复制到解决方案,设置为“复制到输出目录”,可删除不使用的JS。如下图所示
2.CefSharp
此节借鉴了ZaraNet博友的《使用CefSharp前端后台交换》在Nuget中添加对cefsharp.WPF引用,此时编辑项目是失败的,此处有两个解决办法,一是将项目平台改为x86或者x64版本,笔者改成x86版本是可以运行的,二是要使用AnyCpu,需要做如下修改
(1)App.xaml.cs中添加代码。
using CefSharp;
using CefSharp.Wpf;
using System;
using System.Collections.Generic;
using System.Configuration;
using System.Data;
using System.IO;
using System.Linq;
using System.Reflection;
using System.Threading.Tasks;
using System.Windows;

namespace EchartRefSharpDemo
{
    public partial class App : Application
    {
        private static void InitializeCefSharp()
        {
            var settings = new CefSettings();

            // Set BrowserSubProcessPath based on app bitness at runtime
            settings.BrowserSubprocessPath = Path.Combine(AppDomain.CurrentDomain.SetupInformation.ApplicationBase,
                                                   Environment.Is64BitProcess ? "x64" : "x86",
                                                   "CefSharp.BrowserSubprocess.exe");

            // Make sure you set performDependencyCheck false
            Cef.Initialize(settings, performDependencyCheck: false, browserProcessHandler: null);
        }

        // Will attempt to load missing assembly from either x86 or x64 subdir
        // Required by CefSharp to load the unmanaged dependencies when running using AnyCPU
        private static Assembly Resolver(object sender, ResolveEventArgs args)
        {
            if (args.Name.StartsWith("CefSharp"))
            {
                string assemblyName = args.Name.Split(new[] { ',' }, 2)[0] + ".dll";
                string archSpecificPath = Path.Combine(AppDomain.CurrentDomain.SetupInformation.ApplicationBase,
                                                       Environment.Is64BitProcess ? "x64" : "x86",
                                                       assemblyName);

                return File.Exists(archSpecificPath)
                           ? Assembly.LoadFile(archSpecificPath)
                           : null;
            }

            return null;
        }
    }
}
(2)编辑项目的配置文件也就是(*.csproj)文件,添加对AnyCpu支持的配置。
<CefSharpAnyCpuSupport>true</CefSharpAnyCpuSupport>
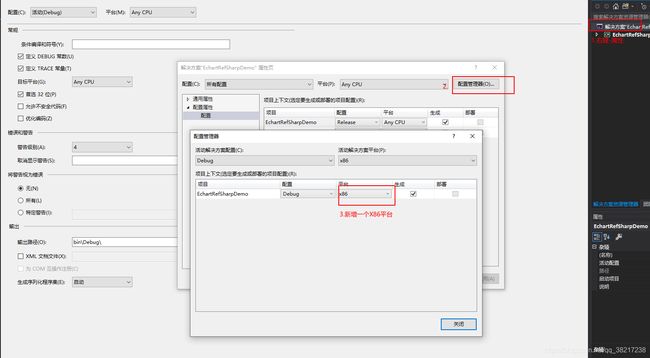
(3)还需添加X86平台,此处个人理解为,实际项目运行时还是x86形式,不过平台配置无需修改。配置步骤如下图。

此时编译项目,即可编译成功。
Cef和WebBrowser一样,提供了两种前后端交互的方式。
后端=>前端:ExecuteJavaScriptAsync:此方法在文中使用。
前端=>后端:BindObjectAsync:此方法的使用可参照前面提到的ZaraNet博友的文章。本文中暂未涉及。
3.使用
- 在窗体MainWindow.xaml中添加对CefSharp引用并添加ChromiumWebBrowser控件。
<Window x:Class="EchartRefSharpDemo.MainWindow"
       xmlns="http://schemas.microsoft.com/winfx/2006/xaml/presentation"
       xmlns:x="http://schemas.microsoft.com/winfx/2006/xaml"
       xmlns:d="http://schemas.microsoft.com/expression/blend/2008"
       xmlns:mc="http://schemas.openxmlformats.org/markup-compatibility/2006"
       xmlns:hc="https://handyorg.github.io/handycontrol"
       mc:Ignorable="d"
       Title="MainWindow"
       WindowStartupLocation="CenterScreen"
       xmlns:cefSharp="clr-namespace:CefSharp.Wpf;assembly=CefSharp.Wpf"
       Height="450"
       Width="800">
   <Grid>
       <Grid.RowDefinitions>
           <RowDefinition Height="*"></RowDefinition>
           <RowDefinition Height="50"/>
       </Grid.RowDefinitions>
       <cefSharp:ChromiumWebBrowser Name="EchartWeb" FrameLoadEnd="EchartWeb_FrameLoadEnd"></cefSharp:ChromiumWebBrowser>
       <Button Grid.Row="1" Content="添加数据" Style="{StaticResource ButtonSuccess}"
               HorizontalAlignment="Left" VerticalAlignment="Top" Width="75"
               Click="Button_Click"/>
   </Grid>
</Window>
- 添加一个Html页面,本例中使用折线图。需要注意InitCodeData方法的注释,此方法为后端调用的JS方法。
<html lang="en" xmlns="http://www.w3.org/1999/xhtml">
<head>
    <meta charset="utf-8">
    <title>第一个 ECharts 实例title>
    <script src="echarts.js">script>
    <script src="echarts-min.js">script>

head>
<body>

    <div id="main" style="width: 600px;height:400px;">div>
    <script type="text/javascript">
        //InitCodeData方法从MainWindow中进行调用。
        function InitCodeData(listdata) {
            myChart = echarts.init(document.getElementById('main'), 'macarons');
            //alert(listdata.Name);
            option = {
                title: {
                    text: '动态折线图'
                },
                tooltip: {
                    trigger: 'axis',
                    axisPointer: {
                        type: 'cross',
                        label: {
                            backgroundColor: '#6a7985'
                        }
                    }
                },
                legend: {
                    data: ['XX数据'],
                },
                //toolbox: {
                //    feature: {
                //        saveAsImage: {}
                //    }
                //},
                grid: {
                    left: '3%',
                    right: '4%',
                    bottom: '3%',
                    containLabel: true
                },
                xAxis: [
                    {
                        type: 'category',
                        boundaryGap: false,
                        data: listdata.Name
                    }
                ],
                yAxis: [
                    {
                        type: 'value'
                    }
                ],
                series: [
                    {
                        name: 'XX数据',
                        type: 'line',
                        stack: '测试数据1',
                        areaStyle: {},
                        data: listdata.Values
                    },
                ]
            };
            myChart.setOption(option);
        }
    script>
body>
html>
- 编辑MainWindow.xaml.cs,ChromiumWebBrowser的Address及绑定Html中Js方法。文中新建了一个测试类,通过按钮逐渐增加传递到前台的数据,以模拟数据的变化。
using System;
using System.Collections.Generic;
using System.IO;
using System.Web.Script.Serialization;
namespace EchartRefSharpDemo
{
public partial class MainWindow
{
#region Field
int number = 20;//测试数据条数
#endregion Field
public MainWindow()
{
InitializeComponent();
EchartWeb.Address = Directory.GetCurrentDirectory() + "/dist/LineChartDemo.html";//指定HTML地址
}
/// 
