SpringCloud笔记02:Nacos配置中心、Feign、Gateway
文章目录
- 一、Nacos 配置管理
-
- 1.1 统一配置管理
-
- 1.1.1 添加配置文件
- 1.1.2 微服务拉取配置
- 1.2 配置热更新
-
- 1.2.1 方式一:RefreshScope
- 1.2.2 方式二:ConfigurationProperties
- 1.3 配置共享
-
- 1.3.1 添加共享配置
- 1.3.2 读取共享配置
- 1.3.3 不同 profile 测试
- 1.3.4 配置共享的优先级
- 1.3.5 不同微服务配置共享
- 1.4 搭建 Nacos 集群
-
- 1.4.1 初始化数据库表
- 1.4.2 配置 nacos 集群
- 1.4.3 启动 nacos 集群
- 1.4.4 nginx反向代理
- 二、Feign 远程调用
-
- 2.1 Feign 的介绍
- 2.2 Feign 替代 RestTemplate
-
- 2.2.1 引入依赖
- 2.2.2 添加注解
- 2.2.3 编写 Feign 客户端
- 2.2.4 测试
- 2.3 自定义配置
-
- 2.3.1 方式一:配置文件
- 2.3.2 方式二:Java 代码
- 2.4 Feign 优化
-
- 2.4.1 连接池优化
- 2.5 最佳实践
-
- 2.5.1 继承方式
- 2.5.2 抽取方式
- 2.5.3 实现基于抽取的最佳实践
-
- 1)抽取
- 2)使用 feign-api
- 3)重启测试
- 4)解决扫描包问题
- 三、Gateway 服务网关
-
- 3.1 为什么需要网关
- 3.2 gateway快速入门
-
- 3.2.1 创建模块
- 3.2.2 编写启动类
- 3.2.3 编写配置
- 3.2.4 重启测试
- 3.2.5 网关路由的流程图
- 3.3 断言工厂
- 3.4 过滤器工厂
-
- 3.4.1 路由过滤器的种类
- 3.4.2 请求头过滤器
- 3.4.3 默认过滤器
- 3.5 全局过滤器
-
- 3.5.1 全局过滤器作用
- 3.5.2 自定义全局过滤器
- 3.5.3 过滤器执行顺序
- 3.6 跨域问题
-
- 3.6.1 什么是跨域问题
- 3.6.2 模拟跨域问题
- 3.6.3 解决跨域问题
- 3.7 限流过滤器
-
- 3.7.1 计数器算法
- 3.7.2 漏桶算法
- 3.7.3 令牌桶算法
一、Nacos 配置管理
Nacos 除了可以做注册中心,同样可以做配置管理来使用。
1.1 统一配置管理
当微服务部署的实例越来越多,达到数十、数百时,逐个修改微服务配置就会让人抓狂,而且很容易出错。我们需要一种统一配置管理方案,可以集中管理所有实例的配置。
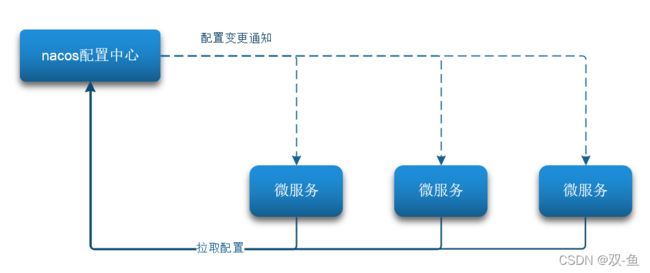
Nacos 一方面可以将配置集中管理,另一方可以在配置变更时,及时通知微服务,实现配置的热更新。
1.1.1 添加配置文件
在配置管理页面,点击右上角的加号即可添加配置
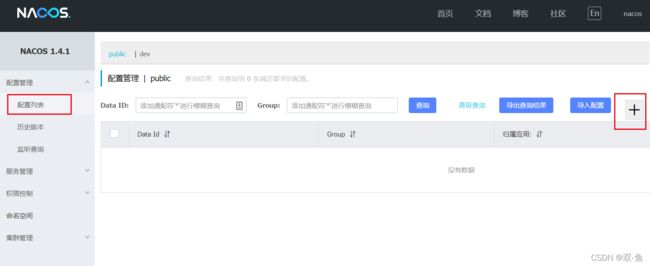
然后在弹出的表单中,填写配置信息:

注意:项目的核心配置,需要热更新的配置才有放到 nacos 管理的必要。基本不会变更的一些配置还是保存在微服务本地比较好。
1.1.2 微服务拉取配置
微服务要拉取 nacos 中管理的配置,并且与本地的 application.yml 配置合并,才能完成项目启动。但如果尚未读取 application.yml,又如何得知 nacos 地址呢?
因此 Spring 中引入了一种新的配置文件:bootstrap.yml 文件,它会在 application.yml 之前被读取,流程如下:

1)在 user-service 服务中,引入 nacos-config 的客户端依赖:
<dependency>
    <groupId>com.alibaba.cloudgroupId>
    <artifactId>spring-cloud-starter-alibaba-nacos-configartifactId>
dependency>
2)在 user-service 中添加 bootstrap.yml 文件(它的启动优先级高于 application.yml),内容如下:
spring:
  application:
    name: user-service # 服务名称
  profiles:
    active: dev # 开发环境,这里是dev
  cloud:
    nacos:
      server-addr: localhost:8848 # Nacos地址
      config:
        file-extension: yaml # 文件后缀名
这里会根据 spring.cloud.nacos.server-addr 获取 nacos 地址,而获取文件 ID 的规则具体参考官网:

本例中,就是去读取user-service-dev.yaml:

3)在 UserController 代码的中间添加业务逻辑,读取 pattern.dateformat 配置,代码如下:
@Value("${pattern.dateformat}")
private String dateFormat;

@GetMapping("/now")
public String now(){
    return LocalDateTime.now().format(DateTimeFormatter.ofPattern(dateFormat));
}
1.2 配置热更新
我们最终的目的,是修改 nacos 中的配置后,微服务中无需重启即可让配置生效,也就是配置热更新。要实现配置热更新,可以使用两种方式:
1.2.1 方式一:RefreshScope
在 @Value 注入的变量所在类上添加注解@RefreshScope:

1.2.2 方式二:ConfigurationProperties
使用 @ConfigurationProperties 注解代替 @Value 注解。在 user-service 服务中,添加一个类,读取 patterrn.dateformat 属性:
package cn.itcast.user.config;

@Data
@Component
@ConfigurationProperties(prefix = "pattern")
public class PatternProperties {
    private String dateformat;
}
在 UserController 中使用这个类代替 @Value 注解,中间代码如下:
@Autowired
private PatternProperties patternProperties;

@GetMapping("/now")
public String now() {
    return LocalDateTime.now().format(
            DateTimeFormatter.ofPattern(patternProperties.getDateformat())
    );
}
1.3 配置共享
其实微服务启动时,会去 nacos 读取多个配置文件,例如:
-
[spring.application.name]-[spring.profiles.active].yaml,例如:user-service-dev.yaml -
[spring.application.name].yaml,例如:user-service.yaml
而无论 profile 如何变化,[spring.application.name].yaml这个文件一定会加载,因此多环境共享配置可以写入这个文件,被多个环境共享。
下面我们通过案例来测试配置共享
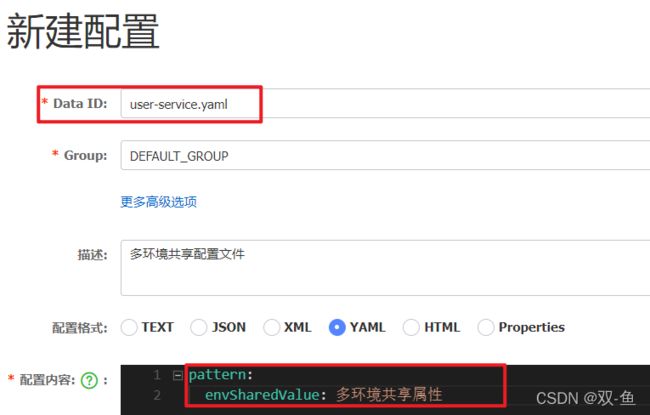
1.3.1 添加共享配置
我们在 nacos 中添加一个 user-service.yaml 文件,用于共享配置:
1.3.2 读取共享配置
在 user-service 服务中,修改 PatternProperties 类,读取新添加的属性:
@Data
@Component
@ConfigurationProperties(prefix = "pattern")
public class PatternProperties {
    private String dateformat;
    private String envSharedValue;
}
在 user-service 服务中,修改 UserController,添加一个方法:
@GetMapping("/prop")
public PatternProperties prop() {
    return patternProperties;
}
1.3.3 不同 profile 测试
修改 UserApplication2 这个启动项,改变其 profile 值:

这样,UserApplication(8081) 使用的 profile 是 dev,UserApplication2(8082) 使用的 profile 是 test。然后一起启动
1)访问页面:http://localhost:8081/user/prop

2)访问页面:http://localhost:8082/user/prop

可以看出来,不管是 dev,还是 test 环境,都读取到了 envSharedValue 这个属性的值。
1.3.4 配置共享的优先级
当 nacos、服务本地同时出现相同属性时,优先级有高低之分,如图:

1.3.5 不同微服务配置共享
不同微服务之间可以共享配置文件,通过下面的两种方式来指定:
方式一:shared-configs
spring:
  application:
    name: user-service # 服务名称
  profiles:
    active: dev # 开发环境,这里是dev
  cloud:
    nacos:
      server-addr: localhost:8848 # Nacos地址
      config:
        file-extension: yaml # 文件后缀名
        shared-configs: # 多微服务间共享的配置列表
          - dataId: common.yaml # 要共享的配置文件id
方式二:extension-configs
spring:
  application:
    name: user-service # 服务名称
  profiles:
    active: dev # 开发环境,这里是dev
  cloud:
    nacos:
      server-addr: localhost:8848 # Nacos地址
      config:
        file-extension: yaml # 文件后缀名
        extension-configs: # 多微服务间共享的配置列表
          - dataId: extend.yaml # 要共享的配置文件id
1.4 搭建 Nacos 集群
Nacos 生产环境下一定要部署为集群状态,部署后整体架构如下:

三个 nacos 节点的地址:
| 节点 | IP地址 | 端口号 |
|---|---|---|
| nacos1 | 127.0.0.1 | 8845 |
| nacos2 | 127.0.0.1 | 8846 |
| nacos3 | 127.0.0.1 | 8847 |
1.4.1 初始化数据库表
Nacos 默认数据存储在内嵌数据库 Derby 中,不属于生产可用的数据库。官方推荐的是使用带有主从的高可用数据库集群。但是这里我们先用单点的数据库为例来讲解。
1)将之前的 nacos-1.4.1 的 zip 包,进行解压
2)创建 nacos 数据库,导入 SQL 文件,文件在 conf/nacos-mysql.sql,数据库名也可以用官方推荐

1.4.2 配置 nacos 集群
1)进入 conf 目录,复制 cluster.conf.example 配置文件,重命名为 cluster.conf,删除里面的内容,配置成我们自己的,如下:
127.0.0.1:8845
127.0.0.1:8846
127.0.0.1:8847
2)修改 application.properties 文件,添加数据库配置:
# 28行,配置IP地址,避免电脑内多网卡冲突
nacos.inetutils.ip-address=127.0.0.1

# 33行,表示使用 mysql 数据库作为外部存储
spring.datasource.platform=mysql
# 36行,表示使用一个数据库
db.num=1
# 39 40 41 行,配置基本参数
db.url.0=jdbc:mysql://127.0.0.1:3306/nacos?characterEncoding=utf8&connectTimeout=10000&socketTimeout=30000&autoReconnect=true&useUnicode=true&useSSL=false&serverTimezone=UTC
db.user.0=root
db.password.0=123456
1.4.3 启动 nacos 集群
1)因为是在 windows 上模拟的,我们可以将之前的 nacos 进行复制三份,分别为 nacos1、nacos2、naocs3
2)分别修改三个文件夹中的 application.properties,配置不同的端口号,在 21 行:
nacos1:server.port=8845
nacos2:server.port=8846
nacos3:server.port=8847
3)然后分别双击启动三个 nacos 节点:
startup.cmd
1.4.4 nginx反向代理
找到资料提供的 nginx 安装包,或者自己下载一个:http://nginx.org/en/download.html,版本为 1.18.0
解压 nginx 到任意非中文目录下:
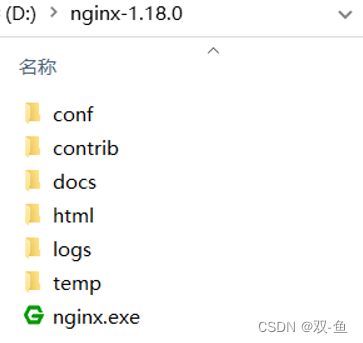
修改 conf/nginx.conf 文件,配置如下:
upstream nacos-cluster {
    server 127.0.0.1:8845;
	server 127.0.0.1:8846;
	server 127.0.0.1:8847;
}

server {
    listen       80;
    server_name  localhost;

    location /nacos {
        proxy_pass http://nacos-cluster;
    }
}
然后双击 nginx.exe 启动,然后在浏览器访问测试:http://localhost/nacos

注意:如果代码中使用,需要修改 application.yml 文件如下:
spring:
  cloud:
    nacos:
      server-addr: localhost:80 # Nacos地址
注意点:
- 实际部署时,需要给做反向代理的 nginx 服务器设置一个域名,这样后续如果有服务器迁移 nacos 的客户端也无需更改配置
- Nacos 的各个节点应该部署到多个不同服务器,做好容灾和隔离
二、Feign 远程调用
先来看我们以前利用 RestTemplate 发起远程调用的代码:
![[外链图片转存失败,源站可能有防盗链机制,建议将图片保存下来直接上传(img-7trHFV6l-1640253220079)(image/image-20211109091256821.png)]](http://img.e-com-net.com/image/info8/2558103d1e10488cb54ea35c8d3bc439.jpg)
存在下面的问题:
- 代码可读性差,编程体验不统一
- 参数复杂 URL 难以维护
2.1 Feign 的介绍
Feign 是一个声明式的 http 客户端,官方地址:https://github.com/OpenFeign/feign
其作用就是帮助我们优雅的实现 http 请求的发送,解决上面提到的问题。

2.2 Feign 替代 RestTemplate
Fegin 的使用步骤如下:
2.2.1 引入依赖
我们在 order-service 服务的 pom 文件中引入 feign 的依赖:
<dependency>
    <groupId>org.springframework.cloudgroupId>
    <artifactId>spring-cloud-starter-openfeignartifactId>
dependency>
2.2.2 添加注解
在 order-service 的启动类添加@EnableFeignClients注解开启 Feign 的功能:

2.2.3 编写 Feign 客户端
在 order-service 中新建一个接口,内容如下:
package cn.itcast.order.client;

@FeignClient("user-service")
public interface UserClient {
    @GetMapping("/user/{id}")
    User findById(@PathVariable("id") Long id);
}
这个客户端主要是基于 SpringMVC 的注解来声明远程调用的信息,比如:
- 服务名称:user-service
- 请求方式:GET
- 请求路径:/user/{id}
- 请求参数:Long id
- 返回值类型:User
有了这些信息,Feign 就可以帮助我们发送 http 请求,无需自己使用 RestTemplate 来发送了。
2.2.4 测试
修改 order-service 中的 OrderService 类中的 queryOrderById 方法,使用 Feign 客户端代替 RestTemplate,然后启动进行进行测试。

2.3 自定义配置
Feign 可以支持很多的自定义配置,如下表所示:
| 类型 | 作用 | 说明 |
|---|---|---|
| feign.Logger.Level | 修改日志级别 | 包含四种不同的级别:NONE、BASIC、HEADERS、FULL |
| feign.codec.Decoder | 响应结果的解析器 | http 远程调用的结果做解析,例如解析 JSON 字符串为对象 |
| feign.codec.Encoder | 请求参数编码 | 将请求参数编码,便于通过 http 请求发送 |
| feign.Contract | 支持的注解格式 | 默认是 SpringMVC 的注解 |
| feign.Retryer | 失败重试机制 | 请求失败的重试机制,默认是没有,不过会使用 Ribbon 的重试 |
一般情况下,默认值就能满足我们使用,如果要自定义时,只需要创建自定义的 @Bean 覆盖默认 Bean 即可。
下面以日志为例来演示如何自定义配置。
2.3.1 方式一:配置文件
基于配置文件修改 feign 的日志级别,可以针对单个服务,也可以针对所有服务:
feign:
  client:
    config:
      default: # 用default代表全局配置,如果是写服务名称如(user-service),就是针对某个微服务的配置
        loggerLevel: FULL # 日志级别
而日志的级别分为四种:
- NONE:不记录任何日志信息,这是默认值。
- BASIC:仅记录请求的方法,URL 以及响应状态码和执行时间
- HEADERS:在 BASIC 的基础上,额外记录了请求和响应的头信息
- FULL:记录所有请求和响应的明细,包括头信息、请求体、元数据。
2.3.2 方式二:Java 代码
也可以基于 Java 代码来修改日志级别,先声明一个类,然后声明一个 Logger.Level 的对象:
package cn.itcast.order.config;

public class DefaultFeignConfiguration {
    @Bean
    public Logger.Level feignLogLevel() {
        return Logger.Level.FULL;
    }
}
如果要全局生效,将其放到启动类的 @EnableFeignClients 这个注解中:
@EnableFeignClients(defaultConfiguration = {DefaultFeignConfiguration.class})
如果是局部生效,则把它放到对应的 @FeignClient 这个注解中:
@FeignClient(value = "user-service", configuration = {DefaultFeignConfiguration.class})
2.4 Feign 优化
Feign 底层发起 http 请求,依赖于其它的框架。其底层客户端实现包括:
| 客户端 | 介绍 |
|---|---|
| URLConnection | 默认实现,不支持连接池 |
| Apache HttpClient | 支持连接池 |
| OKHttp | 支持连接池 |
因此优化 Feign 的性能主要包括:
- 使用连接池代替默认的 URLConnection
- 日志级别,最好用 basic 或 none
这里我们用 Apache 的 HttpClient 来演示。
2.4.1 连接池优化
1)引入依赖:在 order-service 的 pom 文件中引入 Apache 的 HttpClient 依赖
<dependency>
    <groupId>io.github.openfeigngroupId>
    <artifactId>feign-httpclientartifactId>
dependency>
2)配置连接池:在 order-service 的 application.yml 中添加配置,设置连接池参数
feign:
  client:
    config:
      default: # 用default就是全局配置,如果是写服务名称如(user-service),就是针对某个微服务的配置
        loggerLevel: BASIC # 日志级别
  httpclient:
    enabled: true # 开启feign对HttpClient的支持
    max-connections: 200 # 最大的连接数
    max-connections-per-route: 50 # 每个路径的最大连接数
3)测试:在 FeignClientFactoryBean 中的 loadBalance 方法中打断点:

Debug 方式启动 order-service 服务,可以看到这里的 client,底层就是 Apache HttpClient:

2.5 最佳实践
所谓最佳实践,就是使用过程中总结的经验,最好的一种使用方式。仔细观察可以发现,Feign 的客户端与服务提供者的 controller 代码非常相似:

有没有一种办法简化这种重复的代码编写呢?
2.5.1 继承方式
一样的代码可以通过继承来共享,如图:

1)定义一个 API 接口,利用定义方法,并基于 SpringMVC 注解做声明。
2)Feign 客户端和 Controller 都集成改接口
优点:
- 简单
- 实现了代码共享
缺点:
-
服务提供方、服务消费方紧耦合
-
参数列表中的注解映射并不会继承,因此 Controller 中必须再次声明方法、参数列表、注解
2.5.2 抽取方式
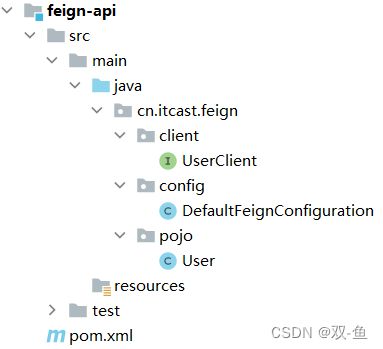
将 FeignClient 抽取为独立模块,并且把接口有关的 POJO、默认的 Feign 配置都放到这个模块中。
例如,将 UserClient、User、Feign 的默认配置都抽取到一个 feign-api 包中,所有微服务引用该依赖包,即可直接使用:

2.5.3 实现基于抽取的最佳实践
1)抽取
在父项目下创建一个子模块,名为:feign-api,然后在 pom 文件中引入 feign 的 starter 依赖
<dependency>
    <groupId>org.springframework.cloudgroupId>
    <artifactId>spring-cloud-starter-openfeignartifactId>
dependency>
把 order-service 中编写的 UserClient、User、DefaultFeignConfiguration 都复制到 feign-api 项目中
2)使用 feign-api
首先,删除 order-service 中的 UserClient、User、DefaultFeignConfiguration 等类或接口。然后在 order-service 的 pom 文件中引入 feign-api 的依赖:
<dependency>
    <groupId>com.xqhgroupId>
    <artifactId>feign-apiartifactId>
    <version>1.0.0version>
dependency>
然后修改 order-service 中的所有与上述三个组件有关的导包部分,改成导入 feign-api 中的包
3)重启测试
重启后,发现服务报错了:

这是因为 UserClient 现在在 cn.itcast.feign.client 包下,而 order-service 的@EnableFeignClients注解是在 cn.itcast.order 包下,不在同一个包,无法扫描到 UserClient
4)解决扫描包问题
方式一:指定 Feign 应该扫描的包
@EnableFeignClients(basePackages = {"cn.itcast.feign.client"})
方式二:指定需要加载的 Client 接口
@EnableFeignClients(clients = {UserClient.class})
三、Gateway 服务网关
Spring Cloud Gateway 是 Spring Cloud 的一个全新项目,该项目是基于 Spring 5.0,Spring Boot 2.0 和 Project Reactor 等响应式编程和事件流技术开发的网关,它旨在为微服务架构提供一种简单有效的统一的 API 路由管理方式。
3.1 为什么需要网关
Gateway 网关是我们服务的守门神,所有微服务的统一入口。
网关的核心功能特性:
-
身份认证和权限校验
- 网关作为微服务入口,需要校验用户是是否有请求资格,如果没有则进行拦截。
-
服务路由、负载均衡
- 一切请求都必须先经过 gateway,但网关不处理业务,而是根据某种规则,把请求转发到某个微服务,这个过程叫做路由。当路由的目标服务有多个时,就需要做负载均衡。
-
请求限流
- 当请求流量过高时,在网关中按照下流的微服务能够接受的速度来放行请求,避免服务压力过大。
在 SpringCloud 中网关的实现包括两种:
- Gateway(推荐):基于 Spring5 中提供的 WebFlux,属于响应式编程的实现,具备更好的性能。
- Zuul(已淘汰):基于 Servlet 的实现,属于阻塞式编程。
3.2 gateway快速入门
下面,我们就演示下网关的基本路由功能。基本步骤如下:
- 创建 SpringBoot 工程 gateway,引入网关依赖
- 编写启动类
- 编写基础配置和路由规则
- 启动网关服务进行测试
3.2.1 创建模块
1)在父项目下创建子模块,名为:getewary
2)在 pom 文件中引入依赖:
<dependencies>

    <dependency>
        <groupId>org.springframework.cloudgroupId>
        <artifactId>spring-cloud-starter-gatewayartifactId>
    dependency>

    <dependency>
        <groupId>com.alibaba.cloudgroupId>
        <artifactId>spring-cloud-starter-alibaba-nacos-discoveryartifactId>
    dependency>
dependencies>
3.2.2 编写启动类
package cn.itcast.gateway;

@SpringBootApplication
public class GatewayApplication {
    public static void main(String[] args) {
        SpringApplication.run(GatewayApplication.class, args);
    }
}
3.2.3 编写配置
创建 application.yml 文件,在里面进行基础配置和路由规则,内容如下:
server:
  port: 10010 # 网关端口

spring:
  application:
    name: gateway # 服务名称
  cloud:
    nacos:
      server-addr: localhost:8848 # nacos地址
    gateway:
      routes: # 网关路由配置
        - id: user-service # 路由ID,自定义但要保证唯一
          # uri: http://127.0.0.1:8081 # 路由的目标地址 http 就是固定地址
          uri: lb://user-service # 路由的目标地址 lb表示负载均衡,后面跟服务名称
          predicates: # 路由断言,其实就是判断请求是否符合路由规则
            - Path=/user/** # 表示按照路径匹配,只要以/user/开头就符合要求
我们将符合Path 规则的一切请求,都代理到 uri参数指定的地址。
本例中,我们将 /user/**开头的请求,代理到lb://userservice,lb是负载均衡,根据服务名拉取服务列表,实现负载均衡。
3.2.4 重启测试
重启网关,访问:http://localhost:10010/user/1,因为符合/user/**规则,请求会被转发到 uri:http://user-service/user/1,所以我们就可以获取到结果:

3.2.5 网关路由的流程图
- 路由 ID:路由唯一标示
- uri:路由目的地,支持 lb 和 http 两种
- predicates:路由断言,判断请求是否符合要求,符合则转发到路由目的地
- filters:路由过滤器,处理请求或响应
接下来,重点来学习路由断言和路由过滤器的详细知识
3.3 断言工厂
我们在配置文件中写的断言规则只是字符串,这些字符串会被 Predicate Factory 读取并处理,转变为路由判断的条件,例如Path=/user/**是按照路径匹配,这个规则是由org.springframework.cloud.gateway.handler.predicate.PathRoutePredicateFactory这个类来处理的,像这样的断言工厂在 SpringCloudGateway 还有十几个:
详细参考官网:https://docs.spring.io/spring-cloud-gateway/docs/current/reference/html/#gateway-request-predicates-factories
| 名称 | 说明 | 示例 |
|---|---|---|
| After | 某个时间点之后的请求 | - After=2037-01-20T17:42:47.789-07:00[America/Denver] |
| Before | 某个时间点之前的请求 | - Before=2031-04-13T15:14:47.433+08:00[Asia/Shanghai] |
| Between | 两个时间点之间的请求 | - Between=2037-01-20T17:42:47.789-07:00[America/Denver], 2037-01-21T17:42:47.789-07:00[America/Denver] |
| Cookie | 请求必须包含某些cookie | - Cookie=chocolate, ch.p |
| Header | 请求必须包含某些header | - Header=X-Request-Id, \d+ |
| Host | 请求必须是访问某个host(域名) | - Host=**.somehost.org,**.anotherhost.org |
| Method | 请求方式必须是指定方式 | - Method=GET,POST |
| Path | 请求路径必须符合指定规则 | - Path=/red/{segment},/blue/{segment} |
| Query | 请求参数必须包含指定参数 | - Query=red, gree. |
| RemoteAddr | 请求者的ip必须是指定范围 | - RemoteAddr=192.168.1.1/24 |
| Weight | 权重处理 | - Weight=group1, 2 |
我们只需要掌握 Path 这种路由工程就可以了。
3.4 过滤器工厂
GatewayFilter 是网关中提供的一种过滤器,可以对进入网关的请求和微服务返回的响应做处理:

3.4.1 路由过滤器的种类
Spring 提供了 31 种不同的路由过滤器工厂:下面列出常见的几个
详细参考官网:https://docs.spring.io/spring-cloud-gateway/docs/current/reference/html/#gatewayfilter-factories
| 名称 | 说明 |
|---|---|
| AddRequestHeader | 给当前请求添加一个请求头 |
| RemoveRequestHeader | 移除请求中的一个请求头 |
| AddResponseHeader | 给响应结果中添加一个响应头 |
| RemoveResponseHeader | 从响应结果中移除有一个响应头 |
| RequestRateLimiter | 限制请求的流量 |
3.4.2 请求头过滤器
下面我们以 AddRequestHeader 为例来讲解。
需求:给所有进入 user-service 的请求添加一个请求头:Truth=itcast is freaking awesome!
只需要修改gateway服务的application.yml文件,添加路由过滤即可:
spring:
  cloud:
    gateway:
      routes:
      - id: user-service
        uri: lb://userservice
        predicates:
        - Path=/user/**
        filters: # 过滤器
        - AddRequestHeader=Truth, Itcast is freaking awesome! # 添加请求头
当前过滤器写在 user-service 路由下,因此仅仅对访问 user-service 的请求有效。
3.4.3 默认过滤器
如果要对所有的路由都生效,则可以将过滤器工厂写到 geteway 的 default-filters 下。格式如下:
spring:
  cloud:
    gateway:
      routes:
      - id: user-service
        uri: lb://userservice
        predicates:
        - Path=/user/**
      default-filters: # 默认过滤项
      - AddRequestHeader=Truth, Itcast is freaking awesome!
3.5 全局过滤器
上一节学习的过滤器,网关提供了 31 种,但每一种过滤器的作用都是固定的。如果我们希望拦截请求,做自己的业务逻辑则没办法实现。此时就需要全局过滤器了
3.5.1 全局过滤器作用
全局过滤器的作用也是处理一切进入网关的请求和微服务响应,与 GatewayFilter 的作用一样。区别在 GatewayFilter 通过配置定义,处理逻辑是固定的,而 GlobalFilter 的逻辑需要自己写代码实现。
定义全局过滤器方式,就是实现 GlobalFilter 接口,重写方法
public interface GlobalFilter {
    /**
     *  处理当前请求,有必要的话通过{@link GatewayFilterChain}将请求交给下一个过滤器处理
     *
     * @param exchange 请求上下文,里面可以获取Request、Response等信息
     * @param chain 用来把请求委托给下一个过滤器
     * @return {@code Mono} 返回标示当前过滤器业务结束
     */
    Mono<Void> filter(ServerWebExchange exchange, GatewayFilterChain chain);
}
在 filter 中编写自定义逻辑,可以实现下列功能:
- 登录状态判断
- 权限校验
- 请求限流等
3.5.2 自定义全局过滤器
需求:定义全局过滤器,拦截请求,判断请求的参数是否满足下面条件:如果同时满足则放行,否则拦截
参数中是否有 authorization,
authorization 参数值是否为 admin
在 gateway 中定义一个过滤器,实现代码如下:
package cn.itcast.gateway.filter;

@Order(-1)
@Component
public class AuthorizeFilter implements GlobalFilter {
    @Override
    public Mono<Void> filter(ServerWebExchange exchange, GatewayFilterChain chain) {
        // 1.获取所有的请求参数
        MultiValueMap<String, String> queryParams = exchange.getRequest().getQueryParams();
        // 2.获取 authorization 参数
        String auth = queryParams.getFirst("authorization");
        // 3.校验
        if ("admin".equals(auth)) {
            // 放行
            return chain.filter(exchange);
        }
        // 4.拦截
        // 4.1 禁止访问,设置状态码
        exchange.getResponse().setStatusCode(HttpStatus.FORBIDDEN);
        // 4.2.结束处理
        return exchange.getResponse().setComplete();
    }
}
重启 gateway,然后访问网址进行测试:http://localhost:10010/user/1?authorization=admin
3.5.3 过滤器执行顺序
请求进入网关会碰到三类过滤器:当前路由的过滤器、DefaultFilter、GlobalFilter
请求路由后,会将当前路由过滤器和 DefaultFilter、GlobalFilter,合并到一个过滤器链(集合)中,排序后依次执行每个过滤器:
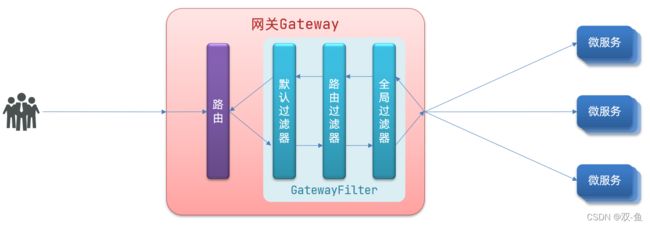
排序的规则是什么呢?
- 每一个过滤器都必须指定一个 int 类型的 order 值,order 值越小,优先级越高,执行顺序越靠前。
- GlobalFilter 通过实现 Ordered 接口,或者添加 @Order 注解来指定 order 值,由我们自己指定
- 路由过滤器和 defaultFilter 的 order 由 Spring 指定,默认是按照声明顺序从 1 递增。
- 当过滤器的 order 值一样时,会按照defaultFilter > 路由过滤器 > GlobalFilter的顺序执行。
详细内容,可以查看源码:
org.springframework.cloud.gateway.route.RouteDefinitionRouteLocator#getFilters()方法是先加载 defaultFilters,然后再加载某个 route 的 filters,然后合并。
org.springframework.cloud.gateway.handler.FilteringWebHandler#handle()方法会加载全局过滤器,与前面的过滤器合并后根据 order 排序,组织过滤器链
3.6 跨域问题
3.6.1 什么是跨域问题
跨域:域名不一致就是跨域,主要包括:
- 域名不同:www.taobao.com 和 www.taobao.org、www.jd.com 和 miaosha.jd.com
- 域名相同,端口不同:localhost:8080 和 localhost:8081
跨域问题:浏览器禁止请求的发起者与服务端发生跨域ajax请求,请求被浏览器拦截的问题
解决方案:CORS,不知道的小伙伴可以查看https://www.ruanyifeng.com/blog/2016/04/cors.html
3.6.2 模拟跨域问题
将下面的页面文件放入 tomcat 或者 nginx 这样的 web 服务器中,进行访问:
DOCTYPE html>
<html lang="en">
<head>
    <meta charset="UTF-8">
    <meta name="viewport" content="width=device-width, initial-scale=1.0">
    <meta http-equiv="X-UA-Compatible" content="ie=edge">
    <title>Documenttitle>
head>
<body>
<pre>
spring:
  cloud:
    gateway:
      globalcors: # 全局的跨域处理
        add-to-simple-url-handler-mapping: true # 解决options请求被拦截问题
        corsConfigurations:
          '[/**]':
            allowedOrigins: # 允许哪些网站的跨域请求
              - "http://localhost:8090"
              - "http://www.leyou.com"
            allowedMethods: # 允许的跨域ajax的请求方式
              - "GET"
              - "POST"
              - "DELETE"
              - "PUT"
              - "OPTIONS"
            allowedHeaders: "*" # 允许在请求中携带的头信息
            allowCredentials: true # 是否允许携带cookie
            maxAge: 360000 # 这次跨域检测的有效期
pre>
body>
<script src="https://unpkg.com/axios">script>
<script>
  axios.get("http://localhost:10010/user/1?authorization=admin")
  .then(resp => console.log(resp.data))
  .catch(err => console.log(err))
script>
html>
会发现浏览器控制台报错如下:

从 localhost:8090 访问 localhost:10010,端口不同,显然是跨域的请求。
3.6.3 解决跨域问题
在 gateway 服务的 application.yml 文件中,添加下面的配置:
spring:
  cloud:
    gateway:
      # 省略中间配置
      globalcors: # 全局的跨域处理
        add-to-simple-url-handler-mapping: true # 解决options请求被拦截问题
        corsConfigurations:
          '[/**]':
            allowedOrigins: # 允许哪些网站的跨域请求
              - "http://localhost:8090"
            allowedMethods: # 允许的跨域ajax的请求方式
              - "GET"
              - "POST"
              - "DELETE"
              - "PUT"
              - "OPTIONS"
            allowedHeaders: "*" # 允许在请求中携带的头信息
            allowCredentials: true # 是否允许携带cookie
            maxAge: 360000 # 这次跨域检测的有效期
3.7 限流过滤器
限流:对应用服务器的请求做限制,避免因过多请求而导致服务器过载甚至宕机。限流算法常见的包括:
- 计数器算法:包括固定窗口计数器算法、滑动窗口计数器算法
- 漏桶算法(Leaky Bucket)
- 令牌桶算法(Token Bucket)
3.7.1 计数器算法
固定窗口计数器算法概念如下:
- 将时间划分为多个窗口;
- 在每个窗口内每有一次请求就将计数器加一,当时间到达下一个窗口时,计数器重置。
- 如果计数器超过了限制数量,则本窗口内所有的请求都被丢弃。
3.7.2 漏桶算法
漏桶算法说明:
- 将每个请求视作【水滴】放入【漏桶】进行存储。
- 【漏桶】以固定速率向外【漏】出请求来执行,如果【漏桶】空了则停止【漏水】。
- 如果【漏桶】满了则多余的【水滴】会被直接丢弃。
3.7.3 令牌桶算法
令牌桶算法说明:
- 以固定的速率生成令牌,存入令牌桶中,如果令牌桶满了以后,多余令牌丢弃
- 请求进入后,必须先尝试从桶中获取令牌,获取到令牌后才可以被处理
- 如果令牌桶中没有令牌,则请求等待或丢弃


