【自定义注解】SpringBoot 自定义注解,附实现日志打印
本文写作目的单纯是一次学习记录,以便于以后查看。
开发工具:IDEA;操作系统:MacOS,JDK版本:1.8
文章目录
- 前言
- 一、AOP是什么?
- 二、元注解和自定义注解
-
- 1.@Target
- 2.@Retention
- 3.@Documented
- 4.@Inherited
- 三、Spring AOP切面方法的执行顺序
- 四、示例演练
-
- 1. 在字段上声明自定义注解
-
- 1.1 创建注解
- 1.2 创建controller测试
- 2. 在方法上声明自定义注解
-
- 2.1 引入依赖
- 2.2 创建注解
- 2.3 实现环绕注解
- 2.4 创建controller
- 2.5【补充知识】用@Before和@AfterReturning代替@Around
- 总结
前言
在springboot项目的开发过程中,学会使用自定义注解有助于高效开发,代码也更加的优美。
自定义注解的核心原理,是使用了spring自身的AOP功能,
一、AOP是什么?
Spring AOP 即面向切面,是对OOP面向对象的一种延伸。
AOP机制可以让开发者把业务流程中的通用功能抽取出来,单独编写功能代码。在业务流程执行过程中,Spring框架会根据业务流程要求,自动把独立编写的功能代码切入到流程的合适位置。
我们通过AOP机制可以实现:Authentication 权限检查、Caching 缓存、Context passing 内容传递、Error handling 错误处理、日志打印等功能。
二、元注解和自定义注解
注解分为两种,元注解和自定义注解。
开始我们写注解的第一步是先了解一下元注解,因为我们自定义注解是离不开这些元注解的
1、@Target
2、@Retention
3、@Inherited
4、@Documented
1.@Target
定义注解使用的目标
ElementType类型字典:
public enum ElementType {
    /** 用于描述类、接口(包括注解类型) 或enum声明 */
    TYPE,

    /** 用于字段声明(包括枚举常量) */
    FIELD,

    /** 用于方法声明 */
    METHOD,

    /** 用于参数声明 */
    PARAMETER,

    /** 用于构造函数声明 */
    CONSTRUCTOR,

    /** 用于本地变量声明 */
    LOCAL_VARIABLE,

    /** 用于注解类型声明 */
    ANNOTATION_TYPE,

    /** 用于包声明 */
    PACKAGE,

    /**
     * 用于类型参数声明,JavaSE8引进,可以应用于类的泛型声明之处
     */
    TYPE_PARAMETER,

    /**
     * JavaSE8引进,此类型包括类型声明和类型参数声明,是为了方便设计者进行类型检查
     * 例如,如果使用@Target(ElementType.TYPE_USE)对@NonNull进行标记,则类型检查器可以将@NonNull class C {...} C类的所有变量都视为非null
     */
    TYPE_USE
}
ps: 如果一个注解没有指定@Target注解,则此注解可以用于除了TYPE_PARAMETER和TYPE_USE以外的任何地方。
2.@Retention
定义注解保留阶段
1.RetentionPolicy.SOURCE —— 这种类型的Annotations只在源代码级别保留,编译时就会被忽略
2.RetentionPolicy.CLASS —— 这种类型的Annotations编译时被保留,在class文件中存在,但JVM将会忽略
3.RetentionPolicy.RUNTIME —— 这种类型的Annotations将被JVM保留,所以他们能在运行时被JVM或其他使用反射机制的代码所读取和使用
RetentionPolicy类型字典:
public enum RetentionPolicy {
    /**
     * 这种类型的Annotations只在源代码级别保留,编译时就会被忽略
     */
    SOURCE,

    /**
     * 这种类型的Annotations编译时被保留,在class文件中存在,但JVM将会忽略
     */
    CLASS,

    /**
     * 这种类型的Annotations将被JVM保留,所以他们能在运行时被JVM或其他使用反射机制的代码所读取和使用
     */
    RUNTIME
}
3.@Documented
注解标记的元素,Javadoc工具会将此注解标记元素的注解信息包含在javadoc中。默认,注解信息不会包含在Javadoc中。
4.@Inherited
是一个标记注解,@Inherited阐述了某个被标注的类型是被继承的。如果一个使用了@Inherited修饰的annotation类型被用于一个class,则这个annotation将被用于该class的子类。
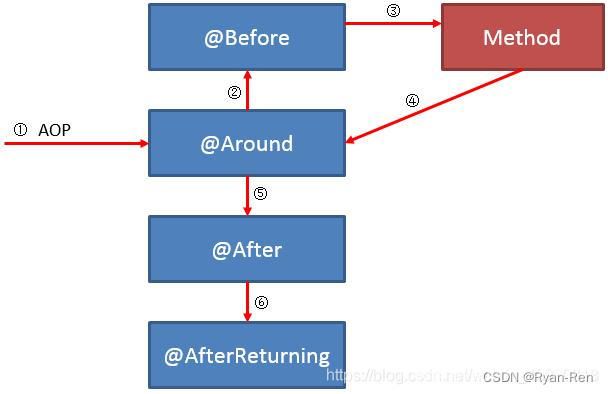
三、Spring AOP切面方法的执行顺序
此节内容参考来自文章: https://baijiahao.baidu.com/s?id=1682210364853022513&wfr=spider&for=pc
这里简单介绍一下,切面的执行方法和其执行顺序:
@Around 通知方法将目标方法封装起来
@Before 通知方法会在目标方法调用之前执行
@After 通知方法会在目标方法返回或者异常后执行
@AfterReturning 通知方法会在目标方法返回时执行
@Afterthrowing 通知方法会在目标方法抛出异常时执行
这里以一个返回正常的情况为例:(异常替换最后一步即可)
ControllerMethodLogAspect.class:用于打印日志的切面定义类
注意要在启动类扫描这个class,并且添加
@EnableAspectJAutoProxy(proxyTargetClass = true)
四、示例演练
1. 在字段上声明自定义注解
1.1 创建注解
/**
 * 自定义注解练习
 * 声明在字段上的注解
 */
@Retention(RetentionPolicy.RUNTIME)
@Target(ElementType.FIELD)
public @interface UserInfoAnnotation {
    String name();
    int age();
}
1.2 创建controller测试
@RestController
public class MyController {

    @UserInfoAnnotation(name = "Ryan", age = 18)
    String user;

    @GetMapping("/test")
    public String test() {
        Class<MyController> mc = MyController.class;
        for (Field field : mc.getDeclaredFields()) {
            if (field.isAnnotationPresent(UserInfoAnnotation.class)) {
                String info = field.getName() + "'s name is " + field.getAnnotation(UserInfoAnnotation.class).name() + ",age is " + field.getAnnotation(UserInfoAnnotation.class).age();
                System.out.println(info);
                return info;
            }
        }
        return "未找到注解";
    }
}
2. 在方法上声明自定义注解
这里就需要根据本文【三、Spring AOP切面方法的执行顺序】中的知识来实现。AOP的主要功能就是将日志记录,性能统计,安全控制,事务处理,异常处理等代码从业务逻辑代码中划分出来
在Aop的切面变成中,我们有很多涉及到流程的注解,如@Before,@After等。在这些流程注解中有一个功能最为强大的通知,这就是环绕通知@Around。
关于@Around
@Around是一个强大的通知。一般使用它时,是你在需要大幅度修改原有目标对象的业务逻辑时才用到,否则都是用其他的通知。环绕通知可以取代原有目标对象方法的通知,也具备回调原有目标对象方法的能力。
环绕通知=前置+目标方法执行+后置,proceed方法就是用于启动目标方法执行的
接下来我们来一次简单的面向切面编程实现日志增强的例子
代码案例参考自文章: https://blog.csdn.net/qq13933506749/article/details/118305283
2.1 引入依赖
<dependency>
	<groupId>org.springframework.bootgroupId>
	<artifactId>spring-boot-starter-aopartifactId>
dependency>
2.2 创建注解
/**
 * 自定义注解练习
 * 声明在方法上的注解
 */
@Retention(RetentionPolicy.RUNTIME)
@Target(ElementType.METHOD)
public @interface LogAnnotation {

    /**
     * 日志内容
     * @return
     */
    String value() default "";

    /**
     * 操作方类型
     * 0-未知来源,1-pc端,2-小程序端,3-其他
     */
    int type() default 0;
}
2.3 实现环绕注解
@Slf4j
@Component
@Aspect
public class OpenLogUtil {

    /**
     * 配置切入点:注释中引号的部分为自己创建的注解的路径,可以通过该注解请求到切入点中去。
     */
    @Pointcut("@annotation(com.example.BootDemo.Annotation.LogAnnotation)")
    public void logPointcut() {
        // 该方法无方法体,主要为了让同类中其他方法使用此切入点
    }

    /**
     * 配置环绕通知,使用自定义方法上注册的切入点。
     */
    @Around("logPointcut()")
    public Object logAround(ProceedingJoinPoint joinPoint) throws Throwable {
        //前置
        long startTime= System.currentTimeMillis();
        /**
         * 环绕通知=前置+目标方法执行+后置,proceed方法就是用于启动目标方法执行的
         * Proceedingjoinpoint 继承了 JoinPoint。是在JoinPoint的基础上暴露出 proceed 这个方法。proceed很重要,这个是aop代理链执行的方法。
         * 暴露出这个方法,就能支持 aop:around 这种切面(而其他的几种切面只需要用到JoinPoint,,这也是环绕通知和前置、后置通知方法的一个最大区别。这跟切面类型有关)
         * */
        Object result=joinPoint.proceed();
        //后置
        long time=System.currentTimeMillis()-startTime;
        recordLog(joinPoint,time);
        return result;
    }
     /**
     * 记录日志
     */
    public void recordLog(ProceedingJoinPoint proceedingJoinPoint,long time){
        //getSignature());是获取到这样的信息 :修饰符+ 包名+组件名(类名) +方法名
        MethodSignature methodSignature= (MethodSignature) proceedingJoinPoint.getSignature();
        Method method=methodSignature.getMethod();
        //getAnnotation:方法如果存在这样的注释,则返回指定类型的元素的注释,否则为null
        LogAnnotation logAnnotation=method.getAnnotation(LogAnnotation.class);
        log.info("==============================开始记录日志===============================");
        log.info("value:{}",logAnnotation.value());
        log.info("type:{}",logAnnotation.type());
        //proceedingJoinPoint.getTarget():获取切入点所在目标对象
        String className=proceedingJoinPoint.getTarget().getClass().getName();
        String methodName=methodSignature.getName();
        log.info("请求的方法是:{}",className+"."+methodName+"()");
        //这里返回的是切入点方法的参数列表
        Object[] args=proceedingJoinPoint.getArgs();
        String params= JSON.toJSONString(args.length==0?"":args[0]);
        log.info("请求的参数是:{}",params);
        log.info("执行时间总共为:{}",time);
        log.info("=================================end===================================");
    }
}
2.4 创建controller
@Slf4j
@RestController
public class MyController {

	@LogAnnotation(value = "记录日志",type=1)
    @GetMapping("/SourceB")
    public String SourceB(){
        log.info("正在执行数据源B");
        return "Source B, All Right!";
    }
}
2.5【补充知识】用@Before和@AfterReturning代替@Around
@Around的功能足够强大了,因为学习中顺手写了一下@Before和@AfterReturning,于是专门记录一下代码
仅仅需要修改【2.3】中的代码即可:
@Slf4j
@Component
@Aspect
public class OpenLogUtil {
    /**
     * 配置切入点:注释中引号的部分为自己创建的注解的路径,可以通过该注解请求到切入点中去。
     */
    @Pointcut("@annotation(com.example.BootDemo.Annotation.LogAnnotation)")
    public void logPointcut() {
        // 该方法无方法体,主要为了让同类中其他方法使用此切入点
    }

	/**
     * 在切点运行前执行该方法
     */
    @Before("logPointcut()")
    public void doBefore(JoinPoint joinPoint) {
        MethodSignature signature = (MethodSignature) joinPoint.getSignature();
        Method method = signature.getMethod();
        LogAnnotation annotation = method.getAnnotation(LogAnnotation.class);
        if (Objects.isNull(annotation)) {
            return;
        }
        String methodName = method.getDeclaringClass().getSimpleName() + "." + method.getName();
        log.info("start {}:", methodName, JSON.toJSONString(joinPoint.getArgs()));
    }

    /**
     * 在切点运行后,无异常时执行该方法
    */
    @AfterReturning(value = "logPointcut()", returning = "result")
    public void afterReturn(JoinPoint joinPoint, Object result) {
        MethodSignature signature = (MethodSignature) joinPoint.getSignature();
        Method method = signature.getMethod();
        String methodName = method.getDeclaringClass().getSimpleName() + "." + method.getName();
        log.info("end {}:", methodName, JSON.toJSONString(result));
    }
}
总结
以上就是今天要讲的内容,本文仅仅简单介绍了spring boot 中注解的自定义方法,第四节的第一小节只是就实现了自定义注解的方法。若需要较为复杂的方法或者逻辑,就可以用第四节第二小节的知识,在实现annotation的方法中对应的befor after arround等方法中进行编写就好。


