react 组件化
目录
傻瓜组件与聪明组件
傻瓜组件(展示型组件)
传值类型检测prop-types
函数式组件和类组件优缺点
解决重复更新渲染
1. extends component + shouldComponentUpdate(性能优化点)
2. pureComponent(只能比较基本类型)
3. react.memo()(返回的是一个新的组件)
受控组件与非受控组件
受控组件
受控组件的缺陷:
非受控组件
受控组件与非受控组件的流程
受控组件简单应用:
组件组合而非继承
react插槽
高阶组件
链式调用
修饰器调用(仅类组件)
高阶组件简单应用
跨组件通信Context
傻瓜组件与聪明组件
基本原则:聪明组件(容器组件)负责数据获取,傻瓜组件(展示组件)负责根据props显示信息内容
- 展示型组件负责展示数据和样式,通常是无状态的(stateless),只接收 props 作为输入,输出渲染结果。因此,展示型组件通常使用函数式组件来定义。
- 容器型组件负责管理数据和状态,以及处理
傻瓜组件(展示型组件)
App.js
import logo from './logo.svg'
import './App.css'

// 傻瓜式组件 展示性组件
function App(props) {
  return (


  )
}
export default App
index.js
import React from 'react'
import ReactDOM from 'react-dom'
import './index.css'
import App from './App'

ReactDOM.render(


  ,
  document.getElementById('root')
)
传值类型检测prop-types
当父子组件之间通过props传递数据时,通过对组件数据进行类型检测,有效监控数据,当数据传递类型出错或者传递空数据我们可以找到出错的精准位置,更省时方便
安装
npm i prop-types
类组件使用
import {Component} from 'react'
import PropTypes from "prop-types";

class Two extends Component {
   static propTypes = {  // 对props进行校验
    name: PropTypes.string.isRequired,
    age: PropTypes.number
  }
  static defaultProps = { // 对props的默认值进行处理
    age: 30
  }
  constructor(props){
    super(props)
    console.log('123', props)
  }
  render () {
    return (

        这是Two!!!

    )
  }
}
export default Two
函数式组件使用
import PropTypes from "prop-types";
function Three (props) {
  console.log(props)
  return (

      这是Three了!

  )
}
Three.propTypes = { // 对props进行校验
  name: PropTypes.string.isRequired
}
Three.defaultProps = { // 对props的默认值进行处理
  name: '大锤'
}
export default Three
当父组件传入的数据类型与propTypes校准类型不一致时,会主动报错:
![]()
函数式组件和类组件优缺点
- .函数式组件
- 纯展示性的组件
- 没有生命周期的钩子方法
- 只暴露props
- class组件
- 生命周期的钩子
- 状态 state props,如果想修改state,必须调用this.setState()
- setState((prevState,prevProps)=>({}),()=>{}) 它是一个异步的函数
- this指向的问题 建议:使用箭头函数,保证this指向当前类组件实例
来看看下面的问题
import React, { Component, PureComponent } from 'react'
function Comment({ comment }) {
console.log('render');
return (
{comment.id}
{comment.content}
{comment.author}
)
}
class CommentList extends Component {
constructor(props) {
super(props)
this.state = {
comments: [],
}
}
componentDidMount() {
this.timer = setInterval(() => {
this.setState({
comments: [
{
id: 1,
title: 'react 非常棒',
author: 'facebook',
},
{
id: 2,
title: 'vue更好',
author: '尤雨溪',
},
{
id: 3,
title: 'angular好',
author: 'Google',
},
],
})
}, 1000)
}
componentWillUnmount() {
clearInterval(this.timer)
}
render() {
return (
{this.state.comments.map((item) => (
当使用一个函数式组件用来渲染数据的时候,我们试着在函数式组件中输出render,发现
展示性的组件打印了3次render,然后用计时器定时渲染,发现render是以数据量倍数增加。
这是因为数据有3条,渲染3次。
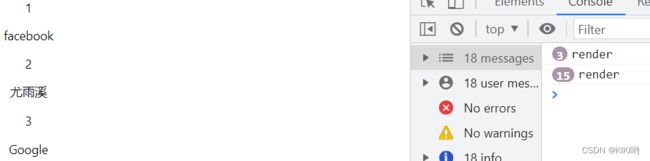
所以问题来了,数据都是死的,没有发生变化,根本不需要重复更新,这样是很消耗性能的
解决重复更新渲染
以下是三种解决方案
1. extends component + shouldComponentUpdate(性能优化点)
在数据不变的情况下,同时保留计时器
import React, { Component} from 'react'

class Comment extends Component {
  shouldComponentUpdate(nextProps) {
    //   性能的优化点
    if (nextProps.comment.id === this.props.comment.id) {
      return false
    }
    return true
  }
  render() {
    console.log('render')
    return (


          {this.props.comment.title}---{this.props.comment.author}


    )
  }
} 
我们发现,控制台只会输出开始的三次,计时器也不会重复render渲染 。
巧妙地使用生命周期钩子函数shouldComponentUpdate中通过简单的判断,阻止了无效更新。
2. pureComponent(只能比较基本类型)
class Comment extends PureComponent {
  // shouldComponentUpdate(nextProps) {
  //   //   性能的优化点
  //   if (nextProps.id === this.props.id) {
  //     return false
  //   }
  //   return true
  // }
  render() {
    console.log('render')
    return (


          {this.props.title}---{this.props.author}-{this.props.id}


    )
  }
}
同样的我们将数据保留,稍微更改了解构式传值,结果很明显是有效的

但是要注意的是 使用PureComponent 比较是基本的数据类型,不能实现复杂类型比较,所以采用逐个传值。同时,在继承了PureComponent 之后,不能使用shouldComponentUpdate。
![]()
3. react.memo()(返回的是一个新的组件)
React.memo 为高阶组件。它与 React.PureComponent 非常相似,但它适用于函数组件,但不适用于 class 组件。
const Comment = React.memo(({ id, title, author }) => {
    console.log('render');
  return (


        {title}---{author}-{id}


  )
})
受控组件与非受控组件
受控组件
- 表单元素依赖于状态,表单元素需要默认值实时映射到状态的时候,就是受控组件,这个和双向绑定相似.
- 表单元素的修改会实时映射到状态值上,此时就可以对输入的内容进行校验.
- 只有继承React.Component才会有状态.
- 必须要在表单上使用onChange事件来绑定对应的事件.
受控组件更新state的流程:
- 可以通过初始state中设置表单的默认值
- 每当表单的值发生变化时,调用onChange事件处理器
- 事件处理器通过事件对象e拿到改变后的状态,并更新组件的state
- 一旦通过setState方法更新state,就会触发视图的重新渲染,完成表单组件的更新
import React, { Component } from 'react'
export default class Shoukong extends Component {
    // 这样的写法也是声明在实例上的对象
    state = {
        username: "ff",
       // 给组件状态设置默认值,在实时修改时进行校验
    }
    // e为原生的事件绑定对象
    handleChange = (e) => {
        // 获取原生对象上的属性
        let name = e.target.name;
        this.setState({
            username: e.target.value
        })
    }

    render() {
        return (

                {this.state.username}
                用户名:

        )
    }
}
受控组件的缺陷:
表单元素的值都是由React组件进行管理,当有多个输入框,或者多个这种组件时,如果想同时获取到全部的值就必须每个都编写事件处理函数,这会让代码看起来很臃肿,所以为了解决这种情况,出现了非受控组件。
非受控组件
如果一个表单组件没有value或checked属性时,就是非受控组件。在非受控组件中,可以使用一个ref来获取DOM中的表单值,而不是为每个状态更新编写一个事件处理函数。
import React, { Component } from 'react'
export default class Feishou extends Component{
constructor(){
super();
// 在构造函数中创建一个引用
this.myref=React.createRef();
}
handleSubmit = (e) => {
// 阻止原生默认事件的触发(刷新)
e.preventDefault();
console.log(this.myref.current.value);
}
render() {
return (
)
}
}受控组件与非受控组件的流程
- 非受控组件: 用户输入A => input 中显示A
- 受控组件: 用户输入A => 触发onChange事件 => handleChange 中设置 state.name = “A” => 渲染input使他的value变成A
注意:
尽可能使用受控组件,受控组件的两个要点:
- 组件的value属性与React中的状态绑定
- 组件内声明了onChange事件处理value的变化
非受控组件更像是传统的HTML表单元素,数据存储在DOM中,而不是组件内部,获取数据的方式是通过ref引用
- 对于有大量表单元素的页面,使用受控组件会使程序变得繁琐难控,此时使用非受控组件更为明智
- Refs不能用于函数式组件,因为函数式组件没有实例
- 在函数式组件内部,是可以使用Refs的
受控组件简单应用:
import React, { Component } from 'react'
function Cart(props) {
return (
{props.cart.map((item) => {
return (
名称:{item.title}
单价:{item.price}
{item.count}
总价:{item.price * item.count}
)
})}
)
}
class CartSimple extends Component {
constructor(props) {
super(props)
this.state = {
title: '',
price: '',
goods: [],
// 购物车数据
cart: [],
}
}
componentDidMount() {
// 模拟ajax请求,与后端交互
setTimeout(() => {
let goods = [
{
id: new Date().toLocaleTimeString(),
title: 'react组件化',
price: 20,
},
{
id: new Date().toLocaleTimeString() + '111',
title: 'react hooks',
price: 10,
},
]
this.setState({
goods,
})
}, 1000)
}
handleTitle(e) {
this.setState({
title: e.target.value,
})
}
handlePrice(e) {
this.setState({
price: e.target.value,
})
}
addGood() {
if (this.state.title && this.state.price) {
this.setState(
{
goods: [
...this.state.goods,
{
id: new Date().toLocaleTimeString(),
title: this.state.title,
price: this.state.price,
},
],
},
() => {
console.log(this.state.goods)
}
)
}
}
addShopCart(i) {
const newCart = [...this.state.cart]
const good = this.state.goods[i]
const idx = newCart.findIndex((item) => item.title === good.title)
const cartGood = newCart[idx]
if (cartGood) {
// 证明已经有商品,修改该商品的数量
newCart.splice(idx, 1, { ...cartGood, count: cartGood.count + 1 })
} else {
// 第一次添加
newCart.push({ ...good, count: 1 })
}
// 修改state
this.setState({
cart: newCart,
})
}
addCount(good) {
const newCart = [...this.state.cart]
const idx = newCart.findIndex((item) => item.title === good.title)
newCart.splice(idx, 1, { ...good, count: good.count + 1 })
this.setState({
cart: newCart,
})
}
render() {
return (
我的购物车
this.handleTitle(e)}
/>
this.handlePrice(e)}
/>
{this.state.goods.length > 0 &&
this.state.goods.map((item, i) => (
-
{item.title}-¥ {item.price}
))}
this.addCount(good)}
>
)
}
}
export default CartSimple简单实现了购物车添加商品信息,商品加购,商品清单列表功能

组件组合而非继承
react插槽
props.children将父组件往该组件插入的内容进行展示
import React, { Component } from 'react'
function Dialog(props) {
console.log(props.children);
return (
{/* 插槽:好比是vue的匿名插槽 */}
{props.children}
{/* 具名插槽 */}
{props.btn}
)
}
function WelcomDialog() {
const confirmBtn =
return (
)
}
class Componsition extends Component {
render() {
return (
运行查看,props.children输出两个数组,分别是WelcomDialog组件的两个定义的标签

高阶组件
高阶组件(higher-ordercomponent)(HOC)是 React 中用于复用组件逻辑的一种高级技巧。HOC 自身不是 React API 的一部分,它是一种基于 React 的组合特性而形成的设计模式。
具体而言,高阶组件是参数为组件,返回值为新组件的函数
链式调用
import React, { Component } from 'react'
// 加工name
const withName = (Comp) => {
// 加工处理
const newComp = (props) => {
return 学习课程:{this.props.name}
学习内容:{this.props.content}
)
}
}
export default withLog(withContent(withLog(withName(withLog(Hoc)))))修饰器调用(仅类组件)
使用修饰器写法必须是在类组件当中
// 使用装饰器写法,包装的组件必须是类组件
// @withName
// @withLog
// @withContent
// @withLog
class Hoc extends Component {
  render() {
    return (

        学习课程:{this.props.name}
        学习内容:{this.props.content}

    )
  }
}
export default HOC
高阶组件简单应用
接下来使用高接组件实现一个简单的权限控制
withAdminAuth.js
import React, { Component } from 'react'
// 保证功能单一性验证权限的功能
export const withAdminAuth =
({ role, isVip }) =>
(Comp) => {
return class extends Component {
constructor(props) {
super(props)
this.state = {
isAuth: false,
}
}
componentDidMount() {
// 已经从后端获取到该页面的用户权限数据
const currentRole = 'admin'
const currentVip = true
this.setState({
isAuth: currentRole === role || currentVip === isVip,
})
}
render() {
if (this.state.isAuth) {
return pageA.js
在导出时调用权限组件,将pageA作为组件参数,如果isVip为true,则将渲染该组件,否则返回无权限访问
import React from 'react'
import { withAdminAuth } from './HOC/withAdminAuth'
const PageA = () => {
  return (

      页面A的内容

  )
}

export default withAdminAuth({ role: 'user', isVip: false })(PageA)
运行页面
![]()
跨组件通信Context
创建方式:const ThemeContext = React.createContext()
react中的Context实际上相当于vue中的provide和inject
以下是简单例子:
ContextSimple.js
import React, { Component } from 'react'
const ThemeContext = React.createContext()
class ThemeBtn extends Component {
// 1.为当前实例设置静态属性,在render中就可以使用this.context获取共享的数据
// static contextType = ThemeContext
render() {
//使用了static contextType 就可以使用this.context来直接获取数据而不用写繁琐的Consumer形式,
//例如以下直接获取了ThemeContext中的type
// return {this.context.type}
return (
{/* 2.使用这种方法,基于函数来渲染 */}
{(value) => {value.type}-{value.name}}
)
}
}
function ToolBar() {
return
)
}
}
export default ContextSimple以上例子中,Context的接收可以采用为当前实例设置静态属性 static contextType = ThemeContext。然后直接使用this.context获取到数据。这种写法减去了冗杂的Consume接收形式。
以下是使用高阶函数的方式
src/Hoc/index.js
import React, { Component } from 'react'
const ThemeContext = React.createContext()
// 高阶函数
// 高级组件本质上就是一个函数 (工厂函数)
// Provider 提供者
export const withProvider = (Comp) => {
return class extends Component {
constructor(props) {
super(props)
this.state = {
store: {
type: 'primary',
name: '按钮',
},
}
}
render() {
return (
{/* 高级组件的props不要丢掉,认为是一种约定 */}
)
}
}
}
// 消费者
export const withConsumer = (Comp) => {
return class extends Component {
render() {
return (
{(value) =>
)
}
}
}
ContextSimpleHoc .js
import React, { Component } from 'react'
import { withProvider, withConsumer } from '../Hoc'
@withConsumer
class ThemeBtn extends Component {
render() {
return {this.props.store.type}
}
}
//const HocThemeBtn = withConsumer(ThemeBtn)
function ToolBar() {
//return